




How to Transfer Files from iPhone to PC: 6 Easy Ways
This guide compares wired, wireless, cloud, and app-based ways to move iPhone files to a Windows PC, with clear limits for each method.

By Jonna Updated on August 21, 2026


If you want to transfer files from iPhone to PC, you have several options depending on the type and amount of data you need to move. You can use a USB cable and File Explorer for photos and videos, iCloud for cloud-based transfers, Apple Devices or iTunes for backups, or dedicated iPhone transfer software for more flexible file management.
The best method depends on what you want to transfer. For example, File Explorer is convenient when you only need to copy photos and videos, while a dedicated transfer tool can be more useful when you need to move music, contacts, messages, or other iPhone data selectively. In this guide, we'll explain how to transfer files from iPhone to PC using 6 practical methods.
Method 1. Transfer Files from iPhone to PC with AOMEI FoneBackup
If you want full control over your iPhone data, AOMEI FoneBackup is a convenient option for Windows users.
This software is a professional and reliable iOS data transfer and backup tool designed to help users manage data between iPhones and Windows PCs. It supports transferring photos, music, and videos from iPhone to PC and also provides iPhone-to-PC transfer, iPhone-to-iPhone transfer, backup and device-management functions. Its transfer interface lets you preview and selectively choose files rather than manually browsing the iPhone's DCIM folders.
 AOMEI FoneBackup
- Selective file transfer: Transfer photos, music, contacts, and videos between iPhone and PC as needed, instead of transferring everything.
- iPhone backup: Create full or selective data backups of iPhone to external hard drive, NAS, USB drive, etc.
- USB-based transfer: Transfer data between your iPhone and Windows PC without relying on a network connection, iCloud, or iTunes.
 100% Secure
Step 1. Install and launch AOMEI FoneBackup on your Windows computer. Connect your iPhone to the PC using a USB cable and unlock the device.
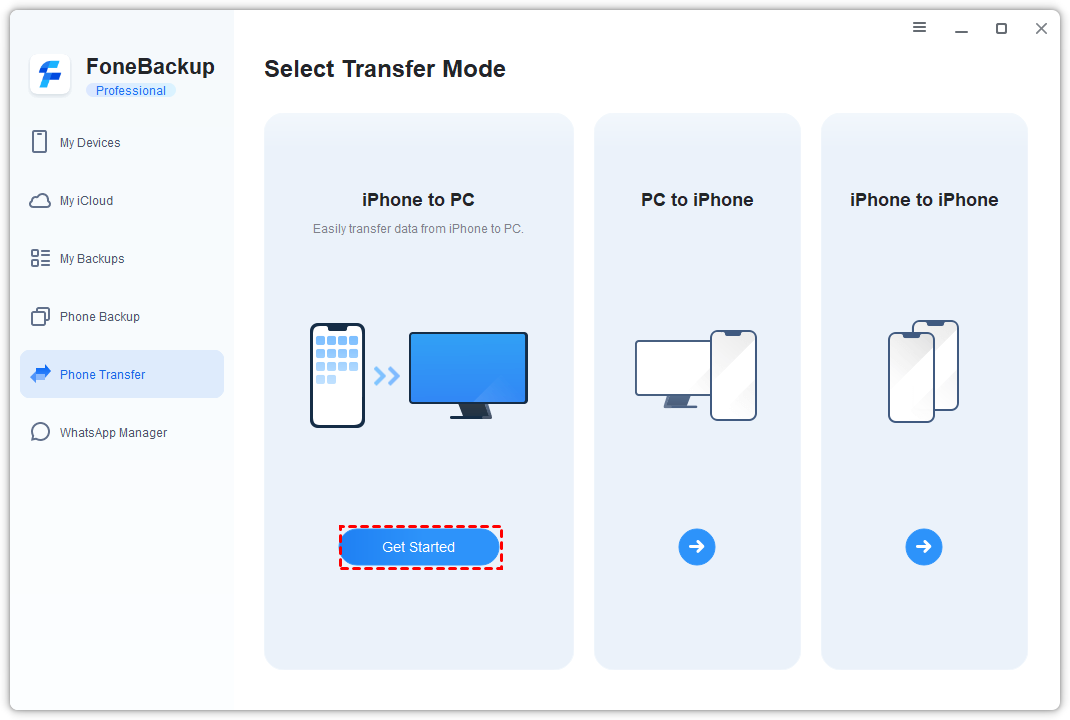
Step 2. Select Phone Transfer from the left-side menu, choose iPhone to PC, and click Get Started.
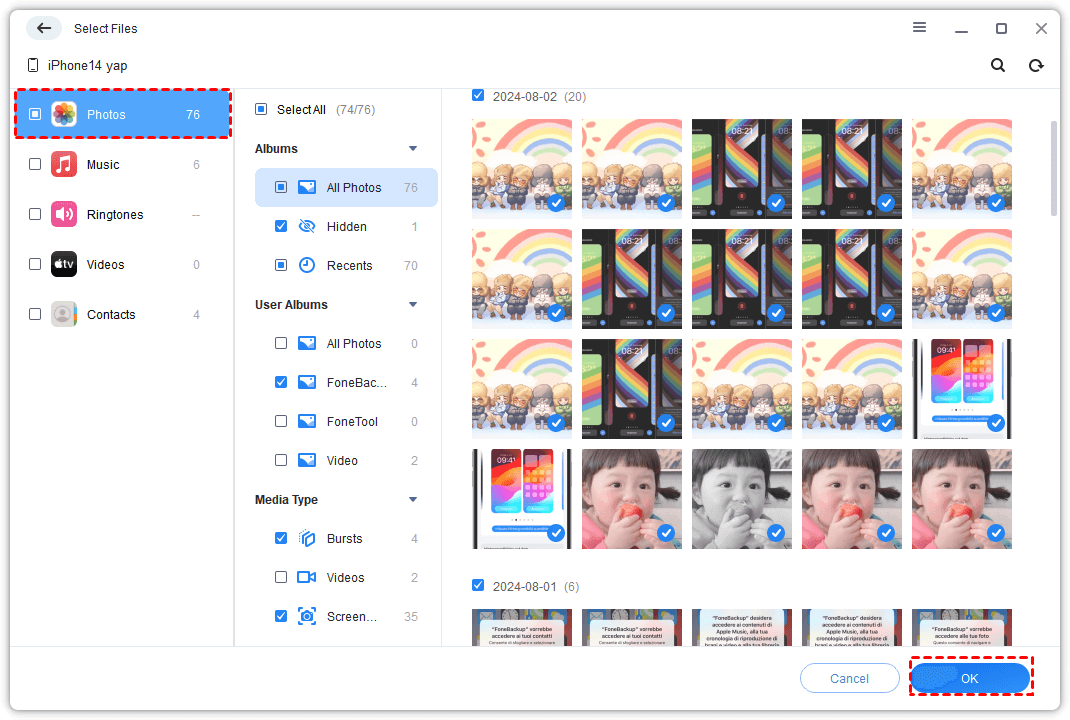
Step 3. Click the "+" icon to check all your file categories, such as photos, music, videos, and contacts. Browse and pick the files to transfer, then click OK.
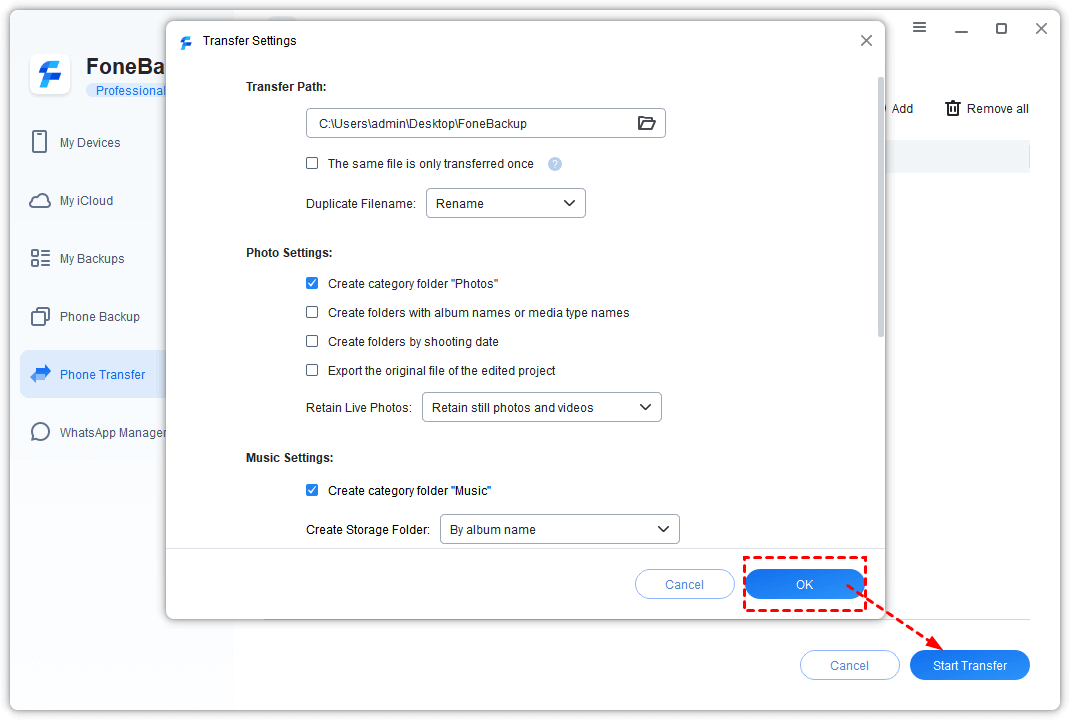
Step 4. Open Transfer Settings, choose a destination folder on the PC, and change any other settings as you want. Click OK.
Step 5. Click Start Transfer and keep the iPhone connected until the process is complete.
If you need a full iPhone backup before updating, resetting, or replacing the device, create a full iPhone backup separately. A backup is for restore, while file transfer is for browsable files on the computer.
Method 2. Copy iPhone Photos and Videos with Windows File Explorer
File Explorer is a quick built-in option when the files you need are camera photos or videos stored under the iPhone DCIM folder. It does not handle every iPhone file type, but it is simple for basic photo export.
Step 1. Connect the iPhone to the PC with a USB cable and unlock the iPhone. Tap Trust This Computer on the iPhone if the prompt appears.
Step 2. Open File Explorer on Windows and choose the iPhone under This PC. Open Internal Storage> DCIM.
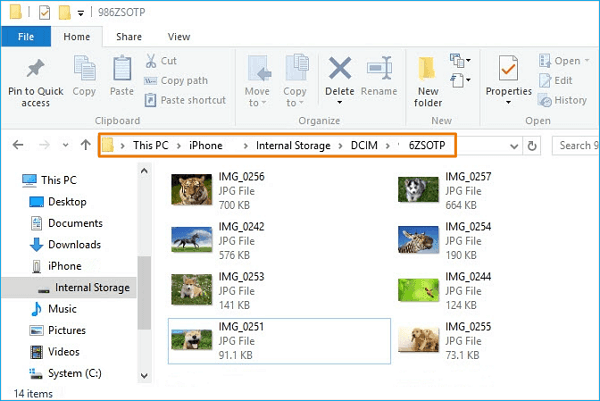
Step 3. Select the photo or video folders you need, then choose Copy. Paste them into a local folder on the PC.
👉 Notes:
- This method only works for photo and video transfer.
- If your iPhone files not showing up on PC, you can check USB connection or driver issues.
- If you need contacts, music, messages, or app documents, choose another method instead of looking for hidden folders in Windows.
Method 3. Copy Files from iPhone to PC with iTunes
iTunes can also help manage iPhone data and transfer data on Windows. It does not turn the iPhone into a full file browser, but only works for specific apps that supports iTunes File Sharing feature.
Step 1. Install or open the latest iTunes on the PC. Connect the iPhone with a USB cable and click the device icon when it appears.
Step 2. Choose File Sharing in the sidebar. Select an app from the list.
Step 3. Choose the documents you want to export and click Save.
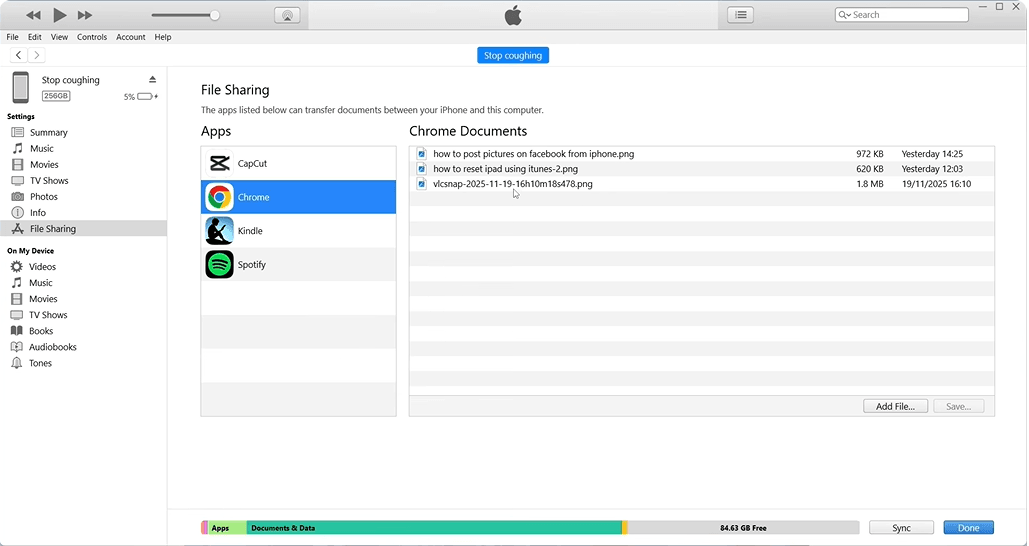
Step 4. Select a PC folder and click Save to start the file transfer.
If the app you need is missing from the File Sharing list, that app does not provide files through this iTunes feature. Try the app's own export menu, iCloud Drive, or AOMEI FoneBackup if the data category is supported.
Method 4. Move Files from iPhone to PC with Snapdrop
Snapdrop is useful when you want to transfer a few files from iPhone to PC without installing desktop software. It works through a browser, so both devices need to stay on the same local Wi-Fi network.
Step 1. Connect the iPhone and PC to the same Wi-Fi network.
Step 2. Open Snapdrop.net in a browser on both devices.
Step 3. On the iPhone, tap the PC name shown on the Snapdrop page.
Step 4. Choose Photo Library, Take Photo or Video, or Choose Files, then select the files you want to send.
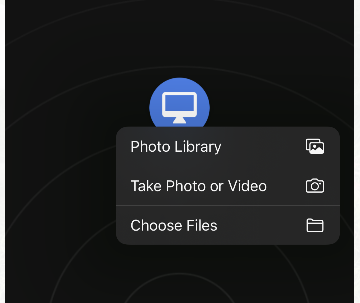
Step 5. On the PC, click Save to keep the received files.
Method 5. Move iPhone Files to PC via iCloud Drive
iCloud Drive is a good choice when the files are already in the iPhone Files app or can be saved there. After uploading, you can download them from iCloud.com or sync them through iCloud for Windows.
Step 1. On the iPhone, open Photos, Files, or another app that can save files to iCloud Drive.
Step 2. Select the files and choose Move, Copy, or Share depending on the app. Save the data to iCloud Drive.
Step 3. On the PC, open iCloud.com in a browser or open iCloud for Windows. Sign in with the same Apple Account used on the iPhone.
Step 4. Open iCloud Drive, select the uploaded files, and download them to the PC.
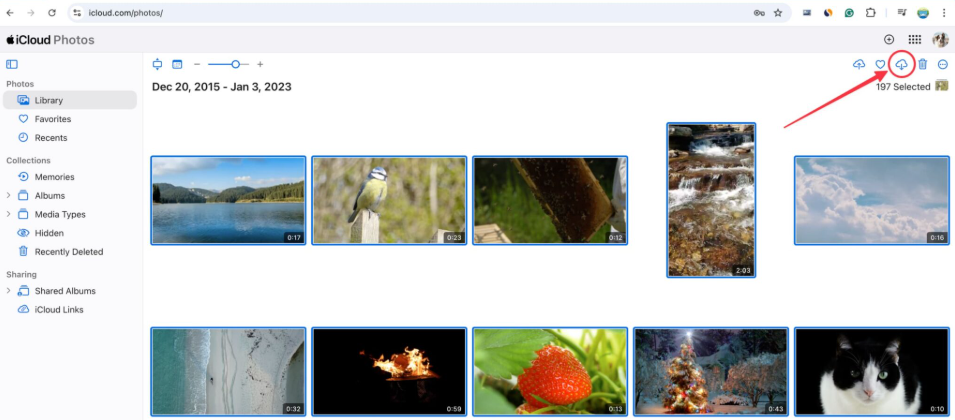
This method depends on iCloud storage and upload speed. If files do not appear immediately, keep the iPhone online and wait for sync to finish before retrying.
Method 6. Transfer APP Data from iPhone to Computer
The source article calls this a Nearby Sharing route, but the actual workflow is closer to connecting the iPhone Files app to a Windows shared location. It can work for users who are comfortable with local network settings.
Step 1. On the PC, prepare a Windows folder that can be accessed from the local network. Find the PC's local network address from Settings > Network & Internet> Properties.
Step 2. On your iPhone, open Files, tap the three-dot icon, and choose Connect to Server. Then, enter the PC address, tap Connect, and choose Registered User if Windows credentials are required; then enter the username and password.
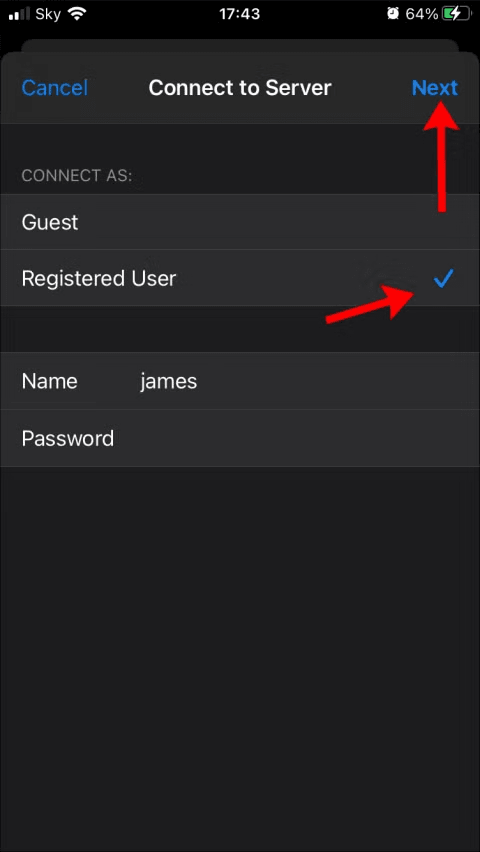
Step 3. Copy files from the iPhone Files app into the shared folder. On the PC, open the shared folder and confirm the files are accepted.
This is not the easiest method for beginners. It is best reserved for documents already accessible in the Files app and for PCs where local sharing is already configured.
FAQ About Transferring Files from iPhone to PC
Can I transfer files from iPhone to PC without iTunes?
Yes. AOMEI FoneBackup, File Explorer for photos and videos, Snapdrop, iCloud Drive, and a shared-folder workflow can all work without iTunes, depending on file type.
Can I drag and drop every iPhone file in Windows?
No. Windows File Explorer mainly exposes the DCIM photo and video folders. Other data types usually need a transfer tool, app export option, iTunes File Sharing, or iCloud Drive.
Which method is best for large files?
A USB-based method is usually more stable for large videos or big batches. AOMEI FoneBackup is worth considering when the file category is supported.
Does an iTunes backup give me normal PC files?
No. An iTunes backup is mainly for restoring an iPhone. It is different from exporting selected files that you can browse in a Windows folder.
Should I use iCloud Drive or AOMEI FoneBackup?
Use iCloud Drive when your files are already in iCloud, and you have enough storage. Use AOMEI FoneBackup when you prefer a local Windows transfer workflow for supported iPhone data.
Conclusion
There is no single best way to transfer files from iPhone to PC for every situation. For quickly copying photos and videos, a USB cable with File Explorer or the Windows Photos app is usually enough. iCloud and cloud storage are better suited to users who prefer wireless transfers. If you need selective transfers, multiple data types, or a more dedicated iPhone management experience, AOMEI FoneBackup is worth considering.
Before transferring important files, make sure your iPhone is unlocked, trusted by the computer, and connected with a reliable USB cable. For valuable photos, videos, contacts, and other personal data, keeping a separate backup on your PC or an external drive is also a good option.

 as a preferred
source on Google
as a preferred
source on Google