




How to Backup iPhone to an External Hard Drive on Windows 11/10
This guide explains how to save a full or selective iPhone backup on an external drive in Windows and how to redirect an iTunes backup safely.

By Ivy Updated on July 21, 2026


You can back up an iPhone to an external hard drive on Windows in two practical ways. AOMEI FoneBackup can save a full or selective backup directly to the connected drive, while iTunes can use the drive after you redirect its default Backup folder with a Windows junction.
Choose the first option for a visual workflow and flexible data selection; choose iTunes when you specifically want an Apple-format device backup and are comfortable using Command Prompt.
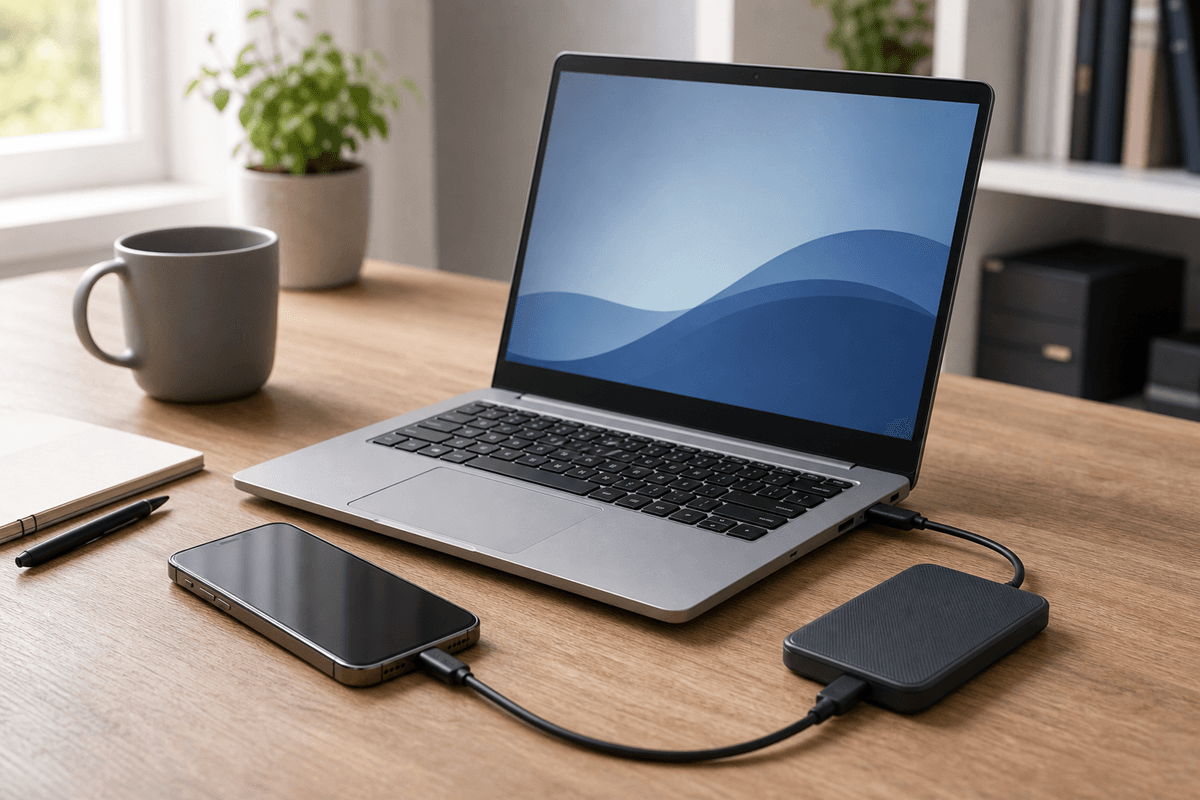
Choose the Right Way to Save Your iPhone Backup
An external drive can keep a large backup from filling the Windows system disk, but the best method depends on what you want to keep and how you expect to use it later.
|
🎯 Your goal |
🛠️ Recommended method |
💡 Keep in mind |
|
Create a complete backup |
AOMEI FoneBackup - Full Backup |
The backup is managed through AOMEI FoneBackup. |
|
Save selected photos, videos, contacts, music, or messages |
AOMEI FoneBackup - Selective Backup |
Choose only the categories or items you need. |
|
Keep an Apple-format device backup |
The setup uses an administrator Command Prompt. |
|
|
Archive an existing iTunes backup |
A copied folder may need to be returned to its expected location before restoration. |
Before You Begin
- Connect the external HDD or SSD and confirm that it appears in File Explorer with a stable drive letter.
- Check that the drive has enough free space for the data on your iPhone.
- Use a reliable USB cable, unlock the iPhone, and tap Trust when Windows asks for permission.
- Keep the external drive connected until the backup and verification are complete.
Method 1: Backup iPhone to an External Drive with AOMEI FoneBackup
🔥 Best for: users who want a direct destination setting instead of changing system folders.
AOMEI FoneBackup is a free iPhone backup and transfer tool for Windows. Its Full Backup and Selective Backup features are completely free, which allows you to backup all iPhone data or selected photos, messages, music, etc. In addition, you can save your backups directly to an external hard drive, USB drive, NAS, etc.
Option A. Create a Full Backup
Step 1. Download and install AOMEI FoneBackup on your computer. Connect the iPhone and external drive to the PC as well.
Step 2. Select Phone Backup on the left, choose Full Backup, and click Get Started.
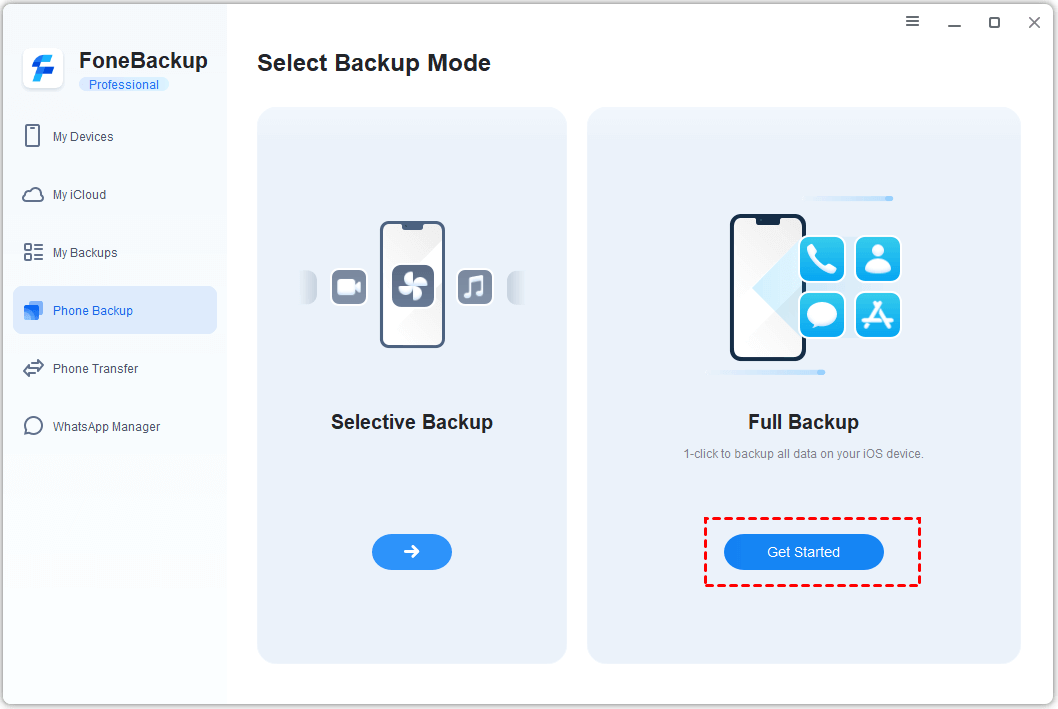
Step 3. Click Backup Storage Path to select your external hard drive as destination and click Start Backup. Optionally, toggle Enable backup encryption on to protect your private data such as Health and Keychain information.
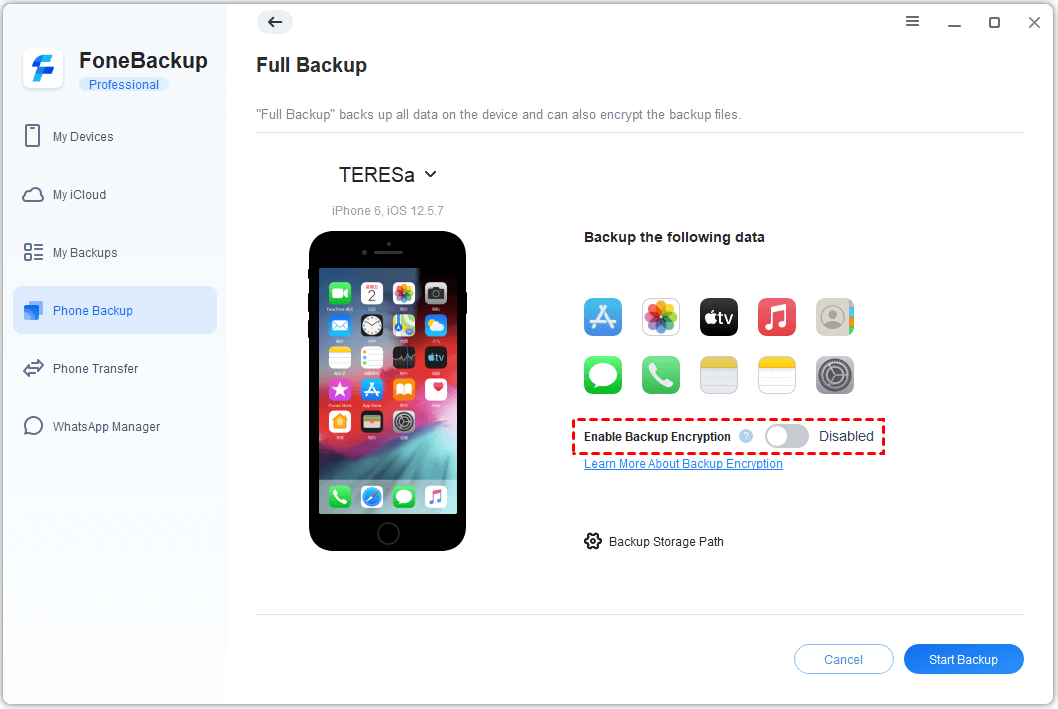
Be sure to leave both devices connected until the task finishes.
Option B. Back Up Selected iPhone Data
Step 1. To selectively back up data on iPhone, go to Phone Backup > Selective Backup and click Get Started.
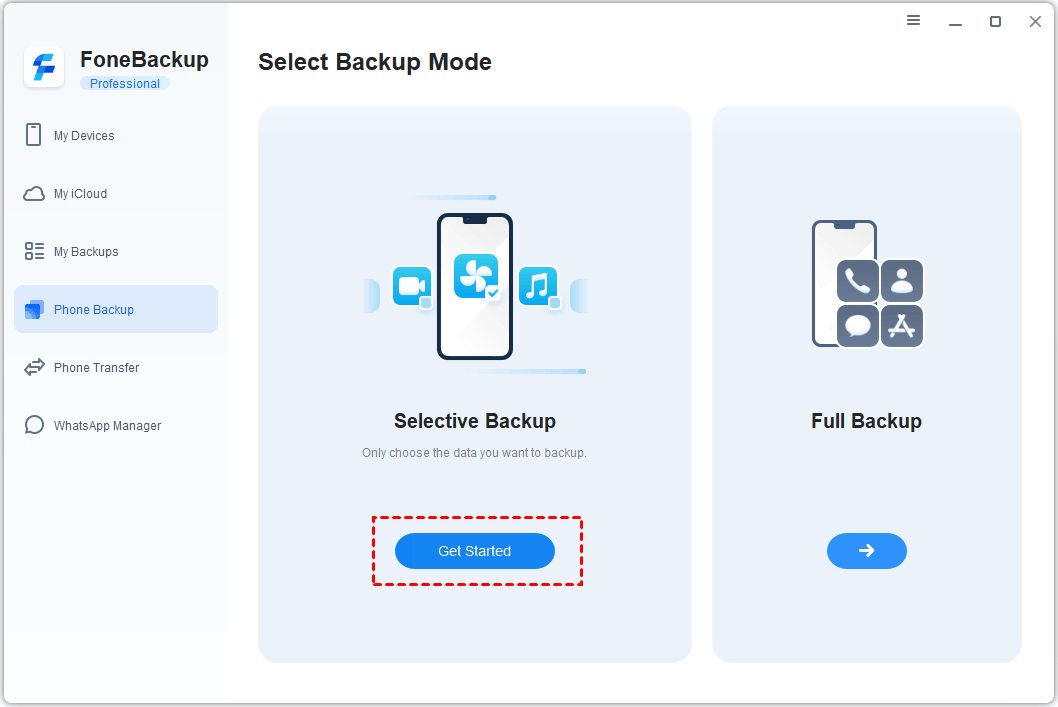
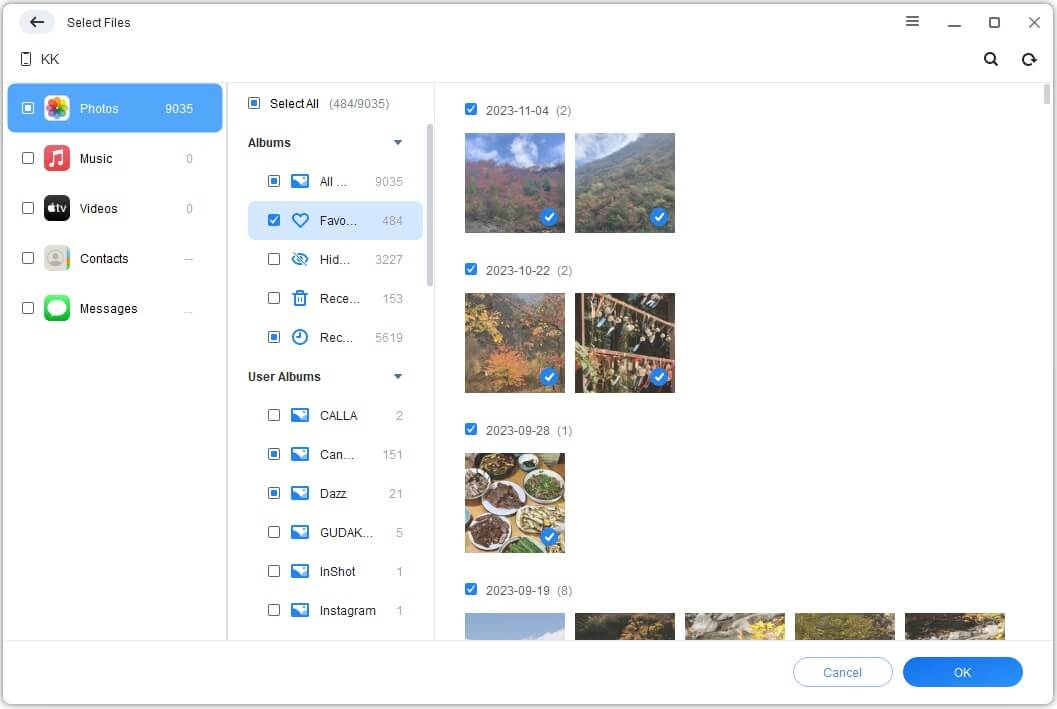
Step 2. Choose a data-type icon, e.g., Photos, preview the available items, select what you need, and click OK.
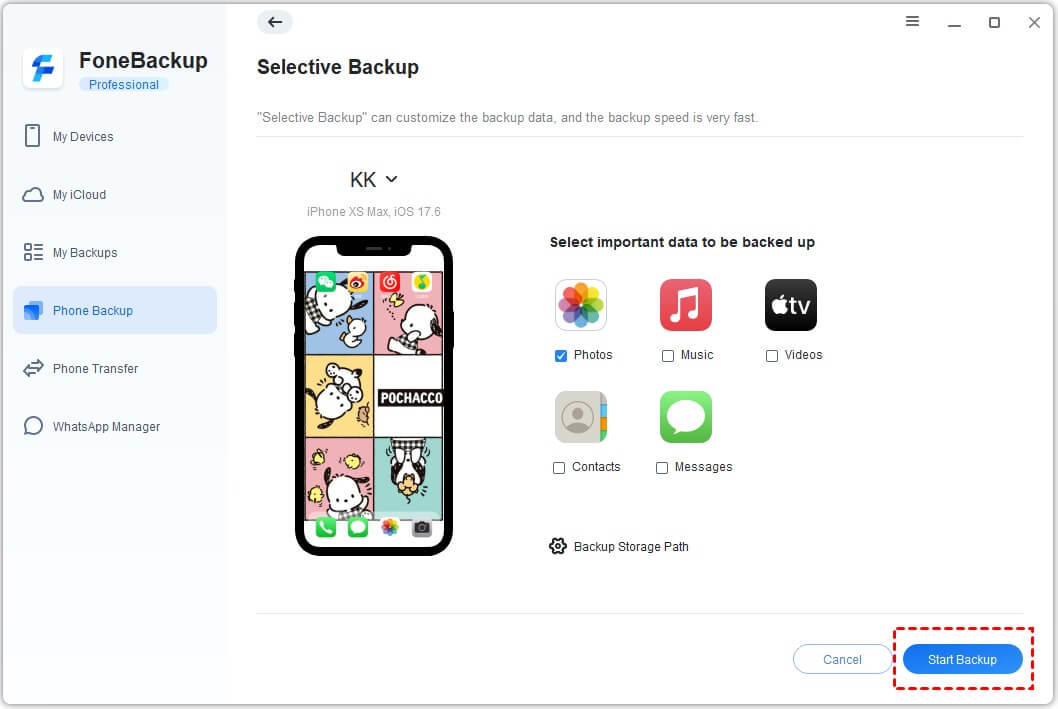
Step 3. Back to the Selective Backup screen, click Backup Storage Path to select your external drive as the destination. Then click Start Backup to backup iPhone to external hard drive.
If the iPhone connects but its content does not appear, check these fixes for iPhone files not showing up on a PC before reconnecting the device.
Method 2: Backup iPhone to an External Hard Drive with iTunes
Apple now recommends the Apple Devices app for local backups on current Windows PCs and keeps iTunes as the alternative when Apple Devices is not installed. However, iTunes has no destination selector, redirecting its Backup folder to an external drive requires a Windows directory junction.
Step 1. Install or open the latest version of iTunes. Connect the iPhone, unlock it, and tap Trust if prompted.
Step 2. Close iTunes. Press Windows + R to open the Run dialog. Locate and copy the entire backup folder (e.g., E:\MobileSync\Backup) to an external drive. Rename the original local folder to Backup-old instead of deleting it.
- Enter %USERPROFILE% if you installed iTunes from the Microsoft Store.
- Enter %AppData% if iTunes displays Help > Check for Updates.
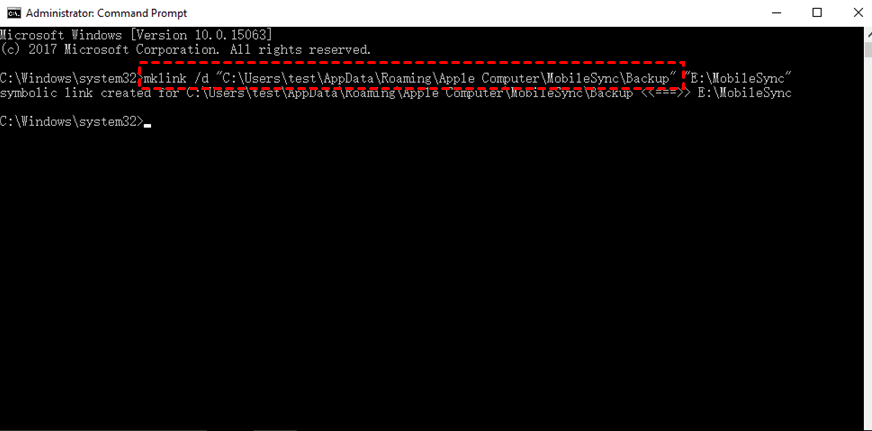
Step 3. Run the right command for your iTunes version in CMD (admin). Replace the username and drive letter with your own.
- Microsoft Store iTunes: mklink /J "C:\Users\[user name]\Apple\MobileSync\Backup" "E:\MobileSync\Backup"
- Traditional iTunes: mklink /J "C:\Users\[user name]\AppData\Roaming\Apple Computer\MobileSync\Backup" "E:\MobileSync\Backup"
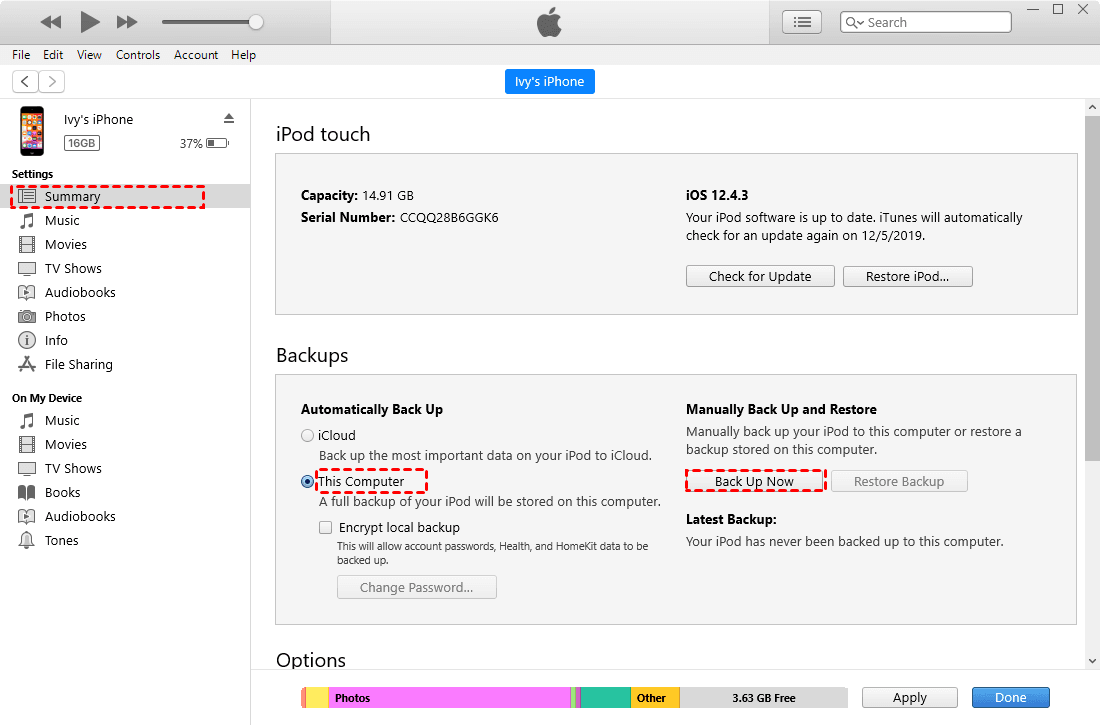
Step 5. Reopen iTunes, click the Device icon > Summary > Back Up Now. If you want account passwords, Wi-Fi settings, and Health data included, select Encrypt local backup and keep the password safe.
If the device icon is missing, try fixes for iPhone not showing up in iTunes and retry the backup afterward.
Method 3: Archive an Existing iPhone Backup to External Drive
If you already have a local iTunes backup and only need a safety copy, you can copy its complete device-named folder to the external drive. Keep every file and subfolder together; an incomplete copy may not be usable.
Step 1. Close Apple Devices or iTunes. Open the local MobileSync\Backup folder.
Step 2. Create a clearly named folder (E:\iPhone_Backups\2026-07-21_Phone_14) on your external drive and copy the entire backup folder to it. Do not change files inside the backup.
- To verify the archived copy, compare the copied folder’s size and file count with the original backup.
- To restore later, return the backup to the appropriate MobileSync\Backup location and confirm it appears under Manage Backups or Edit > Preferences > Devices in Apple Devices or iTunes.
FAQs
1. Can I back up an iPhone directly to an external SSD?
Yes. On Windows, AOMEI FoneBackup can use a connected external SSD as the backup destination. With iTunes, the backup location must first be redirected because iTunes has no built-in destination selector.
2. Can I back up an iPhone to an external drive without iTunes?
Yes. AOMEI FoneBackup can create a full or selective backup without using iTunes. You can also export individual files through suitable transfer workflows, although that is not the same as creating a full restorable device backup.
3. Can I view files inside an iTunes backup?
An iTunes backup is not organized as ordinary readable photo and document folders. Avoid editing or renaming its internal files because that can prevent the backup from being recognized.
4. Can I disconnect the external drive after the backup?
Yes, after the backup has finished and no program is using the drive. Eject it safely in Windows. Reconnect it before viewing, updating, or restoring the backup.
5. Is copying photos the same as backing up the entire iPhone?
No. Copying photos protects those media files, while a full device backup can include a broader set of local data and settings. Choose the method according to what you may need to restore.
Conclusion
To back up an iPhone to an external hard drive on Windows with the least setup, choose AOMEI FoneBackup and set the connected drive as the storage path. If you specifically need an iTunes backup, move the existing Backup folder safely and create a junction so iTunes continues to use its normal path.
Whichever method you choose, verify the new backup before deleting the local copy or freeing space on the iPhone.
- Confirm that the destination folder exists on the external drive and contains recently modified files.
- Check that the folder size is reasonable compared with the data selected for backup.
- For AOMEI FoneBackup, open Backup History and confirm that the new task is listed; use Locate Backup to confirm its storage folder.
- For iTunes, open Edit > Preferences > Devices and confirm that a recent backup appears.

 as a preferred
source on Google
as a preferred
source on Google