



How to Transfer Photos from iPhone to SD Card: 4 Ways
Need to move large photo collections from your iPhone to an SD card? Discover 4 simple methods – with or without a computer – that are safe and fast.

By Lily Updated on August 20, 2026


Why Transfer Photos from iPhone to an SD Card?
iPhones are convenient for taking and storing photos, but high-resolution images and videos can quickly consume available storage. Moving photos to an SD card provides an easy way to create another copy, free up iPhone space, or carry a photo collection between compatible devices.
For example, if you need to travel for work and frequently access certain photos, saving them to an SD card lets you take the files with you without relying entirely on your iPhone. An SD card can also serve as an additional backup location for important memories and work-related images.
So, how do you transfer photos from iPhone to SD card? The best method depends on whether you have a Windows PC, an SD card reader, or access to iCloud. Below are four practical solutions.
|
Method |
Computer Required |
Best For |
Main Advantage |
|
AOMEI FoneBackup |
Yes |
Large photo collections |
Fast and flexible |
|
Windows File Explorer |
Yes |
A few photos |
No extra software |
|
SD card adapter |
No |
Direct transfers |
Works without a computer |
|
iCloud |
Yes |
Wireless/cloud transfers |
No direct USB transfer required |
Method 1. Easiest Way to Transfer Photos from iPhone to SD Card on PC
When you have hundreds or thousands of photos to move, manually copying files can be inconvenient. A dedicated iPhone transfer tool can make the process easier, especially when you need to move a large photo collection directly to an SD card.
AOMEI FoneBackup is one option for transferring iPhone photos to external storage. It can transfer photos and other iPhone data while supporting external destinations such as SD cards and USB drives.
 AOMEI FoneBackup
- Transfer large numbers of photos quickly.
- Support SD cards, USB drives, and other external storage devices.
- Transfer music, photos, videos, contacts, and messages.
- Use a USB connection for a more stable transfer.
- Work with many iPhone models and iOS versions.
 100% Secure
Here's how to transfer photos from iPhone to SD card using AOMEI FoneBackup:
Step 1. Insert your SD card into an SD card reader and connect it to your Windows PC. Then connect your iPhone to the PC with a USB cable and tap Trust on your iPhone if prompted.
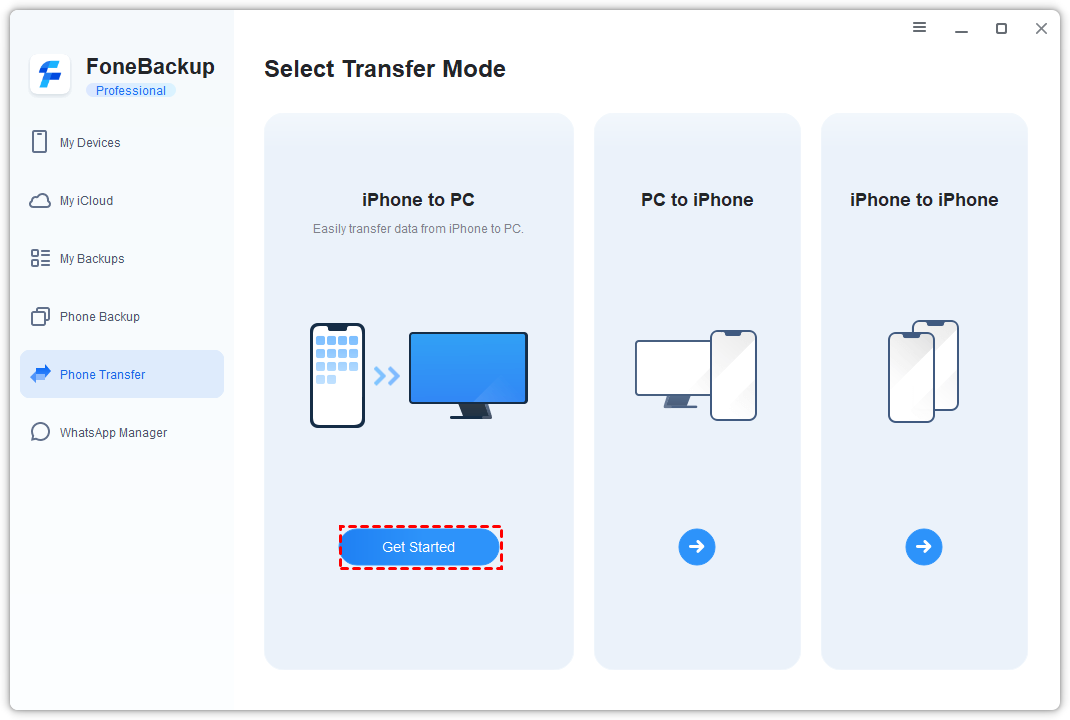
Step 2. Install and open AOMEI FoneBackup. From the main interface, select Phone Transfer > iPhone to PC > Get Started.
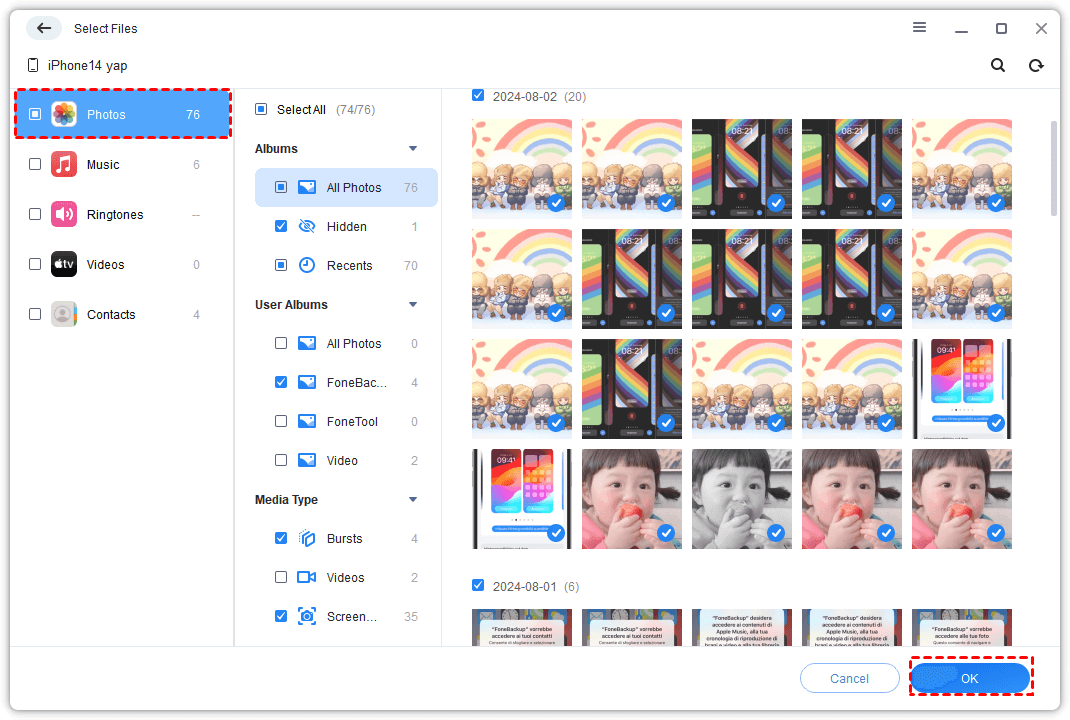
Step 3. Select the Photos icon. In the next window, choose the albums or individual photos you want to move, and click OK.
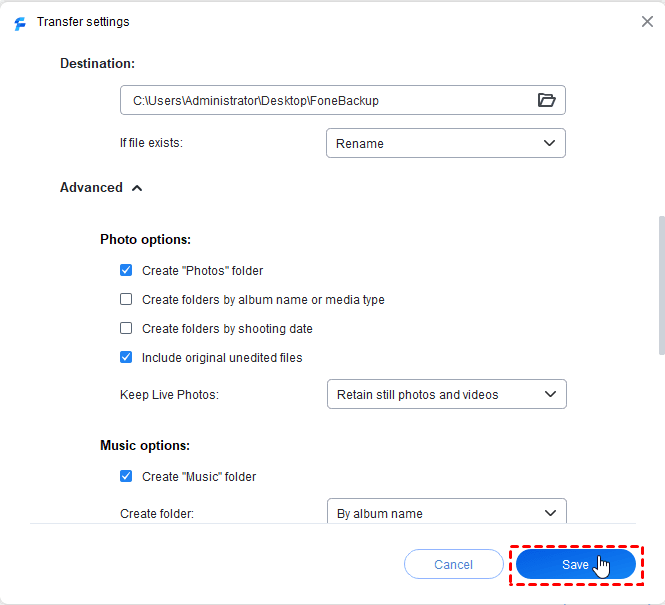
Step 4. Under Transfer Settings, select your SD card as the destination.
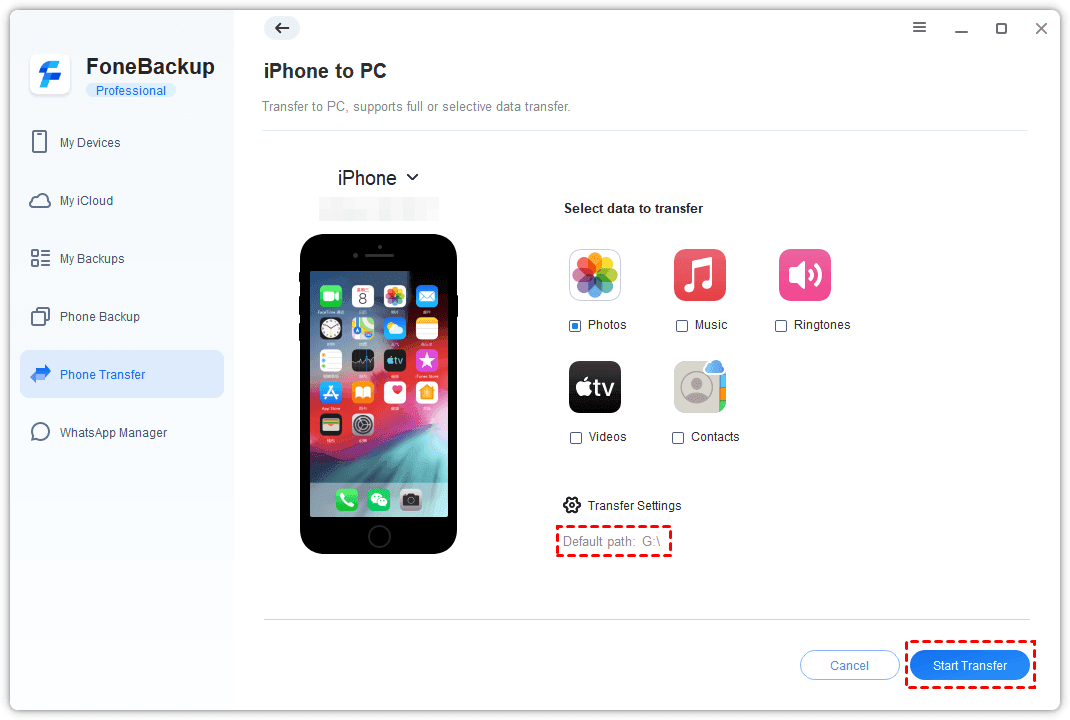
Step 5. Click Start Transfer and wait until the process finishes. Then check the SD card to make sure your photos have been copied successfully.
Step 6. Once you confirm the files are intact, you can safely disconnect both the iPhone and SD card.
✍ Tip: AOMEI FoneBackup can also transfer data between two iPhones. Connect both devices to the computer, select Phone Transfer, and then choose iPhone to iPhone.
Method 2. Transfer iPhone Photos to SD Card Using Windows File Explorer
If you only need to move a few pictures, you may not need additional software. Windows File Explorer can access photos stored in the iPhone's DCIM folder when the device is connected by USB.
This method is useful when you want to transfer photos from iPhone to SD card on PC without installing third-party software.
Step 1. Connect your iPhone to the Windows PC with a USB cable. Unlock the iPhone and tap Trust if the trust prompt appears.
Step 2. Insert your SD card into the computer using an SD card slot or card reader.
Step 3. Open File Explorer and select This PC.
Step 4. Open your iPhone, then go to Internal Storage > DCIM.
Step 5. Browse the folders and select the photos you want to transfer.
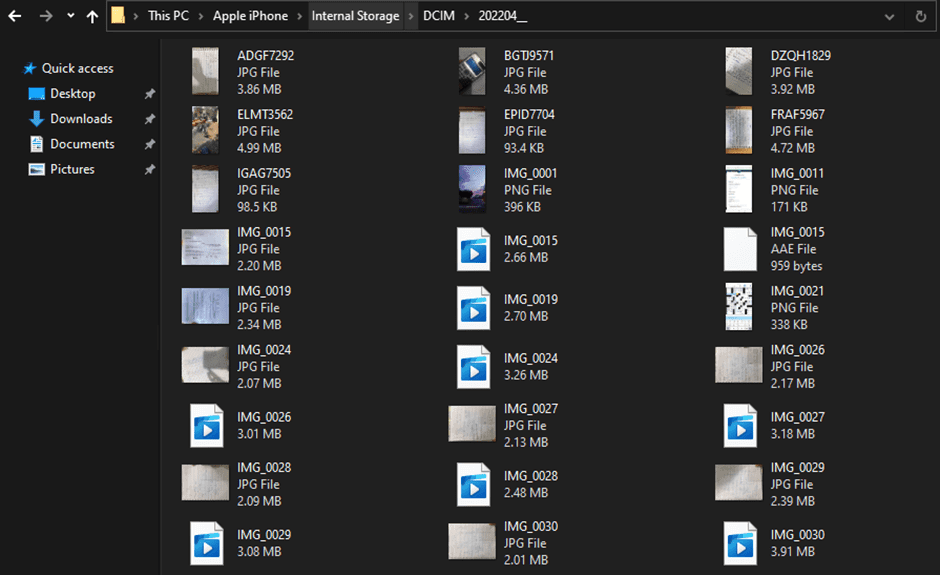
Step 6. Copy the selected photos, open your SD card in File Explorer, choose a destination folder, and paste the files there.
✍ Tip: Windows File Explorer is free and straightforward, but it has some limitations. It primarily provides access to photos and videos that Windows can read from the iPhone. Moreover, you may encounter the iPhone internal storage not showing problem.
Method 3. Export Photos from iPhone to SD Card with an Adapter
If you don't want to use a computer, you can transfer photos directly from your iPhone to an SD card with a compatible SD card reader or adapter. The exact adapter you need depends on your iPhone.
Older iPhones may use a Lightning connector, while newer models use USB-C. Once the SD card is connected, you can use the Files app to save selected photos to the card. Here's how to transfer photos from iPhone to SD card without computer:
Step 1. Insert the SD card into a compatible Lightning or USB-C SD card reader, then connect the reader to your iPhone.
Step 2. Open the Photos app and tap Select. Then choose the photos you want to transfer.
Step 3. Tap the Share button and select Save to Files.
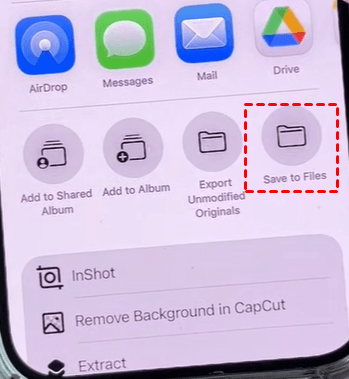
Step 4. Under the available locations, select your connected SD card. It may appear with a name such as NO NAME or a USB/storage icon.
Step 5. Choose or create a destination folder and tap Save.
Step 6. After the transfer is complete, open the Files app and check the SD card to verify that the photos are there.
✍ Tip: This approach is convenient when you don't have access to a PC. It is especially useful for photographers, travelers, or anyone who wants to move photos directly from an iPhone to removable storage.
Method 4. Move Photos from iPhone to SD Card via iCloud
iCloud provides another way to move photos when you don't want to connect your iPhone directly to the computer. However, this method requires enough iCloud storage and an internet connection.
The basic process is to sync your iPhone photos with iCloud, download them to your computer, and then copy them to the SD card.
Step 1. On your iPhone, open Settings, tap your Apple Account, and select iCloud > Photos. Then turn on Sync this iPhone (or iCloud Photos, depending on your iOS version).
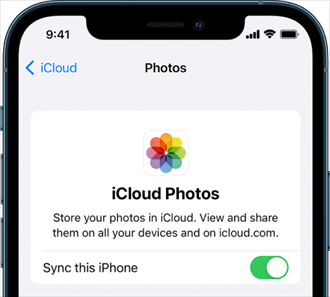
Step 2. Keep your iPhone connected to Wi-Fi and wait for your photos to upload to iCloud.
Step 3. On the computer, visit iCloud.com/photos and sign in with your Apple ID.
Step 4. Select the photos you want to save and click the Download button in the upper-right corner to download them to your computer.
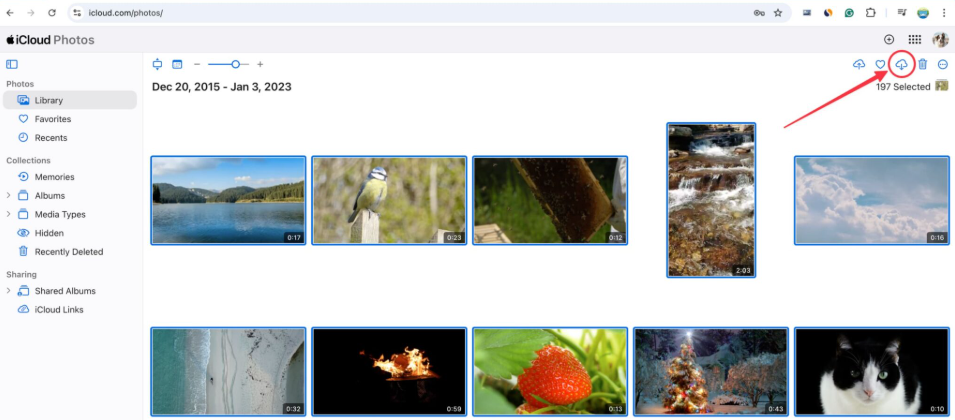
Step 5. Open the download folder (the default is C:\Users\Username\Downloads), unzip the iCloud Photos.zip file, and copy the required images.
Step 6. Connect the SD card to your Windows PC using an SD card reader. Then paste photos into the destination folder on your SD card.
✍ Tip: Downloading a large photo library can take considerable time depending on your internet speed and iCloud storage.
FAQs About Transferring iPhone Photos to an SD Card
1. How do I transfer photos from iPhone to SD card without a computer?
Connect an SD card reader to your iPhone, open Photos, select the pictures, tap Share, choose Save to Files, and select the connected SD card as the destination.
2. Can I transfer iPhone photos to an SD card on Windows?
Yes. You can use Windows File Explorer to copy photos from the iPhone's DCIM folder to the SD card. Alternatively, AOMEI FoneBackup can simplify large transfers and provide additional options.
3. Why can't I see all my iPhone photos on my computer?
If iCloud Photos and optimized storage are enabled, some original photos may be stored in iCloud rather than fully downloaded to the iPhone. In this case, you may need to download the originals before transferring them to an SD card.
Verdict
Now you know how to transfer photos from iPhone to SD card using four different approaches. You can use AOMEI FoneBackup for large transfers, Windows File Explorer for a simple PC-based solution, an SD card reader for direct transfers without a computer, or iCloud when a cloud-based workflow is more convenient.
For large photo collections, using AOMEI FoneBackup can save time and provide more flexibility than manually copying files. What’s more, AOMEI FoneBackup lets you back up your entire iPhone with one click. Don’t hesitate to try it out!

 as a preferred
source on Google
as a preferred
source on Google