



How to Transfer Photos from iPhone to USB (6 Easy Ways)
Is your iPhone running out of storage? Learn how to quickly transfer photos to a USB drive – and keep your precious memories safe.

By Lily Updated on July 30, 2026


Why Transfer Photos from iPhone to USB Flash Drive?
As the number of photos on your iPhone keeps growing, you may want to transfer photos from iPhone to a USB drive for the following reasons:
- Free up iPhone storage – High-resolution photos quickly fill device space; moving older images to a USB drive creates room for new photos, apps, and updates.
- Backup important photos – Relying solely on your iPhone risks data loss from damage, accidental deletion, or system errors. A USB drive provides an additional offline backup that's compact, portable, and accessible anytime.
Whether you use a Windows PC, Mac, or want to transfer photos directly without a computer, this guide will show you several reliable ways to transfer photos from iPhone to USB flash drive.
|
Method |
Best For |
|
AOMEI FoneBackup |
Fast and easy transfer with more control |
|
Windows Photos app |
Importing iPhone camera photos on Windows |
|
Windows File Explorer |
Manual photo copying |
|
iCloud Photos |
Wireless transfer through cloud storage |
|
Mac Image Capture |
Moving photos on Mac |
|
Files app with adapter |
Direct transfer without a computer |
Part 1. Transfer Photos from iPhone to USB on PC or Mac
If you have a Windows PC or Mac, transferring photos through software or built-in tools is usually the easiest option. Below are the most effective methods.
Method 1. Transfer Photos from iPhone to USB with AOMEI FoneBackup
If you want a simple and efficient way to move photos from your iPhone to a USB drive, AOMEI FoneBackup is a great choice. Unlike traditional methods that may require multiple steps, AOMEI FoneBackup allows you to preview your iPhone photos, select specific pictures, and transfer them directly to a USB flash drive without quality loss.
 AOMEI FoneBackup
- Flexible photo transfer: Move all photos or only selected pictures from your iPhone.
- Various photo albums: Transfer photos stored in Camera Roll and any other albums, such as transfer hidden photos.
- Original quality preserved: Transfer photos without compression or reduced resolution.
- Wide compatibility: Works with different iPhone models, iOS versions, USB flash drives, HDDs, and SSDs.
 100% Secure
Learn how to transfer photos from iPhone to USB drive step by step below:
Step 1. Connect your iPhone and USB flash drive to your computer.
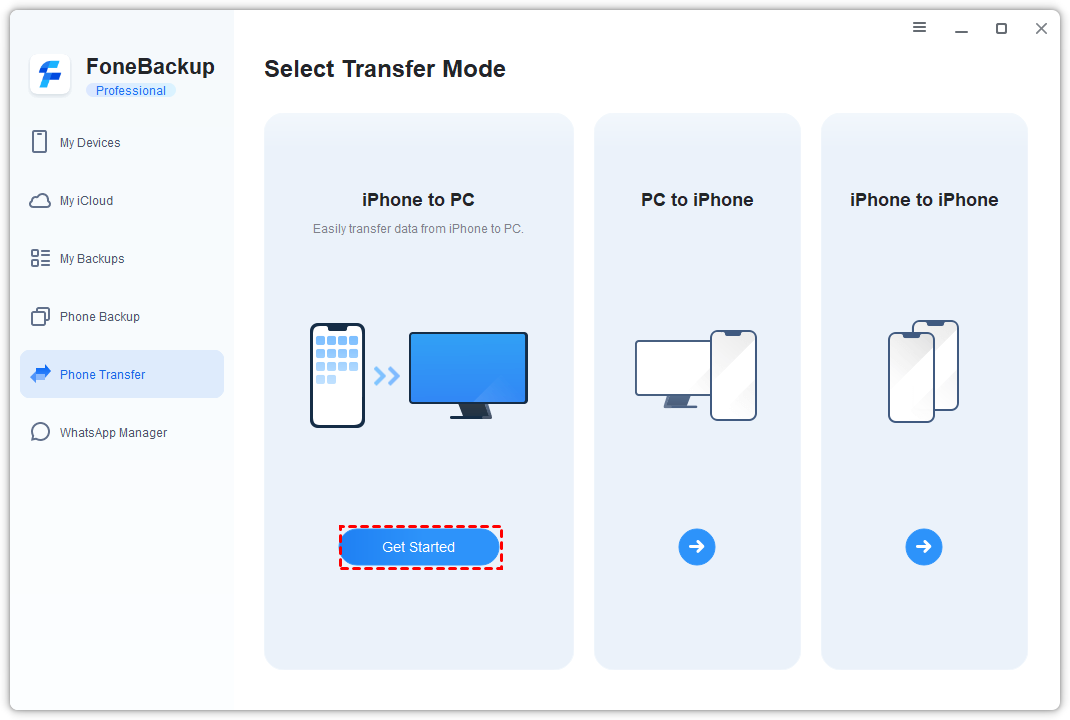
Step 2. Install and open AOMEI FoneBackup. Then select Phone Transfer > iPhone to PC > Get Started.
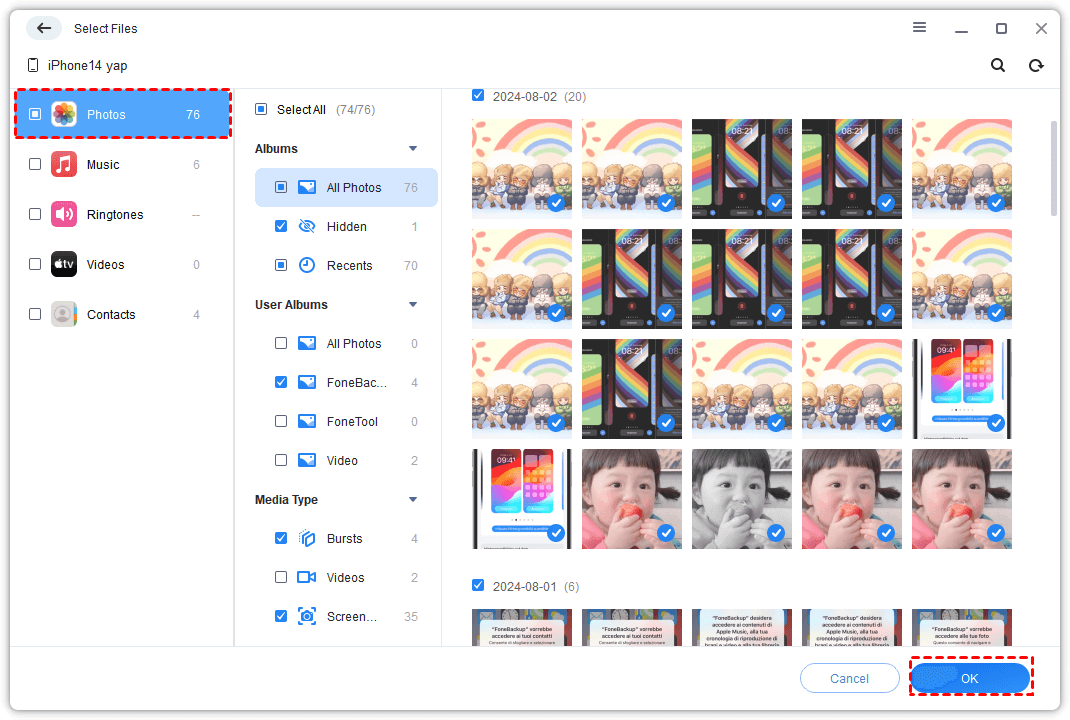
Step 3. Select Photos from the data categories. In the next window, preview your pictures, choose the photos you want to transfer, and click OK.
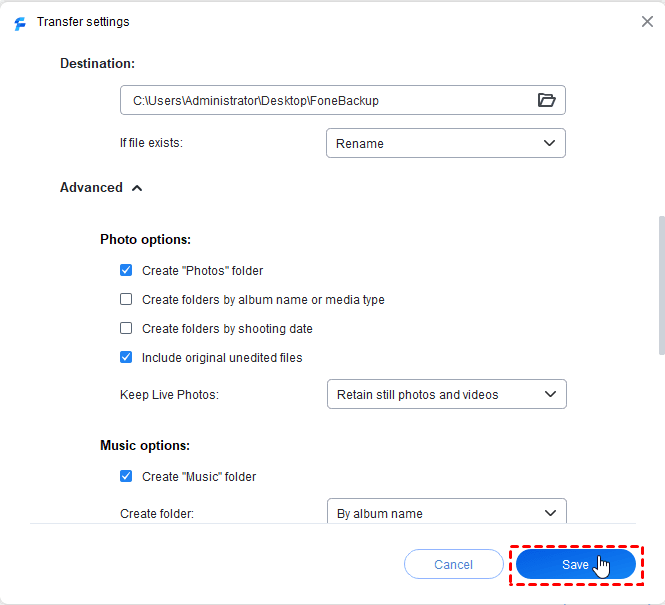
Step 4. Open Transfer Settings to select your USB flash drive as the destination path. Then click Save.
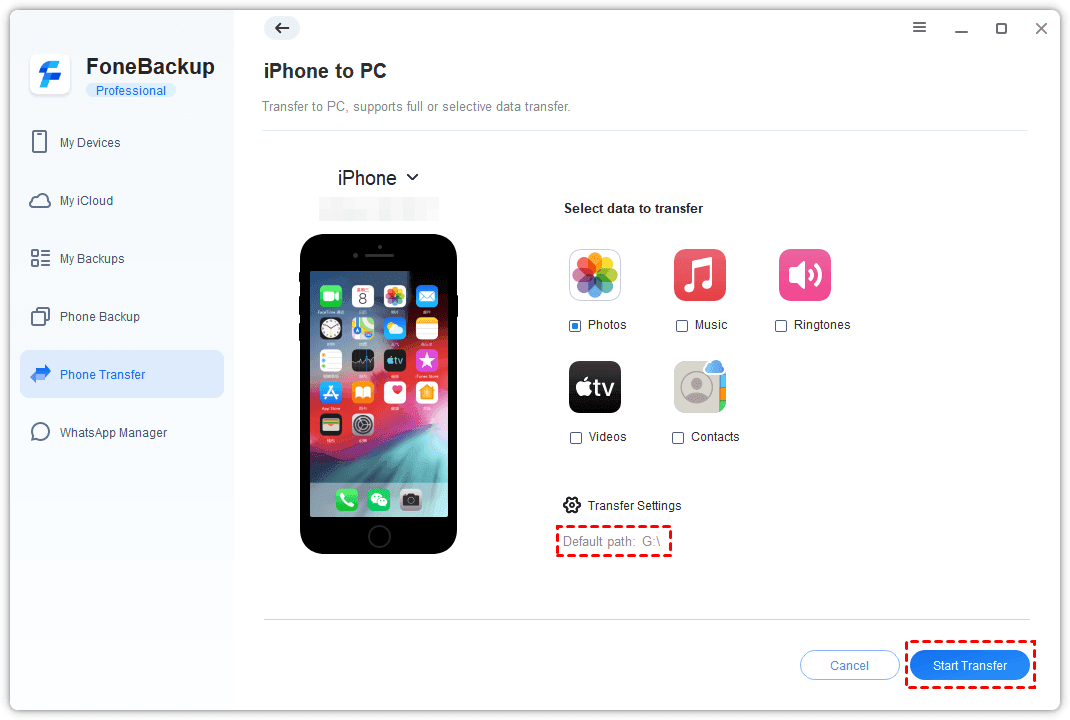
Step 5. Click Start Transfer. Your selected iPhone photos will be saved directly to the USB flash drive.
Method 2. Transfer iPhone Photos to USB Drive Using Windows Photos App
If you are using a Windows PC, the built-in Photos app provides a simple way to import pictures from your iPhone. After importing the photos to your computer, you can move them to a USB flash drive manually.
This method works well for transferring photos from the iPhone Camera Roll. However, it does not allow you to choose a USB drive as the direct destination during the import process, so you need an extra copy-and-paste step. Follow the steps below:
Step 1. Connect your iPhone to the PC using a USB cable.
Step 2. Open the Photos app. Then click Import > Apple iPhone. Wait while Windows scans your iPhone.
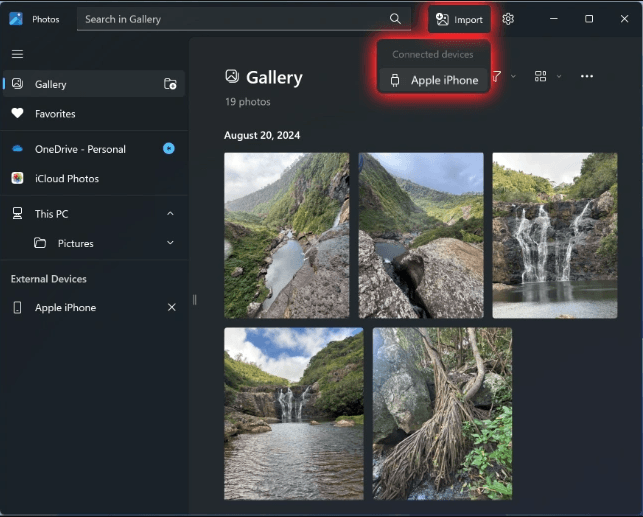
Step 3. Select the photos you want to keep and click the Add icon.
Step 4. Confirm the destination folder (C:\Users\Username\Pictures). Then click Import to save photos to your computer.
Step 5. Once the import process is complete, open the Pictures folder on your computer.
Step 6. Connect your USB flash drive to the computer, create a new folder for your iPhone photos, and copy the imported pictures to the USB drive.
Method 3. Copy Photos from iPhone to USB Flash Drive via File Explorer
Windows File Explorer is another built-in option that allows you to manually access iPhone photos and copy them to a USB drive. This method does not require additional software, but it only works with photos stored in the iPhone DCIM folder. Some synced or downloaded pictures may not appear. Follow the instructions below:
Step 1. Connect your iPhone and USB flash drive to your Windows PC. Unlock your iPhone and tap Trust This Computer if prompted.
Step 2. Open File Explorer, click This PC, and locate your connected iPhone under the “Devices and drives” section.
Step 3. Open Internal Storage > DCIM. Then browse the folders containing your photos and select the pictures you want to move.
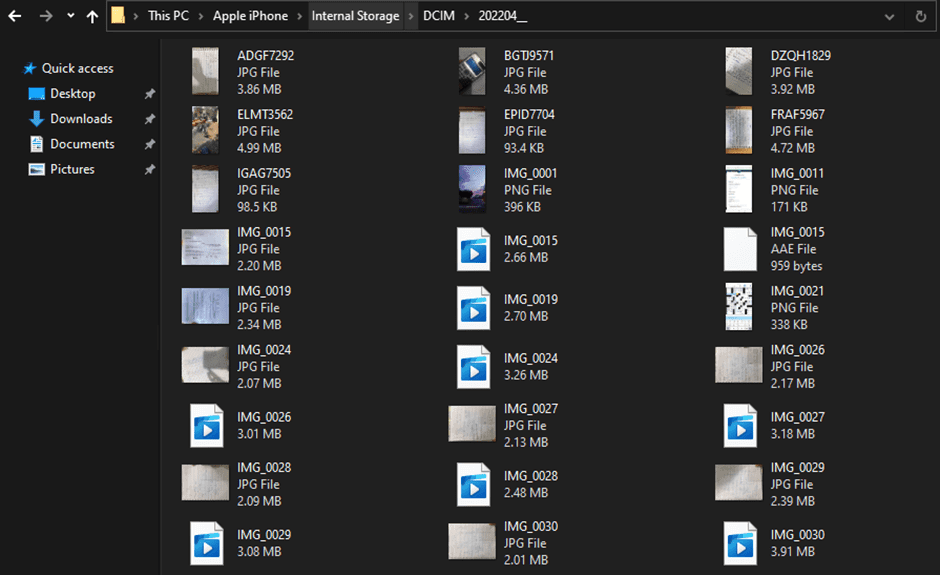
Step 4. Copy the selected photos and paste them into a folder on your USB flash drive.
Step 5. Wait until the copying process is complete, then safely eject both your iPhone and USB drive.
💡 Note: Sometimes Windows may show an empty DCIM folder or fail to detect iPhone photos. This usually happens because the iPhone is locked, the trust permission was not approved, or there is a connection issue.
Method 4. Transfer iPhone Photos to USB Flash Drive Through iCloud
If you prefer a wireless method, iCloud Photos can help you sync pictures from your iPhone and download them to a USB drive through a computer.
However, this method requires enough iCloud storage space. Apple provides limited free iCloud storage, so users with large photo libraries may need additional storage. Here are steps to move photos from iPhone to USB using iCloud:
Step 1. Open Settings on your iPhone and tap your Apple ID at the top.
Step 2. Select iCloud > Photos. Then turn on Sync this iPhone (or iCloud Photos, depending on your iOS version).
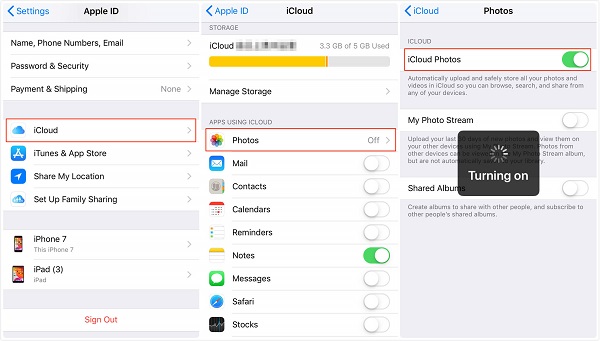
Step 3. Keep your iPhone connected to Wi-Fi and wait for your photos to upload to iCloud.
Step 4. On your computer, open a browser and visit iCloud.com/photos. Sign in with your Apple ID.
Step 5. Select the pictures you want to download and click the Download button in the upper-right corner.

Step 6. After the download completes, go to the download folder on your computer (the default is C:\Users\Username\Downloads).
Step 7. Connect your USB flash drive to your computer and create a folder for your iPhone pictures. Then move the downloaded photos from your computer to the USB drive.
Method 5. Save iPhone Photos to USB on Mac Using Image Capture
For Mac users, Apple provides a built-in tool called Image Capture that can import photos from an iPhone directly to an external storage device. This method is useful if you do not want to install third-party software. Learn how to use it below:
Step 1. Connect your iPhone and USB flash drive to your Mac. Open Image Capture on your Mac.
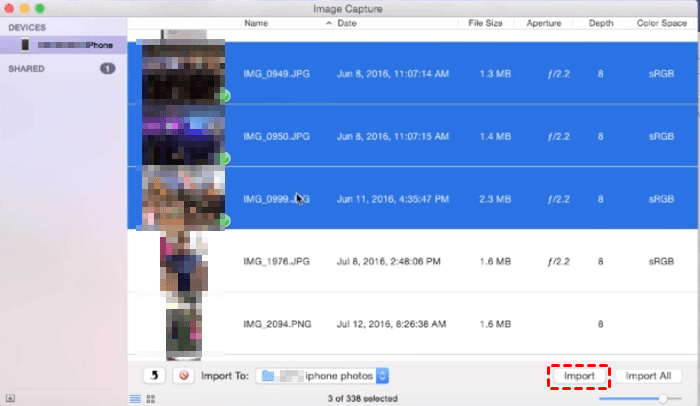
Step 2. On the left side of the interface, select your iPhone from the Devices list.
Step 3. Let Image Capture import your photos. Then choose the photos you want to transfer.
Step 4. At the bottom of Image Capture, select your USB flash drive as the destination location behind Import To.
Step 5. Click Import to transfer the selected photos to USB. If you want to transfer all photos, click Import All.
Part 2. Transfer iPhone Photos to USB Without Computer
If you do not have access to a computer, you can still transfer photos from your iPhone directly to a USB flash drive. You will need a compatible adapter, such as a Lightning-to-USB adapter or USB-C adapter for newer iPhones. Learn detailed steps below:
Step 1. Connect your USB flash drive to your iPhone using a compatible adapter.
Step 2. Open the Files app on your iPhone. Tap Browse at the bottom of the screen. In the "Locations" section, you should see your USB drive's name appear.
💡 Note: If you don't see your USB drive, try unplugging and reconnecting the drive.
Step 3. Open the Photos app on your iPhone. Tap Select in the top right corner and choose the photos you want to transfer.
Step 4. Tap the Share button and select Save to Files.
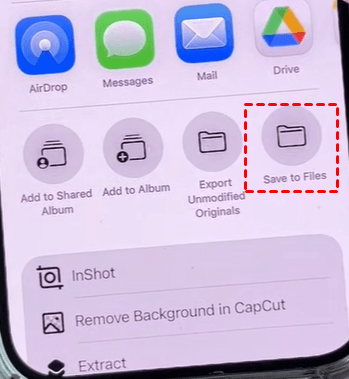
Step 5. In the "Save to Files" menu, tap on the name of your USB drive to select it as the destination. Then tap Save in the top right corner to save photos directly to the drive.
💡 Note: You can also tap the three-dot icon > New Folder to create a new folder on your USB drive to save iPhone photos.
FAQs about Transferring Photos from iPhone to USB
1. Can I transfer photos directly from iPhone to USB flash drive?
Yes. You can transfer photos directly from an iPhone to a USB flash drive by using a compatible adapter and the Files app. For large photo collections, using a computer and tools like AOMEI FoneBackup is usually faster and more reliable.
2. Why can't I see my iPhone photos on my computer?
This issue may happen because your iPhone is locked, the computer has not been trusted, the USB cable is damaged, or the DCIM folder cannot be accessed properly. Try these fixes:
- Unlock your iPhone before connecting it.
- Tap Trust This Computer when prompted.
- Use another USB cable or port.
- Restart both your iPhone and computer.
- Update iPhone drivers on Windows.
3. Does transferring iPhone photos to USB reduce quality?
It depends on the method. Direct transfer methods such as AOMEI FoneBackup copy photos without compression, keeping the original resolution and quality.
Final Words
There are six methods offered in this article to help you transfer photos from iPhone to USB flash drive. Built-in tools like Windows Photos, File Explorer, iCloud, or Mac Image Capture can complete the task.
For the fastest and most flexible experience, AOMEI FoneBackup is a reliable choice. It allows you to transfer selected or all iPhone photos directly to a USB drive while preserving original image quality. Besides photo transfer, it also provides useful iPhone backup and data management features to help keep your iOS data safe.

 as a preferred
source on Google
as a preferred
source on Google