




How to Backup iPhone on Windows 10/11 (Top 4 Ways)
Wondering how to back up your iPhone on a Windows PC? This guide explains four reliable methods. Compare their features, follow step-by-step instructions, and choose the best way to securely protect your iPhone data.

By Lily Updated on July 9, 2026


Why Should You Back Up Your iPhone to a Windows PC?
Regularly backing up your iPhone is one of the easiest ways to keep your personal data safe. In general, saving an iPhone backup on a Windows PC offers several advantages:
- Prevent data loss – Protects against accidental deletion, device damage, system crashes, or failed iOS updates.
- Free up storage – Offload photos, videos, and messages to reclaim space without losing files.
- Simplify device migration – Makes transferring data to a new iPhone quick and seamless.
How Do I Backup My iPhone on a Windows Computer?
There are several ways to back up an iPhone on Windows. Below, we'll compare the four most popular methods so you can choose the one that best fits your needs.
|
Method |
Advantages |
Limitations |
|
AOMEI FoneBackup |
Full and selective backup, fast transfer speed, flexible backup locations |
Requires software installation |
|
iCloud |
Automatic cloud backup, works wirelessly |
Only 5 GB of free storage, Internet required |
|
iTunes |
Official Apple backup solution, creates complete device backups |
No selective backup or restore, slower with large backups |
|
Dropbox |
Easy cloud file synchronization |
Only backs up selected files, limited free storage |
Method 1. Back Up iPhone to Windows with AOMEI FoneBackup (Fast & Free)
If you're looking for the easiest and most flexible backup solution, AOMEI FoneBackup is an excellent choice. It supports both full backups and selective backups, allowing you to protect exactly the data you need.
 AOMEI FoneBackup
- One-click full iPhone backup.
- Selectively back up photos, videos, contacts, messages, music, and more.
- Transfer files between iPhone and Windows without storage limits.
- Restore backups to another iPhone, even with a different Apple ID.
- Save backups to internal drives, USB drives, external hard drives, or NAS devices.
- Backup encryption for protecting sensitive information.
 100% Secure
Learn how to back up iPhone in Windows with AOMEI FoneBackup below. Before you start, please download and install this freeware on your computer.
Option 1. Selectively Back Up iPhone Data
Step 1. Connect your iPhone to your Windows PC using a USB cable and tap Trust This Computer on your iPhone.
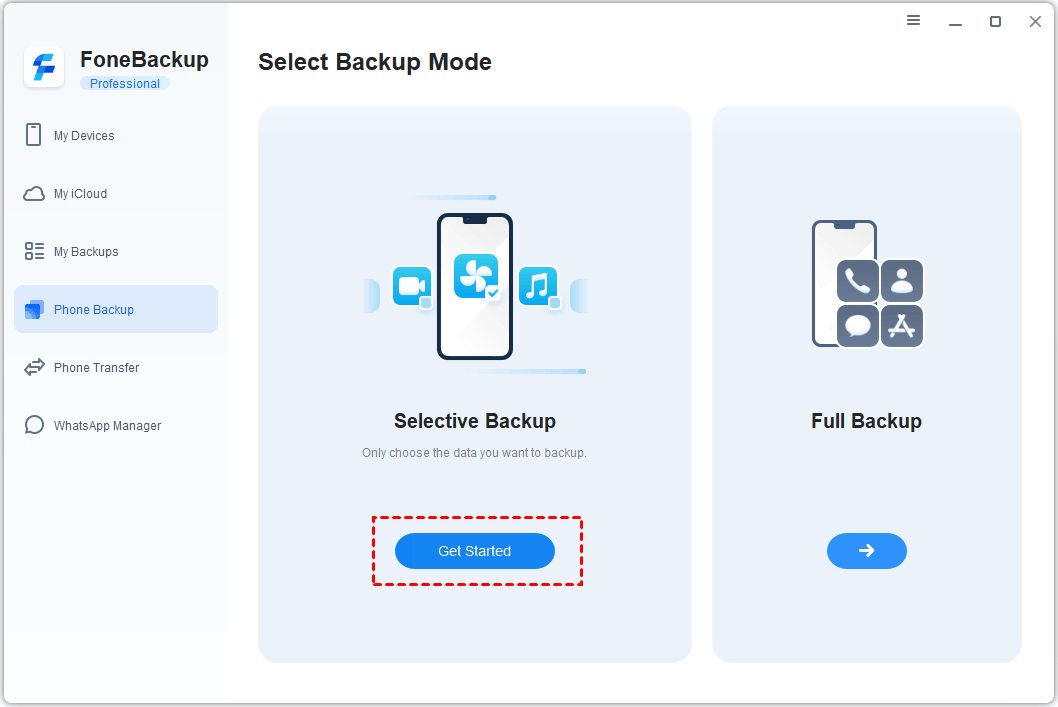
Step 2. Launch AOMEI FoneBackup and navigate to Phone Backup > Selective Backup, then click Get Started.
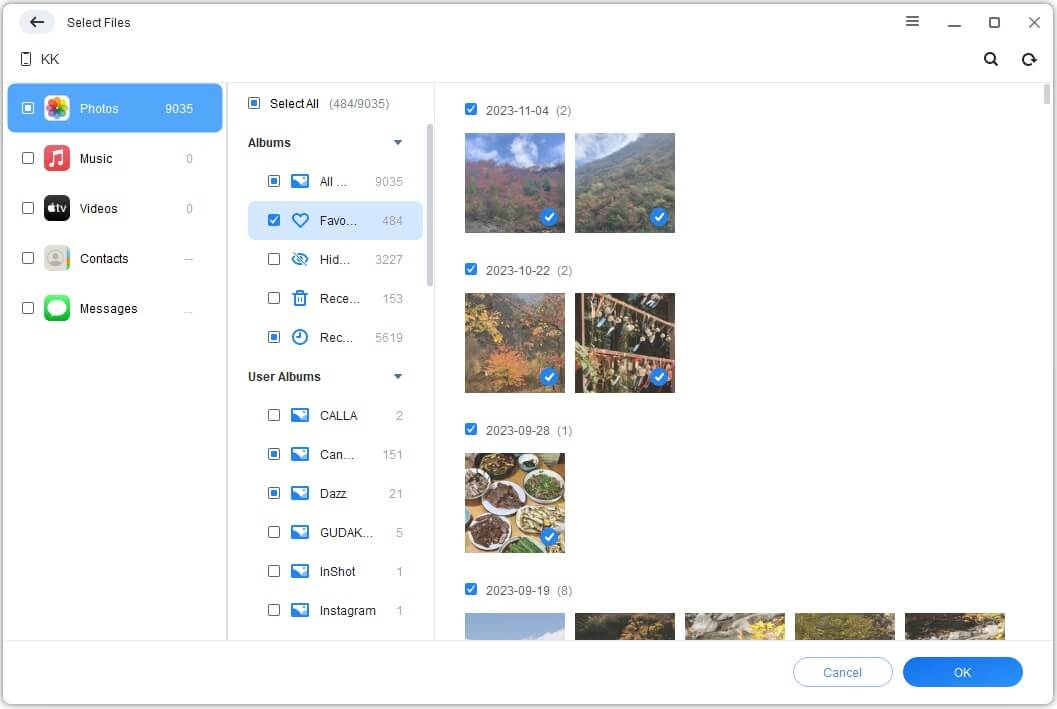
Step 3. Choose the data category you want to back up, such as Photos, Contacts, Videos, Messages, or Music. Then select the desired files and click OK.
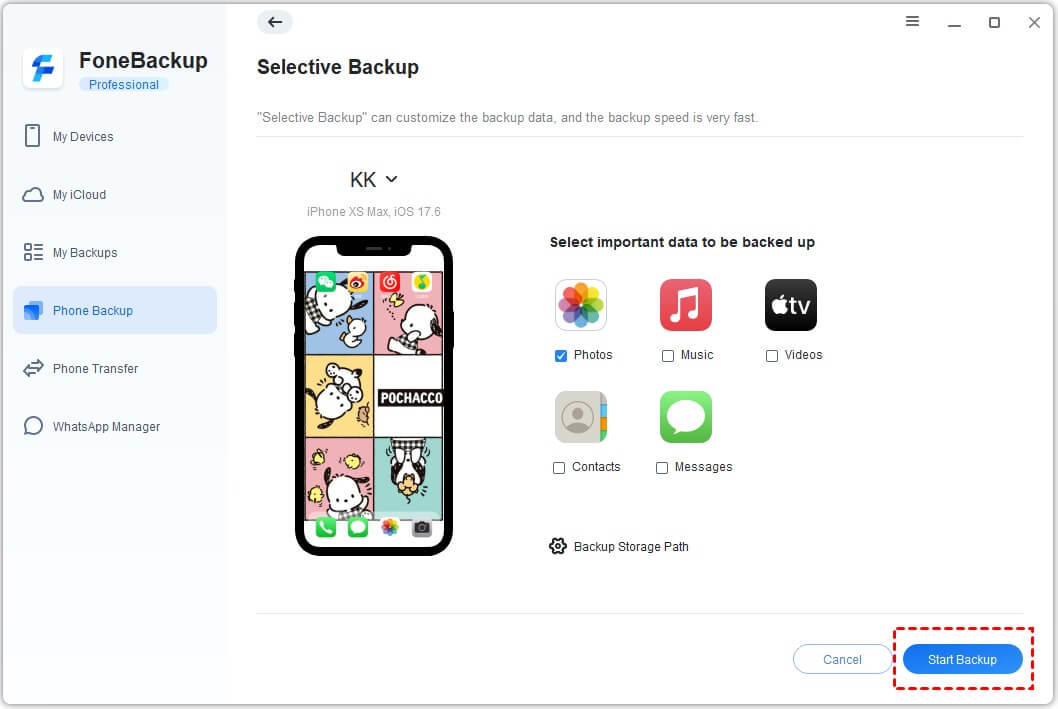
Step 4. Click Backup Storage Path to choose where you'd like to save the backup.
Step 5. Click Start Backup and wait for the process to finish.
💡 Note: After the backup is completed, you can manage or restore it anytime from the My Backups section.
Option 2. Create a Full iPhone Backup
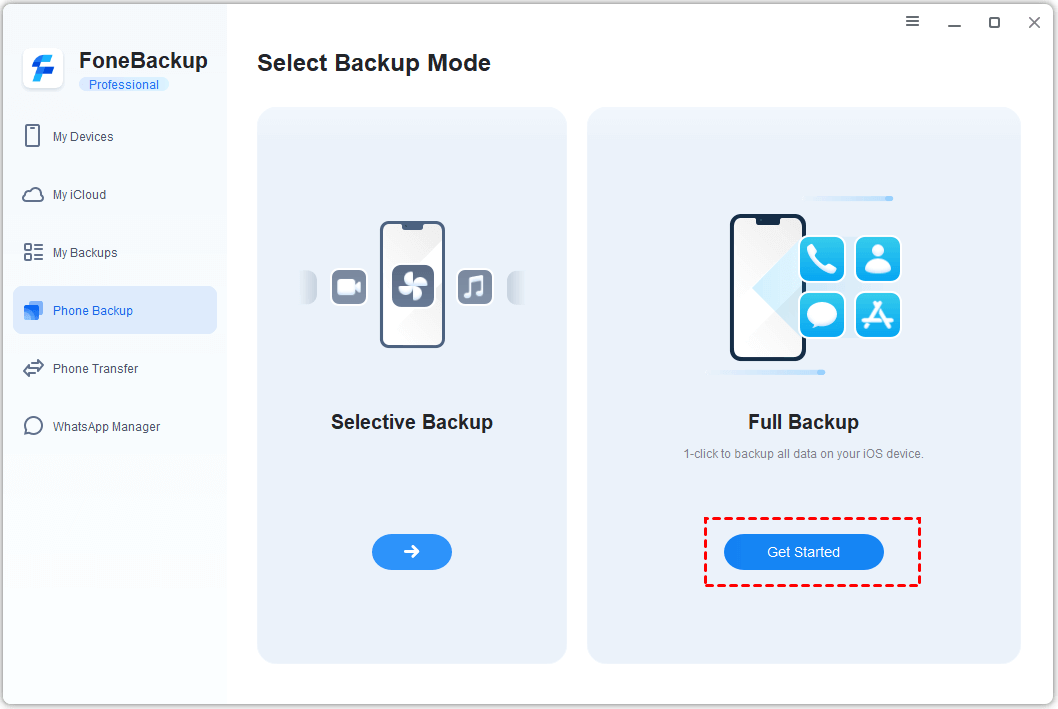
Step 1. Connect your iPhone to PC. Open AOMEI FoneBackup and select Phone Backup > Full Backup > Get Started.
Step 2. (Optional) Enable Backup Encryption to protect sensitive information such as passwords, Health data, and Keychain credentials.
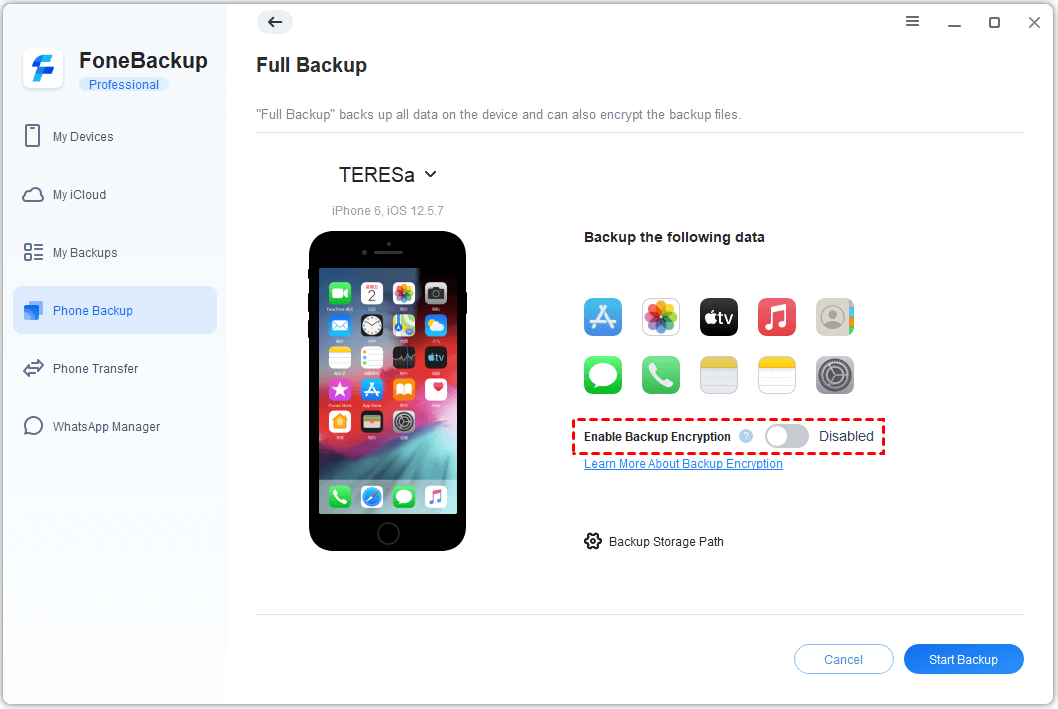
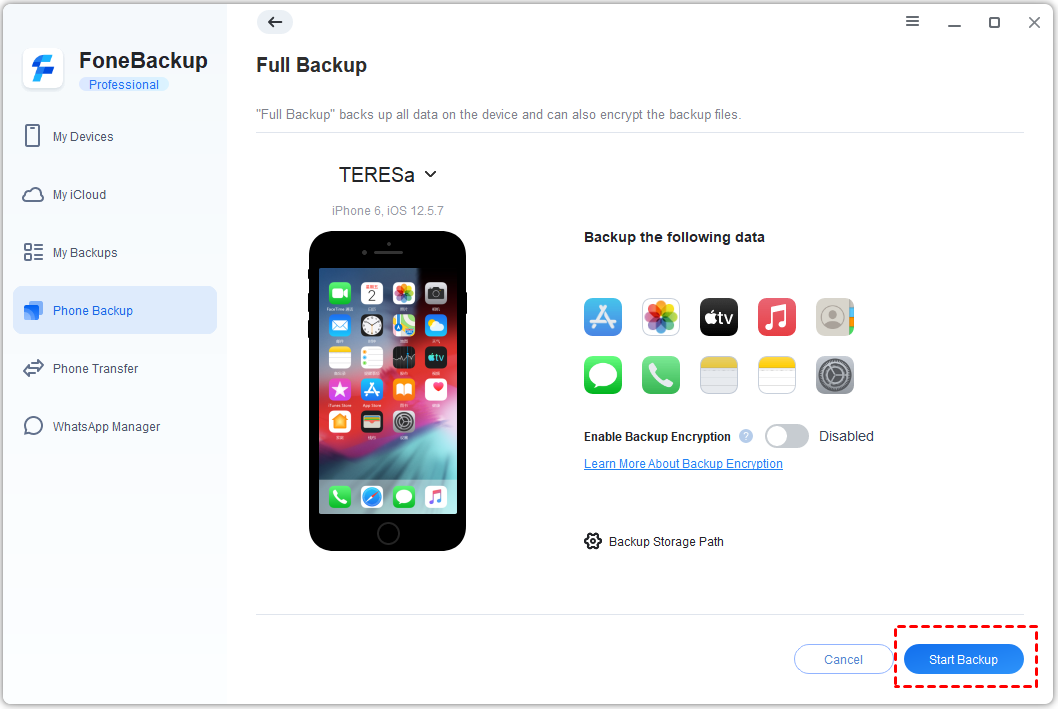
Step 3. Choose a backup destination by clicking Backup Storage Path and then click Start Backup.
Method 2. Back Up iPhone with iCloud
If you prefer a wireless solution, Apple's iCloud service can automatically back up your iPhone over Wi-Fi. After the backup is completed, you can download supported files from iCloud to your Windows PC. Learn how to back up iPhone on Windows PC with iCloud below:
Step 1. Connect your iPhone to a stable Wi-Fi network and make sure the battery level is sufficient.
Step 2. Open Settings > Apple ID > iCloud > iCloud Backup.
Step 3. Turn on iCloud Backup, then tap Back Up Now.
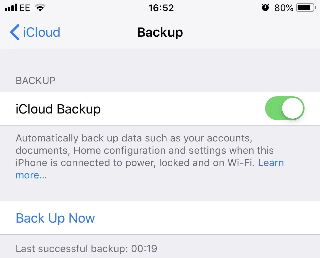
Step 4. After the backup finishes, visit iCloud.com from your Windows browser and sign in with your Apple ID.
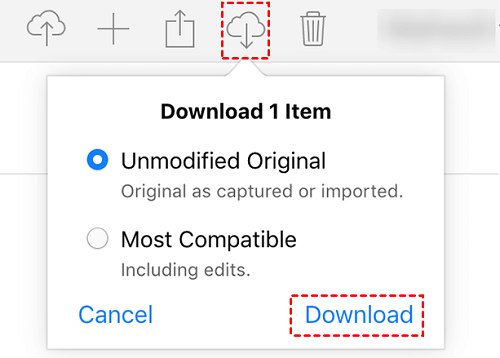
Step 5. Open the corresponding data category, select the files you want, and click the Download button at the top to download them to your computer.
✅ Things to Know
- Apple only provides 5 GB of free iCloud storage.
- A stable Internet connection is required.
- Large backups may take a long time to upload.
Method 3. Back Up iPhone with iTunes
iTunes is Apple's traditional desktop backup solution for Windows. It creates a complete backup of your device but doesn't allow you to select individual files for backup or restoration. Here are the steps to back up using iTunes:
Step 1. Download and install the latest version of iTunes on your Windows PC.
Step 2. Connect your iPhone using a USB cable and launch iTunes.
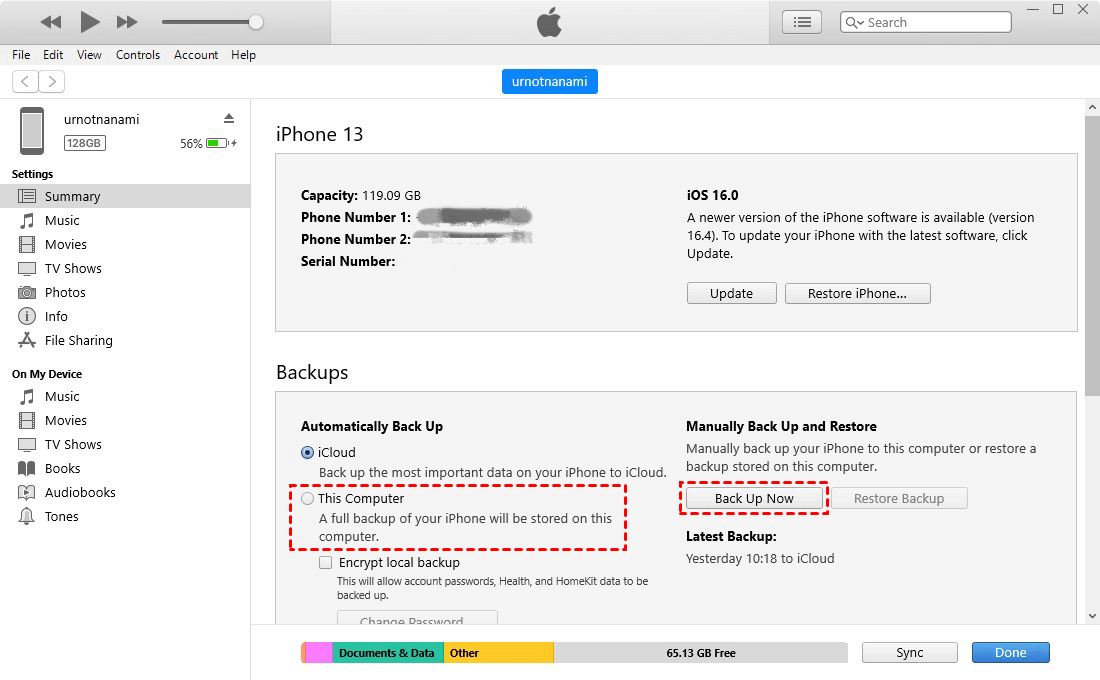
Step 3. Click the Device icon near the top left of the iTunes window. Then select the Summary tab.
Step 4. Under the Backups section, check This Computer to backup iPhone to PC. Then click Back Up Now to launch the process.
✍ Tips:
● Depending on where you downloaded iTunes and which app you use, iTunes can save backups in one of the following paths:
① C:\Users\YourUsername\AppData\Roaming\Apple Computer\MobileSync\Backup
② C:\Users\YourUsername\Apple\MobileSync\Backup
If you want to store backups on another drive, you'll need to create a symbolic link using Command Prompt.
● To protect passwords, Health data, and other sensitive information, enable Encrypt local backup before starting the backup.
Method 4. Save iPhone Files to Windows with Dropbox
Dropbox is another cloud storage option for saving important iPhone files. Unlike iTunes or AOMEI FoneBackup, Dropbox doesn't create a complete device backup, but it's useful for syncing selected documents, photos, and videos between devices. Learn how to save iPhone files to Windows with Dropbox below:
Step 1. Install Dropbox on your iPhone and sign in.
Step 2. Open the Files app on your iPhone. Navigate to the files you want to backup and select them.
Step 3. Tap the Share icon at the bottom of your screen and choose Dropbox.
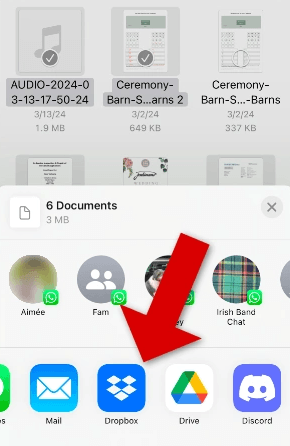
Step 4. Choose a location in your cloud account storage and tap Upload.
Step 5. Sign in to your Dropbox account on your Windows PC.
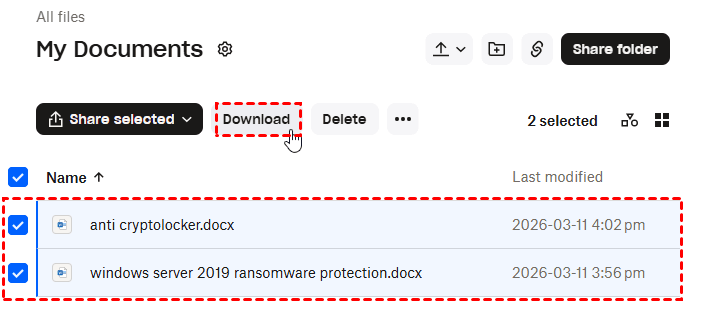
Step 6. Locate uploaded files under All files and select them. Then click on the Download button to save them on your Windows PC.
FAQs About Backing Up an iPhone on Windows
1. Does iTunes back up everything on my iPhone?
No. iTunes backs up most locally stored data, including app data, settings, messages, and photos stored on the device. However, content already synced with iCloud, such as iCloud Photos, isn't included in the backup.
2. Can I create an encrypted iPhone backup?
Yes. Both AOMEI FoneBackup and iTunes support encrypted backups. Enabling backup encryption allows you to include sensitive data such as saved passwords, Health information, and Keychain data.
3. Where are iPhone backups stored on Windows?
If you use iTunes, the default backup location can be either of the following paths:
- C:\Users\YourUsername\AppData\Roaming\Apple Computer\MobileSync\Backup
- C:\Users\YourUsername\Apple\MobileSync\Backup
If you use AOMEI FoneBackup, you can customize the backup location and save backups to your PC, USB drive, external hard drive, or NAS.
4. Which backup method is best for Windows users?
If you want the most flexibility, AOMEI FoneBackup is a strong option because it supports both full and selective backups, faster transfer speeds, encrypted backups, and multiple storage destinations. If you prefer Apple's built-in ecosystem, iTunes and iCloud are also reliable choices, while Dropbox works well for syncing individual files.
Summary
That’s all about how to backup iPhone on Windows 10/11. You can choose from Apple's built-in tools like iTunes and iCloud, or use third-party cloud services such as Dropbox for file synchronization.
For users who want greater flexibility, AOMEI FoneBackup offers a more comprehensive solution. It supports both full and selective backups, encrypted backups, fast transfer speeds, and flexible storage destinations. Don’t hesitate to try it out!

 as a preferred
source on Google
as a preferred
source on Google