




Backup iPhone to QNAP NAS: 3 Practical Ways
This guide compares direct QNAP uploads, AOMEI FoneBackup, and Apple's local backup workflow so you can choose a realistic way to keep iPhone data on NAS storage.

By Jonna Updated on August 12, 2026


Choose the Right iPhone to QNAP Backup Method
QNAP NAS can be a useful local storage target because it gives you more room than a laptop drive and keeps backup files under your own control. The important point is that an iPhone does not always behave like a normal USB drive. Photos can be uploaded through QNAP mobile apps, while broader iPhone backup tasks usually need a computer-based tool or Apple's local backup system.
|
Method |
Best for |
What it can store |
When not to use it |
|
Quick photo and video uploads from iPhone to QNAP |
Camera Roll items and selected files available through the app |
Not ideal when you need a broader iPhone backup workflow or prefer managing backups from Windows |
|
|
Computer-based iPhone backup saved to NAS storage |
Selected iPhone data backup workflow, depending on the feature and data type selected |
Not the direct choice if you only want a simple phone-to-NAS photo upload without using a PC |
|
|
Users who want an Apple local backup and a NAS archive copy |
Apple local backup package stored on the computer, then copied to QNAP |
Less convenient if you want to choose a NAS folder as the backup path directly |
If you want to backup iPhone to QNAP NAS, the right method depends on what you are trying to protect. Use Qfile when your main goal is to upload iPhone photos and videos directly to a QNAP shared folder. Use iPhone data backup and transfer software when you prefer a Windows-based iPhone backup with the output stored on a mapped QNAP drive. Use Apple Devices, Finder, or iTunes when you want an Apple local backup first and then copy that backup folder to QNAP for storage.
Before You Start: Prepare the QNAP Shared Folder
A stable backup starts with the NAS folder, not with the iPhone. Make sure your QNAP device is powered on, connected to the same local network, and has a shared folder prepared for iPhone backup files. If you plan to use a Windows computer, map that shared folder as a network drive first.
Step 1. Install and open Qfinder Pro on the Windows PC, then find your QNAP NAS on the local network.
Step 2. Select the NAS and open Tools > Map Network Drive.
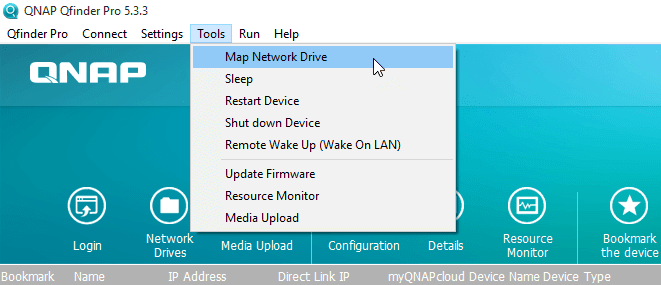
Step 3. Choose the shared folder you want to use for iPhone backups, assign a drive letter, and sign in with your QNAP account.
Step 4. Open File Explorer and confirm that the mapped drive appears and can be opened before starting any iPhone backup task.
If the mapped drive disconnects often, fix that first. A backup that writes to an unstable network location can fail midway or create an incomplete file.
Method 1. Backup iPhone Photos to QNAP with Qfile
Qfile is the more direct route when your main concern is the Camera Roll. It runs on the iPhone and connects to your QNAP NAS, so you can backup iPhone without iTunes or iCloud, and do not need to move photos through a Windows folder first.
Step 1. Install Qfile on the iPhone and sign in with the NAS address, username, and password.
Step 2. Open the target shared folder where you want to store iPhone photos or videos.
Step 3. Tap the More or three-dot menu, then choose Upload.
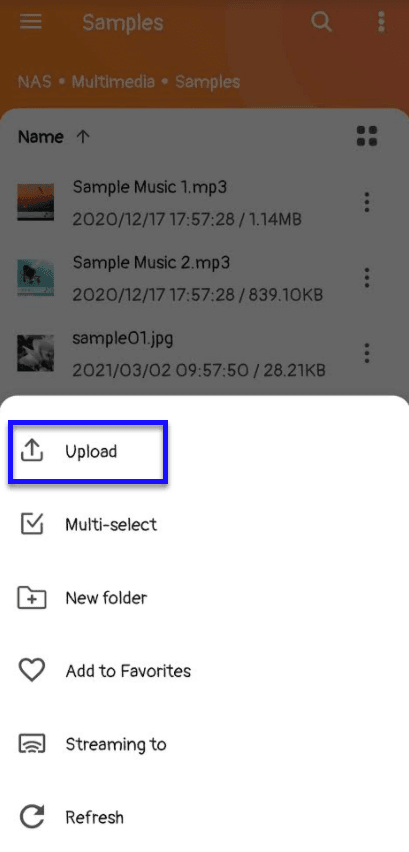
Step 4. Select Camera Roll, Camera, Downloads, or another available source, then choose the items you want to upload.
Step 5. Wait for the upload to finish and open the QNAP folder to confirm the files are visible.
Qfile may also offer auto-upload settings for gallery items. That can be convenient for ongoing photo backup, but check the destination folder and network behavior before relying on it as your only copy.
Method 2. Backup iPhone to a QNAP Network Drive with AOMEI FoneBackup
AOMEI FoneBackup is a free iPhone data backup and transfer software, allowing you to perform seamless data backup and transfer between iPhone and PC. It is useful when you want a Windows-based iPhone backup workflow instead of a pure mobile upload. It is especially relevant if your laptop has limited space and you want the backup destination to be the mapped QNAP drive.
 AOMEI FoneBackup
- Transfer between iPhone & PC: Move media files and personal data to from iPhone to PC/from iPhone to iPhone instantly - no iCloud or Wi-Fi required.
- 1-Click iPhone Backup: Selectively backup photos, videos, contacts, messages, and more or fully backup iPhone to PC, external drive, SSD, USB, or NAS.
- WhatsApp Backup & Transfer: Except for QNAP NAS, it supports iPhone backup to external drives, local PC folders, or USB drives.
- Wide compatibility: Support all iOS versions, including the latest iOS 26 and all models of iPhone, including iPhone 17/16/15, iPad, and iPod.
 100% Secure
Step 1. Connect the iPhone to the Windows PC with a USB cable, trust the computer on the iPhone if prompted, and open AOMEI FoneBackup.
Step 2. On the home screen, choose Phone Backup.
Step 3. Select Selective Backup and click Get Started.
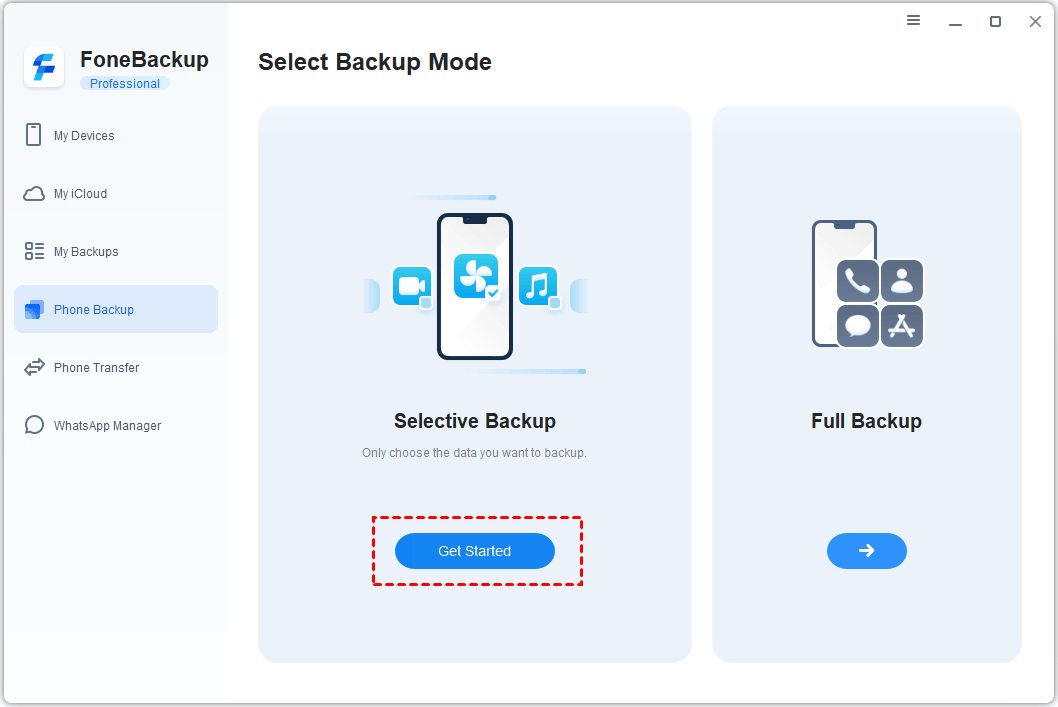
Step 4. Choose the data icons you need, preview the items when available, and click OK to confirm the selection.
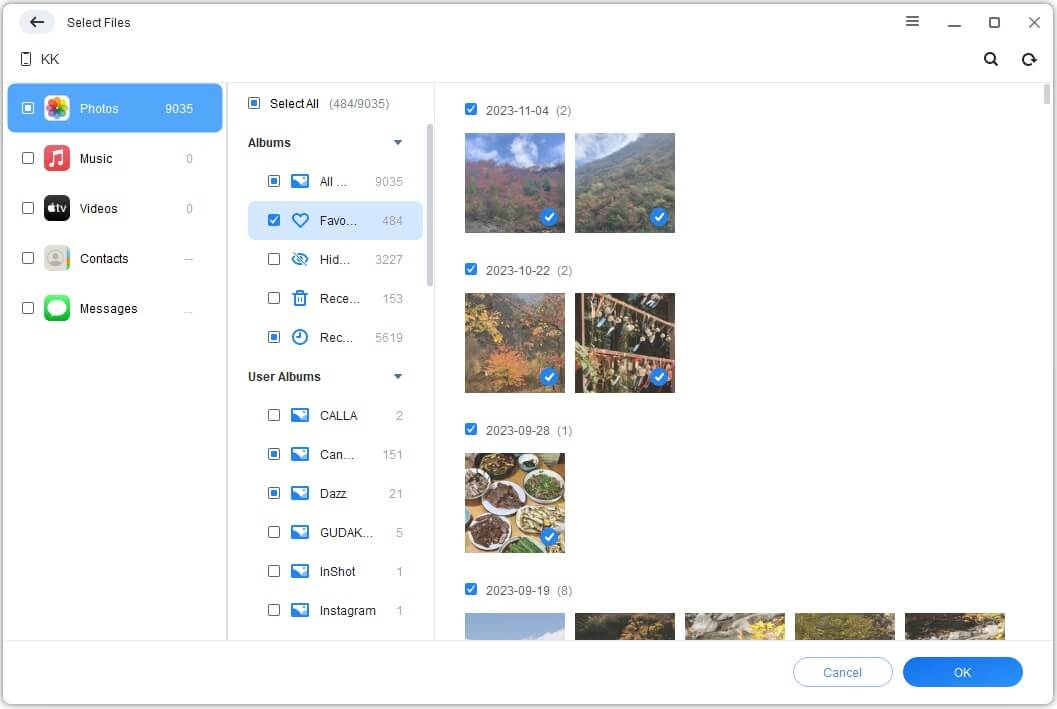
Step 5. Click Backup Storage Path, choose the mapped QNAP network drive, and select the folder prepared for iPhone backups. Click Start Backup and wait until the process finishes.

Tips:
👉 After the backup finishes, use My Backups in AOMEI FoneBackup to manage or check the backup record. If you need a broader backup than selective files, review whether Full Backup fits your current task before starting.
👉 You can also use its WhatsApp Manager to Backup WhatsApp/WhatsApp Business to PC and transfer WhatsApp chats, photos, videos, and stickers between iPhones with one click.
Method 3. Make an Apple Local Backup, Then Copy It to QNAP
Apple's backup tools do not work like a normal file picker that lets you freely select a NAS folder during every backup. The practical workaround is to create a local backup with Apple Devices on Windows, Finder on a newer Mac, or iTunes on older setups, then copy the completed backup folder to your QNAP shared folder for storage.
Choose this method if you want a standard Apple backup package for device restore purposes. It is less convenient than saving directly to a mapped QNAP drive, but it keeps the Apple restore workflow intact.
Step 1. Connect the iPhone to the computer with a USB cable and tap Trust This Computer on the iPhone if prompted.
Step 2. Open Apple Devices on Windows, Finder on macOS Catalina or later, or iTunes if you are using an older Apple backup setup.
Step 3. Select the iPhone, open General in Apple Devices or Finder, or Summary in iTunes.
Step 4. If you need Health, Activity, Wi-Fi passwords, or other sensitive saved data included, enable Encrypt local backup and save the password carefully.
Step 5. Click Back Up Now and wait until the tool shows the latest backup date and time.
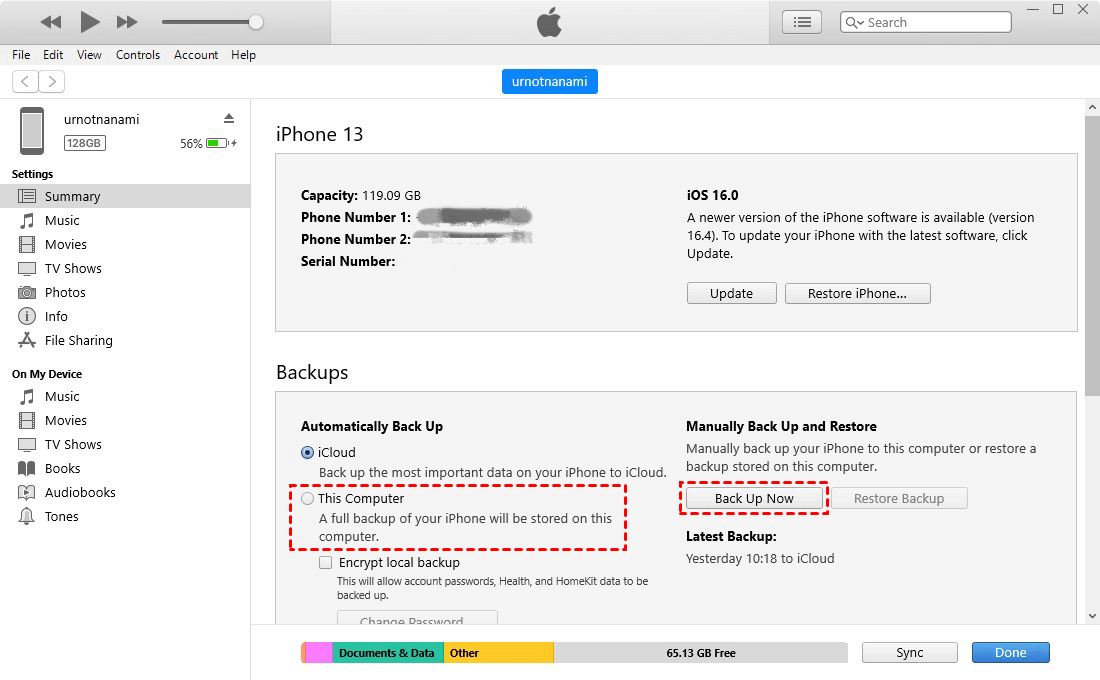
Step 6. Locate the backup folder on the computer. On Windows, open Run, enter %USERPROFILE% for Apple Devices or Microsoft Store iTunes backups, or %AppData% for older iTunes installations, then find the Apple backup location.
Step 7. Copy the completed backup folder to the prepared QNAP shared folder. Keep the original folder structure intact, because changing files inside the backup package may make it unusable for restore.
To restore later, copy the backup folder back to the expected Apple backup location before opening Apple Devices, Finder, or iTunes. Treat the QNAP copy as an archive of the Apple backup package, not as a directly browsable photo or message library.
Common Problems and What to Do Next?
📢 Problem: the QNAP folder does not appear on Windows.
👉 Recommended action: reopen Qfinder Pro and map the shared folder again. If it still fails, check the NAS network connection, user permission, and whether the PC is on the same local network.
📢 Problem: Qfile upload stops or skips items.
👉 Recommended action: keep the iPhone awake, use a stable Wi-Fi connection, and upload a smaller batch first. If it still fails, switch to a computer-based workflow for important files.
📢 Problem: AOMEI FoneBackup cannot save to the NAS path.
👉 Recommended action: Confirm that the mapped drive opens in File Explorer and that the Windows account can write to the folder. If it still fails, save to a local folder first, then copy the backup folder to QNAP after completion.
📢 Problem: Apple Devices, Finder, or iTunes do not show the copied backup for restore.
👉 Recommended action: copy the backup folder back to the official local backup directory and keep the folder name unchanged. If it still fails, create a fresh Apple local backup and archive the new completed folder to QNAP.
FAQ About Backing Up iPhone to QNAP NAS
Can I backup an entire iPhone directly to QNAP NAS?
Not in the same simple way you make an iCloud or Apple local backup. Qfile is better for photo and file upload. For broader backup workflows, use AOMEI FoneBackup with a mapped QNAP path or make an Apple local backup first and copy the finished backup folder to QNAP.
Is Qfile enough for iPhone backup?
It is enough if your goal is mainly to upload photos and videos. It is not the best fit if you want a managed iPhone backup record, selective backup, or a restore path handled from a computer.
Do I need to map the QNAP drive before using AOMEI FoneBackup?
Yes, if you want the backup to be written directly to NAS storage from Windows. Mapping the shared folder lets the backup software treat the NAS folder like a normal destination path.
What should I do if my laptop has limited storage?
Use the NAS as the final storage location. If direct writing to the mapped drive is unstable, create the backup locally only when enough temporary space is available, then move the finished backup folder to QNAP.
Can I restore an iPhone directly from the QNAP copy?
Usually you need the backup folder in the location expected by Apple Devices, Finder, or iTunes. Copy the archived folder from QNAP back to that local backup directory before trying to restore.
Can I delete iPhone photos after uploading them to QNAP?
Only after you confirm the files are visible on QNAP and preferably after keeping another backup copy. Uploading files once is not the same as having a tested backup strategy.
Conclusion
To backup iPhone to QNAP NAS, choose the method by data type and work process. Qfile is the practical choice for direct photo uploads from the iPhone. AOMEI FoneBackup is a better fit when you want a Windows-based backup process and prefer storing the output on a mapped QNAP network drive. Apple Devices, Finder, or iTunes is the right route when you want a standard Apple local backup and only need QNAP as the storage archive. Prepare the shared folder first, run the backup, and verify the result before treating the NAS copy as reliable.

 as a preferred
source on Google
as a preferred
source on Google