




How to Fix: Windows File Recovery There Was an Error Parsing Your Command
This guide explains why Windows File Recovery cannot parse a command, offers an easier recovery alternative, and provides effective solutions.

By Jonna Updated on September 21, 2026


About the There Was an Error Parsing Your Command Error
Windows File Recovery, or WinFR, is Microsoft's command-line app for attempting to recover recently or permanently deleted files from local storage. Its structure is winfr source-drive: destination-drive: [/mode] [/switches]. These words are placeholders, not text to paste literally. Replace them with actual drive letters, a supported mode, and filters.
The "Windows File Recovery: There was an error parsing your command" message means WinFR cannot interpret the command. It is different from a scan that completes but finds nothing. Typical causes are missing drive-letter colons, the same source and destination, incorrect spacing, an unsupported switch, forward slashes in a folder path, an unquoted path containing spaces, or an unreplaced placeholder.
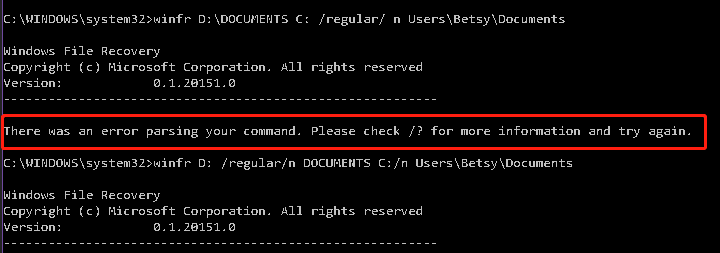
Before retrying, identify the original drive and connect a different recovery destination. Avoid saving new data to the source because deleted-file space can be overwritten.
Simple Alternative Recovery Software When Windows File Recovery Fails
WinFR's strict syntax can be difficult if you rarely use Command Prompt. AOMEI FastRecovery is an alternative when Windows still detects the device, and you prefer to select, scan, filter, preview, and recover files through a visual interface.
 AOMEI FastRecovery
- Provides Quick & Deep Scan to find all recoverable data for complete recovery.
- Recovers 1000+ data formats, including documents, pictures, videos, audio, emails, compressed files, archives, etc.
- Organize and display data by Type or Path, and you can sort, search, filter, and preview files.
- Support data recovery from USB flash drives, SD cards, HDD/SSD, and more.
- Recover files from formatted disks, emptied Recycle Bin, accidental deletion, virus attack, crashed disk/computer, and so forth.
 100% Secure
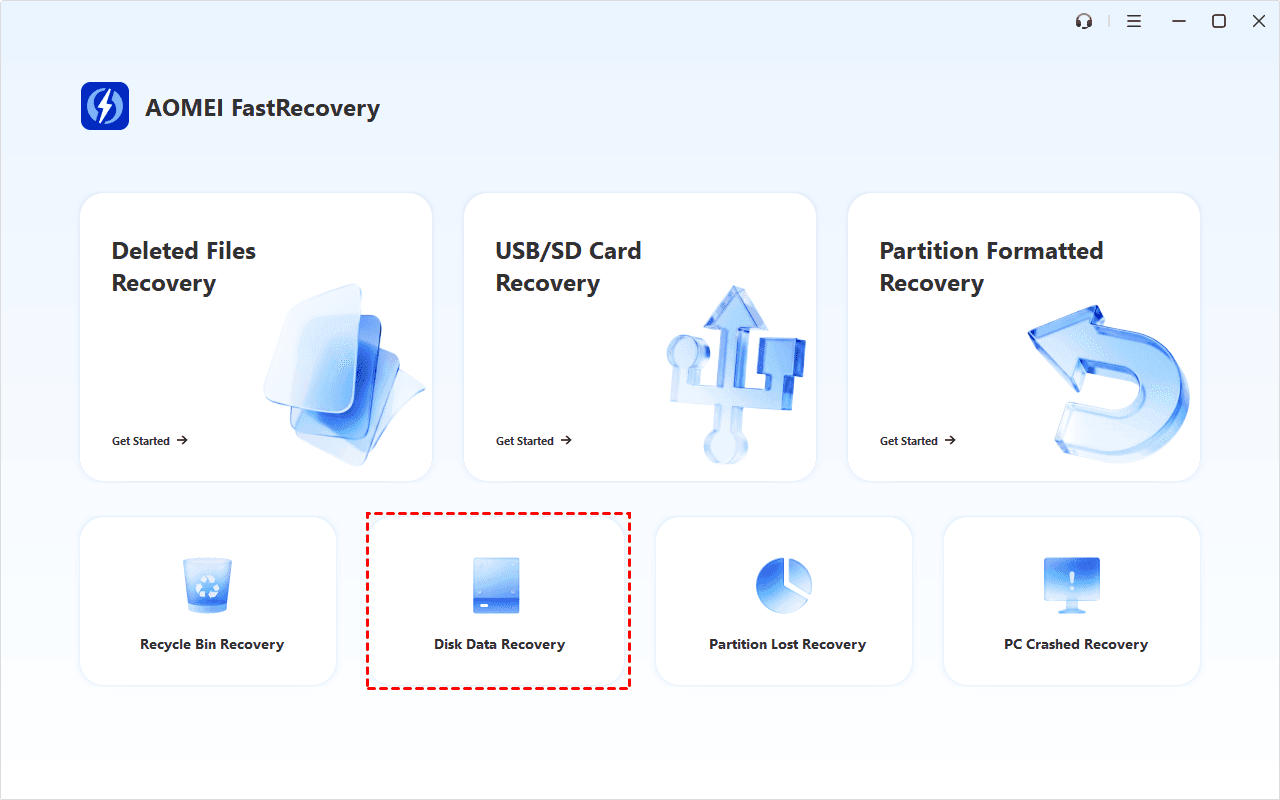
Step 1. Install and open AOMEI FastRecovery on a working drive. Choose Deleted Files Recovery for accidental deletion or the relevant recovery entry for your situation.
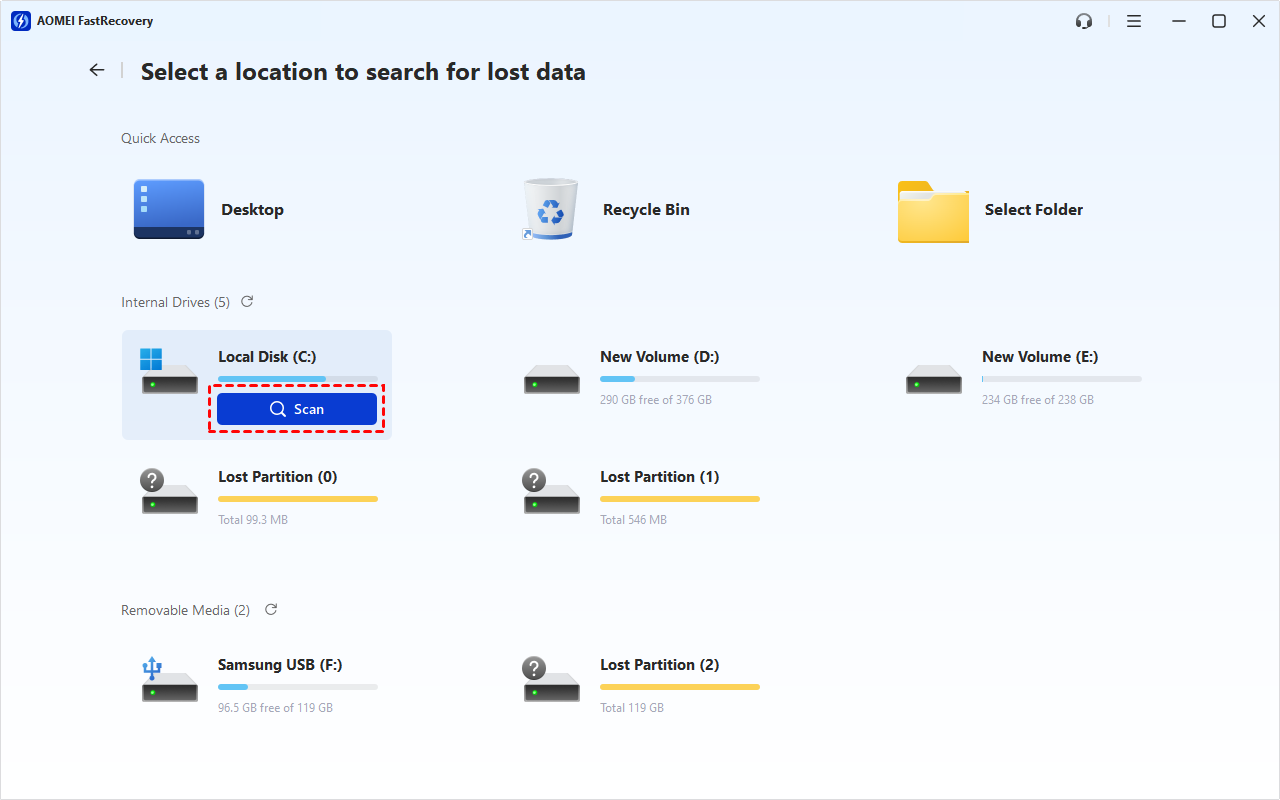
Step 2. Select the original disk or partition where the files were lost, then click Scan. Do not choose the external drive intended to hold recovered results as the scan target.
Step 3. Review results by type or path. Use Filter, search, and preview; if needed, use Deep Scan when offered.
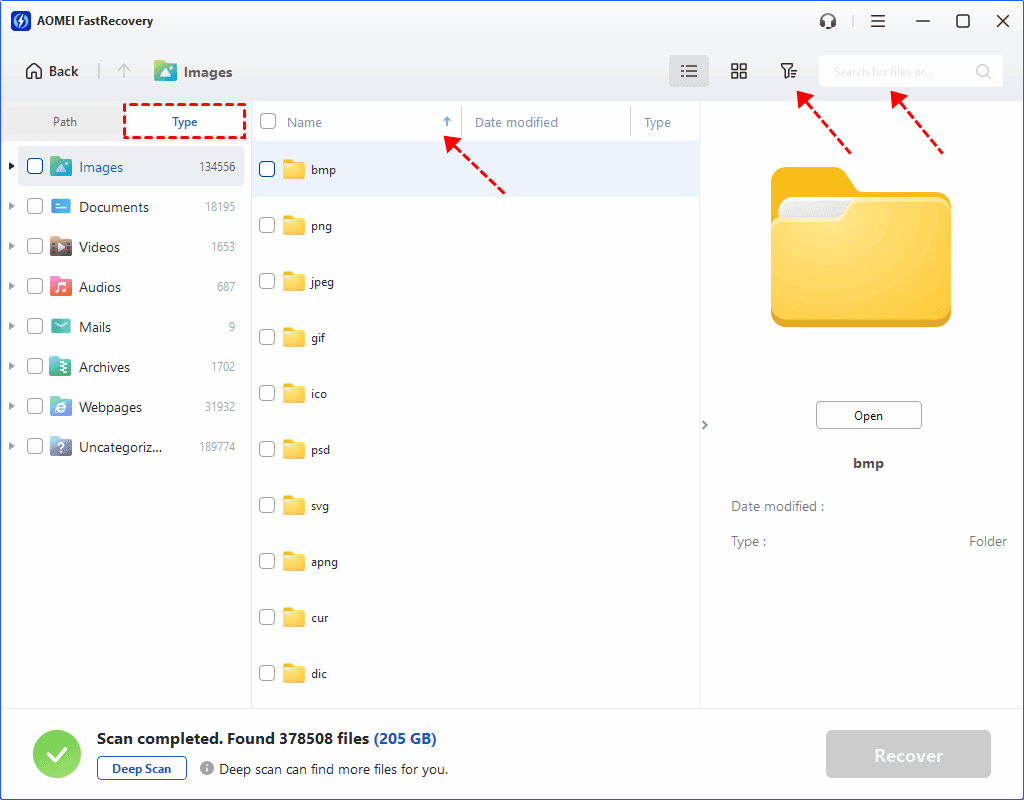
Step 4. Select the files, click Recover, and save them to a different healthy drive. Open a sample before changing the original disk.
How to Fix Windows File Recovery There Was an Error Parsing Your Command
Build the command from left to right and test a simple version first. Use straight quotation marks, not curly quotes copied from a formatted page. The examples use C: as source and E: as destination; replace these values for your computer.
Method 1. Check Source and Destination Drives
WinFR expects a valid source followed by a different destination. Each drive letter needs a colon and a separating space. The two entries cannot refer to the same physical partition, so connect USB or external storage if needed.
Step 1. Open File Explorer and confirm the letter of the drive where the file originally existed.
Step 2. Connect another drive and confirm its letter. Check that it has enough free space for recovered data.
Step 3. Open Windows File Recovery with administrator permission and start with a command such as winfr D: E: /regular /n *.pdf.
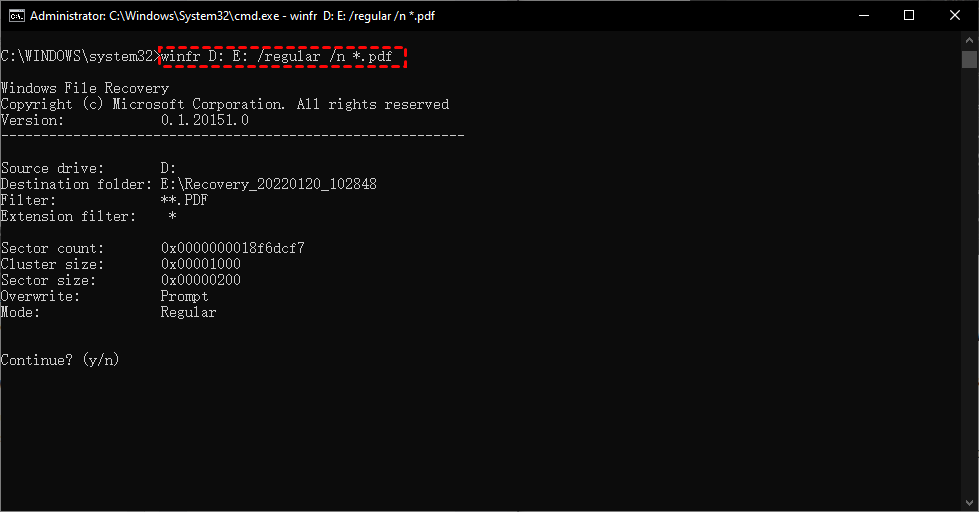
Step 4. Check the colons and spaces. Do not use C:\Recovery as the destination when the source is also C:.
If WinFR reports that the source and destination refer to the same physical partition, syntax alone is not the issue. Select a genuinely different partition or external storage device and retry.
Method 2. Check Recovery Mode or Parameters
Microsoft presents Regular and Extensive as the basic modes. Regular suits recent deletion on healthy NTFS; Extensive covers older deletion, formatting, corruption, and FAT or exFAT. An invalid mode, missing slash, or misplaced switch can trigger the error.
Step 1. Enter winfr /? to display the syntax supported by the installed version. This is especially useful when an older tutorial uses switches that differ from the current examples.
Step 2. Type the mode with a forward slash and no space between the slash and word: /regular or /extensive.
Step 3. Put one space before the next switch. For example, use winfr C: E: /extensive /n *.jpg, not / extensive, /extensive/n, or square brackets around the mode.
Step 4. Remove optional parameters and test a simpler filter. Once the command is accepted, add another /n filter if needed, such as /n *.pdf or /n *.docx.
Square brackets in the generic syntax only show that a mode or switch occupies that position. Do not type [/mode]or [/switches]literally.
Method 3. Check File Path or Filters
The /nfilter identifies what to search for. Use the original location, not the recovery destination. A folder filter begins with a backslash relative to the source drive and ends with a backslash. Put paths containing spaces in straight double quotes.
Step 1. In File Explorer, browse to C:\Users and confirm the actual profile folder name. Replace placeholders with that name.
Step 2. For a Documents folder, use winfr C: E: /regular /n \Users\Alex\Documents\. Replace Alex with the correct profile folder.
Step 3. For a folder with spaces, use winfr C: E: /extensive /n "\Users\Alex\Desktop\LAPTOP 2019\". Keep the path and its trailing backslash inside the quotes.
Step 4. For a file type instead of a folder, use a wildcard such as /n *.xlsx. For two types, add a separate filter for each: /n *.xlsx /n *.csv.
Step 5. Retype quotation marks manually if the command came from Word or a webpage. Curly quotes can look correct but may not be parsed as command delimiters.
Conclusion
Windows File Recovery there was an error parsing your command is usually resolved by rebuilding the WinFR command carefully: use different source and destination drives, select a supported mode, and format each path or filter correctly. If command syntax remains a barrier, AOMEI FastRecovery provides a visual alternative for scanning a detectable drive and recovering selected files to another safe location. Whichever method you choose, minimizing use of the source drive remains the most important first step.

 as a preferred
source on Google
as a preferred
source on Google