




How to Recover Lost Files After Windows 11 Update [5 Ways]
On this page, you will know how to recover lost files after Windows 11 update in different ways. Choose the most suitable method in this post after reading.

By Ivy Updated on May 25, 2026


Worried that upgrading to Windows 11 might delete your files? You're not alone. While the risk of data loss during the update is real, here's the good news: in most cases, your files are safe and even if something goes wrong, recovery is possible.
Keep reading to discover 5 proven solutions to recover lost files after a Windows 11 update, with simple, step‑by‑step instructions you can follow right away.
Method 1. Find lost files using Search
When you think your files are lost, the first thing you should do is search for your files on the computer. If you did not see your files after inputting the filename in the search box, you need to check if your files are hidden.
1. Press the Windows key and E key to open the File Explorer window.
2. Under the View tab, click on the Options button.
3. It will navigate to the Folder Options window. Under the View tab, scroll down to the Advanced settings section and check the “Show hidden files, folders, and drives” option. Then, click Apply and OK.
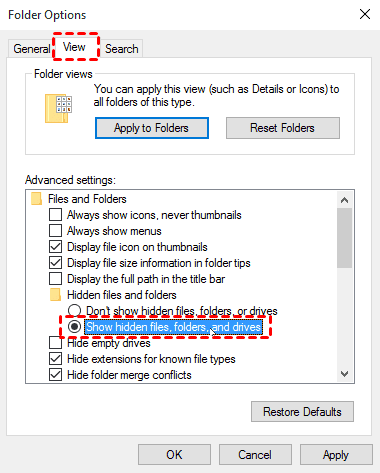
You can then try to search for your lost files again.
Method 2. Recover lost files from Windows backups
If you still cannot find your lost files, it is possible that they were lost after a Windows 11 update. At this time, your files are permanently deleted. Restoring files from Windows backup - Backup and Restore (Windows 7) is one of the best methods to find lost files, especially if you enable this tool before losing data.
1. On your computer, go to Control Panel > System and Security > Backup and Restore (Windows 7).
2. Click on Select another backup to restore files from.
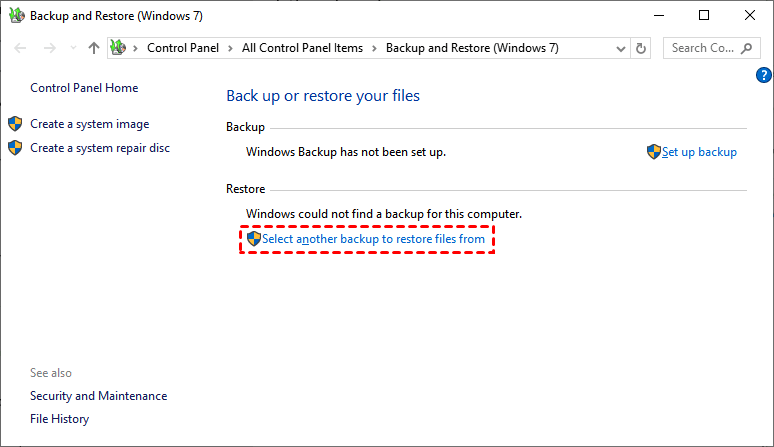
3. Select the backup that includes your lost files. Then, click on the Next button.
4. Here, you can click Browse for files or Browse for folders to find your lost files in the Windows 11 update. And then you can choose a new location to save your lost files.

Method 3. Enable a Windows administrator account
If you have created a new Microsoft account in the previous Windows upgrade, your lost files may exist in a disabled administrator account. To find them, you need to enable a Windows administrator account, then log in to it again to find your lost files.
1. Search for Computer Management, and run it.
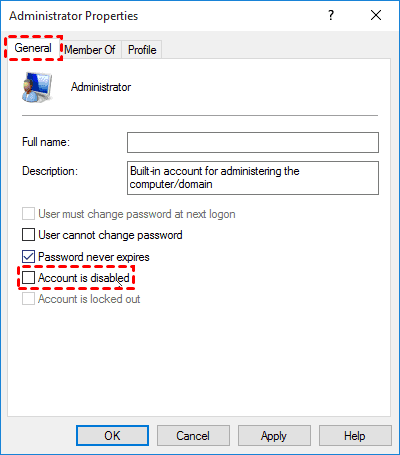
2. Double-click on Local Users and Groups > Users. Locate and right-click the Administrator account, then click Properties in the pop-up window.
3. Press the General tab, and uncheck the Account is a disabled option. Choose Apply and OK.
Method 4. Recover lost files from previous updates
How to recover files after Windows update? Maybe you can roll back to previous Windows updates to find your deleted files on Windows 10. Be sure you enable File History or System Restore.
1. Open the Windows Settings page and go to the Update & Security section.
2. Click on Windows Update on the left side, then tap View update history.
3. Click on the Uninstall updates link.
4. Now, you can select the Windows update that caused your file loss accident to uninstall. Then, reboot your Windows computer to see if your lost files come back.
Method 5. Recover lost files with a data recovery tool
If you want to recover lost files after Windows 11 update quickly and effectively, we highly recommend a professional data recovery tool - AOMEI FastRecovery. It can thoroughly scan your disk to locate files buried deep within the file system and recover them with high success rates and fast speeds.
AOMEI FastRecovery- 🔥 Free data recovery, up to 500 MB.
- Recover 1000+ data types, such as Documents, Photos, Videos, Audio, Archive, and so on.
- Integrates Quick Scan and Deep Scan to find all recoverable data, ensuring a high recovery rate.
- Organize and display data by Type or Path, with options to sort, search, filter, and preview files, making it easier and faster to recover data.
- Create a bootable USB to recover data from unbootable Windows 10, 11, 7, 8, 8.1, and Windows Server.
- Support different storage devices (e.g., HDDs/SSDs, USB drives, SD cards) and NTFS, exFAT, FAT32, and ReFS file systems.
 100% Secure
- Don't download and install FastRecovery on the drive where you store deleted files, as this may cause data to be overwritten.
- Any newly added data or disk formatting can overwrite data. Please avoid these operations after deletion.
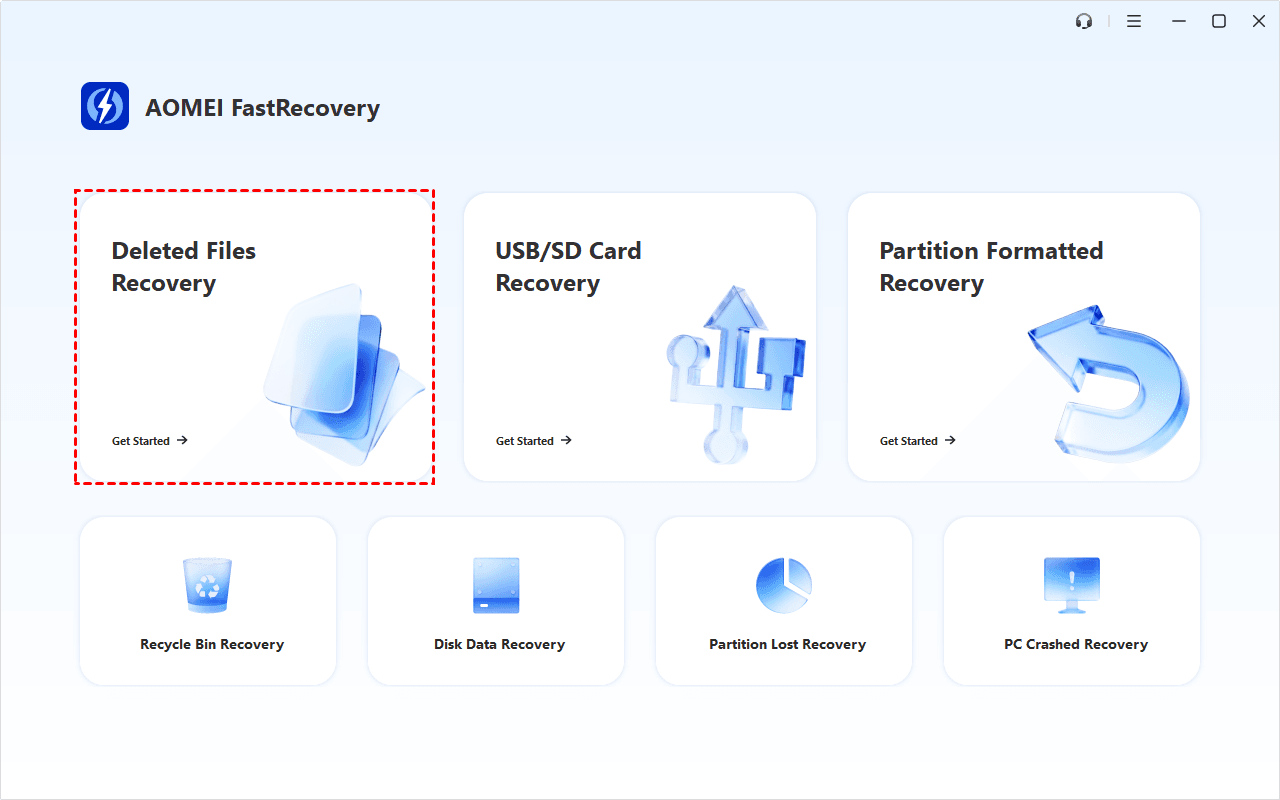
1. Open FastRecovery on your computer after installing. On the main page, click Deleted Files Recovery. You can also choose a more suitable alternative. All of them will not cause any damage.
2. Hover the mouse over the location where your lost files were saved before. Then, click Scan to scan it.
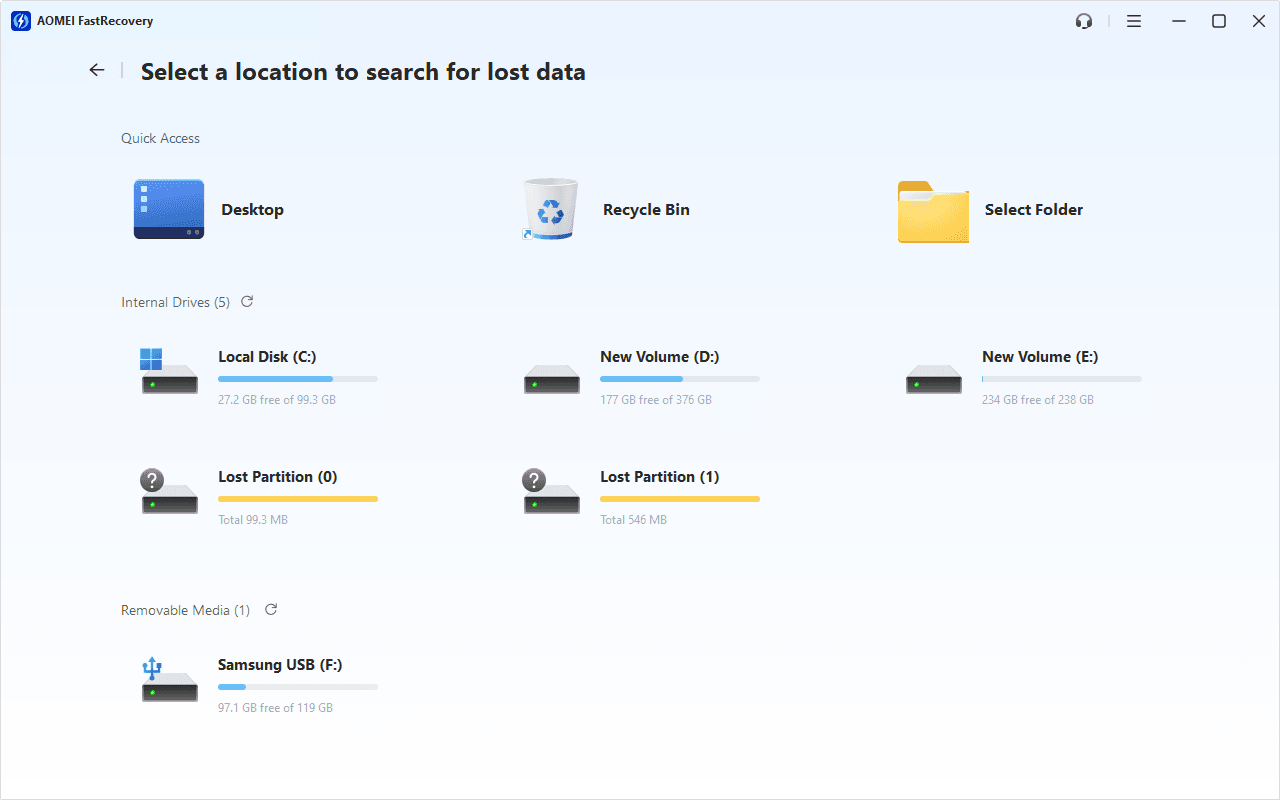
3. It will start Quick Scan automatically to find deleted or lost files. You won't have to wait long. Scan time mainly depends on disk size and health, especially regarding bad sectors or file system corruption.

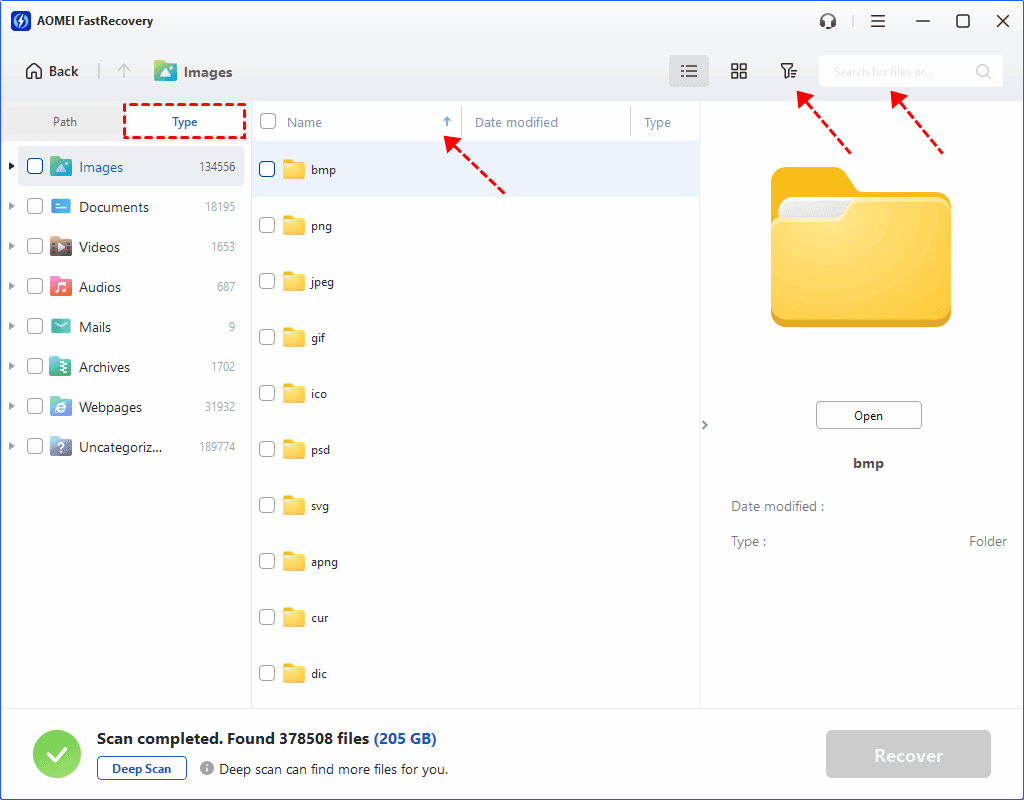
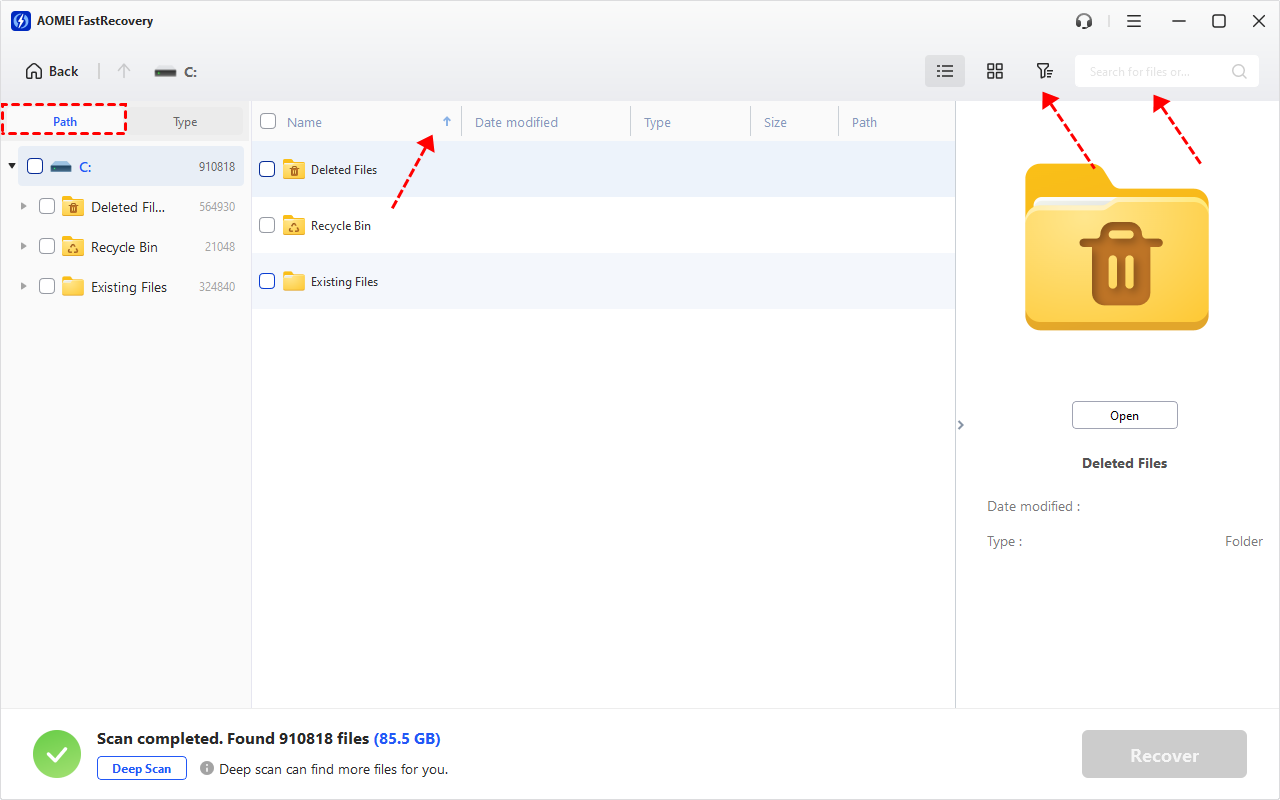
4. Wait for the process to complete. You can select files by Type or Path, with options to sort, search, filter, and preview files.
👉 Under the Type section:
- Specify the data type (e.g., Images, Documents, Videos, etc)and specific formats. Then, click the arrow next to type, size, date modified, etc., to sort files.
- For a specific file or format, directly type the file name or extension in the search box.
- Or use the filter feature, similar to the Type category, allowing you to further specify the size of files, from less than 512 KB to 1GB above.
- Once found, double-click the files to preview.
👉 Under the Path section: Directly navigate to the original location where you saved deleted files. Sort files if needed.
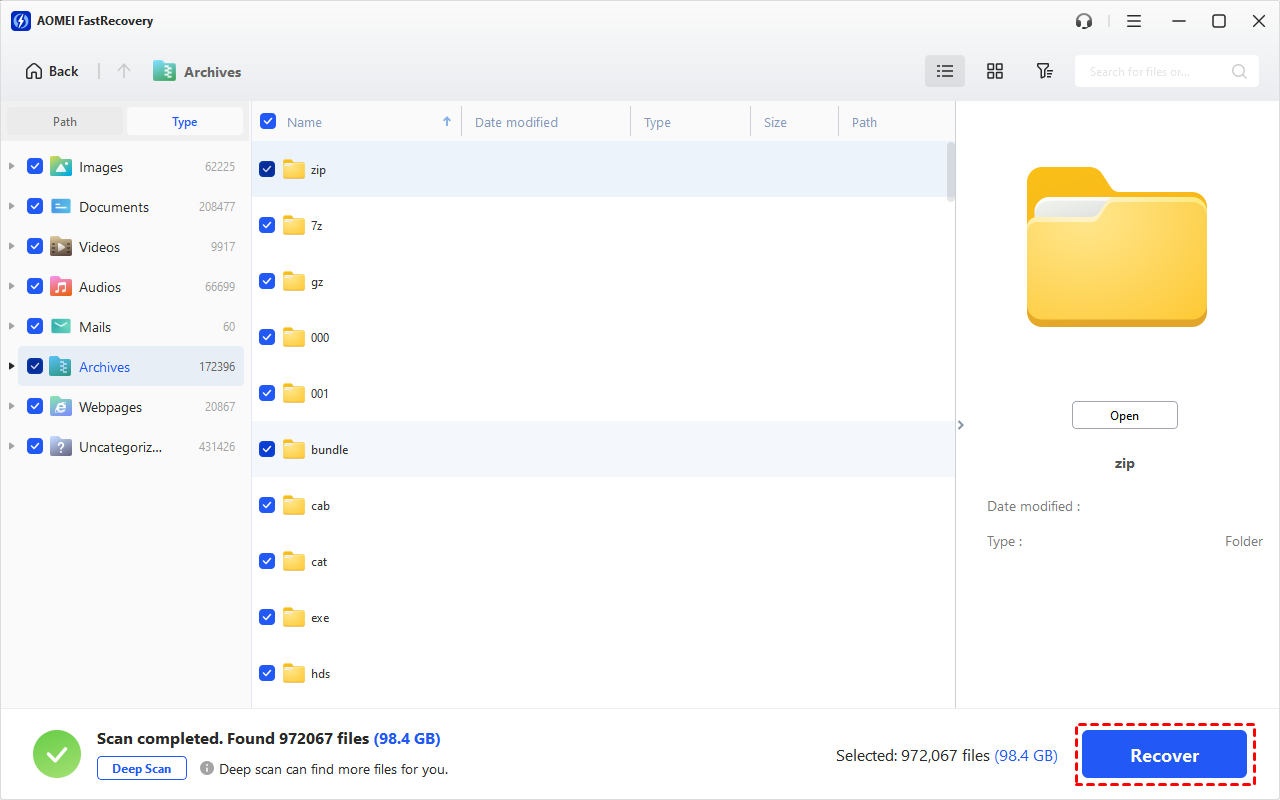
- The Type categories and filter options include all supported data types, such as images, videos, documents, mails, web pages, compressed files, etc.
- Click the Deep Scan to find more data if Quick Scan fails. It will scan every sector of the disk and take longer.
5. Select your lost files and click the Recover button at the bottom to restore your lost files right now.
-
Don't save the recovered files to the original location, as it may cause data overwriting.
-
The free edition only supports 500MB of data recovery. To recover more data, please upgrade FastRecovery to the advanced editions.
To sum up
Now, you know 5 efficient ways to recover lost files after Windows 11 update. The most direct and efficient method is to use the professional data recovery service - AOMEI FastRecovery, which can help you recover deleted files in Windows 11, 10, 8.1, 8, 7, and more with ease.
FAQs
1. Why did all my files disappear in Windows 11?
Some files may be hidden. In the taskbar search box, type File Explorer Options, and then select the View tab. Under Hidden files and folders, select the Show hidden files, folders, and drives option. Then, try searching for the files again.
2. Why did Windows 11 update delete my files?
When you enable Storage Sense, Windows 11/10 will automatically delete unused files when your computer is running low on disk space. Therefore, you can disable Storage Sense to prevent Windows 11 from automatically deleting files.
3. Can lost files be recovered?
Go to the Windows search bar and type "Restore files with File History". Locate the file you want to recover. There may be multiple versions! Click on the file version and click Restore.

 as a preferred
source on Google
as a preferred
source on Google