
How to Fix Error Code 37/1031 Failed to Update BCD File?
This guide provides a straightforward solution for Error Code 37/1031: Failed to update BCD file in Windows PCs. AOMEI Partition Assistant makes it easy to resolve the boot problem when the BCD file is missing or corrupted.
By Irene Updated on June 3, 2026
What is Error Code 37?
Error Code 37 (also known as 1031) appears when a tool, such as AOMEI Partition Assistant, cannot update the Boot Configuration Data (BCD) file on your computer.
The BCD file contains the key instructions Windows needs to start. When you make changes to your system or boot partition, the program must update this file so your computer knows where and how to boot. If the update fails, Error Code 37 shows up. Sometimes, you may even always returning to PreOS mode after reboot. This means Windows may not have the correct boot information, which could affect your system's startup.
Some users want to know why this happens. This error usually occurs because the program cannot access or write to the BCD file. Common reasons include:
-
The BCD file is corrupted.
-
The system partition is damaged or unreachable.
-
The disk has bad sectors.
-
The program lacks permission to update the file.
-
Another application is blocking the write operation.
If your computer still boots normally, you can often ignore the error. If Windows cannot start, you will need to repair the BCD file. You can use a Windows installation disk, a professional boot repair tool to create a WinPE boot disk with AOMEI Partition Assistant and try the operation again.
How to fix Error Code 37/1031: Failed to update BCD file?
Fix 1. Boot into Windows Recovery Environment (WinRE)
Sometimes, the reason bootrec is not recognized is simply because you are not running it in the proper environment. Therefore, follow these steps to boot into WinRE:
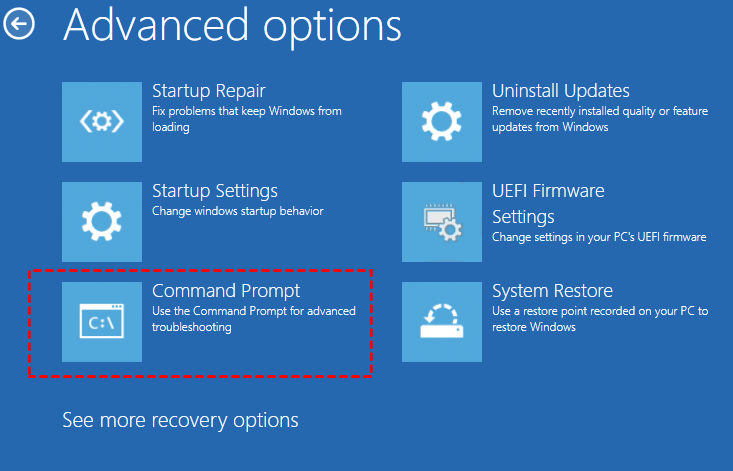
Step 1. Press Shift and click Restart from the Start menu.
Step 2. Choose Troubleshoot, then Advanced options.

Step 3. Select Command Prompt to open a terminal where you can run bootrec.
Step 4. Type the following commands one by one and press Enter after each:
bootrec /fixmbr
bootrec /fixboot
bootrec /scanos
bootrec /rebuildbcd
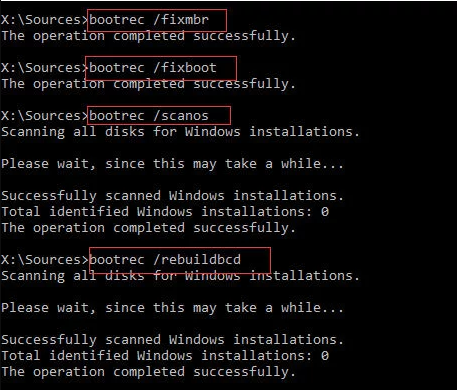
Step 5. Restart your PC after the process completes.
Fix 2. Perform a System Restore
This method attempts to revert your computer's system files and settings to a time when it was working correctly, without affecting your personal files. To perform a System Restore when you can't boot into Windows, you'll need a Windows installation media (a bootable USB or DVD).
Step 1. Boot from Installation Media: Insert your Windows installation USB/DVD and restart your PC. You may need to press a key (like F12, F2, or Del) during startup to enter the boot menu and select the installation media.
Step 2. Access Repair Options: On the initial Windows Setup screen, choose your language and click "Next." Then, instead of "Install now," click on "Repair your computer" in the bottom-left corner.
Step 3. Navigate to System Restore: You'll be taken to the Advanced Startup Options menu. Go to Troubleshoot > Advanced options > System Restore.
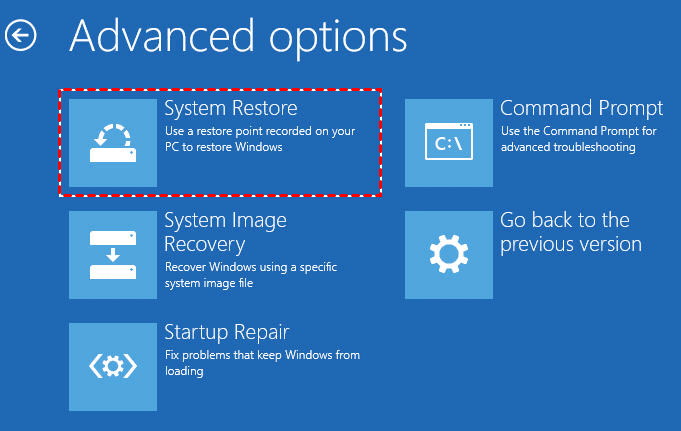
Step 4. Choose a Restore Point: The System Restore wizard will open. Select a restore point dated before you started experiencing the problem and follow the on-screen instructions to begin the process. Once complete, your PC will restart.

Fix 3. Run a professional boot repair tool
If the bootrec /rebuildbcd command is too difficult or does not work, and System Restore also fails or you do not have a restore point, the problem is likely in the core boot files. In this case, using a professional boot repair tool is a practical solution. AOMEI Partition Assistant provides a Boot Repair feature that can automatically detect and fix issues like missing or damaged BCD files. It offers a clear, easy-to-use interface with no command-line steps, so beginners can follow it without trouble. You can also create a bootable USB drive with just a few clicks and repair your system quickly. Overall, it is a faster, safer, and more effective option when manual methods do not solve the problem.
A safe and reliable disk partition management tool that helps you migrate OS to SSD or HDD, reorganize disk space, and improve overall PC performance.
Case 1: Repair an running PC
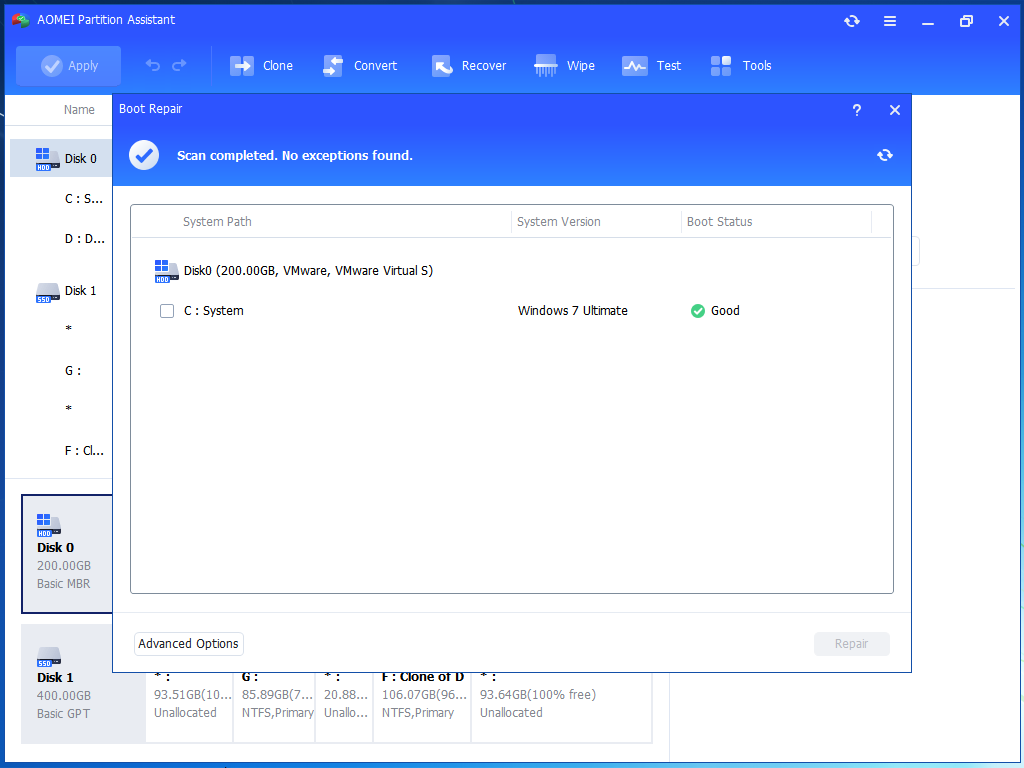
Step 1. Install and launch AOMEI Partition Assistant. In the Main Tab, please click the "Recover" tab and select "Boot Repair".
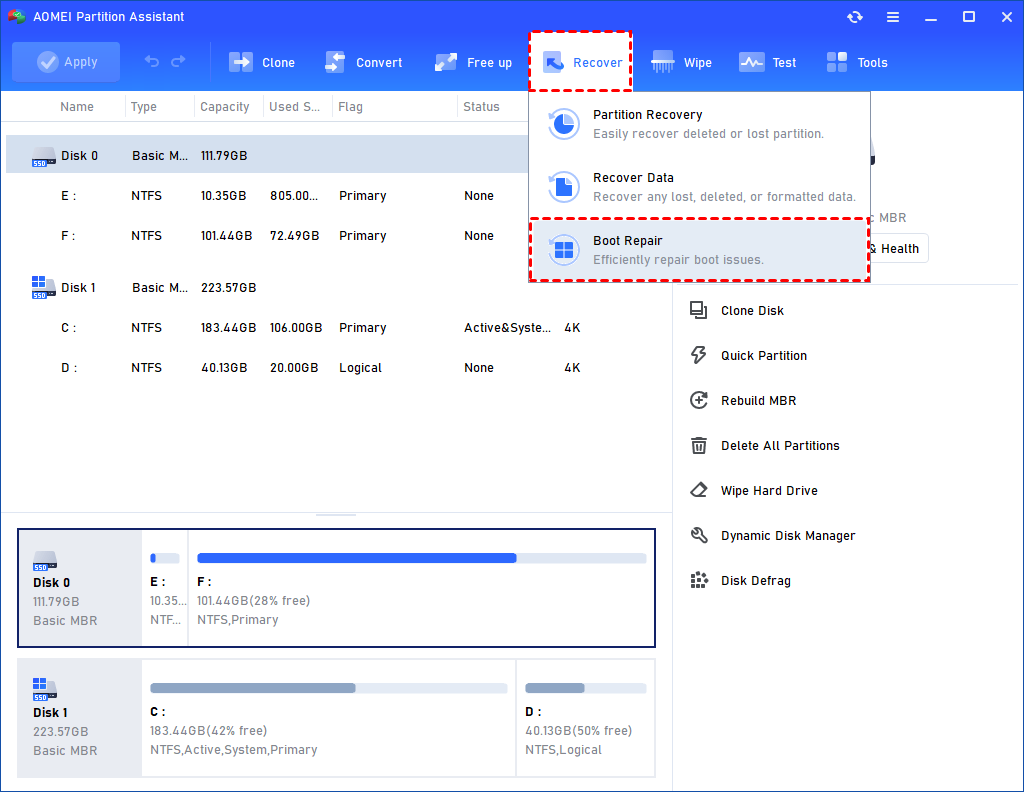
Step 2. The Boot Repair tool will pop up. Please click "Next" to start the system’s boot entries scan process. After the process is completed, it will display the scan result: system paths, system versions, and boot status. And, all repairable boot entries will be available to select.
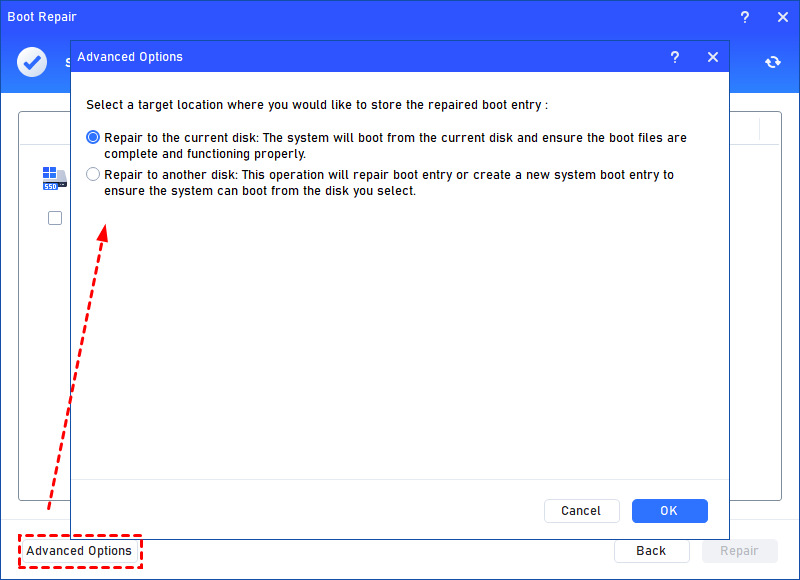
Advanced Settings: Select a location to store the repaired boot entry.
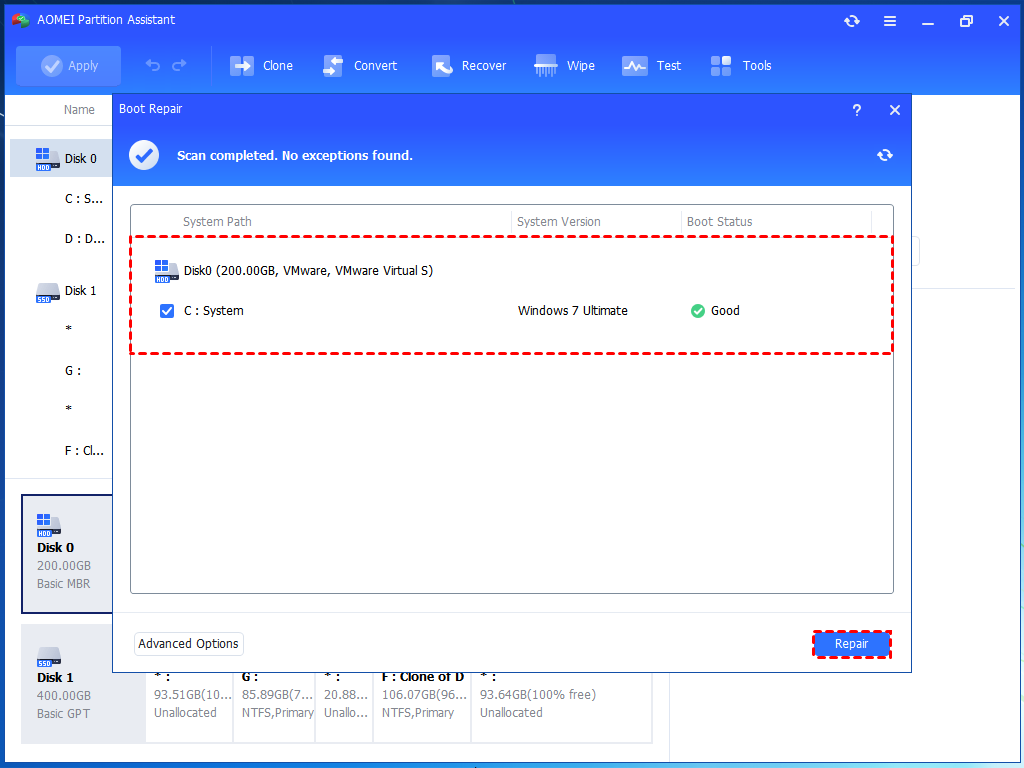
Step 3. Select one/multiple repairable boot entries you want to repair and click the "Repair" button to start the boot repair.
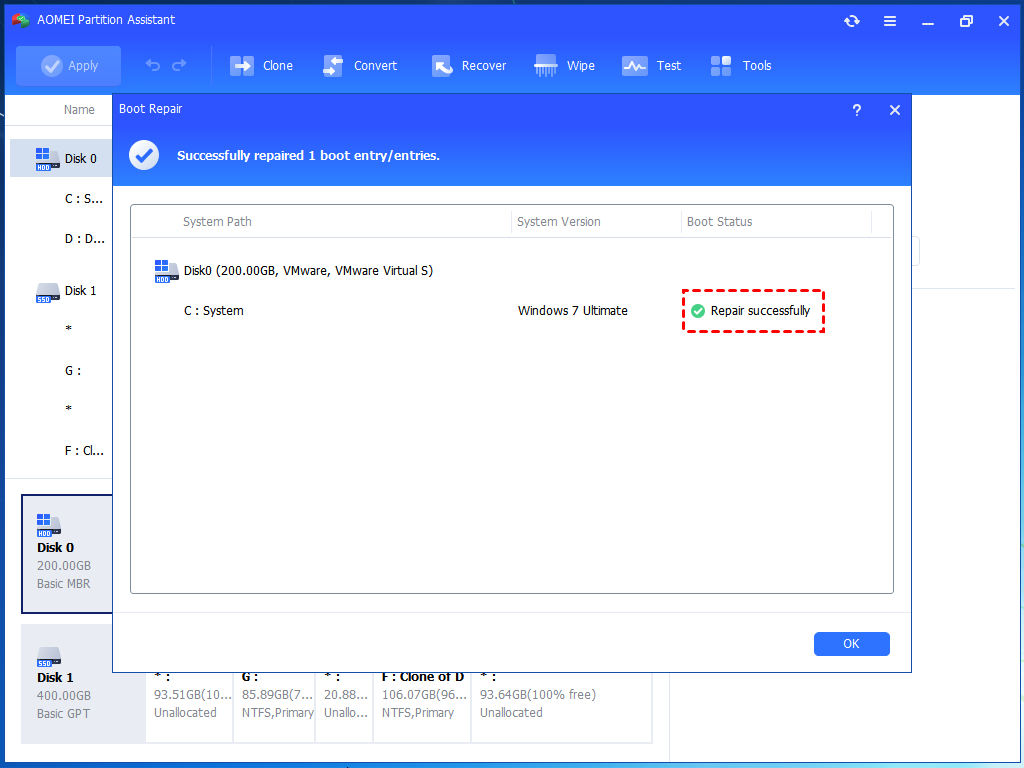
Step 4. Wait for the repair process to finish. Once it is finished, you can check the repair result. If it succeeds, you will get a "Repair Successfully" result.
Case 2: Repair Boot for PC that is unable to Boot
Step 1. Install and launch AOMEI Partition Assistant on a working PC, click "Recover"-"Boot Repair" and then click the "create a bootable disk" option to create a WinPE "Boot Repair" disk.
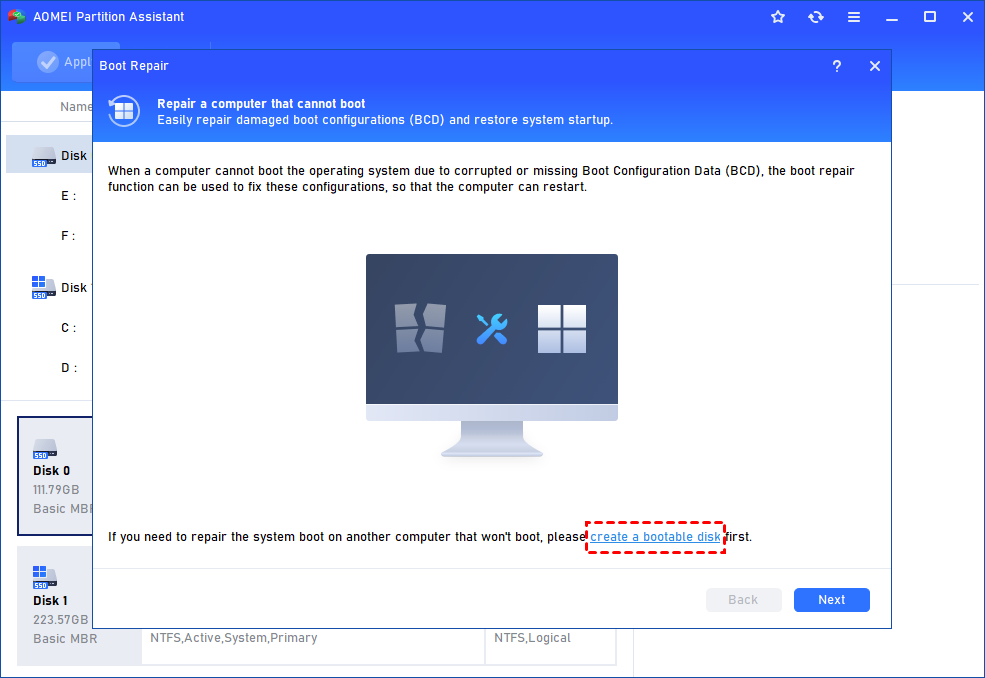
Step 2. Plug the bootable disk you created into the target computer you wish to repair the boot issue.
Step 3. Enter BIOS in your computer, choose the bootable disk as the boot drive to access AOMEI Partition Assistant.
Step 4. The PC that cannot boot into WinPE will automatically load the Boot Repair tool and start the boot entries scan process. All boot entries will be displayed. Then you can follow the same operations as the above steps shows.
Conclusion
Error Code 37 happens when a program fails to update your BCD file, which is vital for starting Windows. This issue often results from a corrupted file, disk damage, or simple permission problems. If your PC boots normally, you can often ignore the warning. If you cannot start Windows, the BCD file requires immediate repair. You have several reliable repair methods available.
You can use the bootrec commands in the Windows Recovery Environment, perform a System Restore using installation media, or utilize an automatic tool like AOMEI Partition Assistant Boot Repair feature. Taking these steps will help you quickly fix the BCD file and get your computer running smoothly again. If there is still any problem, please feel free to contact our AOMEI Support Team.
A safe and reliable disk partition management tool that helps you migrate OS to SSD or HDD, reorganize disk space, and improve overall PC performance.