




Top 4 Best File Recovery Software to Recover Deleted/Lost Files
Important files lost or deleted by accident can be frustrating. Click this guide to compare the top 4 file recovery software options and choose the right recovery tool for you.

By Jonna Updated on September 23, 2026


Losing important files can happen in seconds. You may accidentally delete a document, empty the Recycle Bin, format a drive, or suddenly find that files have disappeared from an external hard drive or USB flash drive. In these situations, reliable file recovery software can help scan the storage device and retrieve recoverable data.
However, not every recovery program works in the same way. Some provide a graphical interface designed for beginners, while others rely on command-line tools or signature-based scanning. The supported operating systems, file systems, recovery methods, and free recovery limits can also vary considerably.
-
Stop saving new files to the drive where data was lost. Deleted data may remain recoverable until its storage space is overwritten. Microsoft and PhotoRec both recommend minimizing further use of the affected storage device.
Hot 4 Best File Recovery Software to Recover Files
Quick Comparison of the 4 File Recovery Software
|
Software |
Ease of Use |
Supported Platforms |
Interface |
Best for |
Free availability |
|
AOMEI FastRecovery |
⭐⭐⭐⭐⭐ Very easy |
Windows 11/10/8/7 & Server |
Graphical |
Beginners and Windows users |
500MB for free and paid tiers |
|
Windows File Recovery |
⭐⭐ Advanced |
Windows 10/11 |
Command line |
Users comfortable with commands |
Free |
|
Recuva |
⭐⭐⭐⭐ Easy |
Windows |
Wizard and advanced GUI |
Simple deletion and removable media |
Free and Pro tiers |
|
PhotoRec |
⭐⭐ Moderate to difficult |
Windows, macOS, Linux, and more |
Text menu; QPhotoRec may be included |
Advanced recovery and severely damaged file systems |
Free, open source |
#1. AOMEI FastRecovery
AOMEI FastRecovery is a Windows-based file recovery software designed to recover deleted, lost, or formatted files from computers and external storage devices.
It supports common data-loss situations such as accidental deletion, emptied Recycle Bin, formatted drives, RAW partitions, system crashes, and some cases involving virus or malware attacks. It can also work with HDDs, SSDs, USB drives, SD cards, and other supported storage devices. For users who do not want to work with command-line syntax, FastRecovery uses a graphical interface and a 3-step recovery process: select the recovery location, scan for lost files, then preview and recover the desired files.
 AOMEI FastRecovery
- Quick Scan and Deep Scan: Offers 2 different scanning approaches to find all recoverable deleted and lost files.
- File preview: Lets you check recoverable files before recovery.
- File filtering: Files can be narrowed down by type, date, and size.
- Multiple storage devices: Supports data recovery from USB drives, HDDs, SSDs, SD cards, and more.
- Multiple file types: Can recover documents, photos, videos, audio, archives, and other file types.
- Windows compatibility: Works on Windows 11, 10, 8/8.1, 7, and various Windows Server versions.
- 💡Up to 500MB free data recovery.
 100% Secure
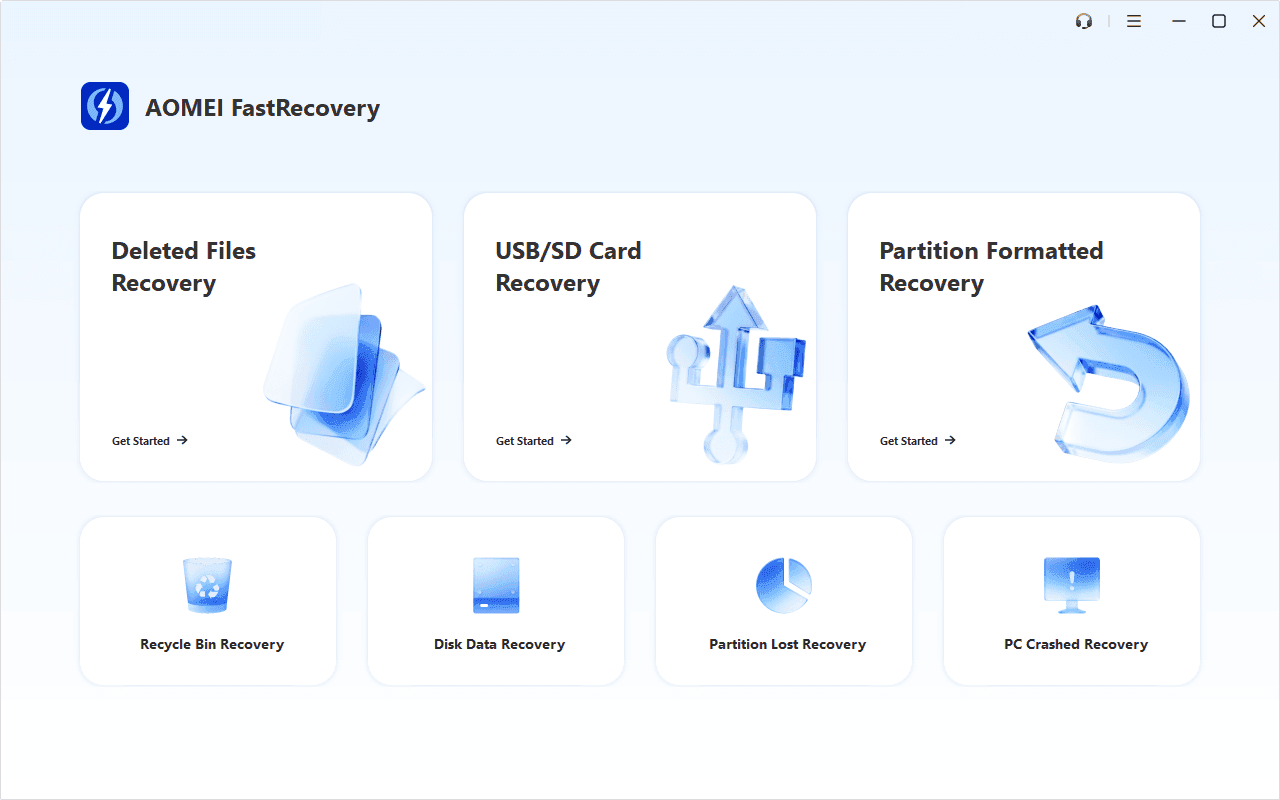
Step 1. Run FastRecovery on your PC. Then, select Deleted Files Recovery or a more suitable recovery situation, such as Recycle Bin Recovery, Disk Data Recovery, etc. All of them can help you restore lost data without causing any damage.
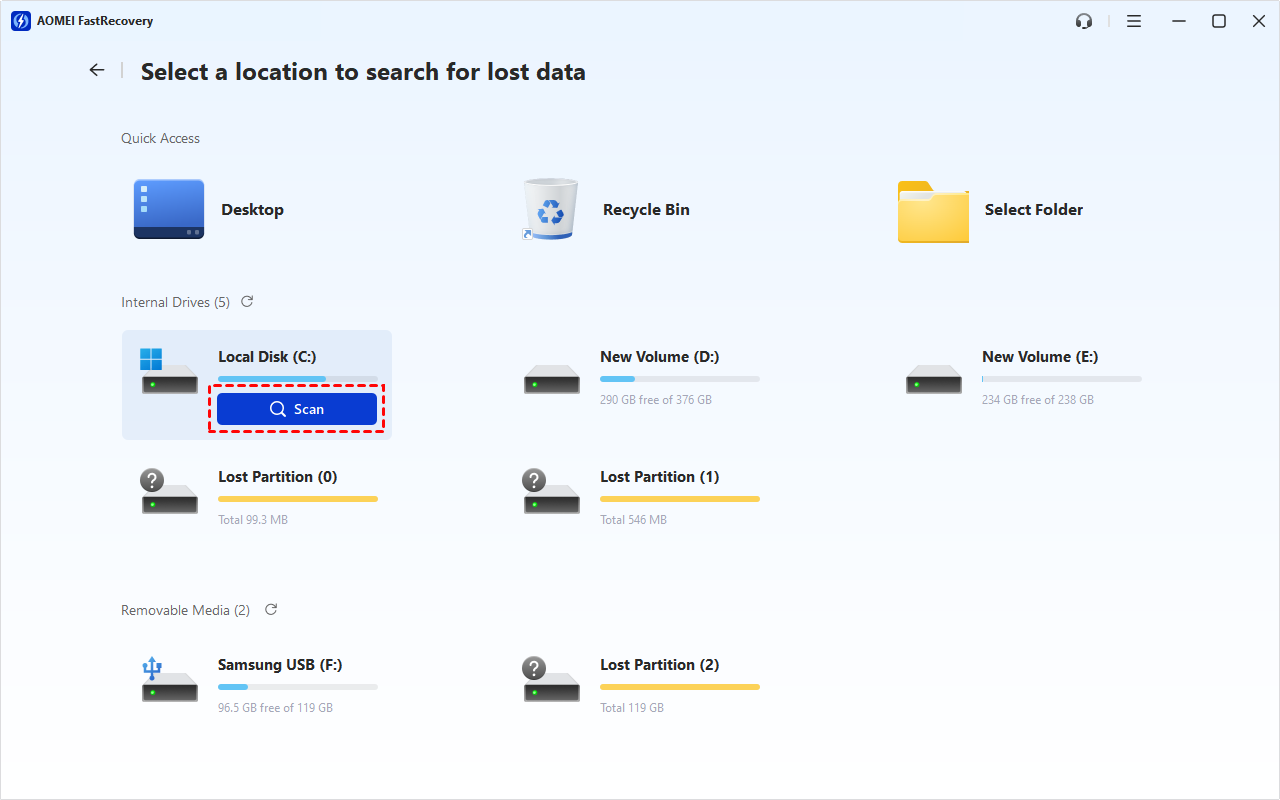
Step 2. All available drives will be listed then, locate the drive where your lost files are located, and hit Scan.
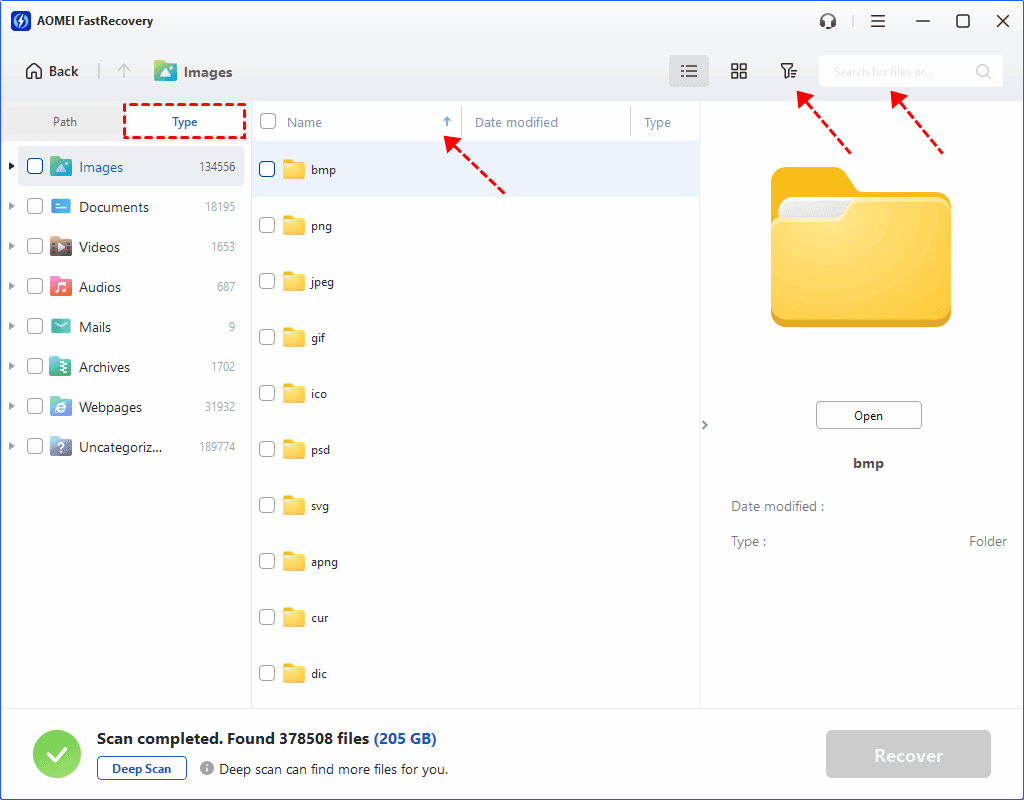
Step 3. It will run Quick Scan to detect all recoverable files automatically. Then, can select files by Type (default) or Path, and integrate it with options to search, sort, filter, and preview files.
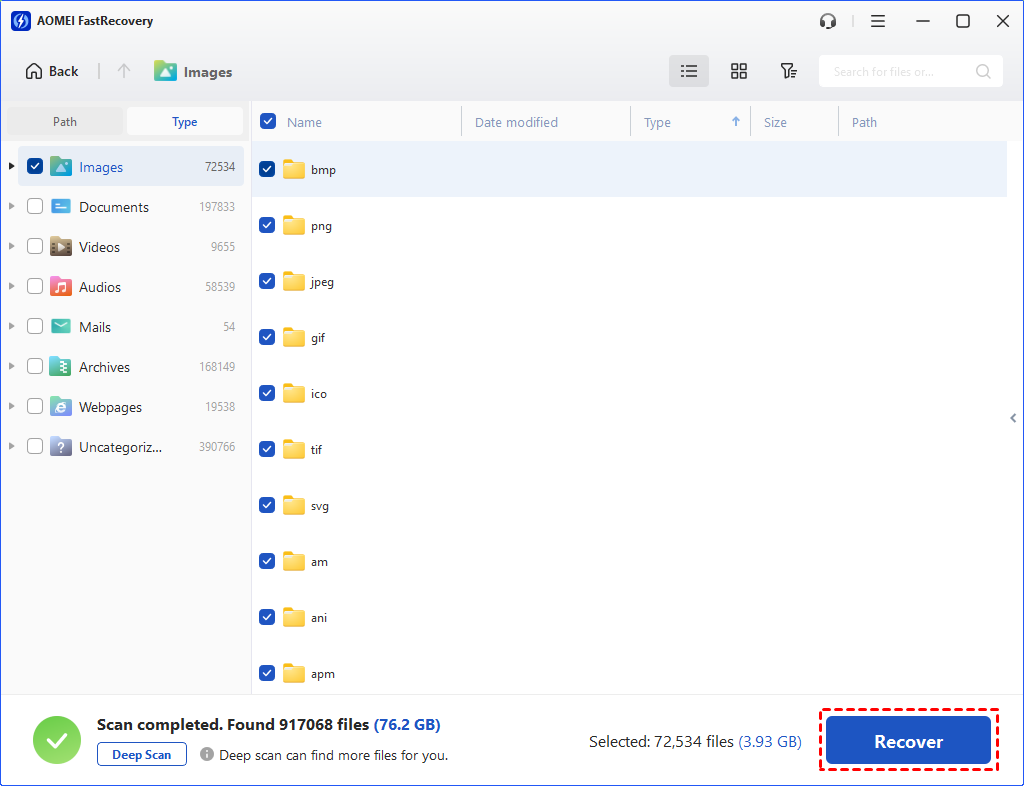
Step 4. Select the target files and click Recover to retrieve data. It is advised to save the recovered files to a new location to avoid overwriting your original data.
#2. Windows File Recovery
Windows File Recovery is Microsoft's official command-line file recovery utility. It is available for Windows 10 and Windows 11 and is intended to recover files that cannot be restored from the Recycle Bin. It can work with local internal drives, external drives, and USB devices, but it does not support recovery from cloud storage or network file shares. Unlike graphical recovery applications, Windows File Recovery requires commands such as: winfr source-drive: destination-drive: /mode /n.
This makes it less approachable for beginners, but the command structure provides considerable control over what you want to search for. Microsoft recommends Regular mode for recently deleted files on healthy NTFS drives, while Extensive mode is intended for situations such as older deletions, formatted drives, corrupted disks, and FAT/exFAT recovery.
Step 1. Open the Microsoft Store and install Windows File Recovery. Determine the drive containing your lost files and prepare a different drive to store the recovered data. For example: source: C:, and destination: E:.
Step 2. Search for Windows File Recovery from the Start menu and launch it with the required permissions. Then enter a recovery command.
For example, to recover PDF files from an NTFS drive:
- winfr C: E: /regular /n *.pdf
For a more extensive search:
- winfr C: E: /extensive /n *.pdf
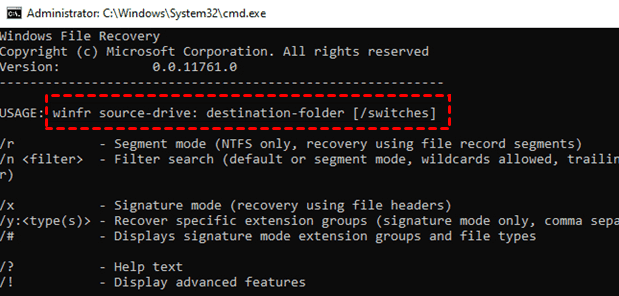
Step 3. When prompted, type Y to begin the recovery operation. Recovered files are placed in a recovery folder automatically created on the destination drive.
#3. Recuva
Recuva is a Windows file recovery tool from CCleaner. It is designed to recover deleted pictures, music, documents, videos, emails, and other file types from Windows computers and removable storage.
Recuva can recover data from rewriteable media such as memory cards, external hard drives, and USB drives, so it is simple for SDHC card recovery. It also provides a Deep Scan mode for finding traces of deleted files and supports recovery from damaged or newly formatted drives. Recuva offers both a free edition and a Professional edition. The current system requirements list Windows 10, 8.1, 7, Vista, and XP, including 32-bit and 64-bit versions.
Step 1. Download Recuva and install it on your Windows computer. As with other recovery programs, avoid installing it onto the drive from which you are trying to recover deleted files.
Step 2. Launch Recuva's recovery wizard. Choose the type of file you want to recover, such as:
- Pictures
- Music
- Documents
- Videos
- Emails
- All Files
Step 3. Tell Recuva where the files were located. You can select a specific location, removable media, Recycle Bin, or another supported storage location.
Step 4. Run the normal scan first. If the desired files cannot be found, enable Deep Scan and scan again. Recuva describes Deep Scan as a method for finding traces of deleted files that are harder to locate.
Step 5. Review the scan results and select the files you want. Click Recover and choose a different storage location for the recovered data.
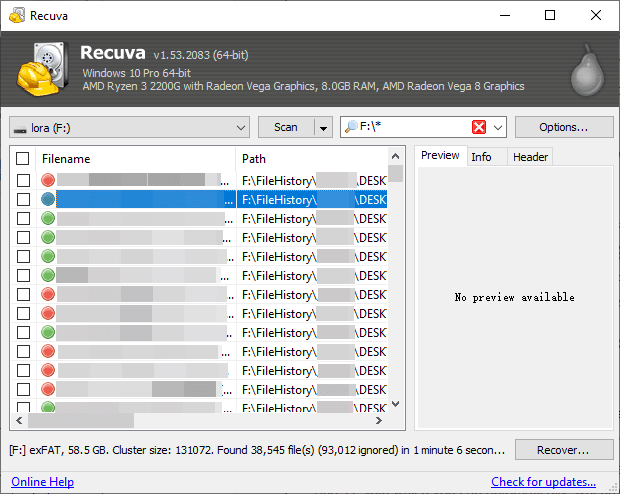
#4. PhotoRec
PhotoRec takes a different approach from traditional file recovery applications. It is an open-source, multi-platform recovery utility that uses file signatures to identify recoverable data instead of relying primarily on the file system. This makes PhotoRec particularly useful when a file system has been severely damaged or reformatted. It can recover documents, videos, archives, photos, and many other file types from hard drives, SSDs, memory cards, USB drives, and other media.
PhotoRec is free and distributed under the GNU General Public License. It supports Windows, macOS, Linux, and several other operating systems. The major trade-off is usability: PhotoRec does not normally preserve the original filenames or folder structure because it reconstructs files from their underlying data signatures.
Step 1. Download the TestDisk & PhotoRec package from the official CGSecurity website. Extract the downloaded archive rather than running the program directly from a compressed archive.
Step 2. On Windows, run the PhotoRec executable with appropriate permissions. Select the source disk by choosing the physical drive containing the lost files and press Enter. And choose the partition containing the lost data.
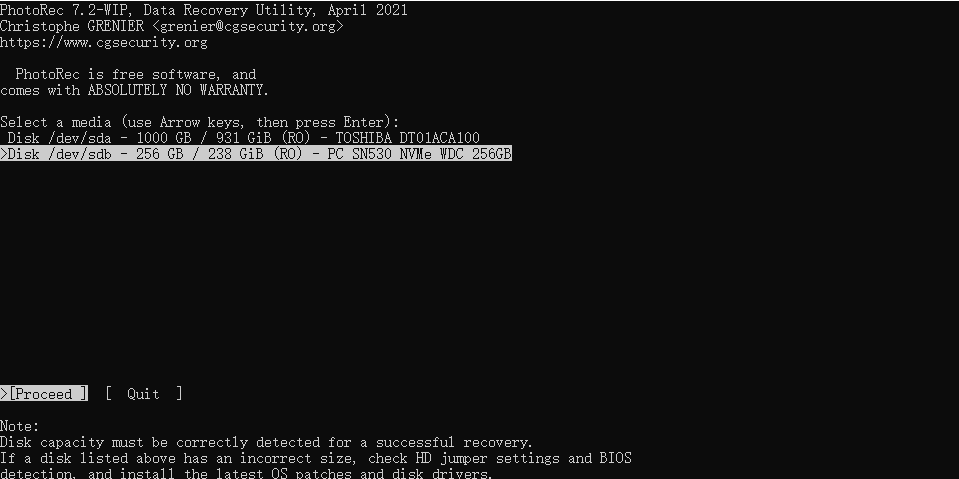
Step 3. Open File Opt and select the file types you want PhotoRec to search for.
Step 4. Select a different drive or storage location for the recovered files.
Step 5. Start the scan and allow PhotoRec to search the storage device.
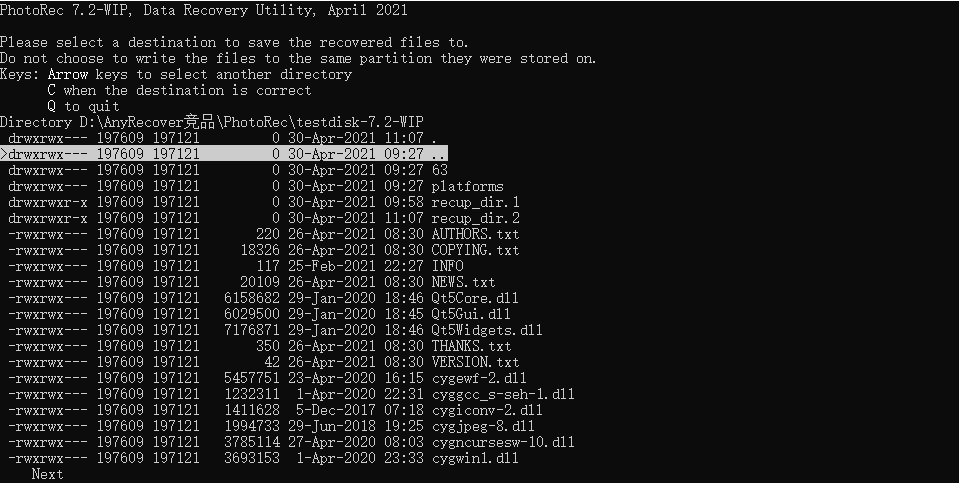
Recovered files are normally placed in folders such as recup_dir.1, recup_dir.2, and so on. Because PhotoRec generally cannot restore the original folder structure and filenames, you may need to organize the results afterward.
Verdict
Choosing file recovery software should start with the type of data loss rather than simply choosing the tool with the most features.
- AOMEI FastRecovery focuses on an easy graphical recovery process for Windows and covers common scenarios such as deleted, formatted, RAW, and inaccessible data.
- Windows File Recovery is a completely free Microsoft option, but its command-line interface requires users to understand recovery modes, source and destination drives, and command parameters.
- Recuva provides a straightforward Windows recovery experience with normal and Deep Scan options and a free edition for home users.
- PhotoRec is particularly different: its signature-based approach can be useful when the file system itself is badly damaged, but recovered files generally lose their original filenames and directory structure.
Whichever file recovery software you choose, the most important rule is the same: stop writing new data to the affected storage device and save recovered files to another drive. This reduces the risk of overwriting data that may still be recoverable.

 as a preferred
source on Google
as a preferred
source on Google