Clone SATA to NVMe Won't Boot | 6 Ways
This guide focuses on resolving cloned SATA to NVMe won’t boot. Read through it to get 6 effective solutions and an error-free way to clone SATA to NVMe on Windows 10/11 easily.
By Jonna Updated on June 20, 2025
Compared to SATA SSD or HDD, NVMe drives use the PCIe interface, which provides higher bandwidth and faster data transfer rates compared to SATA's Serial ATA Express bus. So, many users choose to clone to NVMe SSD for faster loading times and improved overall system responsiveness. However, cloning SATA to NVMe won't boot is a headache. This problem can be occured after Clonezilla SATA to NVMe cloning or Macrium Reflect cloning SATA to NVMe.
But don't worry. This guide walks you through why cloned NVMe won't boot and 6 quick solutions to get your system up and running.
Why Cloned NVMe Won't Boot?
When cloned SATA to NVMe won't boot, it's typically due to differences in drive settings and boot configuration. SATA and NVMe drives are not just physically different - they often rely on different BIOS settings, drivers, and boot methods (MBR vs. GPT, Legacy vs. UEFI). Without correcting those differences, the system can’t find or initialize the operating system on the new drive. Common reasons include:
🔧Improper installation of the NVMe SSD
🔧Incorrect boot order: BIOS still tries to boot from the old SATA drive.
🔧BIOS/UEFI mode mismatch: The cloned OS was installed in Legacy mode but the NVMe needs UEFI.
🔧Missing or damaged boot configuration: Windows Boot Manager isn't pointing to the NVMe drive.
🔧System partition issues: The system partition isn't active or has been skipped.
Error-Free Way to Clone SATA to NVMe SSD
If you're about to begin the cloning process or need to reclone SATA to NVMe due to boot failure, it is recommended to use a reliable, feature-rich tool. AOMEI Cloner is a reliable and efficient disk clone software that handles SATA-to-NVMe cloning without running into boot errors.

- Disk Clone - Allow to clone system disks from GPT to MBR or MBR to GPT without conversion.
- Intelligent Clone - Copy only used space to clone large disk to smaller disk.
- SSD Alignment - Offer 4K partition alignment to improve the target SSD's performance during cloning.
- Wide compatibility - Support various disk types, including SATA, IDE, PCIe, M.2, NVMe SSDs, etc.
Also, it offers System Clone to move only Windows OS to another drive and Partition Clone to migrate specific partitions from one drive to another. Free download the AOMEI Cloner software and learn how to clone SATA to NVMe on Windows 10/11 below:
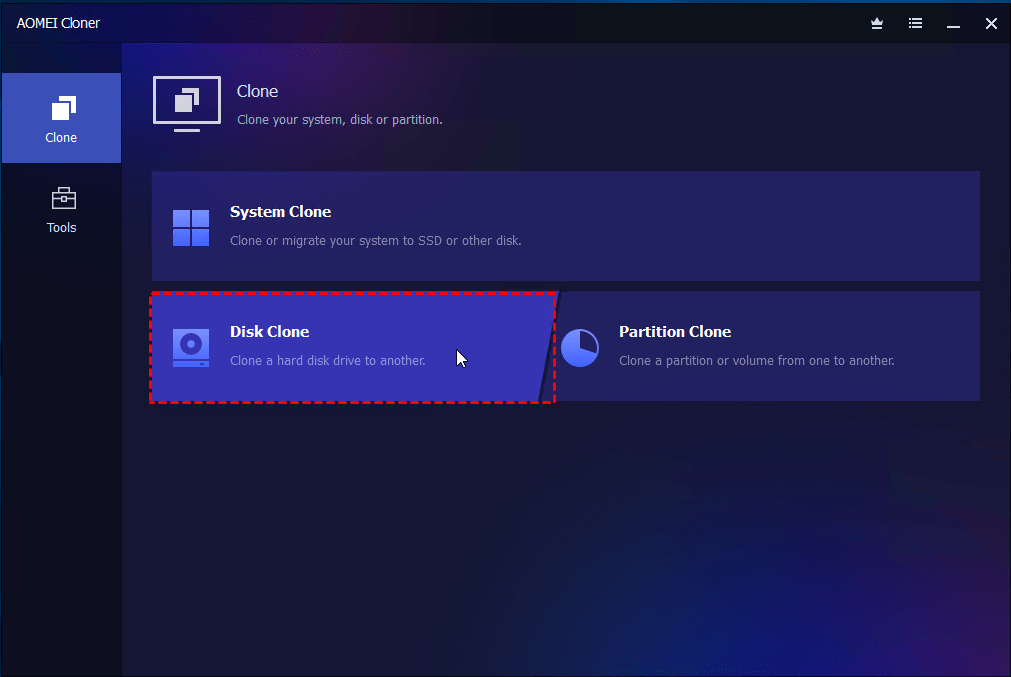
Step 1. Connect the NVMe SSD to computer and make sure it can be detected. Run AOMEI Cloner, click Clone > Disk Clone.
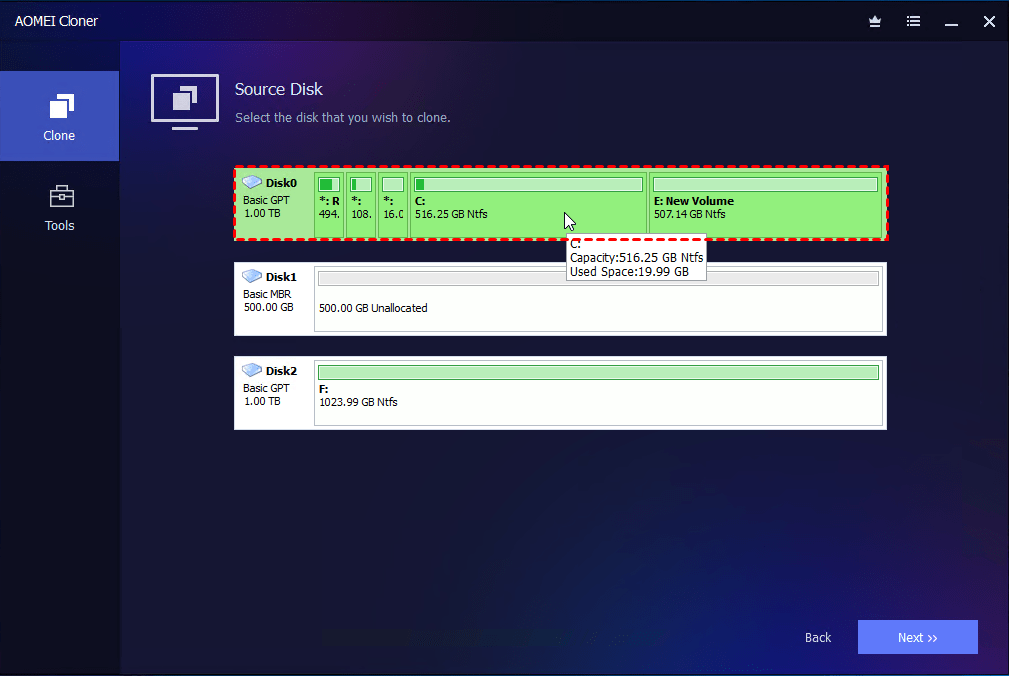
Step 2. Select the SATA drive as the source disk.
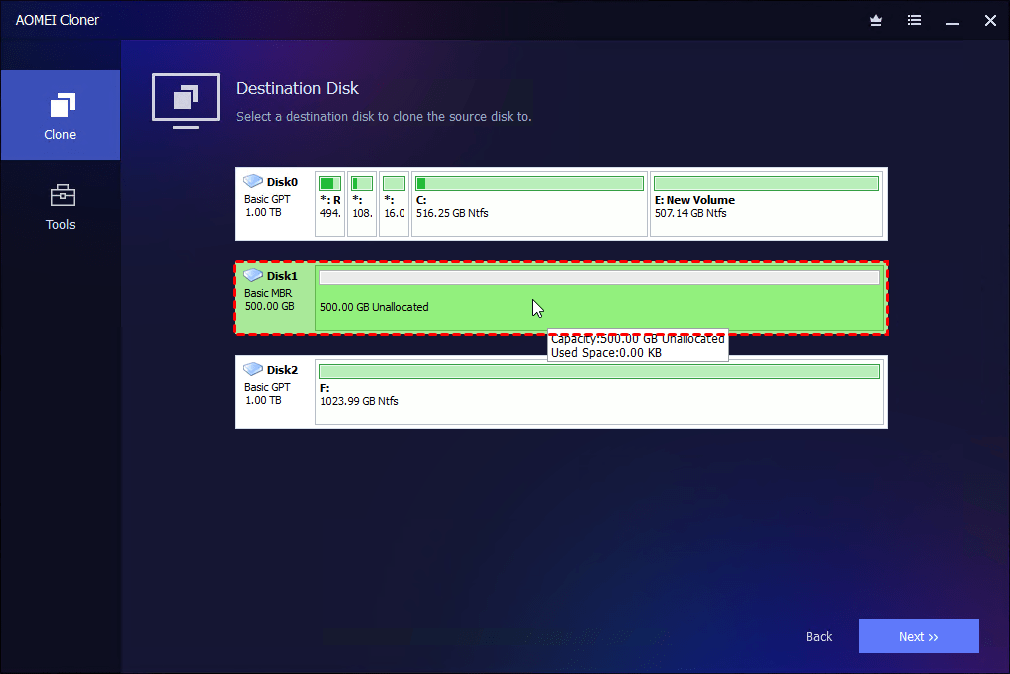
Step 3. Select the NVMe SSD as the destination disk.
Step 4. Check the box next to SSD Alignment to optimize SSD performance and click Start Clone.
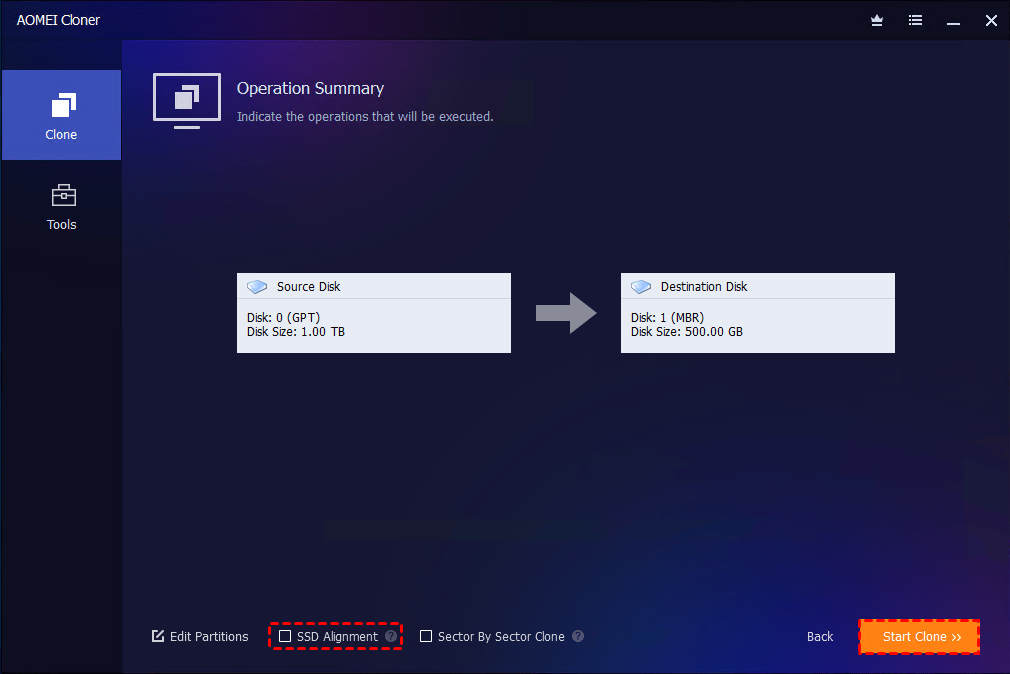
- If you are cloning to a larger NVMe drive, please click Edit Partitions and use Add unused space to all partitions or Manually adjust partition size to fully use the storage space on the target SSD.
- Sector By Sector Clone is used to clone all the sectors, including the blank and logically bad sectors, on the source drive. It requires that the target NVMe SSD is larger than the SATA drive.
Clone SATA to NVMe Won't Boot - 6 Quick Fixes
Here is how to fix NVMe not booting Windows after cloning using practical, proven methods.
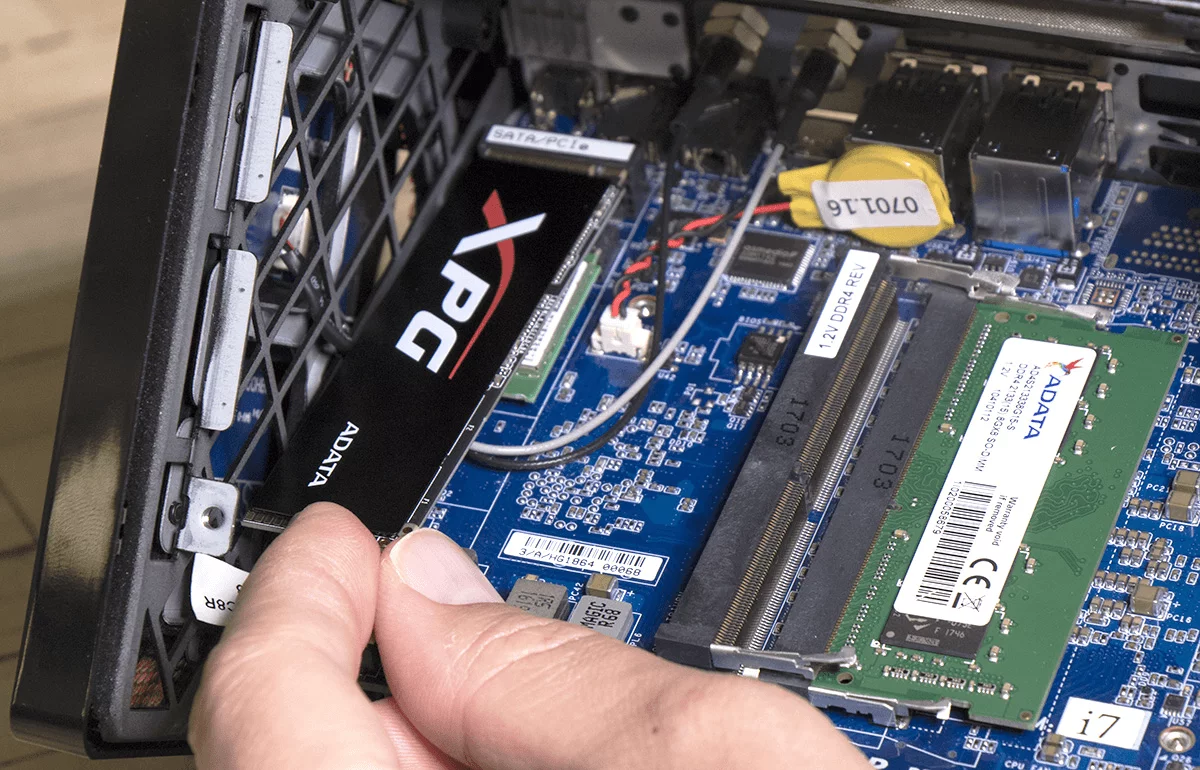
Solution 1. Install NVMe SSD Correctly
Make sure that the NVMe SSD is seated properly in the M.2 slot. NVMe drives can sometimes be improperly installed due to their horizontal screw-in style. And a loose connection will result in NVMe not showing up or BIOS not detecting the drive, hence no boot as well.
Solution 2. Set NVMe as Boot Drive
If you keep both the original SATA disk and the new NVMe SSD on computer, the system may not boot from the cloned NVMe SSD. In such a case, you can change the boot disk in BIOS to boot from the NVMe disk.
Step 1. Power on and tap F2, Del, or Esc during the boot to enter BIOS.
Step 2. Navigate to the Boot Menu.
Step 3. Look for your NVMe drive under Boot Options.
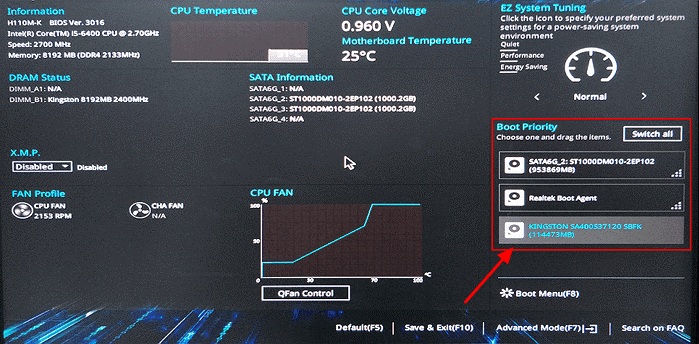
Step 4. Move it to the top using keyboard shortcuts to change boot drive from SATA to NVMe.
Step 5. Save changes and exit.
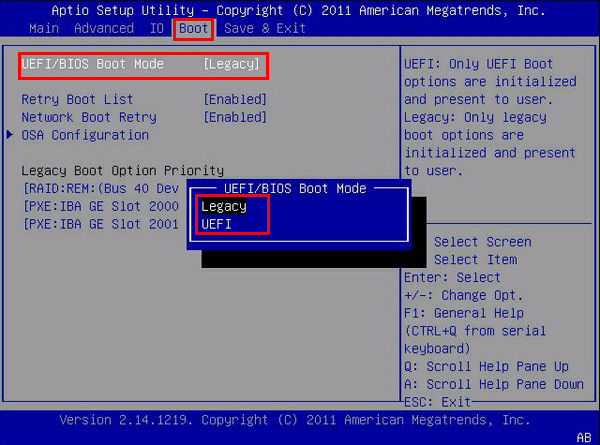
Solution 3. Check Boot Mode
Conflicts in boot mode when cloning GPT to MBR or cloning MBR to GPT can cause the cloned drive to fail to boot up. You may need to change the boot mode according to the partition style: use UEFI for GPT and Legacy for MBR.
You can check the partition style of your disk in Disk Management > right-click the disk and select Properties > go to the Volumes tab to look for the partition style.
Step 1. Reboot and go into BIOS again.
Step 2. Under Boot settings, select either Legacy or UEFI as the boot mode, depending on your chosen partition style. Then, save the change and restart your PC.
Solution 4. Set System Partition as Active Partition
If your NVMe’s system partition isn’t set as active, the PC won't know where to boot fromand may cause NVMe detected but not bootable problem.
Step 1. Boot your computer using the old SATA disk and connect the NVMe SSD externally.
Step 2. Press Win + R keys to access the Run box, then type diskpart in the Run box and hit Enter.
Step 3. In the Command Prompt window, type the following commands:
- list disk
- select disk X (replace X with your NVMe)
- list partition
- select partition Y (replace Y with the OS partition)
- active
- Exit
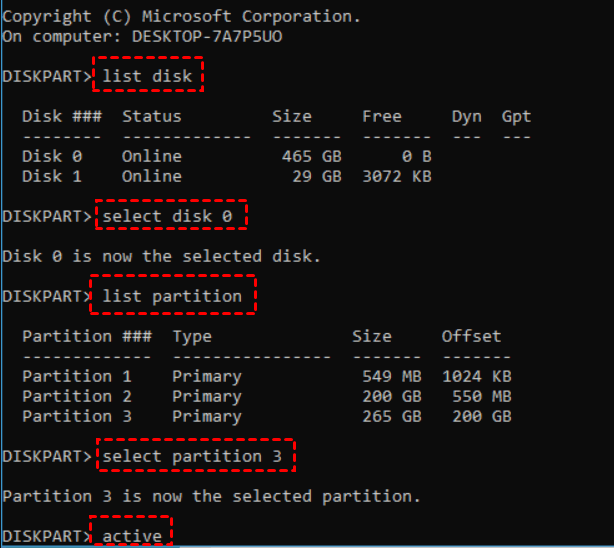
Step 4. Reboot your computer, enter the BIOS, set your computer to boot from the cloned NVMe SSD, and restart the computer.
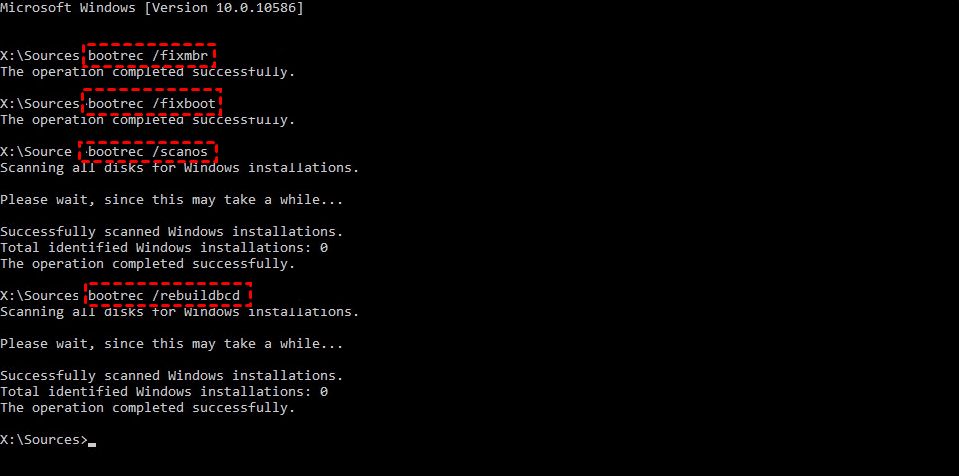
Solution 5. Fix Boot Configuration
When you can’t boot from NVMe after cloning, the issue might be corrupted or missing boot files. You can use the Windows Bootrec.exe tool to rebuild them.
Step 1. Boot your computer using Windows Installation Media or Recovery Drive.
Step 2. Then, choose Repair your computer. Navigate to Troubleshoot > Advanced Options > Command Prompt.
Step 3. In the pop-up command prompt, type the commands below:
- bootrec /fixmbr
- bootrec /fixboot
- bootrec /scanos
- bootrec /rebuildbcd
Solution 6. Run Automatic Repair
Windows recovery environment (Windows RE) also offers to repair Windows Startup when Crucial SSD not booting after clone or other cloned drive won’t boot.It can often diagnose and fix startup issues on its own using the automatic repair feature.
Step 1. Boot from a Windows installation media. Then, click on Repair your computer at the install screen.
Step 2. On the Choose an option screen, select Troubleshoot > Advanced Options > Startup Repair. Then, it will start to repair the startup problem.
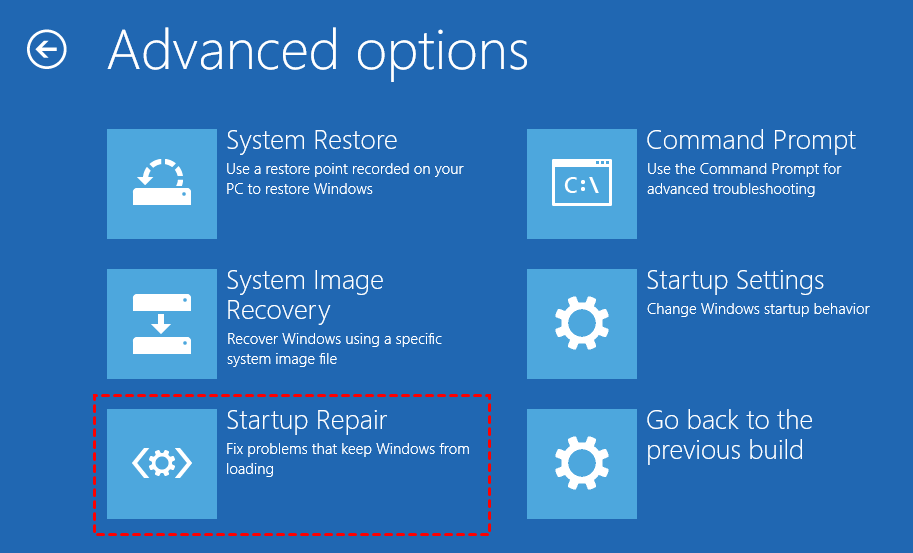
Step 3. Wait as Windows scans and repairs automatically. Restart the computer after the process completes.
Summary
When clone SATA to NVMe won't boot, don't panic. It’s usually a matter of correcting BIOS settings, fixing boot records, or simply making sure your SSD is installed and prioritized correctly. Using a reliable tool like AOMEI Cloner reduces the chances of error significantly by automatically aligning partitions and preserving system boot data.
This software is capable of cloning HDD to HDD or SSD as well as cloning SSD to SSD or HDD. So, you can use it to clone C drive to new SSD without data loss and ensure a secure boot.