
Best Synology Backup Software for Windows 11/10/8/7
Looking to backup your computer to a Synology NAS? This guide walks you through the process step-by-step, highlighting the two best backup software for Synology NAS.
By Lily Updated on March 23, 2026
Whether you’re a home user looking to safeguard photos and documents or an IT admin managing multiple endpoints, Synology’s backup ecosystem provides centralized, automated, and secure data protection that fits nearly any environment. In this guide, we’ll go through the best Synology NAS backup software and step-by-step setup instructions.

Two best backup software for Synology NAS
When choosing backup software for your Synology NAS, there are two popular tools to consider:
1. Active Backup for Business
Active Backup for Business (ABB) is Synology’s own all-in-one backup and recovery solution — deeply integrated into the Synology ecosystem. It supports a wide range of data sources: Windows PCs, physical servers, file servers, virtual machines (VMs), and even other NAS devices — all managed from a single console.
Core features that stand out:
- Global deduplication & incremental backups: ABB can identify duplicate data blocks across devices and only store unique data — dramatically reducing storage usage.
- Bare-metal recovery & flexible restoration: You can restore entire systems or individual files/folders — giving you flexibility depending on the disaster scenario.
- Centralized management dashboard: All backup tasks — across PCs, servers, VMs, file shares — can be monitored and managed through one web-based interface.
- Scalable and license-free: As your data and number of devices grow, you don’t need to worry about per-device licensing fees — ABB grows with your storage.
2. AOMEI Backupper Standard
AOMEI Backupper Standard is a free backup tool for Windows that can back up files, folders, partitions, disks, or entire systems. Importantly, it supports backing up to NAS devices via network share (SMB), which means you can point it at your Synology NAS and store backups there.

- All-around backup solutions: You can back up just your important data, entire disks/partitions, or the whole Windows system.
- Schedule backups & incremental backups: You can configure regular backups so they run automatically without manual intervention. The program backs up only changed data after the first full backup.
- Various backup destinations: Backups can target network shares or NAS devices via SMB. You can also backup to external hard drive, USB drive, or cloud storage.
- Restore flexibility: Recover files/folders, entire partitions, or full system backups (depending on version and type of backup).
Download AOMEI Backupper now to try it out!
Method 1: PC backup to Synology NAS via Active Backup for Business
Follow the steps below to set up a reliable PC-to-NAS backup via Active Backup for Business:
1. On the computer you want to backup, go to the Download Center, select your product model, and download the Active Backup for Business Agent 32-bit or 64-bit installer for the computer.
2. Install and launch Active Backup for Business Agent. Input server address, username, password and click Connect.

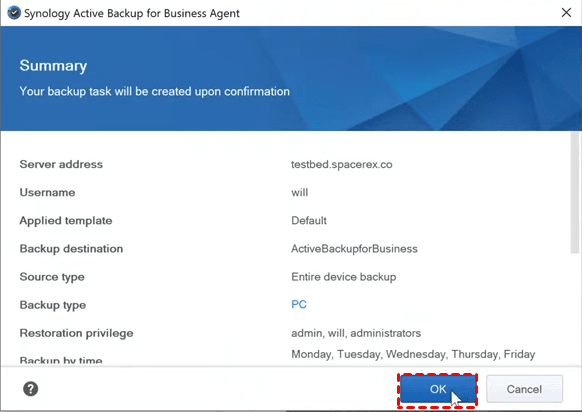
3. Once the target computer is connected to the Synology NAS, a backup task will be created based on the matching template. Review the backup settings and click OK.
4. (Optional) Modify the backup settings as necessary.
4.1. Open Active Backup for Business. Go to PC > Task List. Select the backup task just created and click Edit.

4.2. Under the General tab, you can edit task name, backup source, and choose to enable data transfer compression/encryption or not.
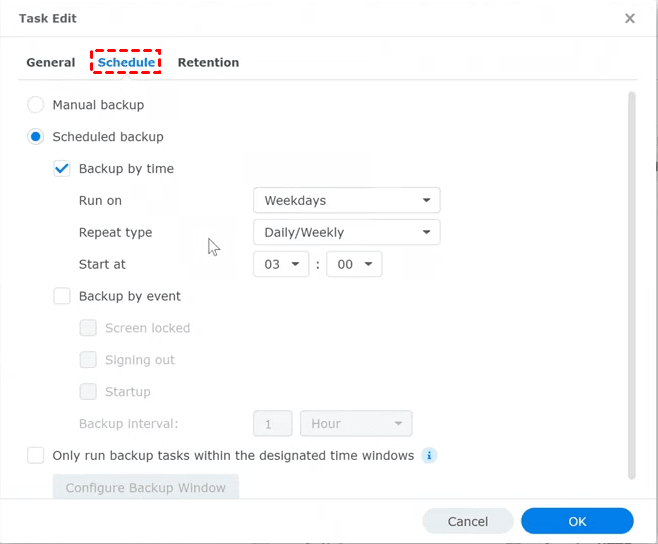
4.3. Under the Schedule tab, you can choose to run manual backup or scheduled backup by time/event.
4.4. Under the Retention tab, you can set a policy to delete old backups automatically to free up space.

How to restore an entire device
When your PC malfunctions, you can restore your PC with the following steps:
👉 Create USB recovery media
1. On a working computer, insert a USB drive with at least 1 GB capacity. Then visit the Synology Download Center to download the Synology Active Backup for Business Recovery Media Creator.
2. Extract and run Synology Active Backup for Business Recovery Media Creator. Select USB media and click Create.

3. To build recovery media, you need to install both the Windows ADK and Windows PE. If not installed, the process will prompt you to download them.
4. After installing the Windows ADK and Windows PE, click Create again. You will be prompted that the USB drive will be formatted. Click Confirm to proceed.

👉 Restore Backups from Synology NAS
1. Connect the USB recovery media to the computer you want to restore. Boot the computer and enter BIOS. Select the boot order for booting recovery media.
2. You'll be directed to Synology Active Backup for Business Recovery Wizard. On the Before the recovery begins page, read the message and click Next.
3. Enter your Synology NAS server address and administrator's credentials and click Connect.
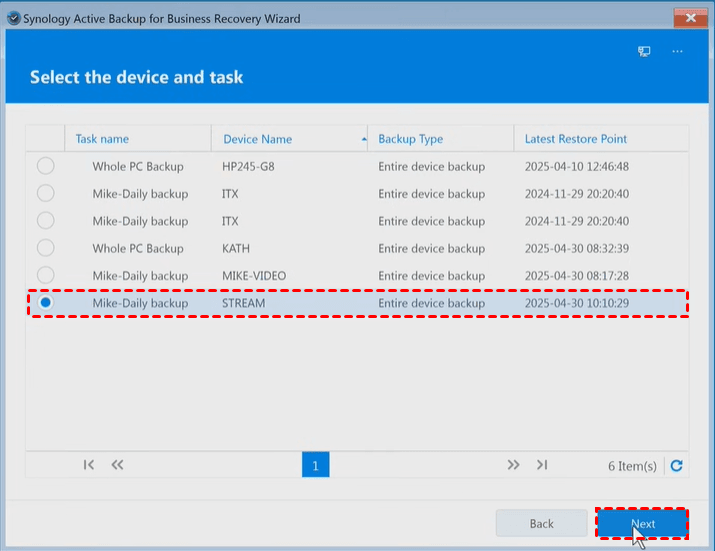
4. Select the device and task and click Next.
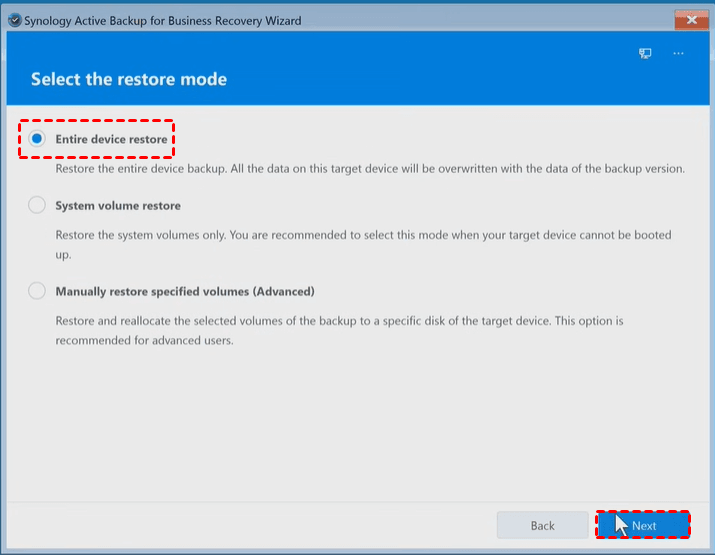
5. Select Entire device restore and click Next.
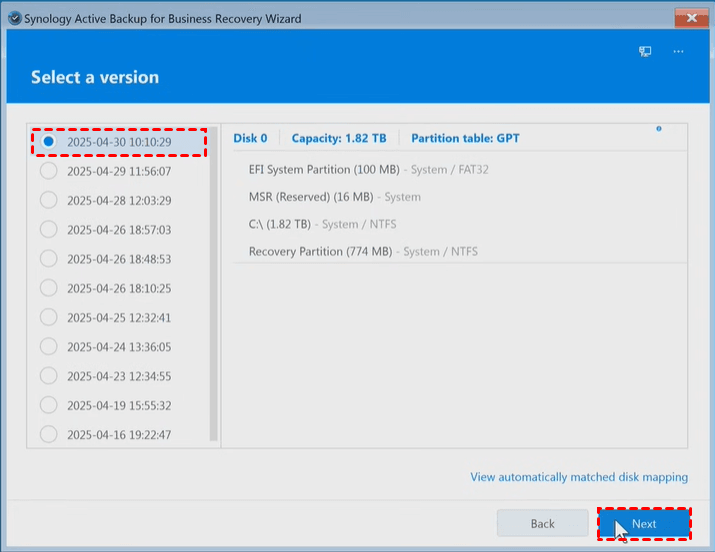
6. Select a backup version to restore and click Next.
7. Confirm the summary and click Next. You will be prompted that the restoration is irreversible. Click OK to proceed.
8. Click Finish and choose if you want to restart or shut down the device once the restoration is complete. Remove the recovery media before restarting the device.
Method 2: Backup PC to Synology NAS using AOMEI Backupper (easier 🔥)
You see backing up and restoring with Active Backup for Business involves multiple steps. If you want a simpler and more flexible way to back up your Windows PC to a Synology NAS, try AOMEI Backupper:
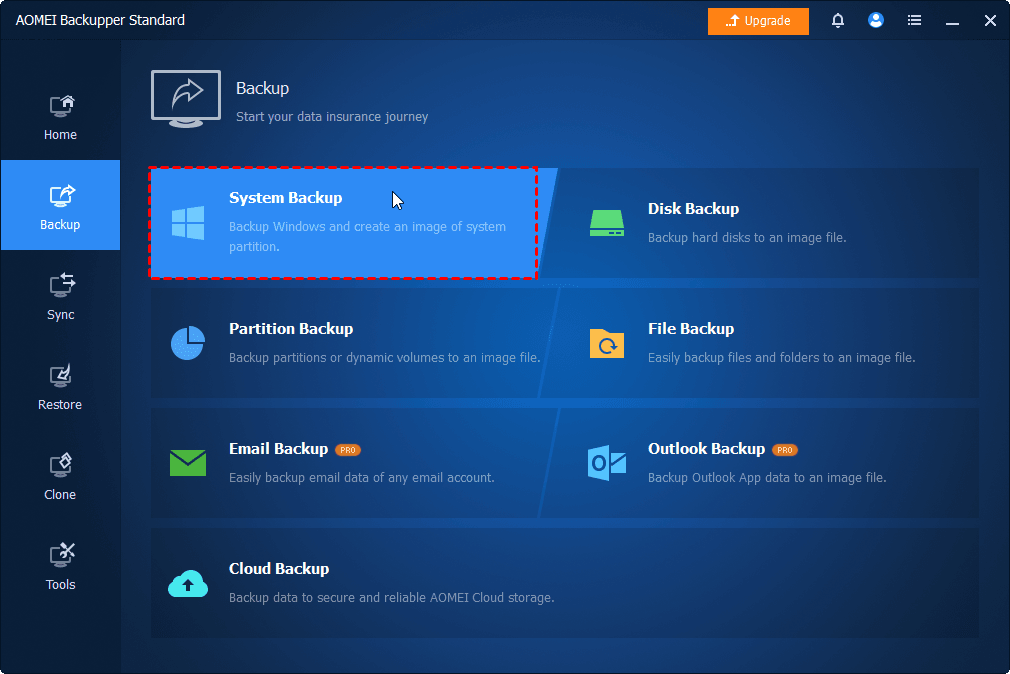
1. Install and run AOMEI Backupper. From the left panel, click Backup, and select System Backup.
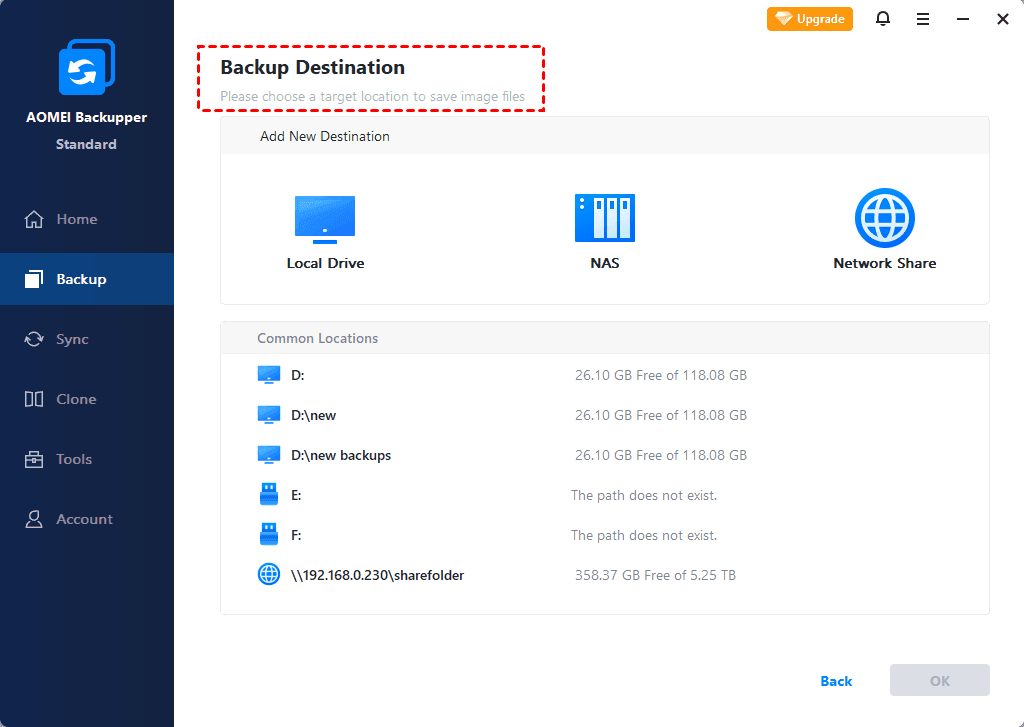
2. Boot-related partitions are selected by default. Click the destination box and select NAS > Add NAS in the Select Destination window.
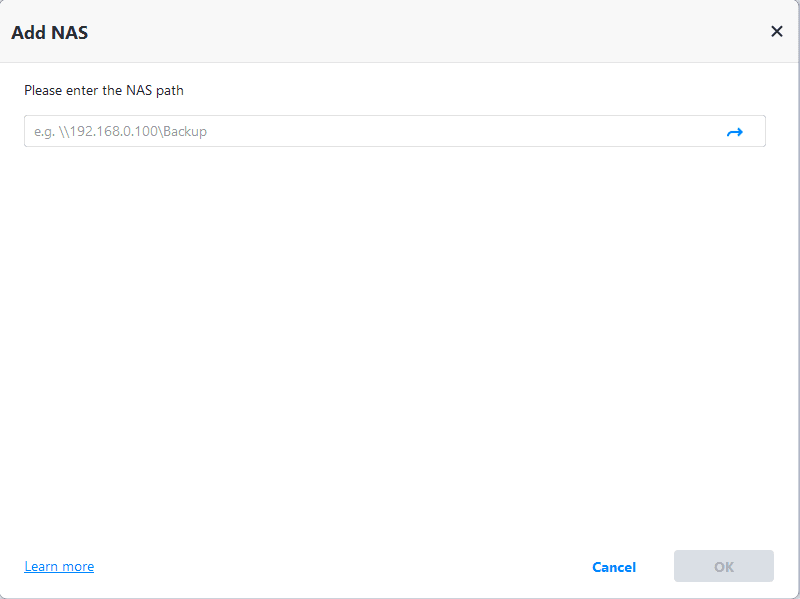
3. On this screen, type your Synology NAS path and click the right arrow. Input username and password if it is required, then click OK.
4. Choose one folder on the Synology NAS as the destination path to store the backup image.
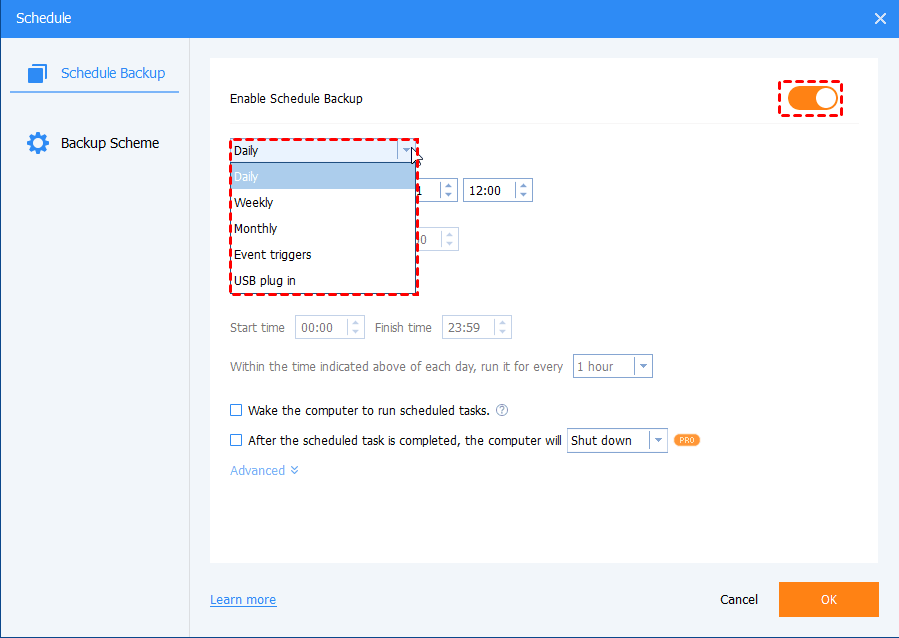
5. Click Schedule to enable automatic Windows backup (One Time, Daily, Weekly, Monthly, or Event triggers). Finally, click Start Backup to begin backing up Windows OS to your Synology NAS.
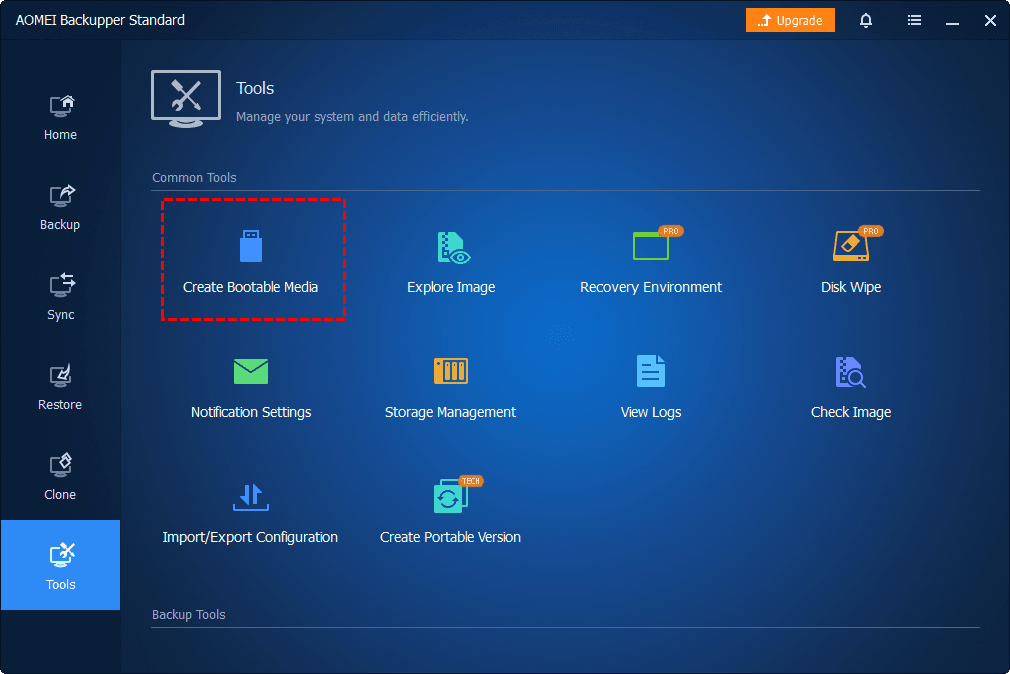
✍ Helpful tip:
Go to the Tools tab, select Create Bootable Media, and follow the wizard to prepare a USB or CD/DVD. This media allows you to restore the system even if Windows cannot boot.
How to restore Windows OS
If your computer encounters serious errors, use the following steps to restore it to a normal state:
1. (Optional) If your computer cannot boot itself, boot it from the bootable USB or CD/DVD created earlier with AOMEI Backupper.
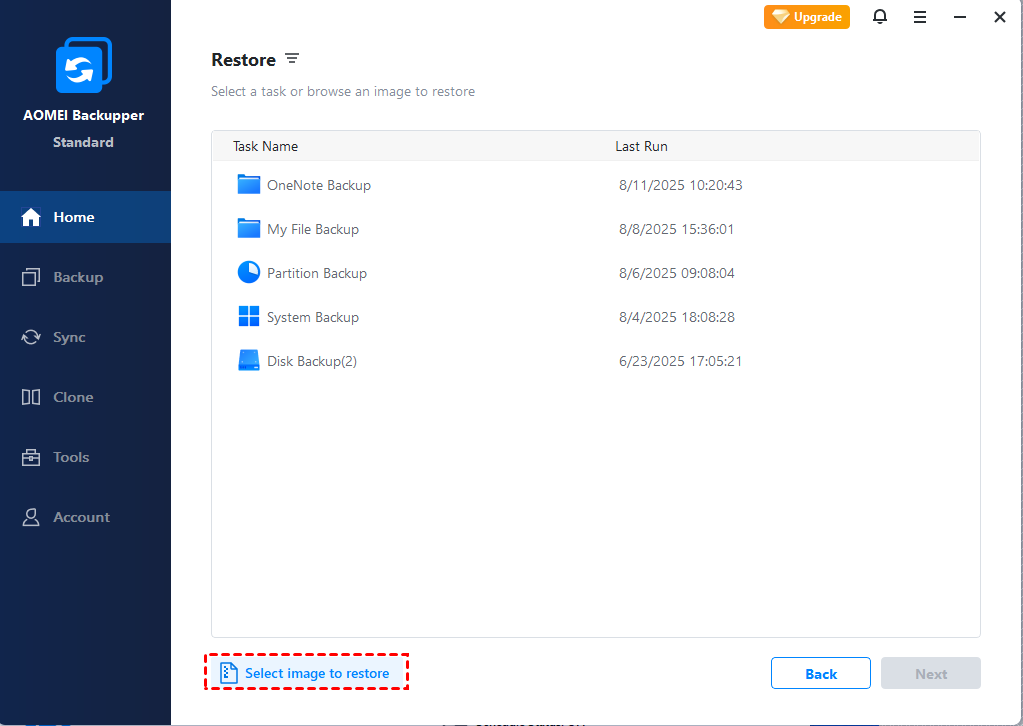
2. Once AOMEI Backupper loads, go to Home > Restore > Select image to restore.
3. In the pop-up window, choose NAS > Add NAS, and type the IP address, username and password of your Synology NAS. Then, you can select the backup image.

💡 Note: If the NAS is added before, you can select it from the left panel and navigate to the image file you need.
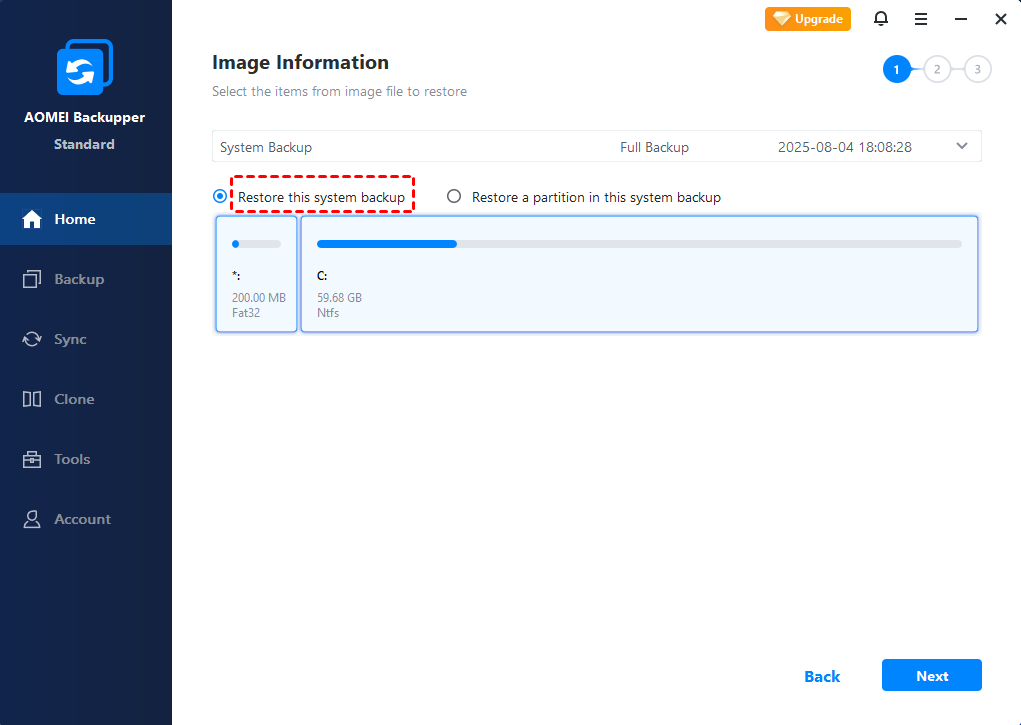
4. If you have multiple backup versions, click the drop-down menu to select a backup version to restore from. Then select Restore this system backup and click Next.
5. Select Restore to original location and click Next.
6. Preview the operation and click Start Restore. The process may take 30 minutes to hours depending on image size and disk speed.
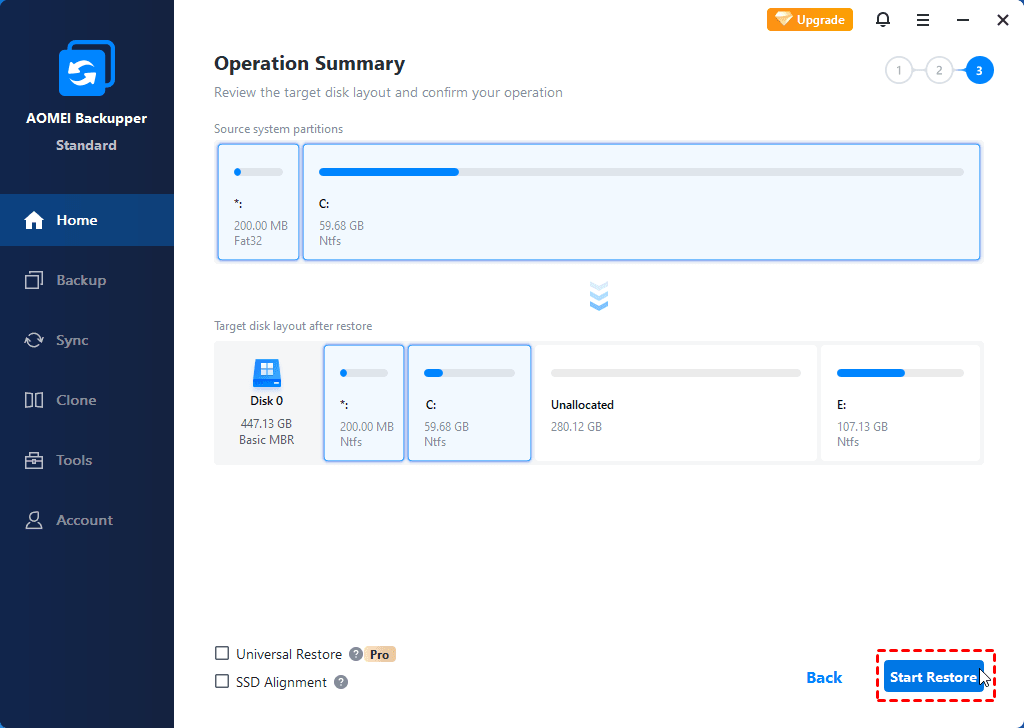
💡 Note: If you're restoring to a new machine, tick the Universal Restore option to ensure a bootable system after recovery. You should upgrade to AOMEI Backupper Professional or higher to enjoy this feature.
Verdict
This page offers you the best 2 Synology backup software for Windows 11/10/8/7. Active Backup for Business offers powerful, centralized backup, while AOMEI Backupper Standard provides a simpler, click-based solution for individual PCs.
If you’d like to perform Windows Server image backup, please try AOMEI Backupper Server. Start your data insurance journey with AOMEI Backupper now!
