
How to Run Bare Metal Recovery Backup in Windows 11/10/8/7
Learn how to create a bare metal recovery backup and subsequently restore your system using this guide for Windows 11/10/8/7.
By Lily Updated on April 30, 2026
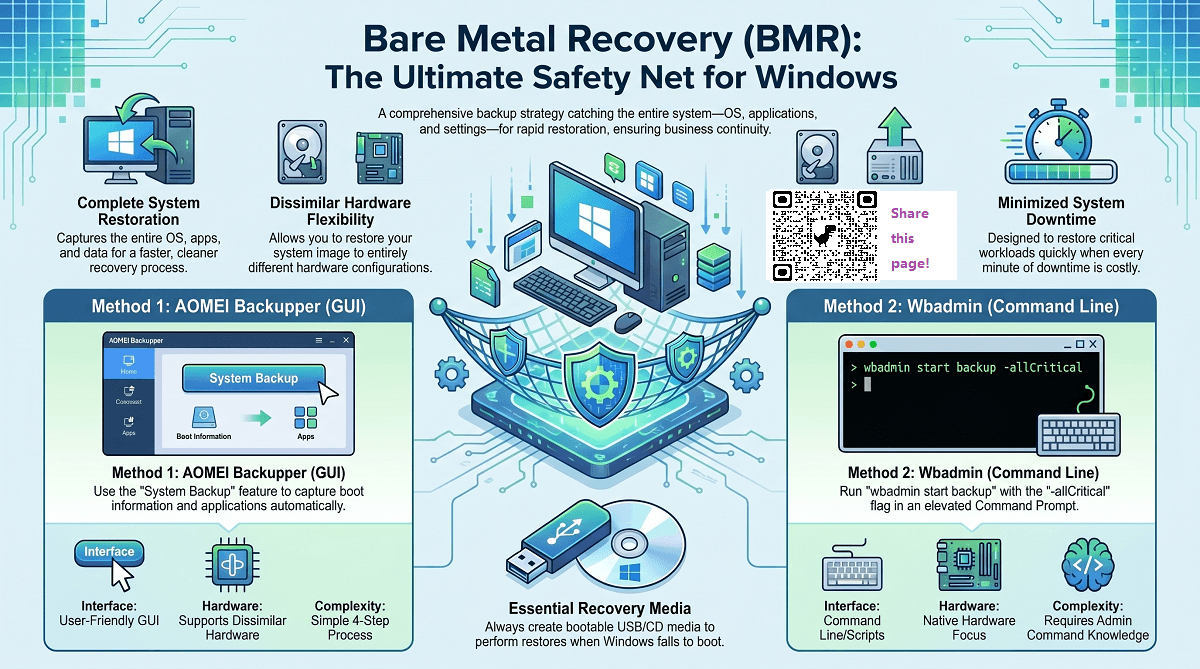
Benefits of Using Bare Metal Recovery Backup
When downtime is costly and data loss is unacceptable, a bare metal recovery backup (BMR) offers one of the most reliable and comprehensive protection strategies available. Unlike traditional backups that only save files or selected volumes, BMR captures the entire system—OS, apps, and data—making full system recovery faster and cleaner. Below are the key advantages.
✅Full-system restoration in a single process
✅Minimal downtime for critical workloads
✅Strong protection against multiple failure scenarios
✅Flexibility to restore to dissimilar hardware
✅Ideal for large-scale deployments and IT management
🌟 To check more scenarios about backing up Windows 10, please refer to this complete guide: Backup Windows 10.
Top 2 Ways to Create Bare Metal Recovery Backup
In the following parts, you’ll learn 2 effective ways to create a bare metal recovery backupon Windows PC.
|
Aspect |
||
|
Interface |
Graphical user interface (GUI), beginner-friendly |
Command-line tool, requires technical knowledge |
|
Backup Scope |
Full system image (OS, apps, settings, disks, partitions) |
Full server/system image including critical volumes |
|
Backup Destination |
Local disks, external drives, NAS, network shares, cloud |
Local drives and network shares |
|
Automation |
Supports scheduled backups (daily/weekly/monthly, event-triggered) |
Can be automated via scripts or Task Scheduler |
|
Flexibility |
Advanced options like incremental/differential backups, compression, encryption |
Limited flexibility; mainly full backups |
|
Ease of Use |
⭐⭐⭐⭐⭐ (Step-by-step wizard) |
⭐⭐ (Complex syntax) |
|
Best For |
Home users, SMBs, and users wanting simplicity and automation |
IT professionals, admins, and scripting environments |
Method 1: Create Bare Metal Recovery Backup via Reliable Tool
AOMEI Backupper Professional is a versatile and reliable bare metal backup software, widely used for creating bare metal recovery backups.

- System, Disk, and Partition Backup: Capture the entire system or selected disks for comprehensive protection.
- Bare Metal Recovery Support: Restore the full system to the same or dissimilar hardware.
- Incremental & Differential Backups: Save storage space and reduce backup time by only saving changes.
- Scheduled Backups: Automate backups daily, weekly, or monthly to ensure consistent protection.
- Bootable Media Creation: Create a recovery USB or CD/DVD for system recovery when Windows fails to boot.
Download AOMEI Backupper and follow the steps below to create a bare metal backup in Windows 11/10/8/7. To create a bare metal backup in Windows Server, try AOMEI Backupper Server.
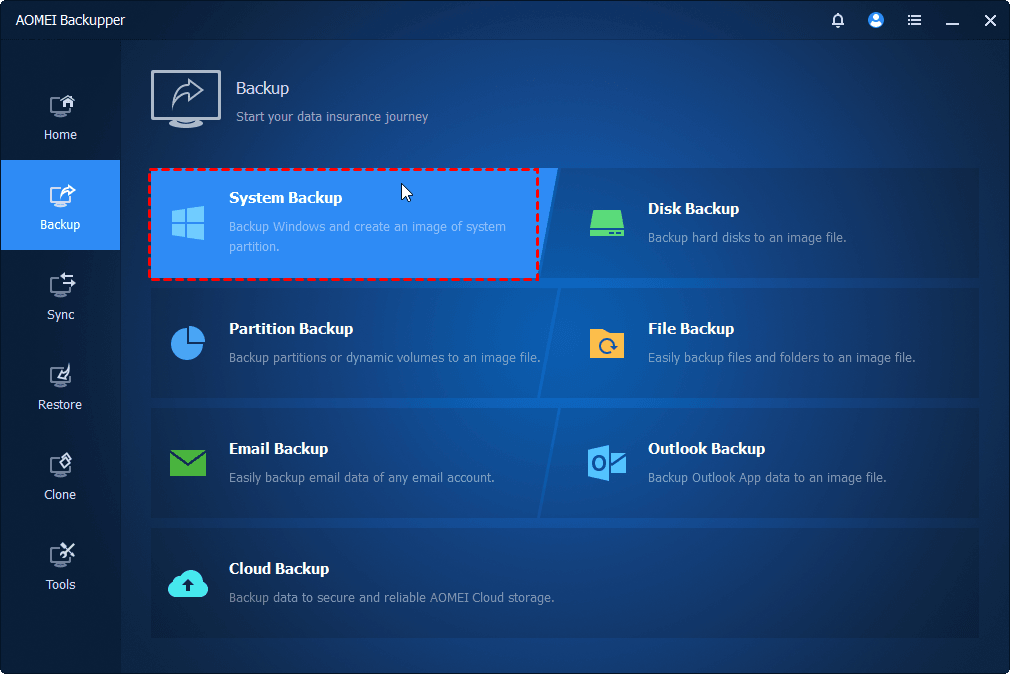
Step 1. Install and launch AOMEI Backupper. In the Backup tab, choose System Backup. This ensures that Windows, installed applications, settings, and necessary boot information are included in the backup.
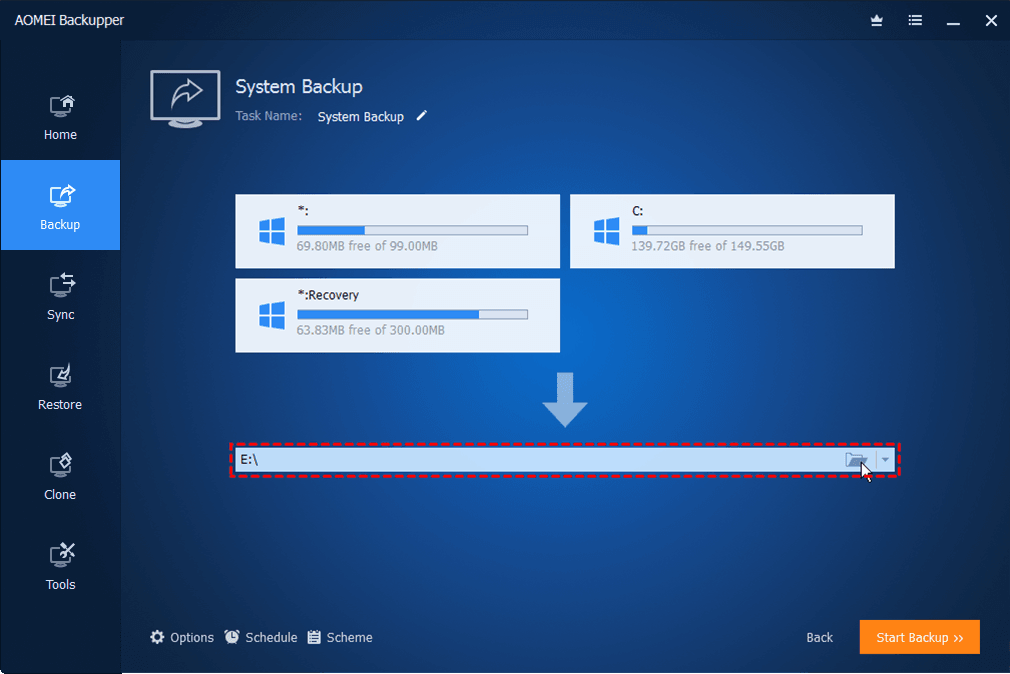
Step 2. Select a location to store the backup image. This can be an external hard drive, NAS, or network location. Ensure there is sufficient free space for the system image.
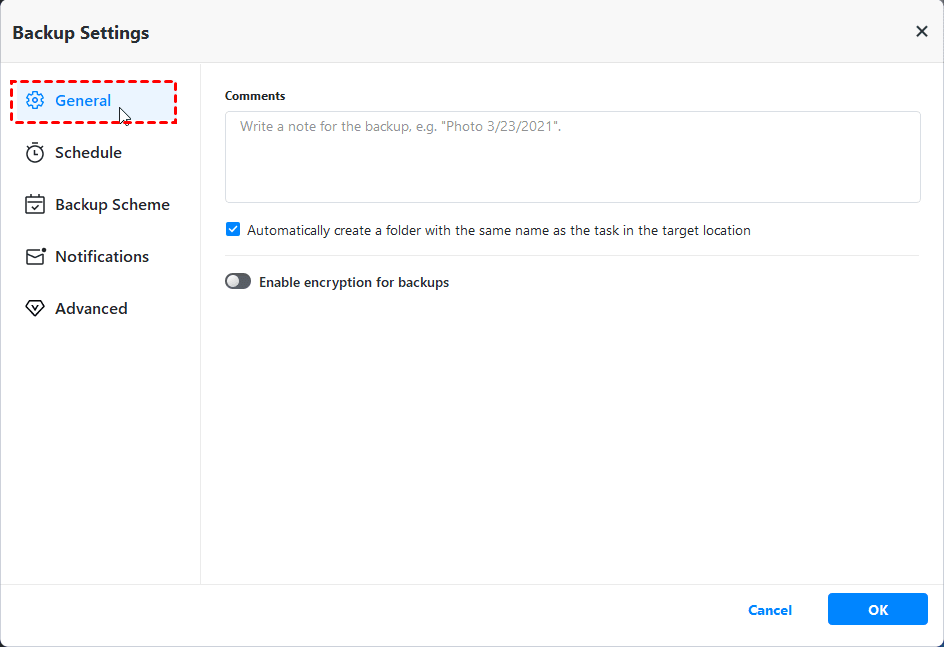
Step 3. (Optional) Configure advanced options.
- Options: You can encrypt, compress, split your backups and set email notification based on your needs.
- Schedule: Enable automatic backups with preferred schedule modes - “One-Time”, “Daily”, “Weekly”, “Monthly”, and “Event triggers”.
- Backup Scheme: Choose full/incremental/differential backup and enable automatic backup cleanup.
Step 4. Click Start Backup to begin the bare metal recovery backup process. Wait until the process completes successfully.
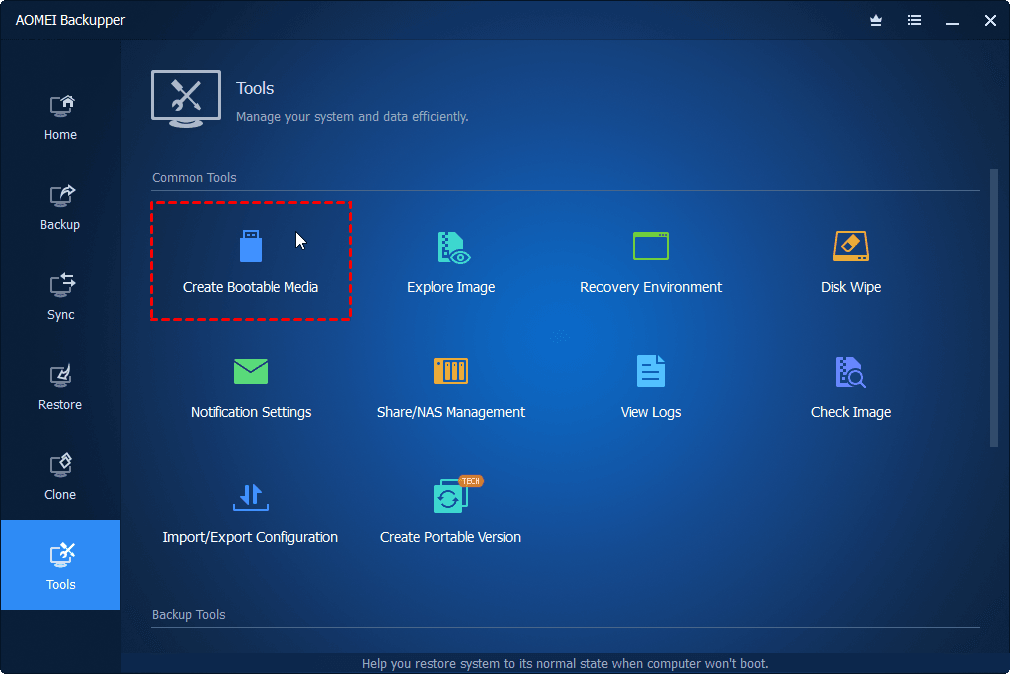
✍ Helpful tip:
Go to the Tools tab, select Create Bootable Media, and follow the wizard to prepare a USB or CD/DVD. This media allows you to restore the system even if Windows cannot boot.
How to Run Bare Metal Restore
Performing a bare metal restore with AOMEI Backupper Professional is straightforward, even when the original system is unbootable or the hardware has been replaced. Below are the detailed steps:
Step 1. (Optional) If the source system cannot boot or you're restoring to a new machine, boot the target computer from the bootable USB or CD/DVD created earlier with AOMEI Backupper.
Step 2. Once AOMEI Backupper loads, go to Home > Restore. Then click Select image to restore to browse and select the system image you created earlier.

💡 Note: If the image file is on an external hard drive, attach the drive in advance.
Step 3. If you have multiple backup versions, click the drop-down menu to select a backup version to restore from. Then select Restore this system backup and click Next.

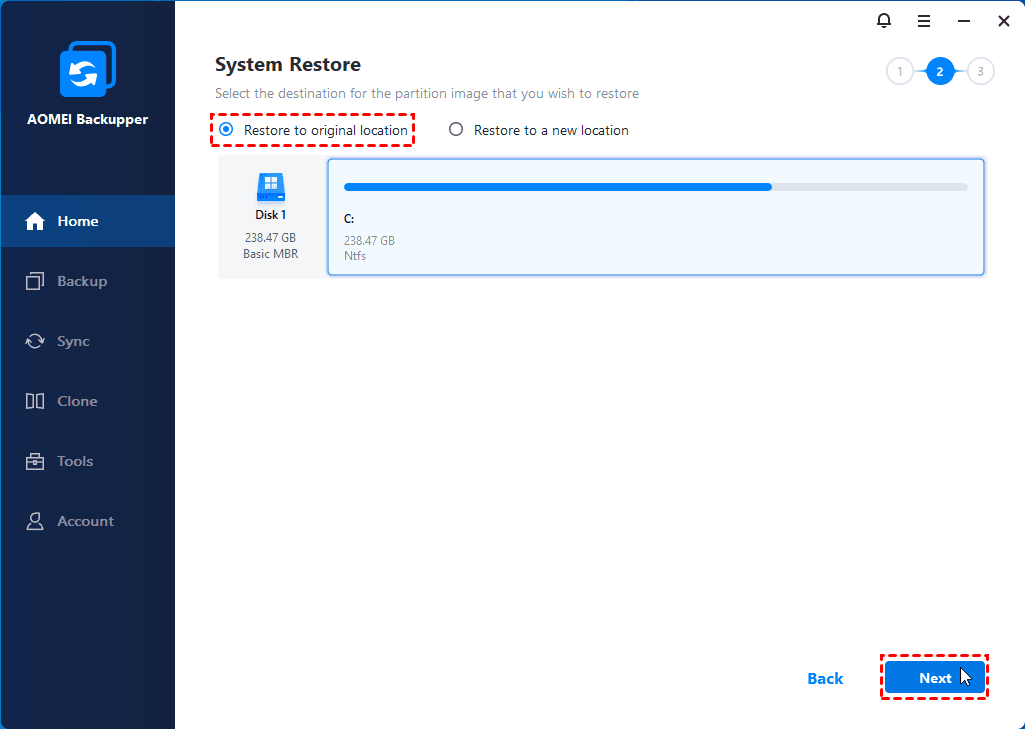
Step 4. Select Restore to original location or Restore to a new location as per your need. Click Next.
Step 5. Preview the operation and click Start Restore. The process may take 30 minutes to hours depending on image size and disk speed.
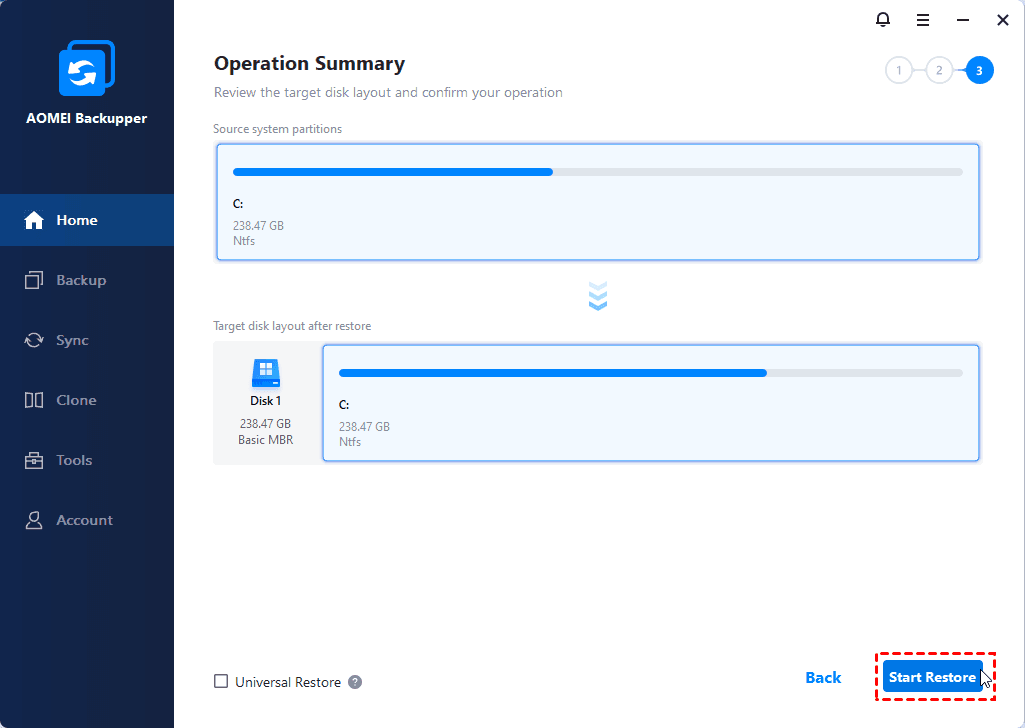
💡 Note: If you're restoring to a new machine, tick the Universal Restore option to ensure a bootable system after recovery.
Method 2: Create Bare Metal Recovery Backup Using CMD
For administrators who prefer command-line operations or need an automated scripting workflow, Windows provides a built-in tool - Wbadmin to create a bare metal backup directly from CMD. It is a command-line backup tool included in Windows 10/11 and Windows Server editions.
Before running Wbadmin, ensure the following:
- You have administrator privileges in CMD or PowerShell.
- The destination storage (external drive, network share, or secondary internal disk) has enough free space.
- Windows Backup features are enabled (usually enabled by default in modern systems).
Now follow the instructions below:
Step 1. Press Win + S, type cmd. Right-click Command Prompt → Run as administrator.
Step 2. Type the following command and press Enter to start a full bare metal recovery backup:
wbadmin start backup -backupTarget:F: -allCritical -quiet
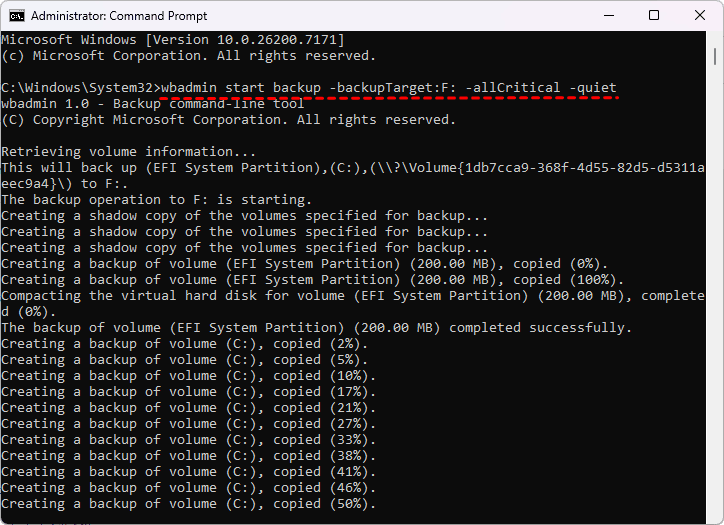
-backupTarget: Choose the destination drive or network share.
-allCritical: Include all critical system volumes required for a bare metal restore, such as Windows OS, boot partition, System Reserved partition, and EFI partition.
-quiet: Runs without confirmation prompts (ideal for scripts).
✍ Helpful tip:
If the Wbadmin command fails to backup volume C:, you should turn on system protection for C: drive and configure the maximum disk usage:
- Press Win + R, type SystemPropertiesProtection and press Enter.
- Under the System Protection tab, select C: drive and click Configure.
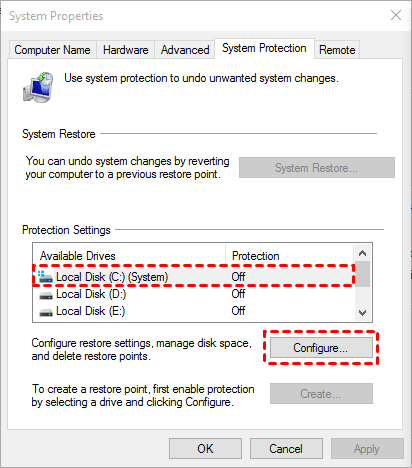
- In the new window, choose Turn on system protection. This enables restore point creation and allows VSS to function properly for backups.
- Under Disk Space Usage, move the slider to set a reasonable limit. Typically 5%–10% of the disk size is recommended.
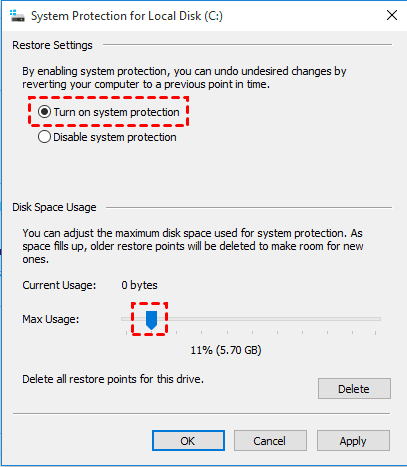
- Click Apply, then OK.
How to Run Bare Metal Recovery
If you created your backup using Wbadmin, you can also perform a full bare metal recovery with it. Below is a clear, step-by-step walkthrough:
💡 Note: The wbadmin start sysrecovery command must be run from the Windows Recovery Console, and isn't listed in the default usage text for the wbadmin tool.
Step 1. Open Command Prompt and run wbadmin get versions to get the version identifier of the backup. Please note down the version identifier for later use.
Step 2. Boot into Windows Recovery Environment (WinRE).
- In Windows 10, go to Start > Settings > Update & security > Recovery > under Advanced Startup, click Restart now.
- In Windows 11, go to Start > Settings > System > Recovery > in Advanced Startup, click Restart now.
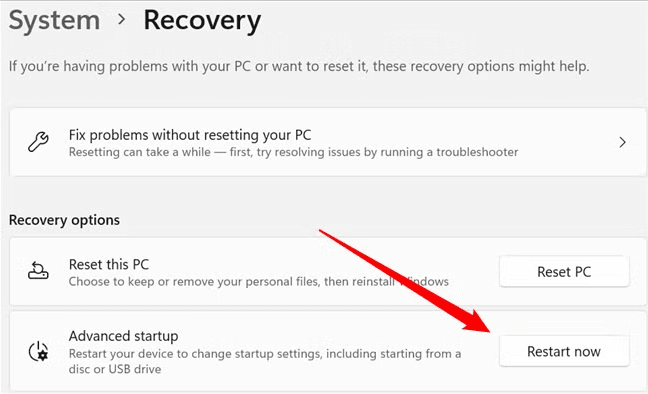
💡 Note: If your computer cannot boot now, you should use a Windows installation DVD/USB or a recovery drive to boot into WinRE.
Step 3. Select Troubleshoot → Advanced options → Command Prompt.
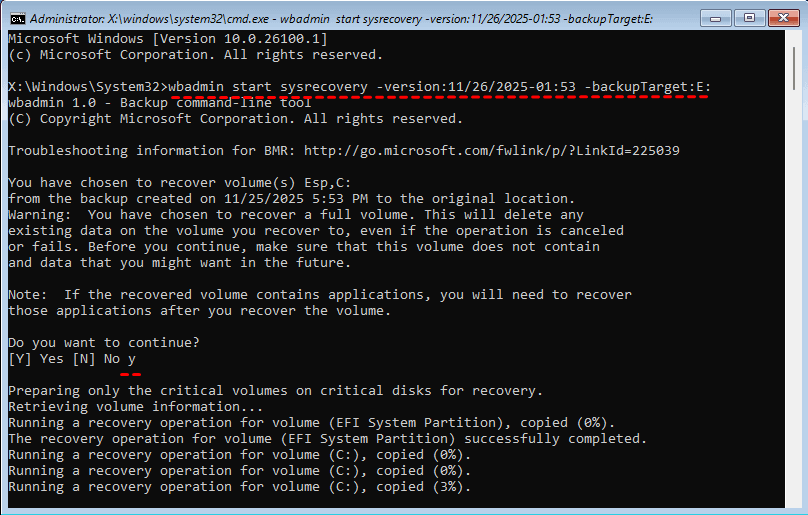
Step 4. In the Command Prompt window, type the following commands and press Enter after each:
- diskpart
- list volume (Please note the drive letter of the backup target drive. It may change under WinRE.)
- exit (Exit DiskPart)
- wbadmin start sysrecovery -version:11/26/2025-01:53 -backupTarget:E: (Replace the version identifier and the backup target path with yours.)
- y (Confirm the deletion of existing data.)
Step 5. Recovery time varies depending on image size and disk performance. Once complete, restart your computer to see if it works properly.
FAQs about Bare Metal Recovery Backup
1. Is bare metal recovery backup better than image backup?
Whether bare metal recovery backup is better than image backup depends on your goal. If your priority is disaster recovery and fast system rebuilds, bare metal recovery (BMR) is the better choice. For simple file or partition recovery, a regular image backup is usually sufficient.
2. Does bare metal recovery backup include all drivers?
Yes, bare metal recovery backup includes all drivers. However, there’s a catch: when restoring to different hardware, some drivers (like chipset or storage controllers) may not be compatible. AOMEI Backupper solves this with the “Universal Restore” feature.
3. Can small businesses afford bare metal recovery backup solutions?
Yes, small businesses can afford bare metal recovery backup solutions. There are both free and paid options available, ranging from built-in system tools to affordable third-party software like AOMEI Backupper.
4. How to test bare metal recovery backup regularly?
To test bare metal recovery backup regularly, you should do the following things monthly or quarterly:
- Restore the backup to a virtual machine or spare hardware to ensure it boots and functions correctly.
- Verify backup integrity using built-in validation tools.
- Check that recovery media works.
- Confirm critical applications run as expected.
Conclusion
Bare metal recovery backup is one of the most powerful and reliable methods for protecting a full Windows system against hardware failure, OS corruption, ransomware, and unexpected disasters. You may use AOMEI Backupper Professional for a streamlined, user-friendly experience or rely on Wbadmin for command-line operations.
AOMEI Backupper is recommended as a smoother, more efficient, and more powerful backup solution. You can use it to backup OS, disks and create continuous backup for important files. Try it now to discover more!
