
How to Perform Windows Server Image Backup: Best 3 Ways
Want to protect your entire server system and ensure quick recovery? This page provides step-by-step methods using both built-in tools and powerful third-party software. Scroll down to learn more.
By Lily Updated on October 20, 2025
Unlike basic file-level backups, an image backup captures the entire system: operating system, configurations, applications, and data, allowing you to restore your server to a fully functional state in minutes. That’s why implementing a Windows Server image backup isn’t just an IT best practice—it’s a vital layer of protection against unexpected system failures, ransomware attacks, and hardware disasters.
How to Run Windows Server 2025/2022/2019/2016 Image Backup
Below are three proven methods to create a Windows Server image backup. They are suitable for different versions of Windows Server (2025/2022/2019/2016/2012, etc.), ranging from the easiest GUI-based option to advanced command-line tools.
👉 Method 1: Best Windows Server Image Backup Software🔥
👉 Method 2: Backup Windows Server with WSB
👉 Method 3: Windows Server Image Backup via Wbadmin
Method 1: Best Windows Server Image Backup Software
For users seeking reliability, automation, and flexibility, third-party backup software is the most efficient solution. The best server disk imaging software - AOMEI Backupper Server offers a user-friendly interface and professional-grade features that go beyond what native tools provide.
Key Benefits:
🌟Full system, disk, and partition image backup
🌟Incremental and differential backups to save space
🌟Automatic scheduled backups for continuous protection
🌟Backup to NAS, network shares, external drives, and cloud, etc.
🌟Bare-metal restore and dissimilar hardware recovery
Follow the steps below to create a Windows Server image backup with AOMEI Backupper. Take System Backup as an example:
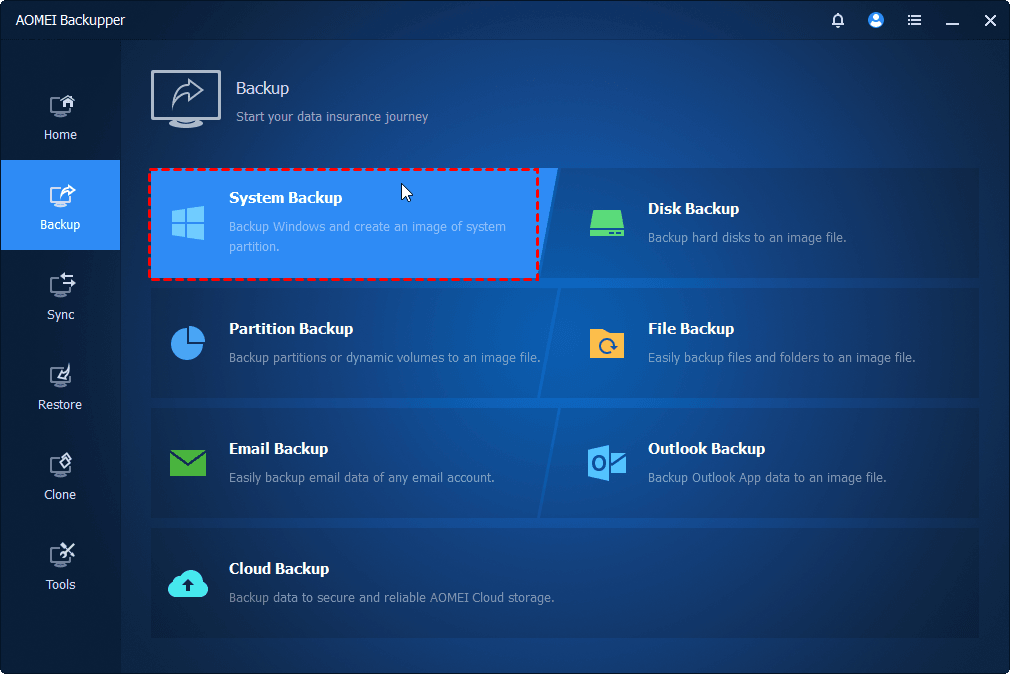
Step 1. Download, install, and launch AOMEI Backupper. Then go to Backup > System Backup.
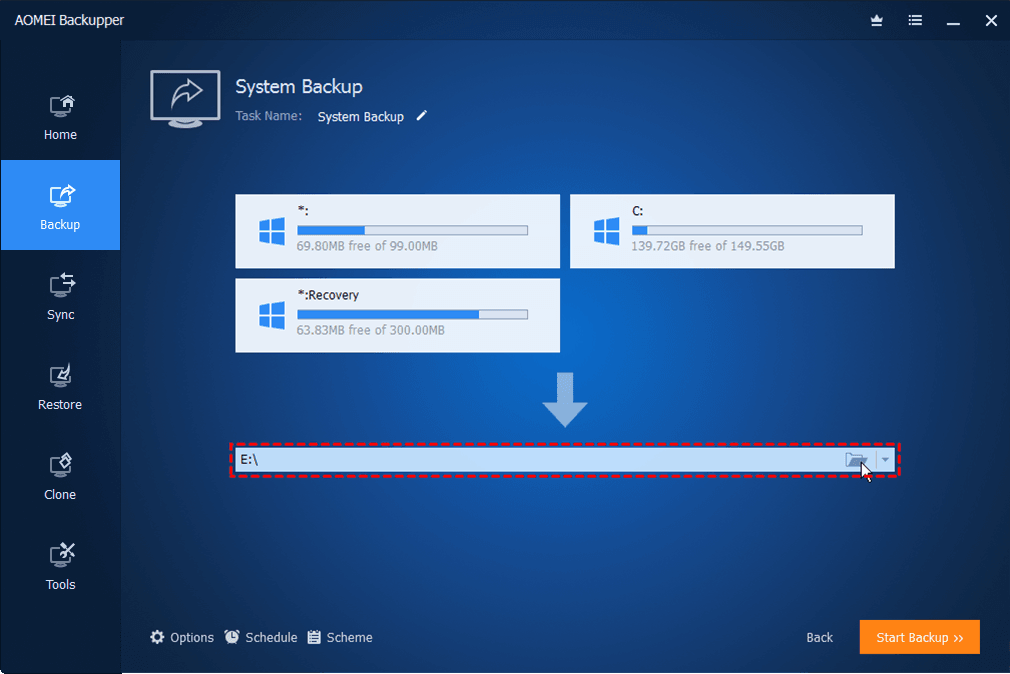
Step 2. The system partitions required for booting will be auto-selected. Choose the destination: local disk, NAS device, or network path.
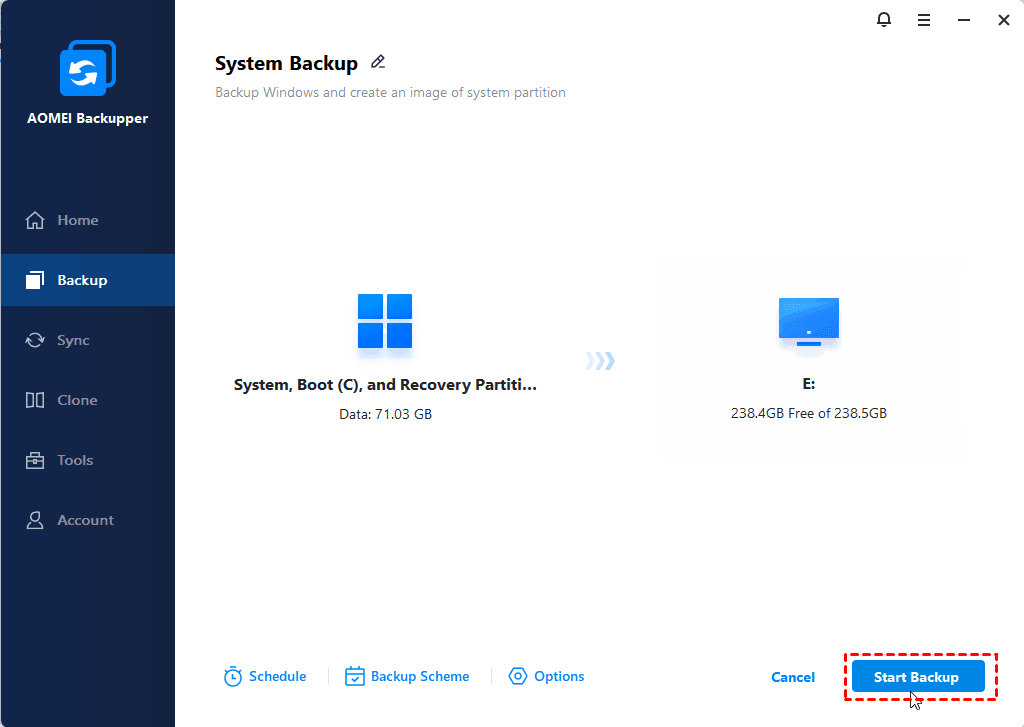
Step 3. Customize your backup task and click Start Backup to create a complete Windows Server image.
👉Options: You can encrypt, compress, split your backups and set email notification based on your needs.
👉Schedule: Enable automatic backups with preferred schedule modes - “One-Time” “Daily”, “Weekly”, “Monthly”, and “Event triggers”.
👉Backup Scheme: Choose full/incremental/differential backup and enable automatic backup cleanup.
Method 2: Backup Windows Server with WSB
Windows Server Backup (WSB) is Microsoft’s built-in tool available in Windows Server 2008 and later. It allows users to perform full server image backups via a graphical interface. Learn how to use it to backup Windows Server below:
Step 1. Install WSB:
- Open Server Manager > Add roles and features > Features.
- Select Windows Server Backup and install.
Step 2. Open Windows Server Backup from the Start Menu and click Backup Once.
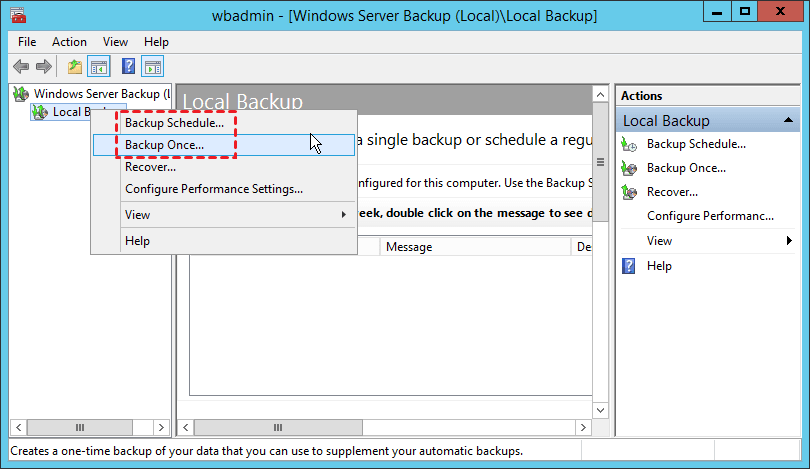
Note: If you want to set up an automated, recurring backup policy that runs without manual intervention, click Backup Schedule.
Step 3. Choose the backup options: Different options, and hit Next.
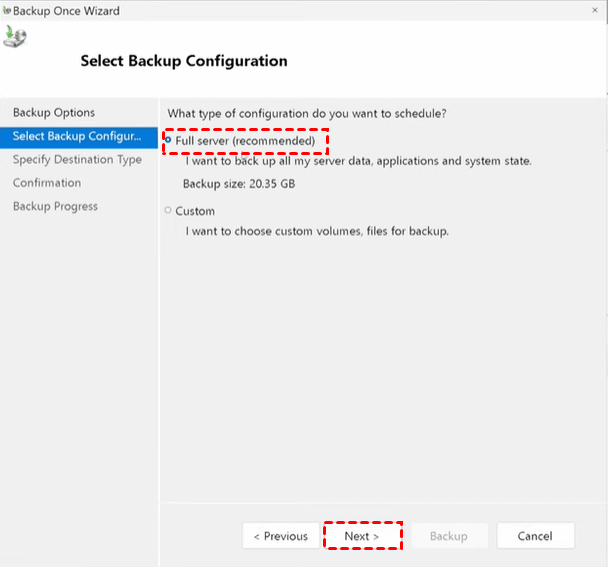
Step 4. Choose Full server to create an image backup. Click Next.
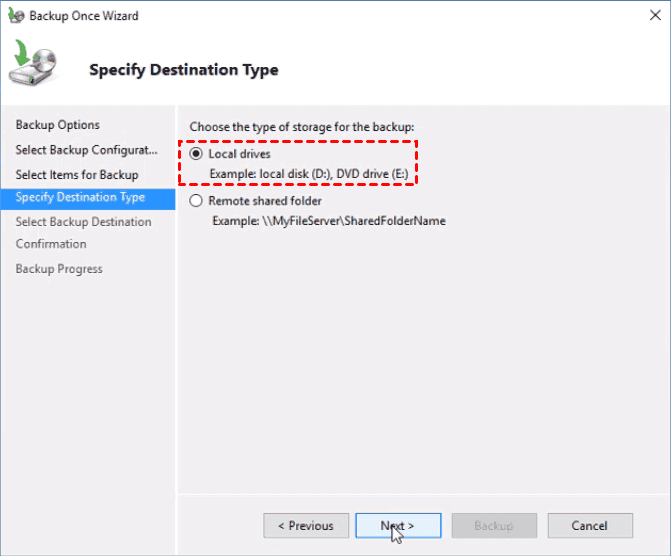
Step 5. Select a backup destination (local disk, external drive, or network share) and press Next. Here I choose Local drives.
Step 6. Confirm settings and click Backup to begin.
Method 3: Windows Server Image Backup via Wbadmin
Wbadmin is a command-line utility that offers more control and automation capabilities than the GUI version of Windows Server Backup. It is ideal for advanced users and IT professionals. Follow these steps to create a Windows Server image backup via Wbadmin:
Step 1. Search “cmd” from the Start Menu. Then right-click on Command Prompt and select Run as administrator.
Step 2. Type the following syntax to create a full server backup and press Enter.
wbadmin start backup -backupTarget:F: -include:C: -allCritical -quiet
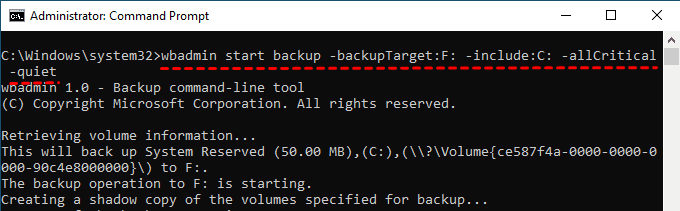
● -backupTarget: Specifies the drive or network share to store the backup
● -include: Defines which volume to include (e.g., C:)
● -allCritical: Backs up all volumes necessary to recover the system
● -quiet: Runs the command without prompts
Step 3. After the backup operation completes, exit Command Prompt.
Why Is Image Backup Critical for Windows Server?
A Windows Server image backup provides the highest level of protection, enabling full system restoration with minimal effort. Here are the key reasons why you need an image backup in Windows Server:
|
✅Complete System Recovery |
An image backup allows you to restore the entire server to its previous state, ensuring all system configurations and applications remain intact. |
|
✅Protection Against Hardware Failure |
Hard drives, RAID arrays, and physical servers can fail unexpectedly. With an image backup, you can restore your entire system to new hardware without rebuilding from scratch. |
|
✅Defense Against Cyberattacks and Ransomware |
Ransomware attacks can encrypt your entire system, making file backups insufficient. A full server image backup enables you to roll back your server to a clean, pre-attack state in minutes. |
|
✅Bare-Metal Recovery |
Image backups support bare-metal recovery, enabling you to restore your server on a completely new machine—even with different hardware—saving time and resources when disaster strikes. |
|
✅Minimized Downtime |
When every minute of server downtime can cost thousands, image backups ensure rapid disaster recovery (DR) and business continuity, reducing both operational and financial impact. |
Advanced Backup Strategies for Windows Server
A basic backup is not enough to protect modern IT environments from evolving threats, rapid data growth, and strict uptime requirements. To ensure maximum resilience and business continuity, you must implement advanced Windows Server image backup strategies:
1. Full, Incremental, and Differential Image Backup
Use a combination strategy—perform a full image backup weekly with daily incremental backups to balance speed and storage efficiency.
2. Offsite, Offline, and Cloud Image Backups
Follow the 3-2-1 backup rule—keep 3 copies of your backup, on 2 different storage media, with 1 stored offsite.
3. Scheduled and Automated Backup Policies
Automating your server backup ensures continuous data protection without relying on manual processes.
- Configure daily, weekly, or real-time schedules based on data volume and business requirements.
- Use email notifications and backup reports for monitoring.
- Enable automatic cleanup and image retention policies to prevent storage overload.
4. Disaster Recovery (DR) and High Availability Integration
- Use backup software with bare-metal recovery and universal restore to minimize downtime.
- Pair image backup with failover clustering or virtual machine replication for instant server recovery.
- Regularly test your recovery process to verify that backup images are fully restorable.
Summary
In today’s always-on business environment, protecting your server infrastructure is non-negotiable. A Windows Server image backup is the most comprehensive way to safeguard your entire system. In this guide, we explored 3 methods for creating image backups using built-in tools (Windows Server Backup and Wbadmin) and advanced third-party software.
You may choose AOMEI Backupper Server over built-in tools for its superior flexibility and advanced feature set. It offers highly granular scheduling and robust merging/cleanup policies to manage backup storage efficiently and provides reliable universal restore for dissimilar hardware recovery. Download it now to discover more!
