
[Complete Guide] to Windows Server 2019 Backup to NAS
Want to backup Windows Server 2019 to NAS like Synology or QNAP? Scroll down to get 2 effective ways.
By Lily Updated on October 17, 2025
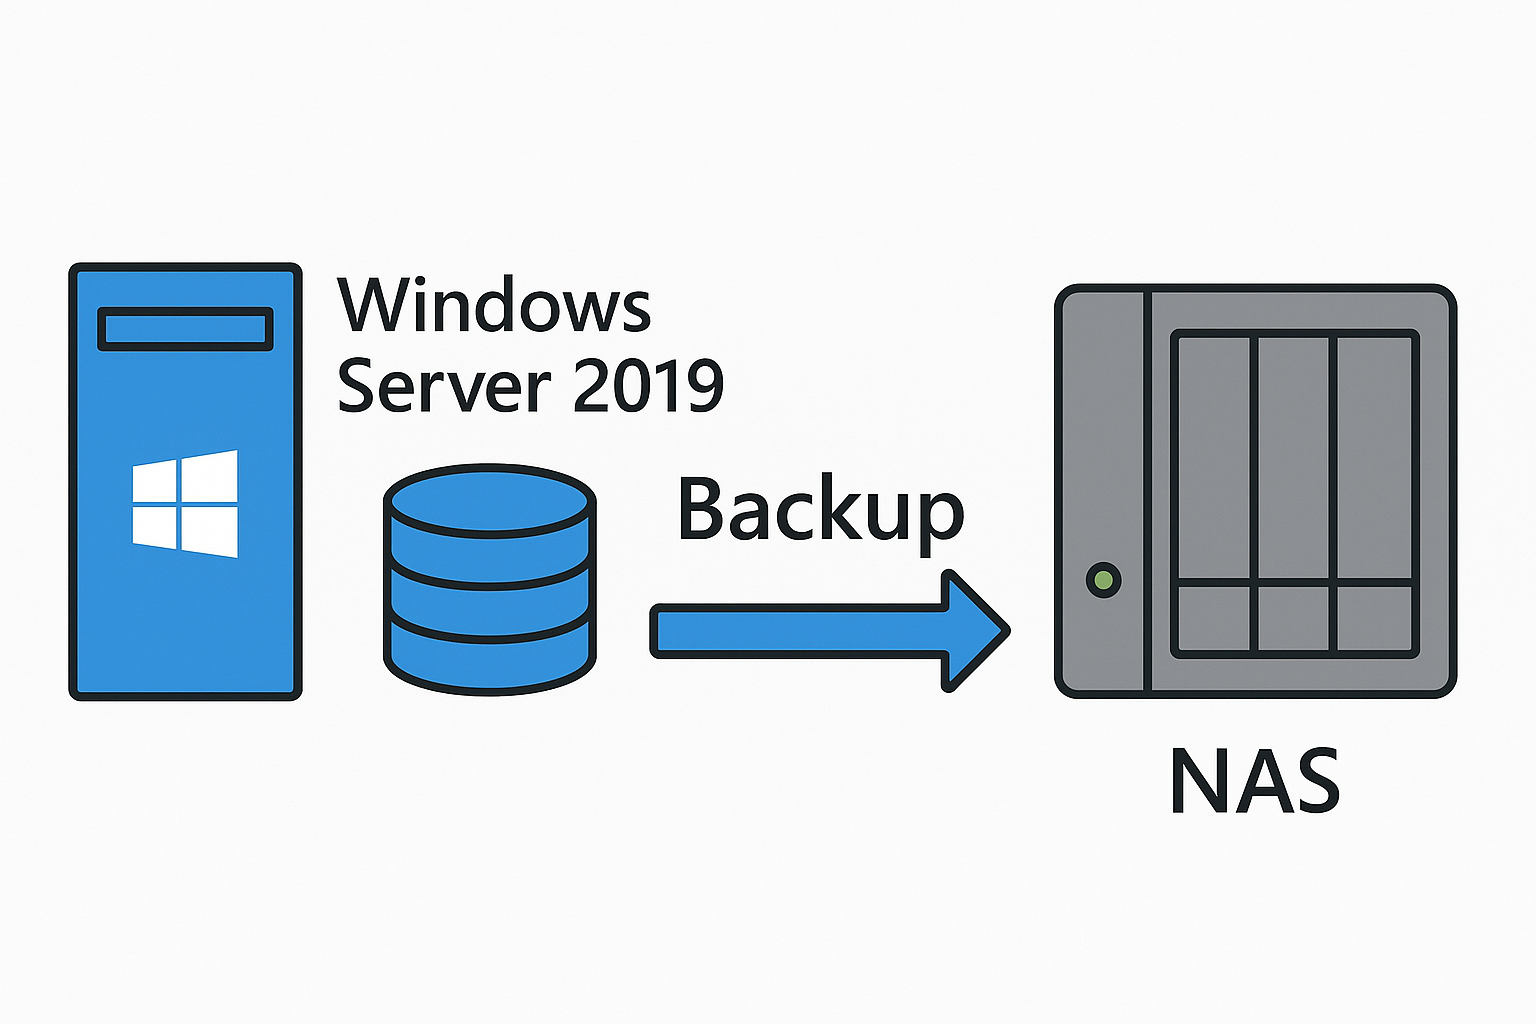
For many IT administrators, backing up Windows Server 2019 to NAS is one of the most practical and cost-effective solutions available. Whether you’re protecting your entire server system or just specific files and folders, backing up to NAS ensures your data remains safe and recoverable in case of hardware failure, ransomware attack, or accidental deletion. Follow this guide to backup Windows Server to NAS easily.
Preparation Before Backing Up Windows Server to NAS
Before you start backing up Windows Server 2019 to NAS, it’s crucial to make sure your network and storage environment are properly set up. Follow these preparation steps to get everything ready.
1. Ensure Network Connectivity
Your Windows Server and NAS device must be on the same local network for successful communication. Assign a static IP address to both the server and NAS to avoid changes that could break the network connection.
2. Create a Shared Folder on the NAS
You need a shared folder on your NAS device to store backup files.
- Log into your NAS management interface (e.g., Synology DSM, QNAP QTS, or similar).
- Create a new folder, such as “ServerBackups”.
- Set read/write permissions for the user account that your Windows Server will use to connect.
- Note down the folder path (e.g., \\192.168.1.100\ServerBackups).
3. Verify Access and Storage Space
Before running your first backup:
- Make sure the NAS has enough free space for your backup data.
- Test accessing the NAS path on Windows Server 2019.
You can now proceed to configure the actual backup process with two methods offered below.
👉 Method 1: Windows Server 2019 Backup to NAS Using AOMEI Backupper🔥
👉 Method 2: Backup Windows Server 2019 to NAS Using Windows Server Backup
Method 1: Windows Server 2019 Backup to NAS Using AOMEI Backupper
If you want a flexible, automated, and reliable way to back up Windows Server 2019 to NAS, AOMEI Backupper Server is the ideal solution. It offers all the backup and restore features you need to protect Windows Server.
🙂 Multiple Backup Types: Supports System, Disk, Partition, and File/Folder backups.
🙂 Incremental & Differential Backup: Automatically backs up only changed data to save time and space.
🙂 Automatic Backup Schedule: Set backups to run daily, weekly, or monthly without manual intervention.
🙂 Backup Scheme Management: Automatically delete old backups to free up storage.
🙂 Encryption & Compression: Protects your data and reduces backup file size.
🙂 NAS & Network Support: Seamlessly connect to NAS or network share paths.
Download AOMEI Backupper now to try it out!
Take Synology NAS as an example. Learn how to perform Windows Server backup to Synology NAS with AOMEI Backupper below:
Step 1. Install AOMEI Backupper Server on your Windows Server 2019 system, then open the program.
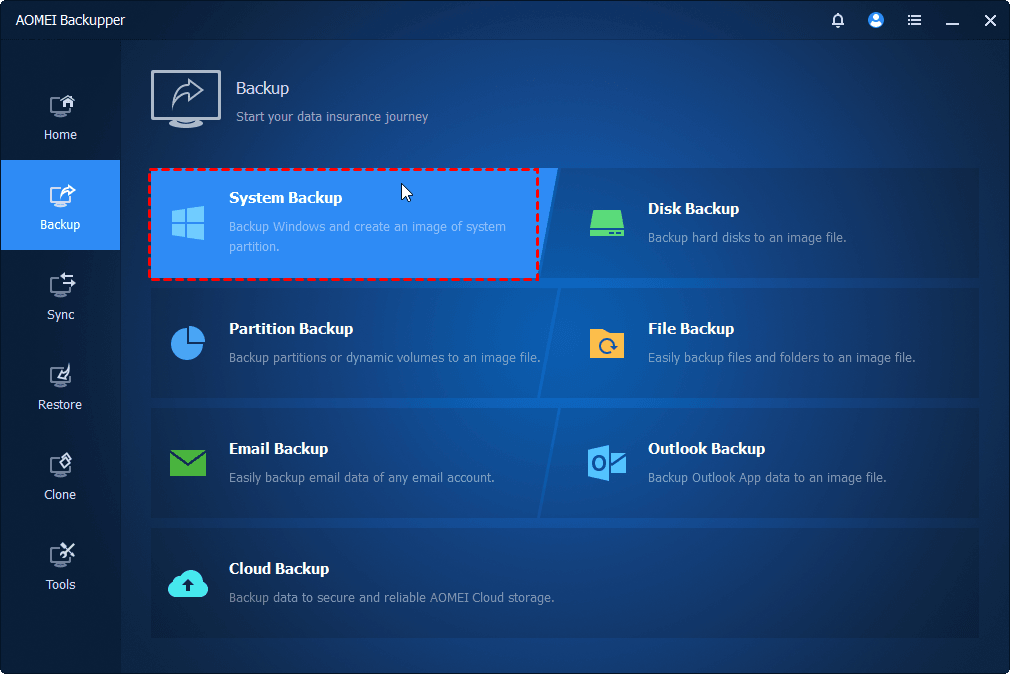
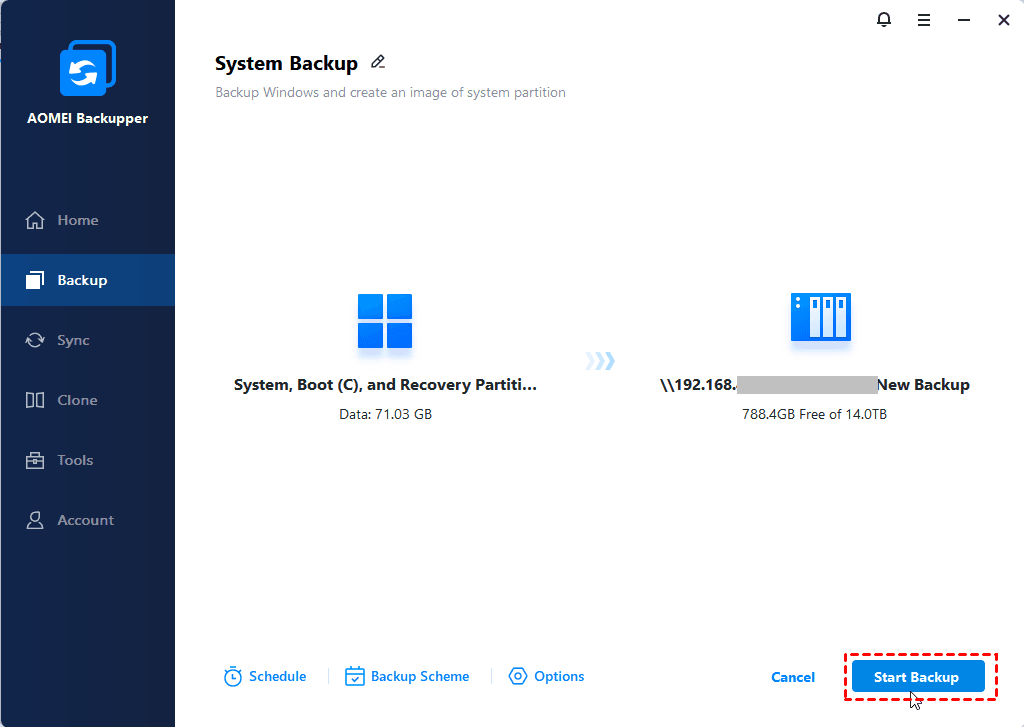
Step 2. From the left panel, click Backup, and select System Backup to backup the operating system and boot partitions.
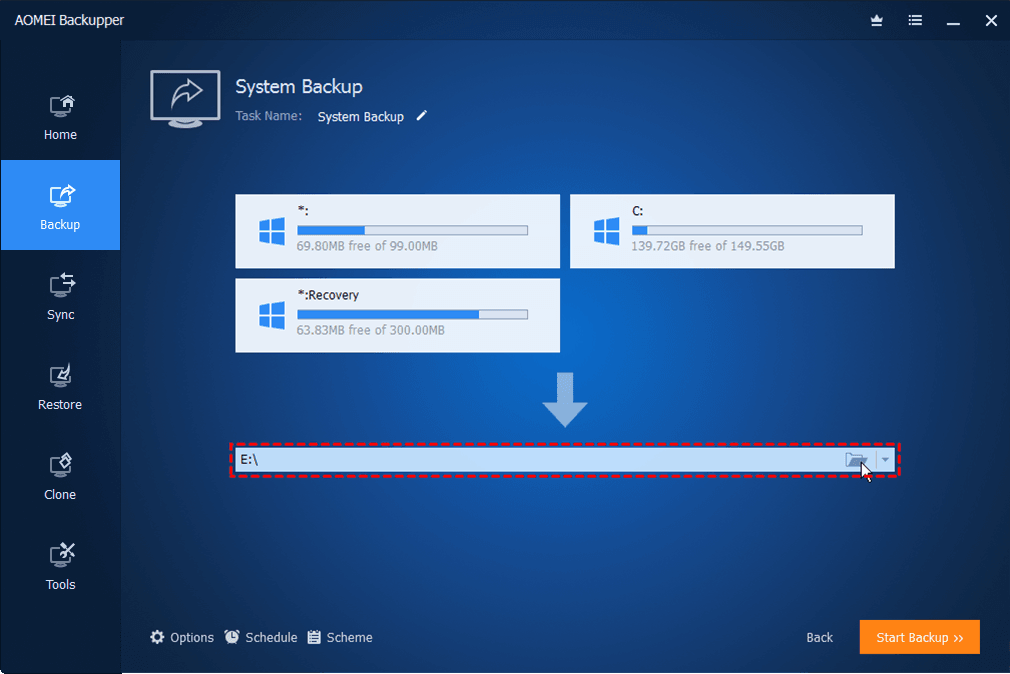
Step 3. Boot-related partitions are selected by default. Click the destination box and select NAS in the Backup Destination window.
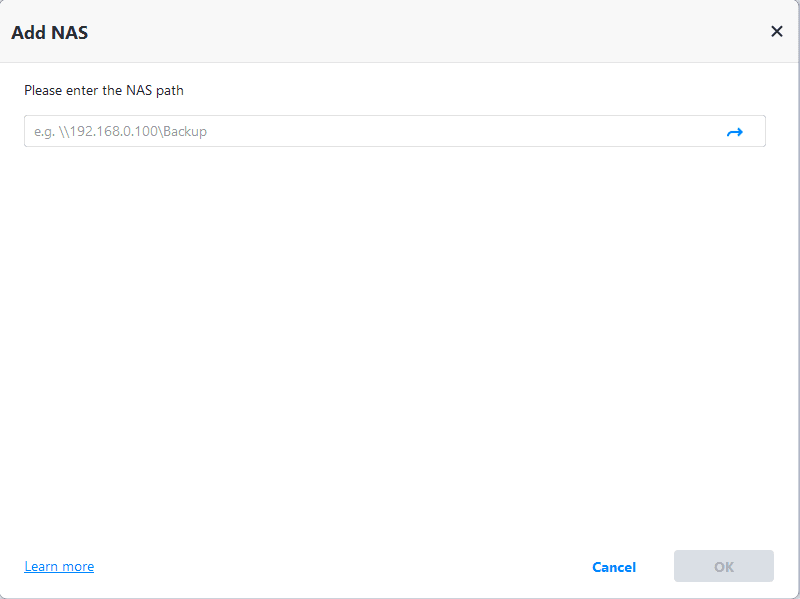
Step 4. On this screen, type your Synology NAS path and click the right arrow. Input username and password if it is required, then click OK.
Step 5. Then, choose one folder on the Synology NAS as the destination path to store the backup image.
Step 6. Customize your backup with Options, Schedule, and Backup Scheme as necessary. Finally, click Start Backup to begin backing up Windows Server 2019 to your NAS.
Method 2: Backup Windows Server 2019 to NAS Using Windows Server Backup
Windows Server Backup (WSB) is Microsoft’s built-in tool for performing system and data backups. It allows you to create full server, system state, and custom backups — including the option to store them on a network share (NAS).
Although it’s not as flexible or feature-rich as professional software like AOMEI Backupper Server, it’s still a viable choice for simple, small-scale environments or when you prefer native tools. Follow the steps below to backup Windows Server 2019 to NAS with WSB:
Step 1. Install the Windows Server Backup feature.
- Open Server Manager → click Manage → select Add Roles and Features.
- Proceed to Features → check Windows Server Backup.
- Click Install and wait for completion.
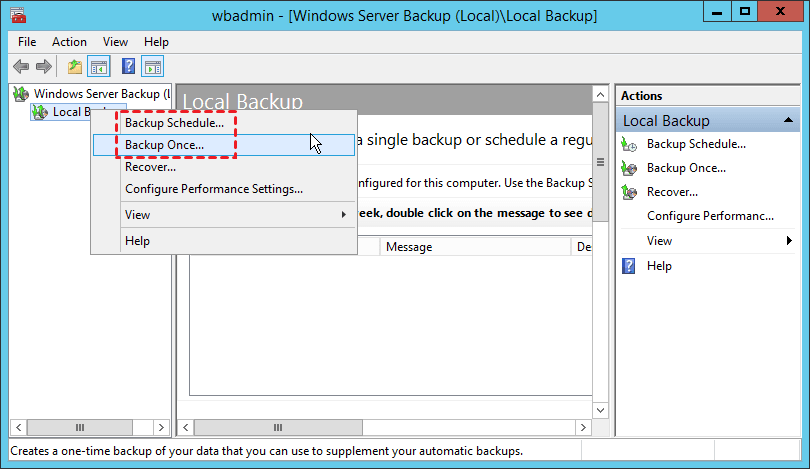
Step 2. After installation, open Windows Server Backup and choose Local Backup > Backup Once or Backup Schedule depending on your needs. Here I choose Backup Once.
Step 3. Choose the backup options: Different options, and hit Next.
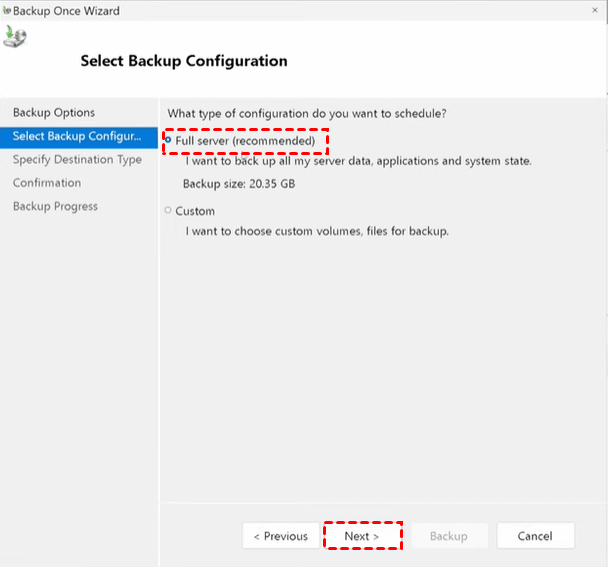
Step 4. Choose Full Server to back up everything (system, applications, and data) and hit Next. You can also choose Custom to select specific volumes or files.
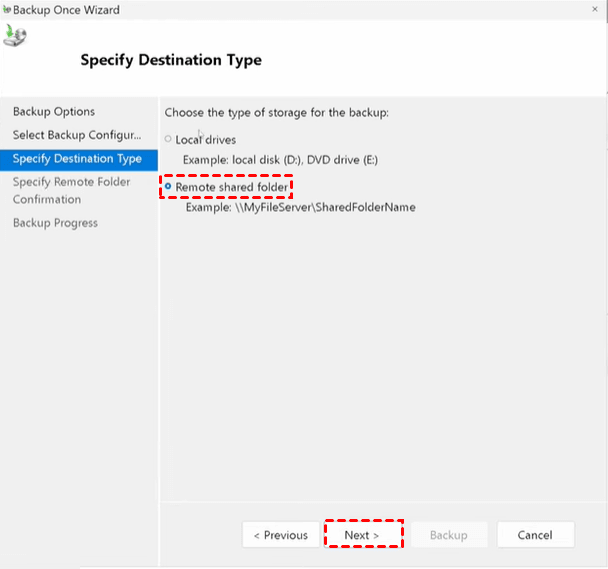
Step 5. Choose a backup destination: Remote shared folder, and press Next. Then type your NAS path and click Next.
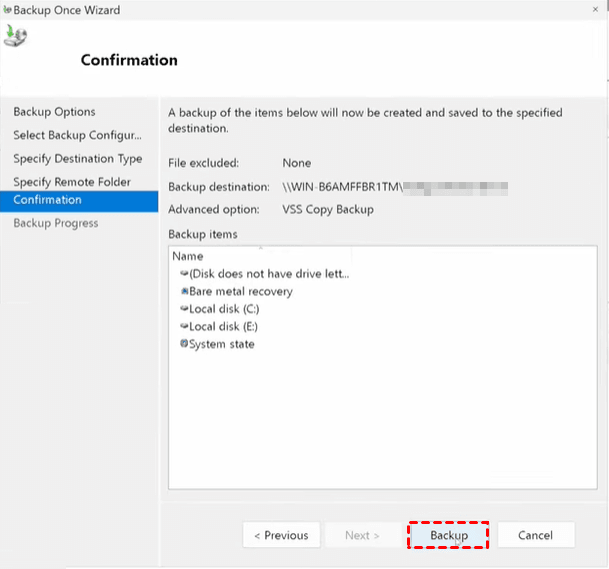
Step 6. Preview your backup settings and click Backup to perform Windows Server 2019 bare metal backup to NAS.
⚠️ Note: Windows Server Backup can store only one backup version in a network share. Each new backup will overwrite the previous one. If you want multiple versions retained, use local drives or third-party backup software.
FAQs about Windows Server Backup to NAS
1. Can I schedule automatic backups to NAS using Windows Server Backup?
Yes, you can create a Backup Schedule that automatically runs at specific intervals. However, when backing up to a NAS, Windows Server Backup will still overwrite older backups. If you require multiple restore points or automated version management, use AOMEI Backupper Server instead.
2. What format does Windows Server Backup use when saving to NAS?
Windows Server Backup typically saves data as a VHDX image file (for full backups) or BKF files (for certain legacy configurations). These files can be restored through the Windows Server Backup recovery wizard or mounted manually in Disk Management.
3. Why does my backup to NAS fail with an “Access Denied” error?
This issue usually occurs due to insufficient permissions or incorrect network credentials. To fix it:
- Verify that the NAS shared folder allows read/write access for the user account used in the backup.
- Re-enter correct credentials in the backup wizard.
- Make sure both devices are on the same domain or workgroup.
Wrapping Things Up
This article explains how to perform Windows Server 2019 backup to NAS efficiently and securely. It covers everything from initial preparations to detailed backup methods using both Windows Server Backup and AOMEI Backupper Server.
While Windows Server Backup provides a simple way to store one backup version on a NAS, AOMEI Backupper Server offers far more flexibility with incremental and differential backups, automatic scheduling, and encryption, etc. You can also use it to backup Windows 11/10/8/7. Why not give it a shot?
