
Best Way to Sync Laptop and Desktop on Windows 11 (2 Cases)
Learn how to sync your Windows 11 laptop and desktop. We cover both Microsoft and third-party tools to keep your files, settings, and workflow seamless across devices.
By Lily Updated on March 23, 2026
Can You Sync a Laptop and Desktop on Windows 11?
Yes, you can run laptop sync with desktop on Windows 11. However, what Windows 11 can sync automatically and what you must sync manually are two different things.
👉 What Windows 11 Can Sync Automatically
If you sign in with the same Microsoft account on both your laptop and desktop, Windows 11 can automatically sync several system-level preferences across devices, including:
- Theme, personalization, and wallpaper
- Language and accessibility settings
- Wi-Fi passwords and some credential data (via Windows Hello and Microsoft account sync)
- Browser favorites and data (if using Microsoft Edge with sync enabled)
👉 What Windows 11 Cannot Sync Automatically
Windows does not automatically sync your personal documents, desktop files, photos, downloads, custom folders, or application installations. These require separate tools.
Because of these limitations, most users need a mix of Microsoft account settings sync + file sync tools to truly keep both devices updated.
👉 Situation 1: Sync Settings Between Laptop and Desktop
👉 Situation 2: Sync Files Between Laptop and Desktop🔥

Situation 1: Sync Settings Between Laptop and Desktop
If your goal is to keep both devices feeling identical—same theme, same preferences, same Wi-Fi passwords—Windows 11 makes this part easy. By signing in with the same Microsoft account, your laptop and desktop can automatically sync most system settings without any extra tools.
1. On your laptop, open Settings > Accounts. Ensure you’re signed in with a Microsoft account.
2. Go to Windows backup and turn on:
- Remember my apps
- Remember my preferences
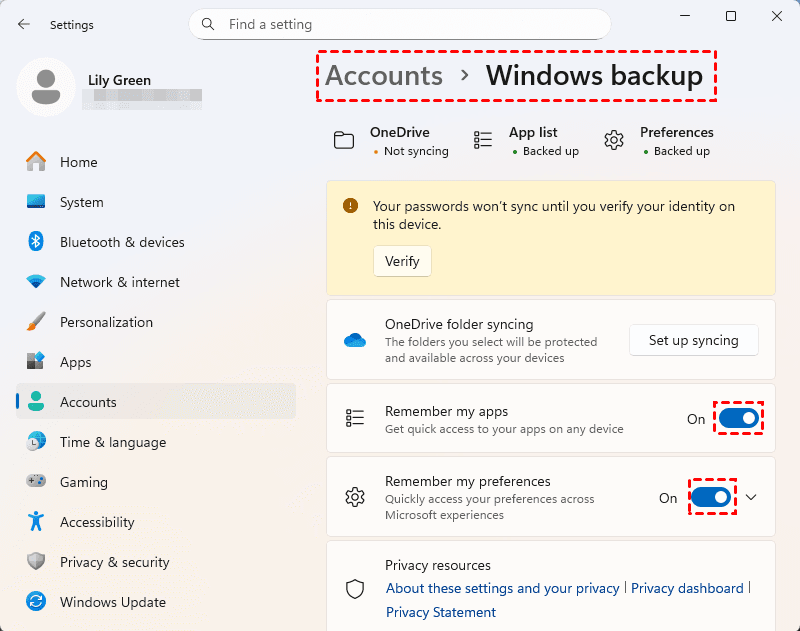
3. Repeat steps 1, 2 on your desktop to apply the same settings.
Situation 2: Sync Files Between Laptop and Desktop
If you want a reliable way to keep folders perfectly aligned between your laptop and desktop, AOMEI Backupper Standard is a go-to option. It supports various sync sources and destinations, and can automatically keep both devices updated on a schedule.

- Batch Sync: Synchronize multiple folders simultaneously to work faster and smarter.
- Scheduled Sync: Set daily, weekly, monthly, or event-triggered sync based on your needs.
- Flexible Sources & Destinations: Support local disk, external drive, NAS device, and cloud storage, etc. You can sync network folders to OneDrive easily.
- User-Friendly Interface: Simple design that makes advanced syncing accessible to everyone.
Download AOMEI Backupper and learn how to sync files between laptop and desktop on Windows 11 below:
1. Prepare devices for sync.
- Ensure both devices are connected to the same LAN network.
- Create a new folder on the source computer (here I use laptop) and share it over network.
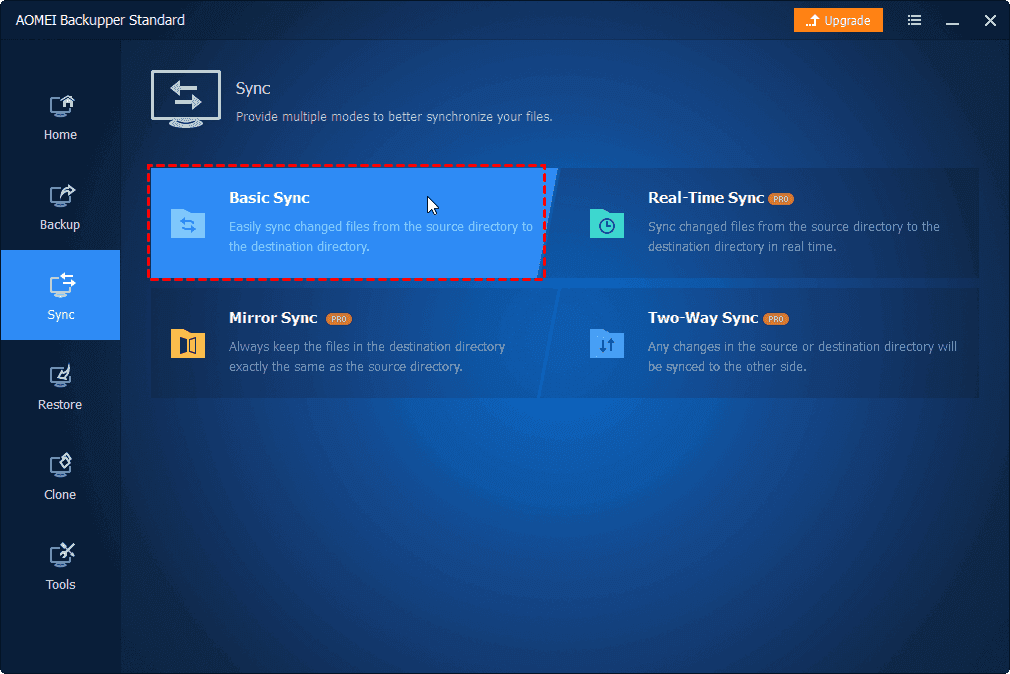
2. Install and launch AOMEI Backupper on your laptop. Click Sync and select Basic Sync.
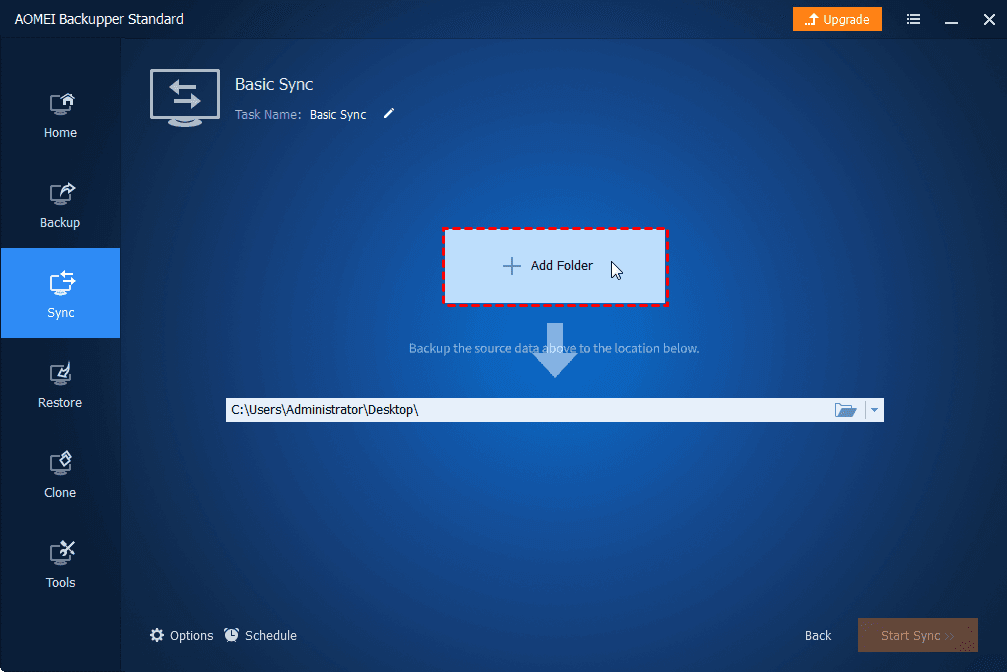
3. Click Select Source to select the folder(s) you want to sync from laptop to desktop.
4. Click the destination box and select Network Share > Add Network Share. Then enter the IP address of your source computer, select the shared folder just created and click OK.

5. Enable Schedule Sync and choose your preferred frequency as necessary. Finally, click Start Sync to begin file sync.
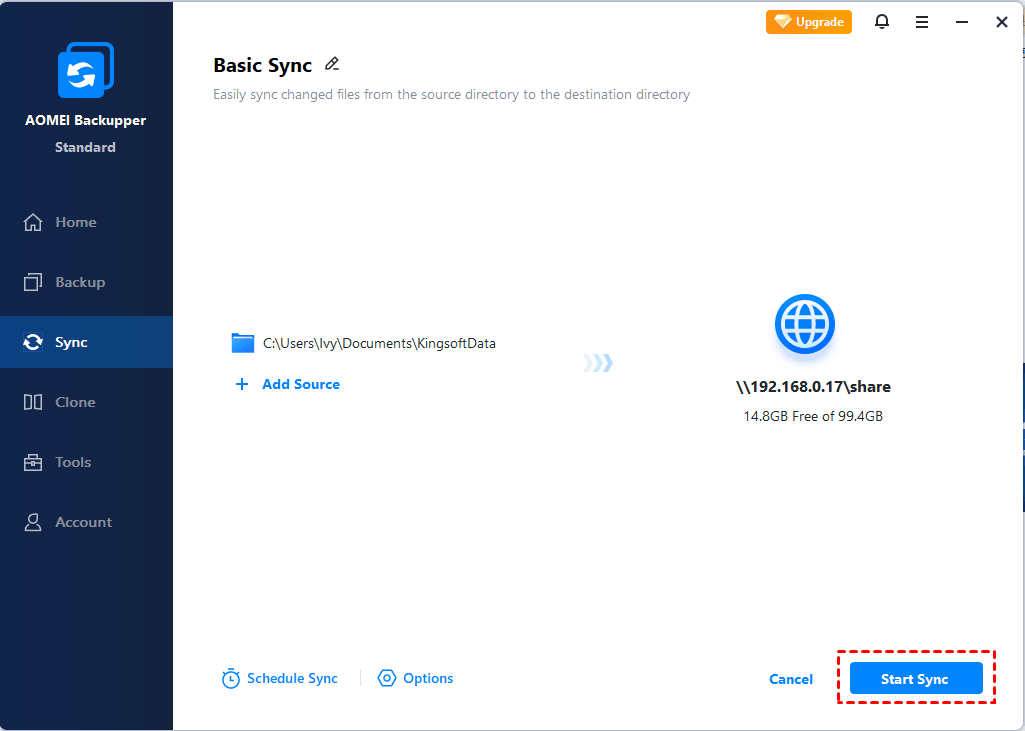
6. After the sync process is finished, type the network path (e.g., \\192.168.0.17\share) in the search box on your desktop. Then you can see all the synced files. Copy those files elsewhere on your desktop as necessary.
✍ Notes:
● To enjoy advanced sync modes like Mirror Sync, Two-Way Sync, and Real-Time Sync, please upgrade to AOMEI Backupper Professional or higher.
● To sync files between two computers without network, you can sync files to an external hard drive on the source computer and then connect the external hard drive to the destination computer.
Best Practices for Smooth Cross-Device Sync
Syncing your laptop and desktop in Windows 11 becomes far more reliable when you follow a few proven habits.
1. Use a Consistent Folder Structure on Both Devices
Maintaining identical folder layouts on your laptop and desktop prevents confusion and reduces the risk of syncing the wrong directory. For example:
- Use a standard Work, Projects, Media, or Docs hierarchy
- Avoid scattering important files across multiple locations
- Keep naming conventions consistent
This makes syncing faster, cleaner, and easier to troubleshoot.
2. Monitor Disk Space on Both Devices
A sync is only as smooth as the storage available on each computer. Before setting up a large sync job:
- Check free space on both devices
- Ensure the destination drive can hold all synced data
- Consider storing large media libraries on a NAS instead of local devices
Running out of space mid-sync can cause incomplete transfers or data inconsistencies.
3. Use Scheduled Sync to Avoid Manual Errors
Automated schedules ensure your laptop and desktop stay aligned without needing to remember manual updates. AOMEI Backupper lets you sync daily, weekly, or at startup or shutdown, etc.
4. Keep Both Devices on the Same Network (for LAN Sync)
If you're syncing via shared folders or NAS:
- Use a stable home or office network
- Connect devices using Ethernet when possible for speed
- Ensure both devices can discover each other on the network
A stable LAN connection boosts sync performance and reduces dropped transfers.
Wrapping Things Up
You have learned the best way to sync laptop and desktop on Windows 11. Windows 11 can automatically sync system settings when you sign in with the same Microsoft account. For files and folders, you need dedicated tools like AOMEI Backupper.
AOMEI Backupper enables you to sync files between various locations. What’s more, it’s all-around backup and restore software for Windows 11. Try it now to discover more!
