
Windows Sync Folders Between Computers [Free & 5 Methods]
This article describes how to sync folders between computers in Windows 11, 10, 8.1/8, 7 using network, OneDrive, or free sync software like AOMEI Backupper, SyncToy, etc. Scroll down to learn more.
By Ivy Updated on March 23, 2026
Windows sync folders between computers is a practical way to keep your files updated, shared, and protected. It ensures that all your files stay the same on multiple computers- any change you make is synced automatically. This eliminates the hassle of manually moving files, keeping your work consistent wherever you are.
It also makes sharing and teamwork easier since everyone can access the same up-to-date files without sending them back and forth. Plus, syncing acts as a vital backup, keeping your data safe if something goes wronglikecomputer crashes or accidental deletion.

This article includes 5 simple and effective methods to sync folders between computers in Windows 11, 10, 8, 7, etc., such as network, cloud services, free file sync software - AOMEI Backupper, SyncToy, etc. Select the one that best suits your needs.
Method 1: Sync Folders Between Computers in Windows Through the Network
One of the simplest methods to sync folders between computers in Windows is by using your local network. It allows you to share files directly between devices connected to the same Wi-Fi or LAN, without requiring the internet or software. Be sure to set a shared folder first on one of the computers.
Step 1. On the one computer, right-click the folder you want to share and select Properties. Then, go to the Sharing tab and click Advanced Sharing.
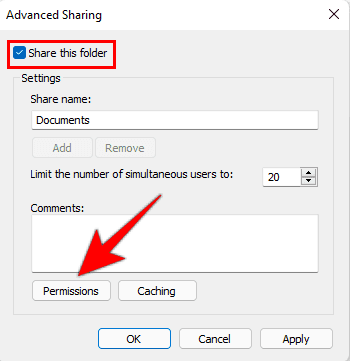
Step 2. Check the box that says Share this folder. Then, click Permissions and check Full Control, or Read-only. Click Apply and OK to confirm.
⚠️Take note of the network path shown (e.g., \\YourComputerName\FolderName). You’ll use this to access the folder from another computer. Or directly access it through the IP address as well as the folder name.
Step 3. On the other computer, press Win + R to open the Run dialog box. Then, type the network path you noted earlier (e.g., \\YourComputerName\FolderName) and press Enter to access and copy the files you want.
Using this method, you can easily share and sync files between computers on the same network. For continuous or automatic sync, consider pairing this setup with software or using cloud storage like OneDrive.
Method 2: Sync Folders Between Computers in Windows with OneDrive
OneDrive is seamlessly integrated into Windows 10 and 11, allowing you to quickly set it up using your Microsoft account and automatically sync files across multiple devices. This is a great way to manage your files if you have a OneDrive subscription.
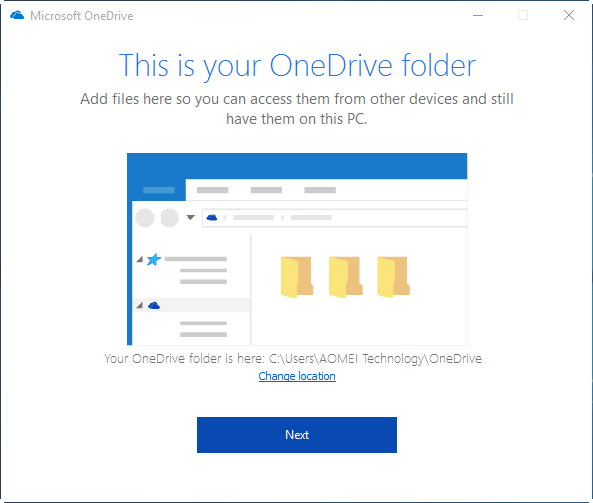
Step 1. Sign in to OneDrive on both computers using the same Microsoft account. This creates a local OneDrive folder, usually located at C:\Users\[YourName]\OneDrive, and triggers an auto-sync task.
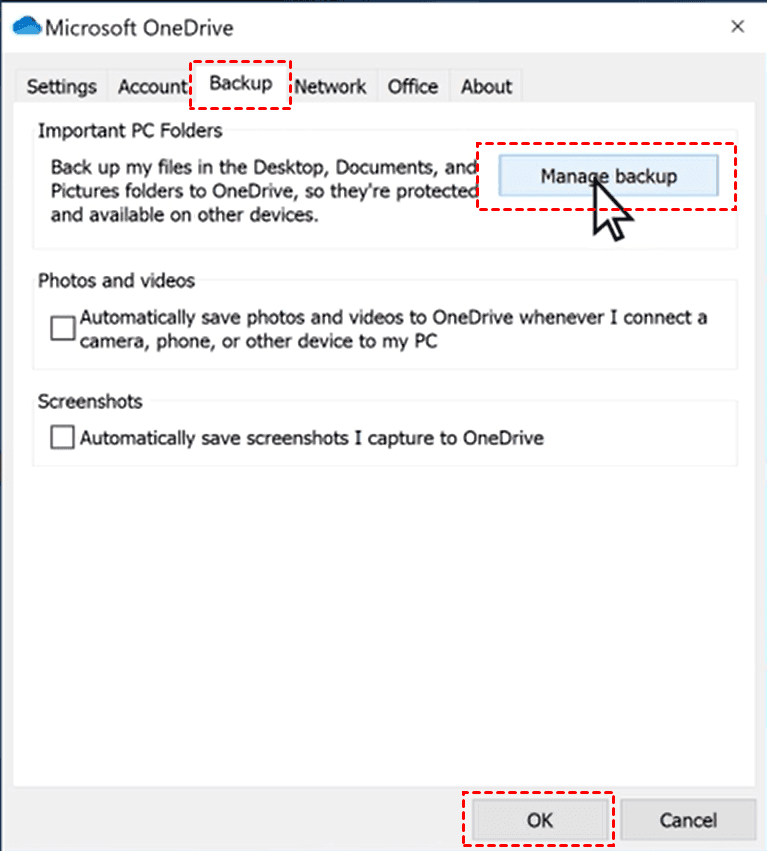
Step 2. Click Help & Settings> Settings gear. Then, under the Backup tab, click Manage backup.
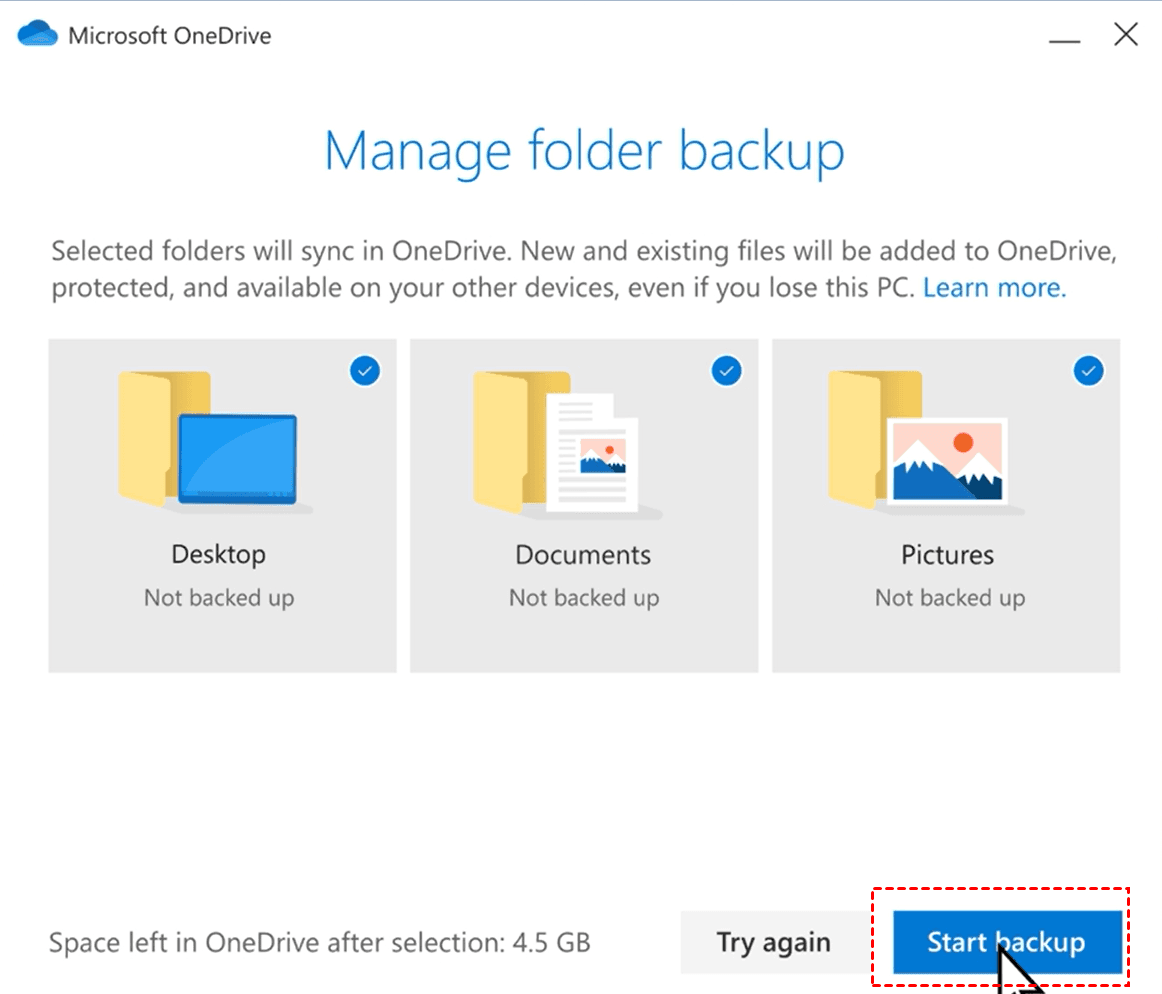
Step 3. Select the folders you want to sync between the computer and OneDrive and click Start Backup.
Step 4. After syncing, open the OneDrive folder on another computer to confirm. Or log in to OneDrive.com or use the OneDrive mobile app.
Using OneDrive is perfect if you want seamless, cloud-based synchronization without needing extra tools. It keeps your files safe, accessible anywhere, and auto-syncs in case of hardware failure.
Method 3: Windows Sync Folders Between Two Computers using AOMEI Backupper
AOMEI BackupperStandard is a professional sync tool that makes it easy to sync folders between computers, drives, network locations, etc., in Windows. It offers users a free basic sync, from source to destination, with flexible schedule sync options, and 3 advanced sync modes, allowing you to automate the process without manual intervention.
- Real-Time Sync: Sync files from source to destination as long as the change is detected.
- Mirror Sync: Always keeps files in the destination exactly the same as the source.
- Two-Way Sync: Any changes in the source or destination will be synced to the other.
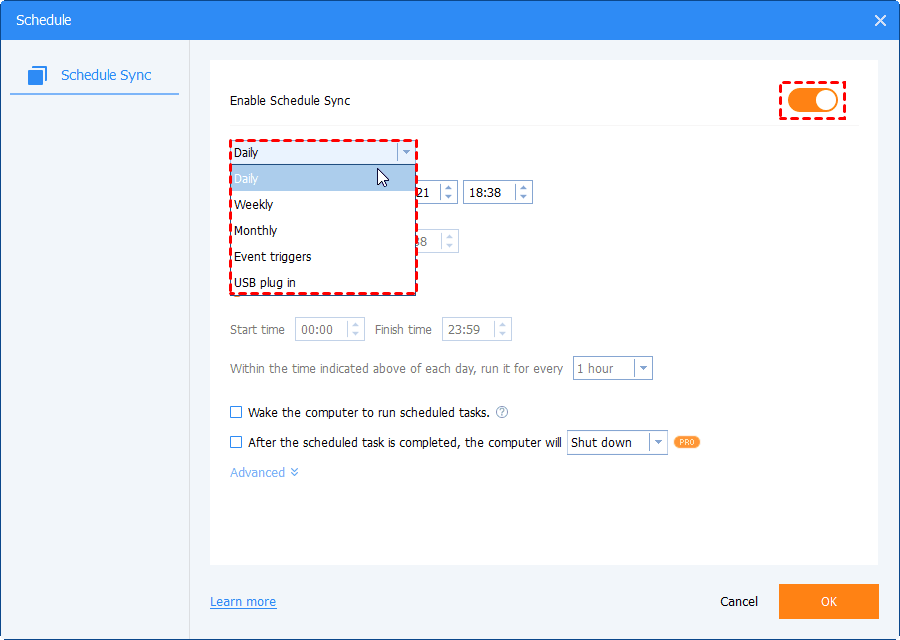
- Schedule Sync: Sync files automatically, such as Daily/Daily (By interval), Weekly, Monthly(By week/date), One Time, and Event triggers.
Step 1. Once installed, open AOMEI Backupper - you’ll see a simple, user-friendly interface. Click Sync in the left panel and then Basic Sync.
Step 2. Click Select Source to select the folder you want to sync. This can be the local computer's desktop, documents, or other folders. To sync files from a remote computer, NAS, or network share, click NAS or Network Share to add the NAS/network path.
Step 3. Under Destination, click the PC icon > Network Share > Add Network Share. Then, enter the network path of the other PC and select the destination folder.
Step 4(Important). Click Schedule Sync and enable it. Then, select one sync option from the drop-down menu. It enables this task to be automatic.
Step 5. Confirm the sync settings and click Start Sync to sync folders between computers in Windows.
This lets you sync data directly across the network without using external drives or cloud storage. What’s more, it’s automatic and flexible- making it ideal for both personal and business use.
Method 4: Windows Sync Folders Between Computers using SyncToy
SyncToy is a free folder synchronization tool developed by Microsoft. Although it’s no longer officially updated, many Windows users still find it useful for simple, manual folder sync. It allows you to keep two folders on the same computer, external drive, or network.
Step 1. Download and install SyncToy (version 2.1 is the latest) on one of the computers. Then, click Create New Folder Pair.
Step 2. Click Browse under the Left Folder and Right Folder to select the files you want to sync and where the files will be copied or synced to. After selecting both folders, click Next.
Step 3. Select one of the three sync methods: Synchronize, Echo, or Contribute. Then, name this folder pair and click Finish.
- Synchronize: Keeps both folders identical. Changes in one folder are automatically synced to the other.
- Echo: Copies new and updated files from the left folder to the right folder only.
- Contribute: Copies new and updated files from the left to the right folder, excluding deleted files.
Step 4. To start syncing, select the folder pair created previously and click Run. SyncToy will analyze both folders and perform the sync task. Once complete, it will display a detailed report of the changes made.
While SyncToy doesn’t have built-in scheduling, you can automate it using Windows Task Scheduler:
- Open Task Scheduler > Create Basic Task.
- Choose when you want SyncToy to run (daily, weekly, etc.).
- Set the program to run: "C:\Program Files\SyncToy 2.1\SyncToyCmd.exe" -R. This command automatically runs all folder pairs.
Using SyncToy is a great option if you prefer a free, no-frills tool for manual or scheduled syncing. It’s best for users who want simple control over which folders get updated and how, without needing cloud storage or advanced software.
Method 5: Sync Folders Between Computers in Windows using FreeFileSync
FreeFileSync is a free, open-source sync tool that can sync folders across computers, external drives, or network locationsand allow you to compare files before syncing and choose exactly what gets updated.
Step 1 . Download the latest version of FreeFileSync on a Windows PC. It features a side-by-side folder comparison interface. You can select the source and destination folders by clicking the Browse icon on the left and right sides.
Step 2. Click the Compare button (with two blue arrows). It will scan both folders and display differences, highlighting new, changed, or missing files.
Step 3. Click the green gear icon and select the best-suited sync mode. Then, click the Synchronize button to sync folders between computers in Windows.
- Two Way: Keep both folders identical. Changes in one folder are synced to the other.
- Mirror: Make the destination folder exactly match the source.
- Update: Only add or update files in the destination without deleting files.
- Custom: Configure the sync rules.
FreeFileSync will start the process, showing a progress bar and a summary once it’s done. You can save this sync setup as a batch job if you want to use it regularly.
Comparison of Different Folder Sync Methods in Windows
|
Sync Methods |
👍 Pros |
❌ Cons |
|
Network |
|
|
|
Cloud Drive (e.g., OneDrive) |
|
|
|
AOMEI Backupper (Local/Network) |
|
|
|
SyncToy (Local) |
|
|
|
FreeFileSync (Local/Network) |
|
|
Conclusion
With these 5 practical methods, you can easily perform Windows sync folders between computers, though the results vary slightly. Sync through network offers a straightforward method, while OneDrive requires a subscription service (to ensure smooth synchronization).
All software options are free, but SyncToy and FreeFileSync do not support auto-sync unless done through the Task Scheduler. AOMEI Backupper, however, is very straightforward and offers you 7 scheduled sync options.
