
QNAP Wipe Disk & Replacement [Complete Guide]
Scroll down to learn more about QNAP wipe disk and how to wipe a disk step by step. The best alternative - AOMEI Cloner is included, offering more control and SSD compatibility.
By Ivy Updated on March 18, 2026
What Is a QNAP Wipe Disk?
QNAP offers a Secure Erase feature in QTS and QuTS hero for complete data destruction through hardware-level commands that overwrite the entire disk, along with different methods. No data can be recovered even with professional recovery tools.
- Fast/Complete: Uses sector-by-sector overwriting to replace existing data with meaningless patterns.
- SSD: Uses ATA Secure Erase to reset the memory cells at the controller level -faster and more reliable than traditional overwriting.
This process eliminates file system structures, metadata, and hidden data areas, leaving no usable traces behind, making it the safest option when you plan to reuse, sell, replace, or dispose of a NAS drive. Once Secure Erase completes, the disk returns to an uninitialized state, as if brand new, with no recoverable data remaining.
How to Perform QNAP Secure Erase Safely
Performing a QNAP Secure Erase is a powerful and irreversible operation that ensures complete data destruction while protecting the stability of your NAS system. Follow the steps below carefully to ensure the process is safe, effective, and error-free.
📚 Notes:
1️⃣ Secure Erase permanently destroys everything on the selected disk. Before proceeding, please backup files you still need to a safe location.
2️⃣ You cannot securely erase a disk that is currently part of an active storage pool or RAID array.
In QTS / QuTS hero:
- Open Storage & Snapshots. Then, go to Storage / Snapshots > Disks.
- Identify the target disk and remove the disk from its storage pool or RAID group (if necessary).
3️⃣ Never erase the only system disk unless you wantto completely reset the NAS.
Step 1. Log in to your QNAP NAS as admin. Open Storage & Snapshots, click Storage > Disks. Select the disk you want to wipe
Step 2. Click Action > Secure Erase. The Secure Erase window opens. Click Next.
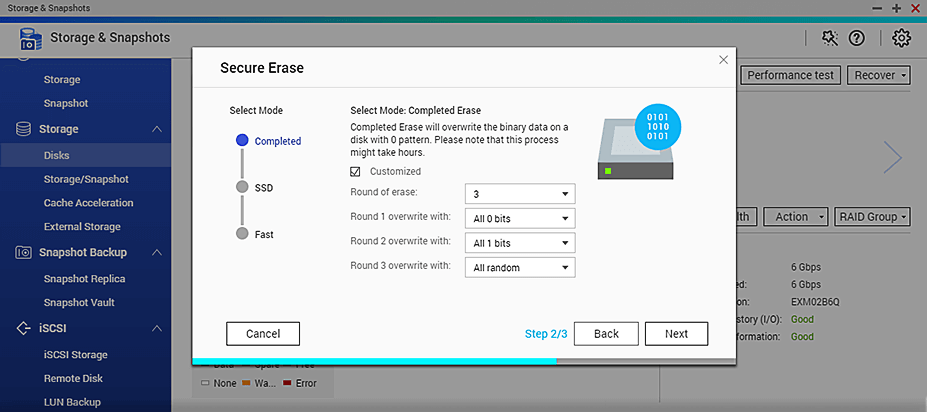
Step 3. Select an erase method and click Next.
- Complete: Overwrite the binary data with a 0 pattern - most secure, but takes a long time. Or set it to Customized, with random bytes and multiple passes.
- SSD: Eraseall data and restore the disk to its factory performanceusing ATA command.
- Fast: Overwrites the partition and RAID configuration data with zeros - fastest but less secure.
Step 4. Enter your password and click Apply to wipe the disk on QNAP. Don’t reboot the NAS until the process is complete.
Step 5. When finished, return to Storage & Snapshots > Disks. Confirm the disk shows as Uninitialized or Not Configured.
Best QNAP Wipe Disk Replacement - AOMEI Backupper
QNAP provides users with multiple erasure methods, but typically selects one automatically. For more control or better SSD compatibility, select a QNAP wipe disk replacement. AOMEI Backupper Professional stands out as the best disk wiper for Windows 11, 10, 8.1/8, 7, with advanced algorithms, bootable environment, wide compatibility, etc.

- Selective Wiping Standards: Fill sectors with zero, random data, DoD 5220.22-M, and Gutman,
- Flexible Target: Wipe the entire drive, partition(s), or unallocated space.
- Bootable Environment: Create a bootable ISO file automatically to erase C drive or system disk in the recovery environment. Or creating one manually.
- Universal Storage Devices: Fully compatible with all types of SSDs, such as SATA, M.2, NVMe, etc., while also supporting HDDs, external hard drives, USB drives, and more.
- Integrated Backup Feature: Support file backup, system backup, schedule backup, etc., for data protection. No need to download extra software.
How to Securely Wipe Disk on QNAP
Now, download the best QNAP wipe disk replacement - AOMEI Backupper Professional to securely wipe HDDs/SSDs, external drives, USB drives, etc., with just a few steps.
Step 1. Open AOMEI Backupper after installing. Then, go to Tools and click Disk Wipe.

Step 2. Select the Wipe disk option. Choose the hard drive or SSD you want to wipe and click Next > Yes to continue.
Step 3. Select a disk wiping method based on the speed and security level required.
- Fill sectors with Zero - Quick but relatively basic.
- Fill with random data - Safer than Zero.
- DoD 5220.22-M - Multiple passes, based on U.S. Department of Defense standards.
- Gutmann - 35 passes, extremely secure but very slow.
At last, click Start to wipe the disk on QNAP. It will automatically create a bootable ISO and execute this process in reboot mode if it’s a system disk.
⚠️Note: You can also use this software to wipe USB flash drive, external drive, unallocated space, etc.
Conclusion
The QNAP wipe disk refers to permanently removing all data using the built-in Secure Erase feature, but it will automatically detect the disk type and select the data erasure method. In addition, it’s less compatible with NVMe SSDs.
Thus, many users are looking for the best QNAP wipe disk replacement for more control or SSD compatibility. AOMEI Backupper Professional excels in this regard. Free download it to erase any disk!
