
How to Move Files instead of Copying in Windows 11 (All Scenarios)
Microsoft provides users with 5 simple methods to move files in Windows 11. To manage different tasks easily and automatically, try the powerful file sync software - AOMEI Backupper Standard.
By Ivy Updated on May 26, 2026
📖 Quick Answer: The Fastest Way to Move Files in Windows 11
If you just need a quick solution, Windows 11 offers several simple ways to move files without installing any extra tools.For details, scroll down to learn more.
#1: Drag and drop between folders or drives (easiest):
👉 Fast, visual, and ideal for small batches of files
Open File Explorer and drag files from one folder to another. This works both within the same drive and across different drives (such as moving files from C: to D:).
#2: Use Cut (Ctrl + X) and Paste (Ctrl + V) to move instead of copy:
👉 Best for precise control and keyboard efficiency
Select your files, press Ctrl + X to cut them, then go to the destination folder and press Ctrl + V to paste. This ensures the files are moved, not duplicated.
#3: Use right-click “Move to” option in File Explorer:
👉 Best for fast navigation to common or predefined folders
In File Explorer, you can also right-click selected files and choose “Move to” to quickly select a destination folder.
Method 1: Move Files using Drag and Drop (Best for Beginners)
Drag and drop is the most intuitive way to move files in Windows 11. It allows you to visually transfer files between folders or drives (e.g., move files from C: to D:, or transfer files from one drive to another) without using menus or shortcuts, making it ideal for beginners.
Case 1: Move Files Between Folders or Drives
With Drag and drop methods, you can move files between folders, transfer files within the same drive or across different drives such as moving files from C drive and D drive, or even to an external hard drive in Windows 11.
Step 1: Open File Explorer and navigate to the folder where your files are currently stored. Or the drive containing the files you want to move.
Step 2: Click and hold the file (or select multiple files), then drag them to the target folder or drive. Release the mouse button to complete the move.
- To move files to external hard drive in Windows 11, you must first connect the drive and then select it as the destination when drag and drop the files.
- Windows will handle file transfer automatically. Moving files within the same drive is usually very fast because it only updates file locations.
- When moving files across drives, Windows deletes the original file only after the transfer is complete, for data security reasons.
Case 2: Move Multiple Files in Windows 11
Moving multiple files at once in Windows 11 is simple. Instead of moving files one by one, you can quickly group and transfer them in just a few clicks.
1️⃣Use Ctrl (Select Individual Files):
Hold down the Ctrl key and click on each file you want to move. This allows you to select multiple files that are not next to each other. Once selected, you can move them together as a group.
2️⃣ Use Shift (Select a Range of Files):
Hold down the Shift key and click the first and last file in a sequence. Windows will automatically select all files in between. This is useful when moving large batches of consecutive files.
After selecting your files, simply drag and drop them into the target folder. You can also move them to Quick Access pinned folders for faster navigation and organization.
Case 3: Move Files using Quick Access
Step 1: Navigate to the folder you want to move files to, right-click it, and select Pin to Quick Access. Do the same for the target folder.
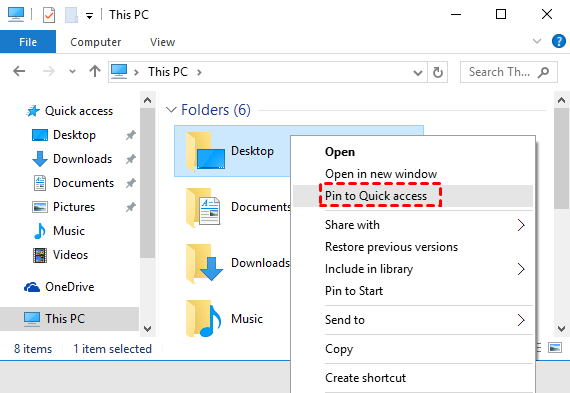
Step 2. In File Explorer, look at the left navigation panel. You will see Quick Access, which contains your frequently used and pinned folders.
Step 3. Select the file(s) you want to move, then drag and drop them into the desired folder pinned under Quick Access. You don’t need to manually search for the destination folder.
Method 2: Move Files using Cut and Paste
Cut and paste is one of the most reliable ways to move files in Windows 11. Unlike copying, this approach ensures files are transferred to a new location without creating duplicates.
To move files instead of copying them, you need to understand the difference between Copy and Cut:
- Copy (Ctrl + C): Creates a duplicate of the file in the new location while keeping the original file in place.
- Cut (Ctrl + X): Removes the file from its original location and places it in the new destination when pasted.
Step 1. Open File Explorer. Locate the files you want to move, either in a folder or drive (e.g., C:), select them, and press Ctrl + X to cut.
Step 2. Go to your destination folder or drive (e.g., D:) and then press Ctrl + V to paste the files.
Method 3: Transfer Files using Move to Ribbon Menu
Windows 11 also provides a “Move to” option in the File Explorer Ribbon Menu that makes moving files more convenient, especially for users who prefer not to use drag-and-drop or keyboard shortcuts. You don’t need to open multiple folders manually.
Step 1. Open File Explorer and select the files you want to move. Then, go to the top toolbar where file management options are available.
Step 2. Under the Home tab, click on Move to.
Step 3. Select the desired folder you want to move files to. Or click Choose location to browse and select a destination. The selected files will be moved immediately.
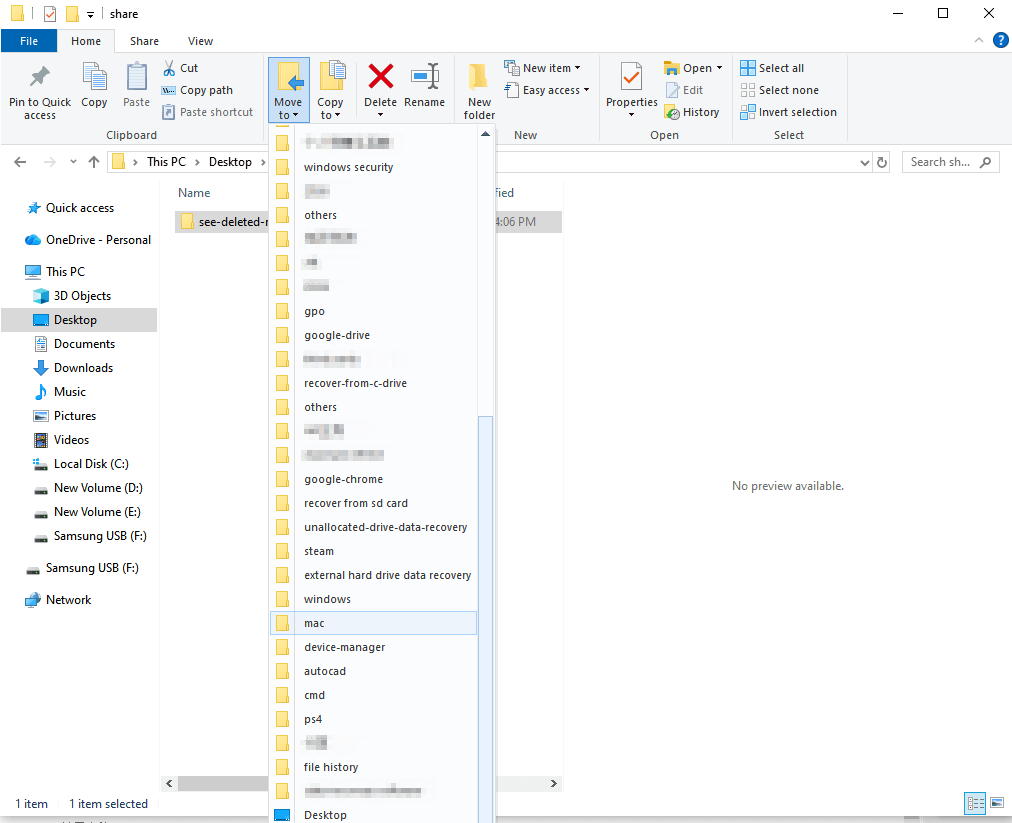
You can also right-click the files and select Show more options > Move to Folder to transfer files in Windows 11.
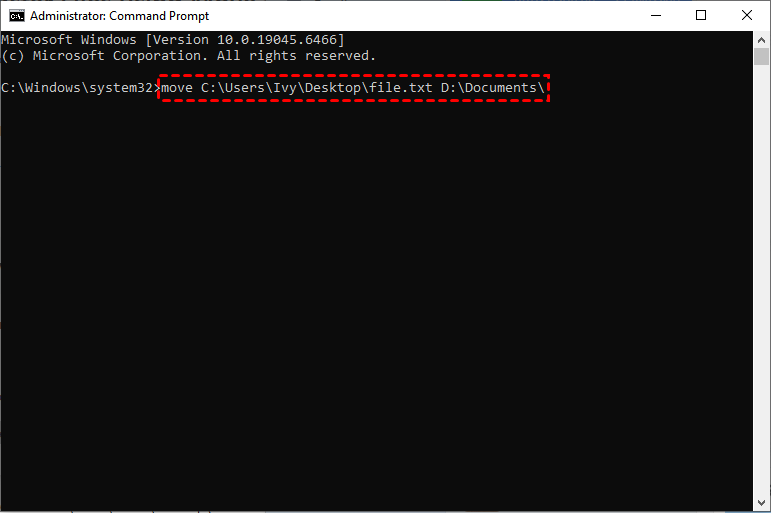
Method 4: Move Files with Command Line (Advanced Users)
For users who prefer more control or need to handle bulk operations efficiently, Windows 11 also provides users with the move command to transfer files from one location to another. These methods are especially useful for automation, batch file management, and advanced workflows.
Step 1. Press Win + S to open the Start menu. Type cmd and select Run as administrator.
Step 2. Type the move command based on syntax and examples:
👉 Move a single file: move C:\Users\Name\Desktop\file.txt D:\Documents\
👉 Move multiple files (same type): move C:\Users\Name\Desktop\*.jpg D:\Pictures\
👉 Move and rename a file: move C:\Users\Name\Desktop\file.txt D:\Documents\newfile.txt
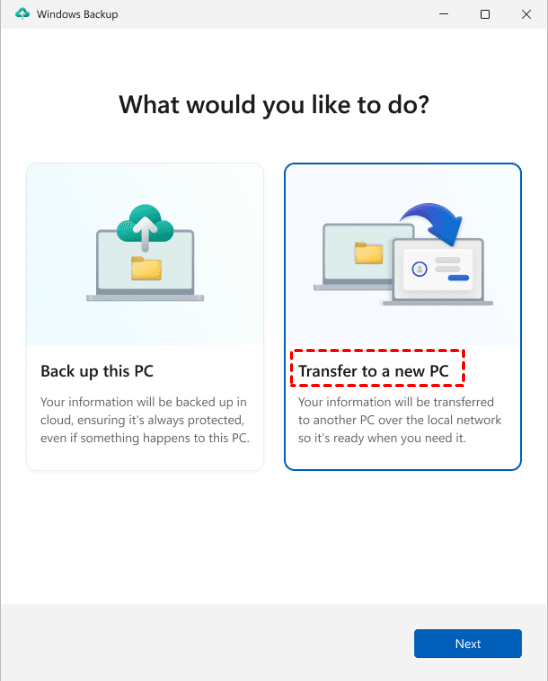
Method 5: Transfer Files to New Windows 11 Computer
Windows 11 provides a built-in Windows Backup feature that helps you transfer files, settings, and preferences from your old PC to a new Windows 11 device. It works through your Microsoft account and cloud synchronization, allowing you to restore data during the initial setup or after signing in on a new computer
- Make sure both PCs are connected to the same WiFi or LAN network and plugged into a power source.
- Ensure your old PC is up to date. If not, check for updates through Windows Settings.
Step 1. Open the Windows Backup app. Then, select Transfer to a new PC and click Next.
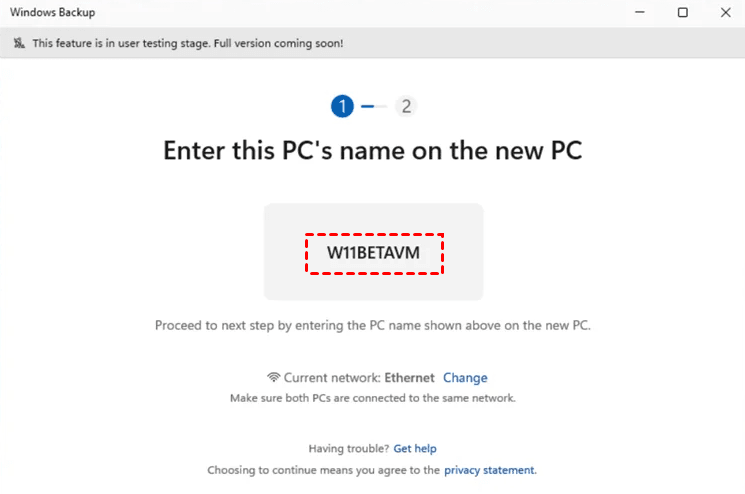
Step 2. On the old PC, you'll be asked to enter this PC's name on the new PC. Do it and click Next.
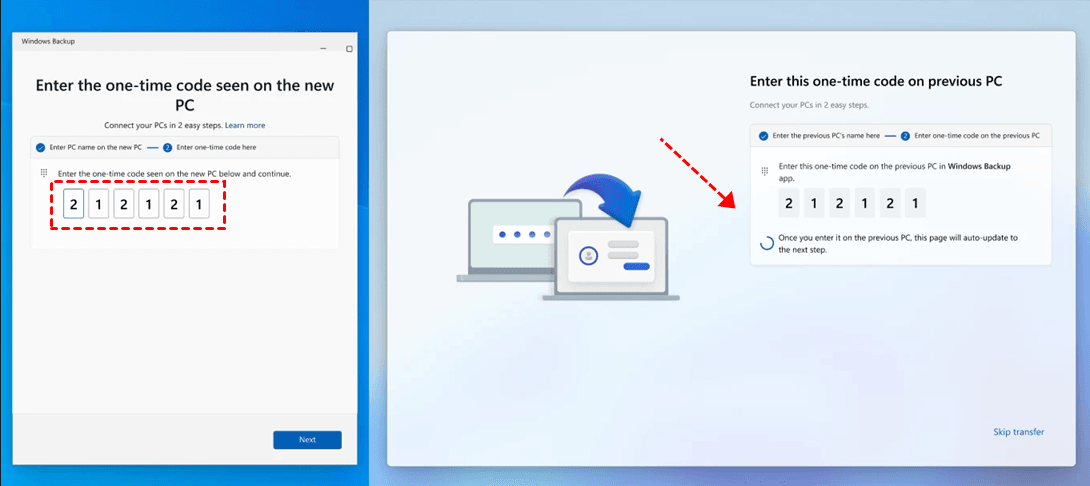
Step 3. Then, enter the one-time code shown on your new PC.
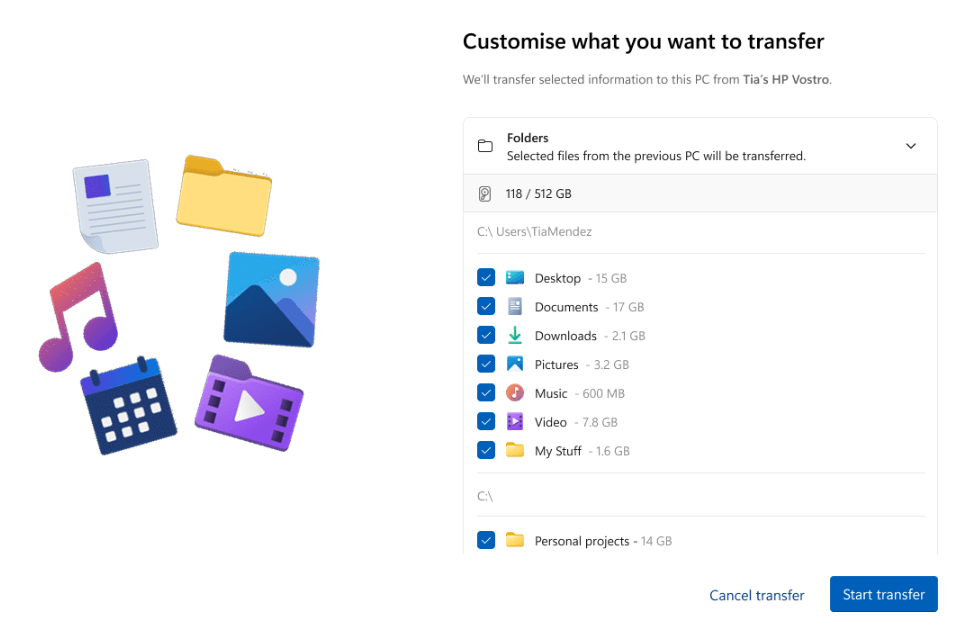
Step 4. Select the folders you want to transfer to new Windows 11 computer.
Step 5. On the new PC, click Start Transfer to transfer files to new Windows 11 computer.
🔥 Easier Way: Move Files in Windows 11 using Software (for All Scenarios)
Whether you’re moving files between drives (from C: to D:), transferring large amounts of data, migrating to a new computer, or dealing with system files that can’t be moved manually, dedicated software provides a simple and more efficient method, without interruptions or data loss during the process.
AOMEI Backupper Standard is the best sync tool that can deal with all of these scenarios. With it, you can automatically transfer files to any folders or drives, or between them, whether on the same or different drives, from HDDs to SSDs, external drives, USB drives, share or NAS, etc., and even to a new computer.

- Free & Fast Sync: Sync only changed files each time to maximize transfer speed.
- Flexible Sync: Select multiple folders to sync at once, or even batch sync them.
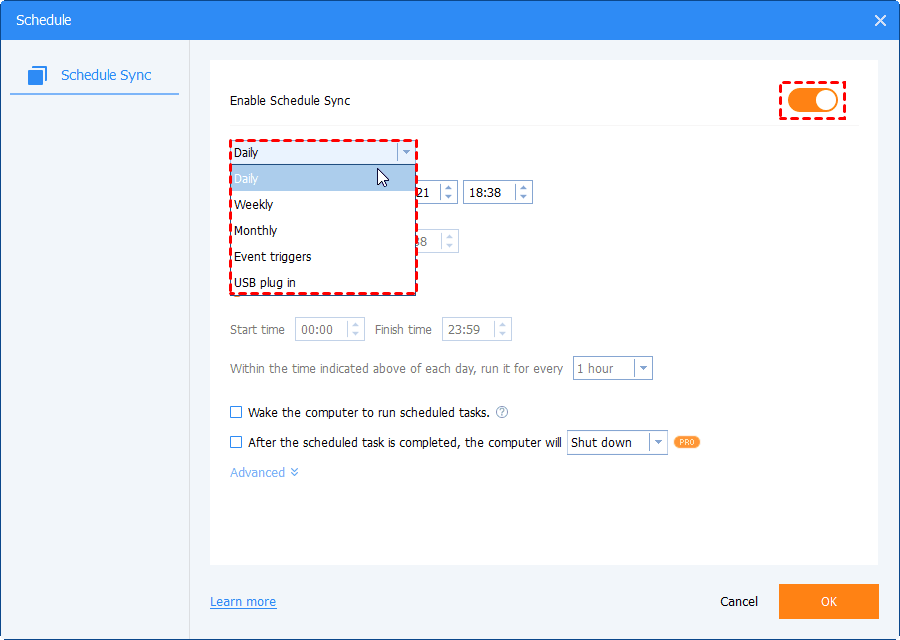
- Automatic Sync: Set up schedule sync based on daily, weekly, monthly, or event triggers, without intervention.
- Sync Deletions: Optionally sync the deletions from the source directory to the destination.
- Email Notification: Set it up before syncing to get timely alerts.
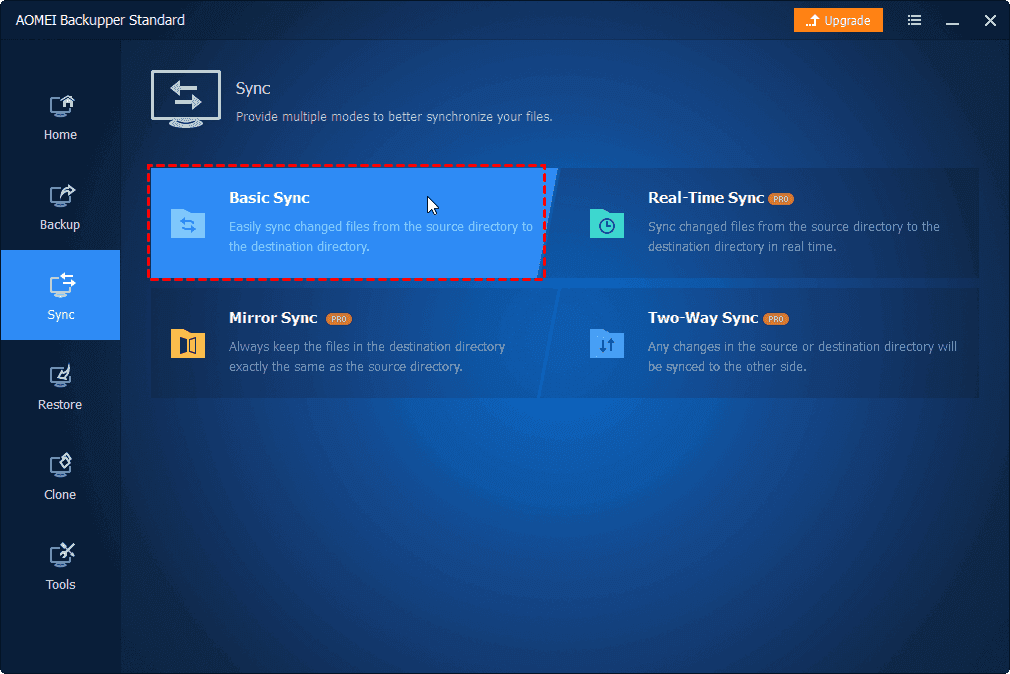
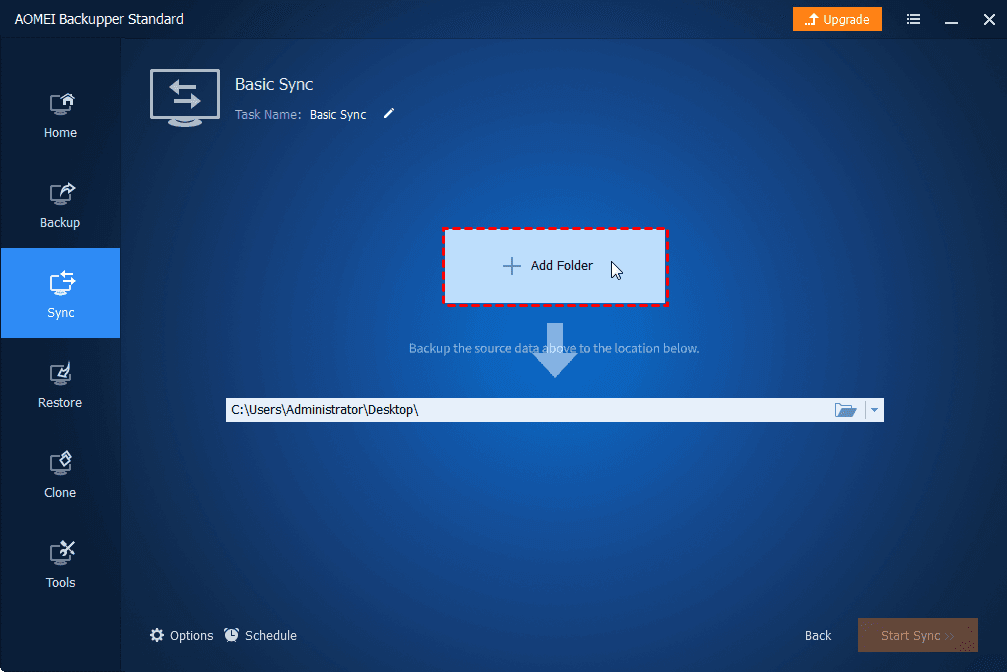
Step 1. Download and install AOMEI Backupper Standard on your computer. Open it and click Sync >Basic Sync.
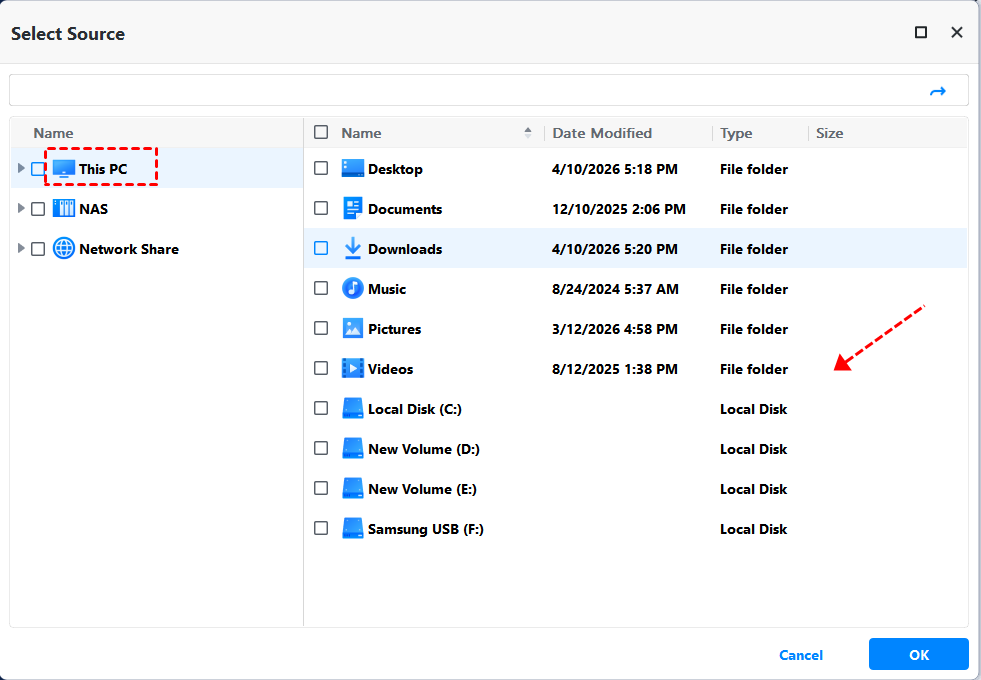
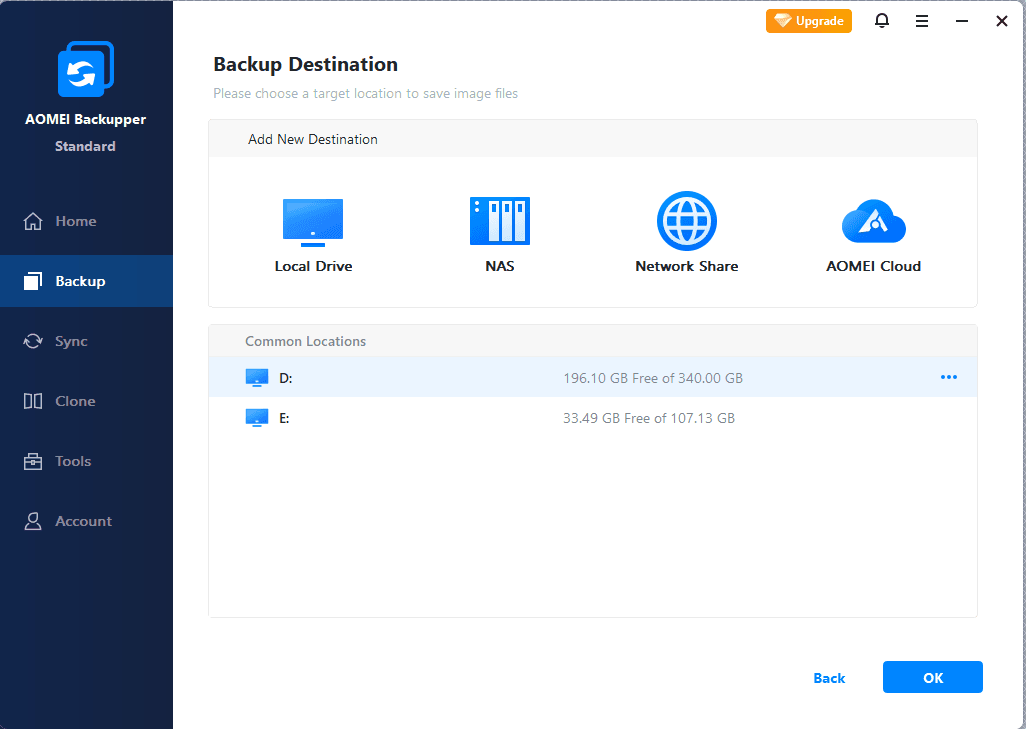
Step 2. Click Select Source to find files you want to move. Select This PC, Network Share, or NAS, depending on where the files are. Then, click the PC icon to select a destination.
For example, to move files from C drive to D drive:
- Click Select Source > This PC and scroll down to select the C drive.
- Then, click the PC icon to find the D drive under This PC. For a specific folder, just expand the D drive to select it.
Or to transfer files to new Windows 11 computer:
- Click Select Source and then Network Share > Add Network Share.
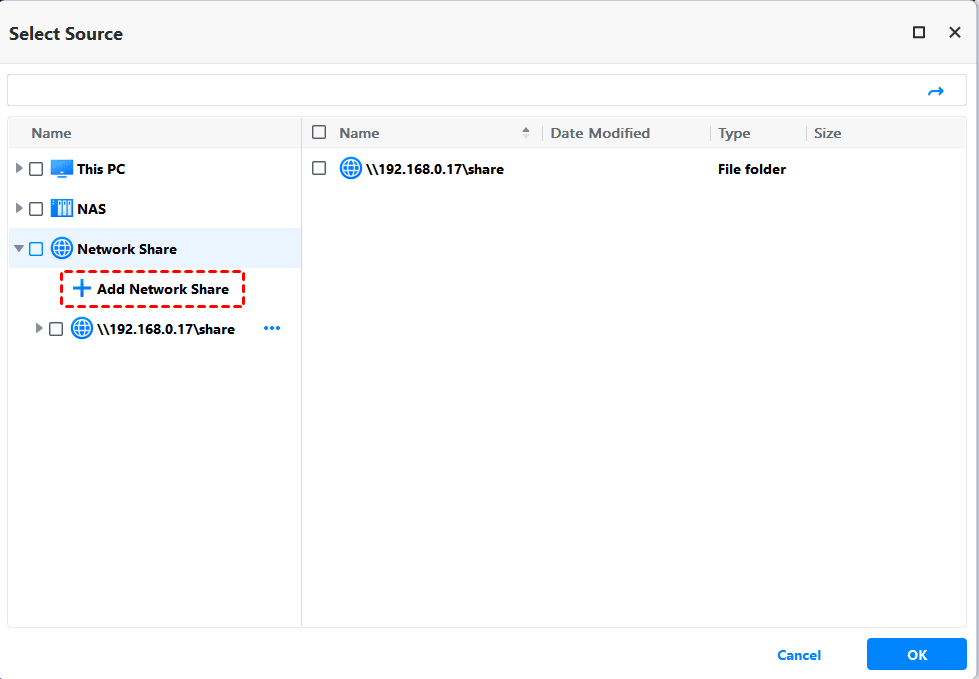
- Then, enter the network path of the old computer and select the files or folders you want to move.

- Similarly, click the PC icon and add the network path of the new computer.
Step 3. Click Schedule Sync to set a frequency - based on daily, weekly, monthly, or event triggers. You can also enable Email notifications for sync status. At last, click Start Sync to move files in Windows 11.
- After the first sync, it will only sync modified or new files -saving both time and disk space.
- To enhance efficiency, please check the option to sync deletions from the source directory to the destination.
- To ensure safety, it’s suggested to verify the integrity of files in Options.
- You can set multiple sync tasks to suit different scenarios.
Fix Missing “Move to Folder” in Windows 11
Some users may notice that the “Move to Folder” option is missing in Windows 11. You can add this option back in Registry.
- Press Win + R and type in regedit to access the Registry Editor.
- Navigate to HKEY_CLASSES_ROOT\AllFilesystemObjects\shellex\ContextMenuHandlersv.
- Right-click on ContextMenuHandlers, and select New > Key. Then, name the new key: {C2FBB631-2971-11D1-A18C-00C04FD75D13}.

- Try “Move to Folder” again.
Conclusion
Moving files in Windows 11 can be simple or complex, depending on your needs. From basic methods like drag-and-drop and Cut & Paste to advanced options, or automatic software, each approach serves a different purpose and user level.
For example, Quick Access and File Explorer are great for everyday use. For larger tasks, such as moving files across drives, handling bulk data, or transferring to a new computer, you may need a more robust solution.
In these cases, using a dedicated tool like AOMEI Backupper can make the process easier and more reliable. With wide compatibility and a free sync solution, along with a suite of sync features, it is able to handle all file-moving scenarios in Windows 11 efficiently and safely.
