
Best Disk Wiping Software to Safely Wipe HDD/SSD on Windows
Disk wiping software helps permanently erase data from HDDs and SSDs. Learn the best two options and how them work from this page.
By Lily Updated on December 18, 2025
When it comes to protecting sensitive information, simply deleting files or formatting a drive is not enough. Hidden traces of data can still be recovered with the right tools, putting personal, financial, or business information at risk. That’s why disk wiping software has become an essential solution for anyone who needs to permanently erase data from a hard drive or SSD.
Best disk wipe software for Windows 11/10/8/7
When you’re ready to securely erase sensitive data from a PC or storage drive, choosing the right hard drive wipe software for Windows is crucial. Below are two excellent options:
Option 1: AOMEI Backupper Professional – All-in-One Tool with Disk Wipe
AOMEI Backupper Professional is primarily known as a powerful backup and restore utility for Windows, but it also includes a built-in Disk Wipe feature that securely erases data beyond recovery.

- Multiple Wiping Methods: Choose from basic overwriting with zeros and random data to more secure standards like DoD 5220.22-M and Gutmann for thorough erasure.
- Flexible Targeting: Wipe an entire disk, specific partitions, or unallocated space depending on your needs.
- Bootable Media Creation: Create bootable USB or CD/DVD media to wipe system drives outside Windows, ensuring all data — even the OS — is erased securely.
- Supported Devices: You can use it to perform HDD and SSD secure erase. You can also use it to wipe a USB drive, SD card, etc.
Option 2: Active@ KillDisk – Dedicated Secure Drive Sanitizer
Active@ KillDisk is a dedicated disk sanitizer designed specifically for permanent data destruction. It provides strong erase standards and advanced options useful for both home and professional needs.
- Comprehensive Data Erasure: Completely sanitize hard drives (HDDs), SSDs, USB drives, and memory cards with no possibility of recovery.
- International Standards Support: Includes support for 20 + international data sanitizing methods — such as U.S. DoD 5220.22-M — to help meet compliance requirements.
- Parallel Erasing: Wipe multiple disks at once, saving time when handling many devices.
- Verification & Reporting: Generate detailed reports, verification logs, and even PDF certificates for audit or compliance documentation.
- Bootable Options: Run KillDisk from bootable media to sanitize drives that Windows can’t erase while running.
How to use specialized programs to wipe hard drive step by step
This part will show you how to wipe a hard drive using professional disk wipe tools on Windows 11/10/8/7.
Method 1: Wipe disk via AOMEI Backupper
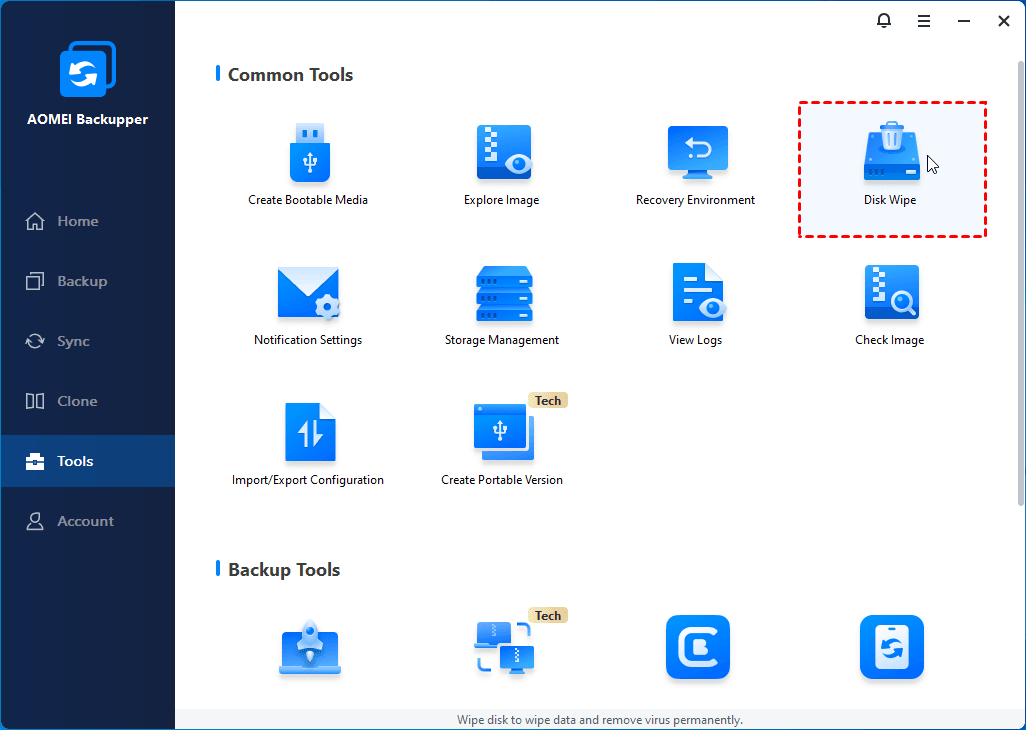
Step 1. Download and install AOMEI Backupper Professional, then launch the program. From the main interface, click Tools and select Disk Wipe.
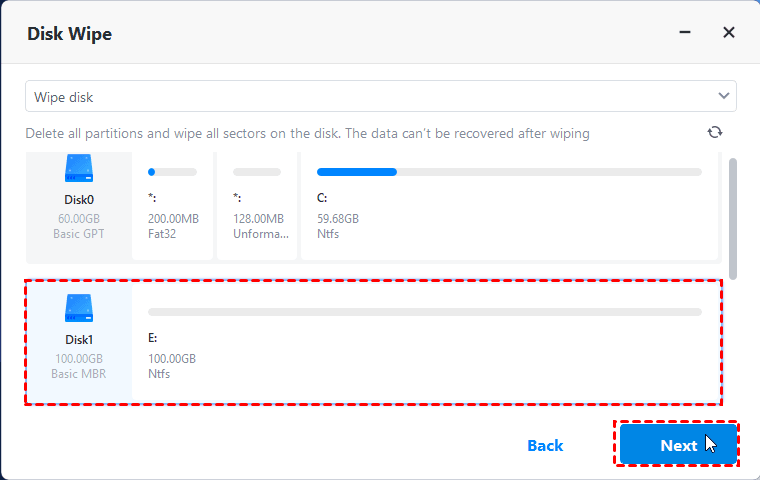
Step 2. In the pop-up window, select Wipe disk from the drop-down menu. Then click on the disk that needs to be wiped and click Next.
💡 Note: If you choose to wipe a system disk, you’ll be prompted the operation needs to be executed in reboot mode. Click OK to confirm.
Step 3. Choose a wiping method based on your need and click Start to begin the wiping process.
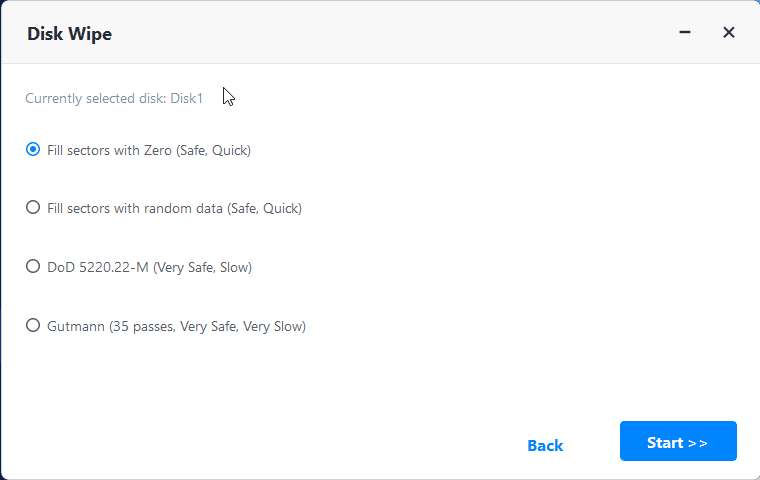
💡 Note: Stronger erasure methods take longer because they overwrite data more times to ensure it is irrecoverable.
Method 2: Wipe disk using KillDisk
In this example, I used the KillDisk Freeware version which only supports One Pass Zeros erase method without verification.
💡 Note: Create a bootable USB/CD with Active@ Boot Disk Creator if you plan to wipe the system drive.
Step 1. Download, install, and launch Active@ KillDisk. Select the hard drive you want to erase from the disk list. Then click Erase Disk from the top-left corner.
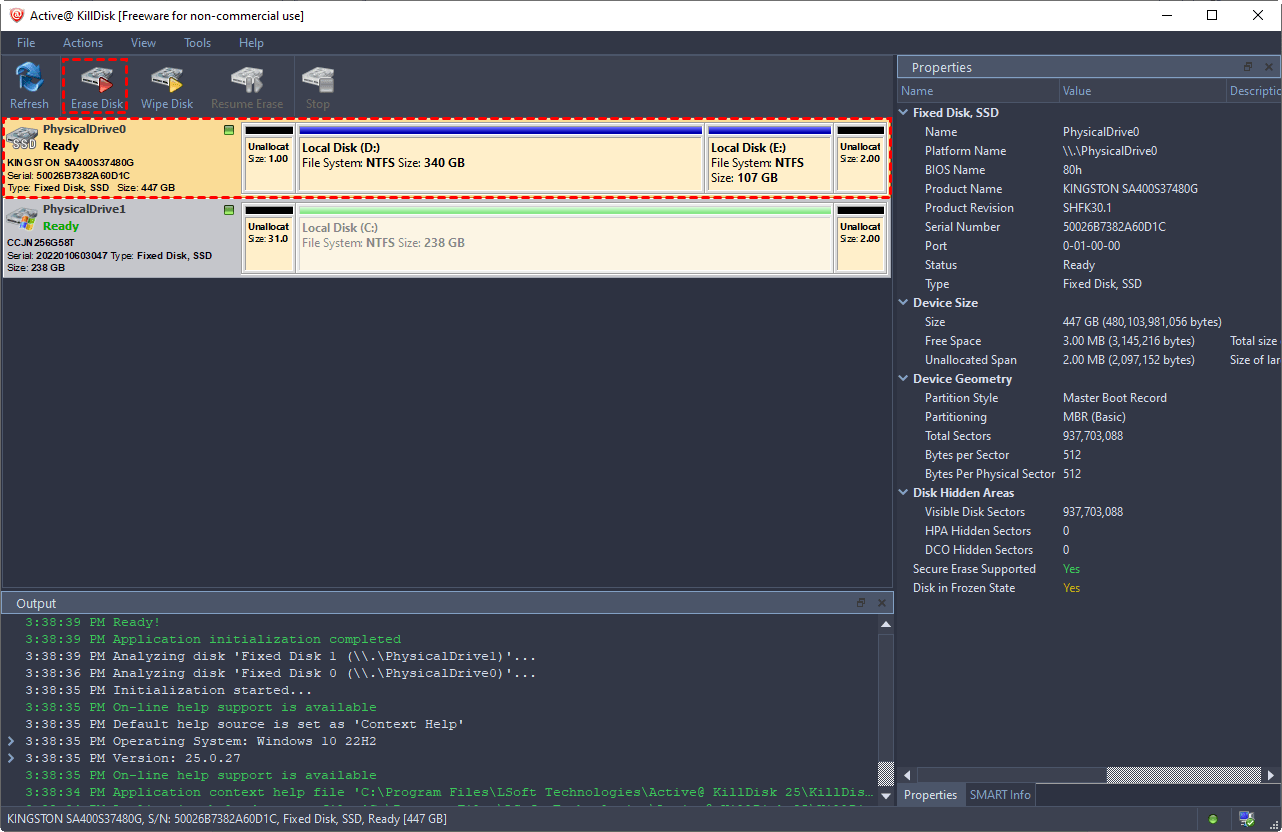
👉 Erase Disk: Permanently destroys all data on a drive or partition, overwriting everything.
👉 Wipe Disk: Only targets unused/unallocated space and deleted file residues, leaving existing files and the OS intact.
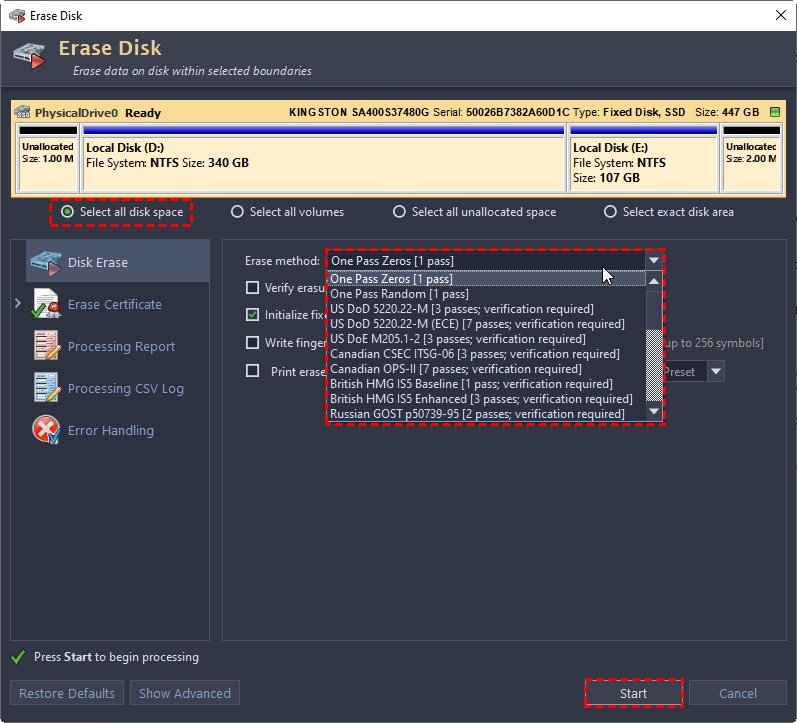
Step 2. In the pop-up window, select to wipe the entire disk or selected parts with the four options available:
- Select all disk space: Wipe the entire disk.
- Select all volumes: Wipe all volumes on the disk.
- Select all unallocated space: Wipe all unallocated space on the disk.
- Select exact disk area: Select specific partitions or unallocated space to be wiped.
Step 3. Keep the default erase method One Pass Zeros [1 pass] and click Start.
Bonus: How to clean Windows drive without software
If you prefer not to use third-party hard drive eraser software, there is a built-in feature - Reset this PC that can help you clean a Windows system drive before selling or giving away a PC. Learn how to use it below:
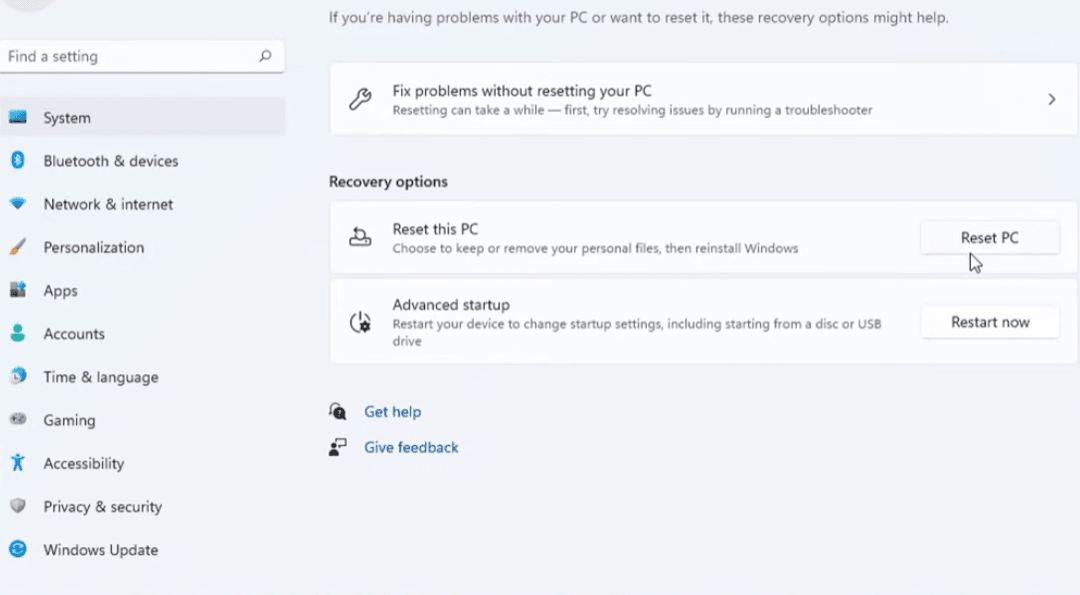
Step 1. Navigate to Reset this PC.
- In Windows 10, go to Settings > Update & Security > Recovery. Then click Get started under Reset this PC.
- In Windows 11, go to Settings > System > Recovery. Then click Reset PC in the Reset this PC box.
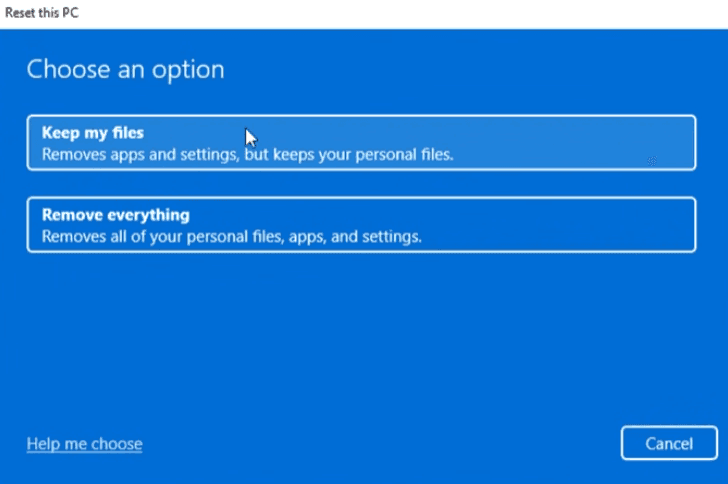
Step 2. Choose Remove everything to delete all of your personal files, apps, and settings.
Step 3. Choose a way to reinstall Windows: Cloud download or Local reinstall.

Step 4. On the Additional settings page, click Change settings. Then turn on the switches for “Clean data?” and “Delete files from all drives?” and click Confirm.
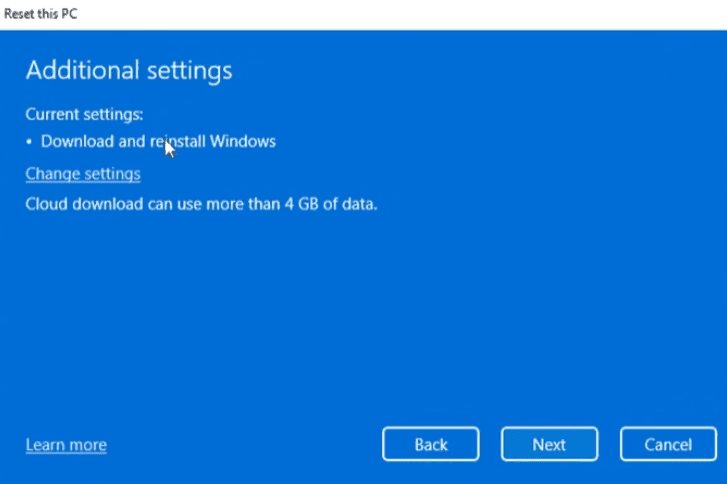
Step 5. Click Next to move to the last page. Confirm your settings and click Reset to begin wiping your computer hard drive.
Best Practices for Safe and Effective Disk Wiping
Disk wiping is a permanent operation, so following best practices is essential to avoid mistakes and ensure your data is truly unrecoverable.
✅ Back Up Important Data First
Before starting any disk wipe, backup files you may need later. Once the wiping process begins, data cannot be recovered.
✅ Choose the Right Wipe Method
Match the wiping method to the drive type and security needs:
- Use overwrite methods (single-pass or multi-pass) for HDDs
- Use secure erase or manufacturer-recommended methods for SSDs
- Apply stronger standards for sensitive or confidential data
✅ Double-Check the Target Disk
Always verify the selected disk or partition before wiping. Accidentally wiping the wrong drive is one of the most common and costly mistakes.
✅ Verify the Wipe Completion
After the process finishes, confirm that the wipe completed successfully. Some tools provide verification results or logs to ensure data was properly erased.
Verdict
This page offers you the best two disk wiping software in Windows. By using trusted hard drive wipe software, following correct step-by-step procedures, and applying best practices, you can safely prepare hard drives and SSDs for resale, donation, or disposal.
Besides disk wipe, AOMEI Backupper offers comprehensive backup and restore solutions. It enables you to create Windows 11 local backup and real-time file sync, etc. Try it now to discover more!
