
Quick Fixes to Automatic Repair Loop on Windows 11
With x simple and effective solutions, you can easily fix Automatic Repair loop on Windows 11, along with step by step instructions. Scroll down to learn more!
By Ivy Updated on March 25, 2026
Your computer is stuck. It keeps showing "Preparing Automatic Repair," trying to fix itself, failing, and then restarting - over and over. This is the Windows 11 Automatic Repair loop, and it's incredibly frustrating.

While this feature is supposed to fix startup problems, sometimes it just can't solve the issue and instead gets stuck in this loop. The good news: you can break this loop. Follow this simple, step-by-step guide, starting with the easiest fixes first.
Why Does the Automatic Repair Loop Happen? (The Common Culprits)
Before fixing the Automatic Repair loop error, it’s important to understand what triggers it. Windows 11 Automatic Repair loop error occurs when Windows detects something preventing a normal startup, usually corruption, conflicts, or hardware issues. Just identify the root cause.
- Corrupted System Files or Boot Configuration: Unexpected shutdowns, such as power loss, failed Windows updates, or malware infections, can corrupt essential system files or the Boot Configuration Data (BCD). When Windows can’t load these critical components, it repeatedly triggers Automatic Repair, creating a loop where the OS tries to fix the same broken files but fails every time.
- Recent Installation: If you recently installed new drivers, applications, or hardware, they can cause conflicts, blocking Windows from booting normally.
- Failing Hardware (HDD/SSD, RAM): The Windows 11 Automatic Repair loop can also signal underlying hardware failure. A dying HDD or SSD may corrupt data as it’s read, while faulty RAM can cause Windows to crash during boot.
How to Fix Windows 11 Automatic Repair Loop
Now, it’s time to fix the Windows 11 Automatic Repair loop in 6 simple and effective methods.
Fix 1: The Simple Restart & Power Drain
Start with the simplest fix-hard shutdown and draining the battery to clear temporary glitches, and resetting hardware states. This can sometimes break the repair loop instantly.
Step 1. Hold the Power button for 5–10 seconds until the PC fully shuts down.
Step 2. Unplug the power cable (and remove the battery if it’s a laptop).
Step 3. Hold the power button for another 10–15 seconds to fully drain the battery. Then, reconnect the power and restart your computer.
Fix 2: Boot into Safe Mode and Undo Recent Changes
Safe Mode loads Windows with only essential drivers, making it ideal to undo changes that trigger the Automatic Repair Windows 11 loop.
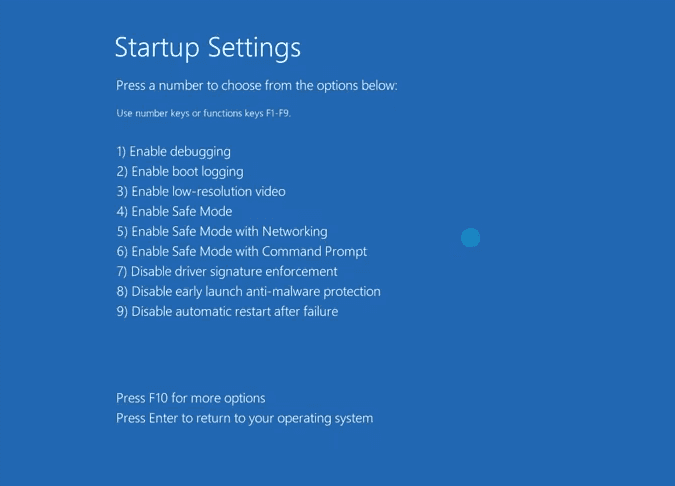
Step 1. On the Automatic Repair screen, click Advanced options.
Step 2. Go to Troubleshoot >Advanced options > Startup Settings and click Restart.
Step 3. Press 4 to enter Safe Mode.
👉 What to do in Safe Mode:
- Uninstall recent Windows updates
- Roll back recently installed drivers.
- Uninstall any newly added software.
- Or directly use System Restore to undo changes.
Fix 3: Perform Startup Repair Manually (The Obvious Fix)
Manually performing Startup Repair sometimes helps to fix the Windows 11Automatic Repair loop. Try it again.
Step 1. Go to Advanced options from the Automatic Repair screen.
Step 2. Select Troubleshoot > Advanced options >Startup Repair.
Step 3. Select the operating system you want to repair.
Step 4. Select the account, enter the password, and click Continue to attempt repairs.
Fix 4: Repair System Files or Disk Errors (for Advanced Users)
You can also try to rebuild the boot loader, repair system files, and check the drive for physical errors in the Command Prompt.
#1: Rebuild the Boot Configuration Data (BCD)
Step 1. In the Advanced options screen, click Command Prompt.
Step 2. In the Command Prompt window, enter the following commands one by one:
- bootrec /fixmbr
- bootrec /fixboot
- bootrec /scanos
- bootrec /rebuildbcd

#2: Run System File Checker (OfflineScan)
Step 1. Identify your Windows drive, type dir C:\Windows and press Enter.
Step 2. Run the offline SFC command:
sfc /scannow /offbootdir=C:\ /offwindir=C:\Windows
#3: Check Disk for Errors (CHKDSK)
Type chkdsk C: /f /r and press Enter in the Command Prompt window.
Fix 5: Go Back in Time using System Restore
If your PC recently installed a problematic update, driver, or program, System Restore lets you restore system to a known working state without deleting personal files.
Steps: Step 1. In the Advanced Options screen, click System Restore.
Step 2. It will navigate to the System Restore window. Click Next to see a list of system restore points.
Step 3. Select the latest restore point and click Next > Finish to restore your computer to an earlier date.
Fix 6: Reset This PC
If all other methods fail, try to reset Windows for a fresh start. You can choose to keep your personal files or wipe everything during this process.
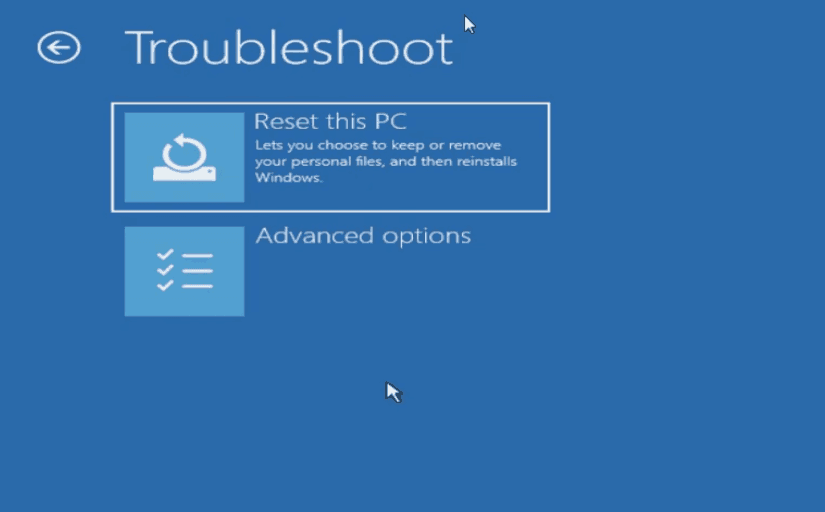
Step 1. Click Advanced options from the Automatic Repair screen.
Step 2. Click Troubleshoot > Reset this PC.
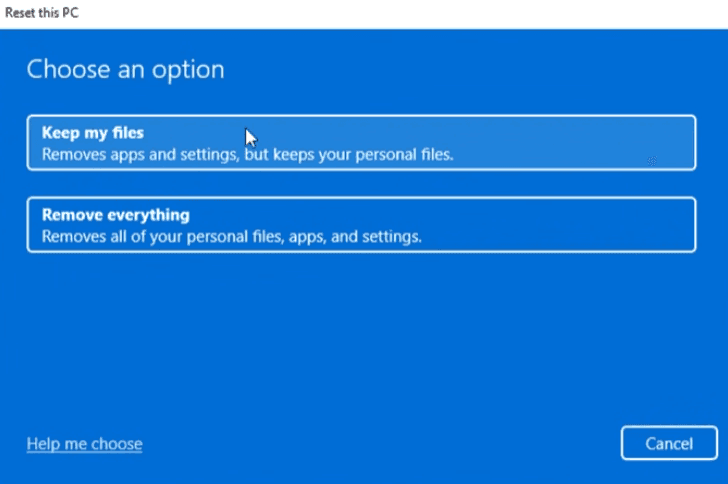
Step 3. Choose Keep my files or Remove everything.
- Keep my files: Preserves personal data but removes apps and resets settings.
- Remove everything: full wipe and clean reinstall.
Step 4. Follow the on-screen instructions to reset this PC.
Create a Full System Image to Bypass Automatic Repair Loop
AOMEI Backupper Standard is a free backup software for Windows 11, 10, 8/8.1, 7that can backup the entire system or disk, including the OS, settings, files, and apps exactly as they were. With it, you can restore Windows 11 to new hard drive or SSD quickly and easily without reinstalling Windows.

- Set-and-forget Backup: Set up continuous backup triggered by frequency or events.
- Multiple Versioning: Perform a full backup initially, then save time and space with faster incremental backup or differential backup- save multiple backup versions.
- Smaller & Smarter Backup: Enable compression, splitting, backup only used sectors of the file system, VSS, etc., to automatically minimize image file size and avoid any interruptions.
- Flexible Destination: Backup Windows 11 to HDDs/SSDs, external hard drives, USB drives, network drives, etc.
- Bootable Media Creator: Create Windows 11 bootable USB, CD/DVD, or ISO to start Windows, especially when it fails.
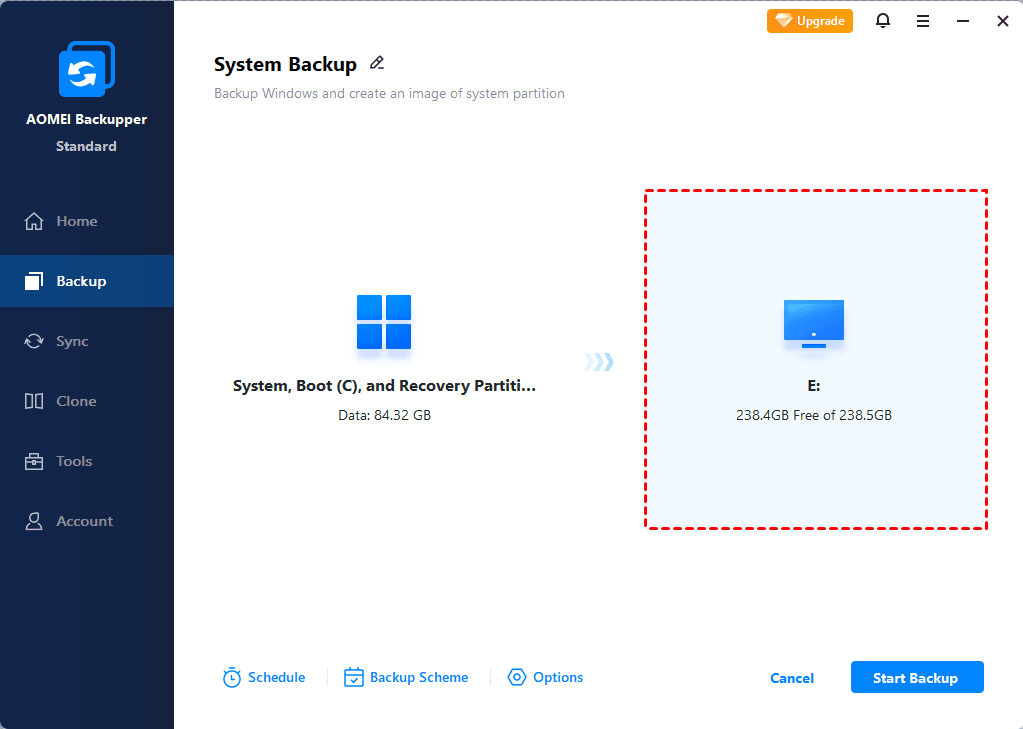
Step 1. Open AOMEI Backupper Standard after installing. Then, click Backup in the left menu and select System Backup. The software will automatically select the system partitions.
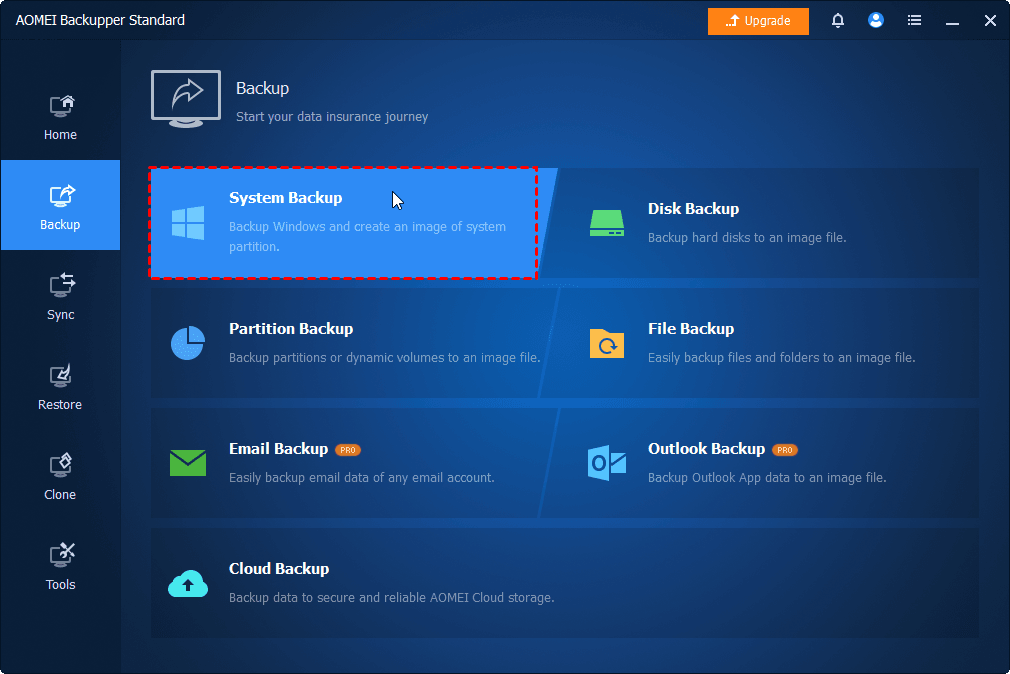
💡Note: Click Disk Backup to back up the entire disk. It will include the OS and all data on the entire drive.
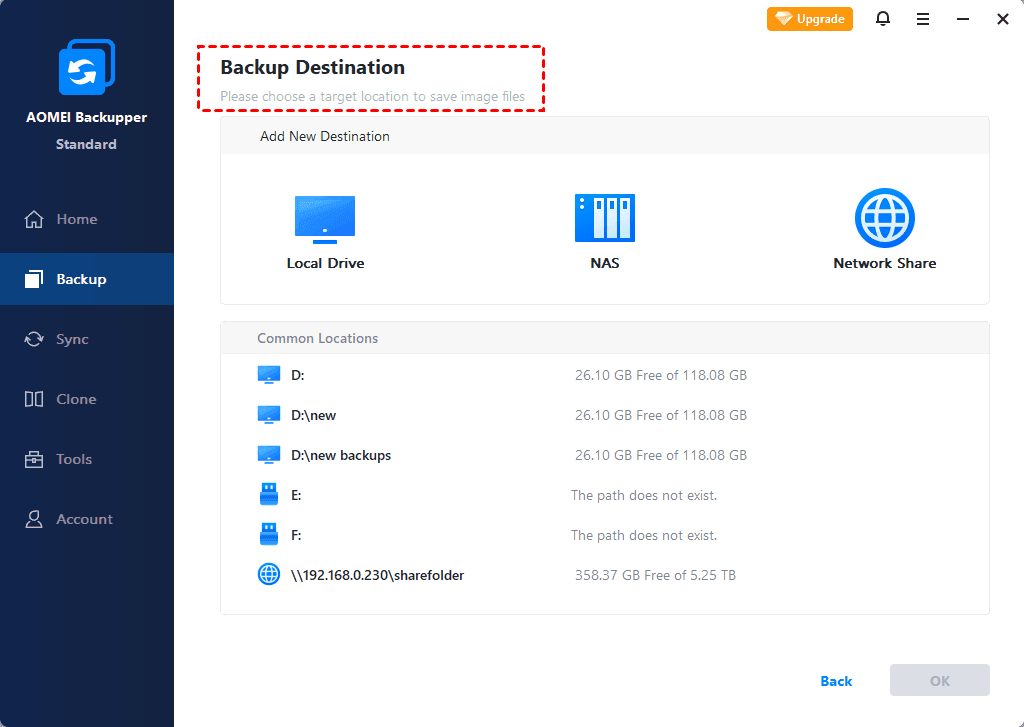
Step 2. Click the PC icon to choose a destination. It’s best to choose a different drive than your system drive for safety.
In the Backup Destination window, click Local Drive, Network Share, or NAS.
- Local Drive: Select hard drive or SSD, external drive, USB drive, cloud drive (you need to install it locally), etc.
- Network Share: Enter the network path and click OK. Be sure you have full access permissions.
- NAS: Enter the NAS path and click OK to add it.
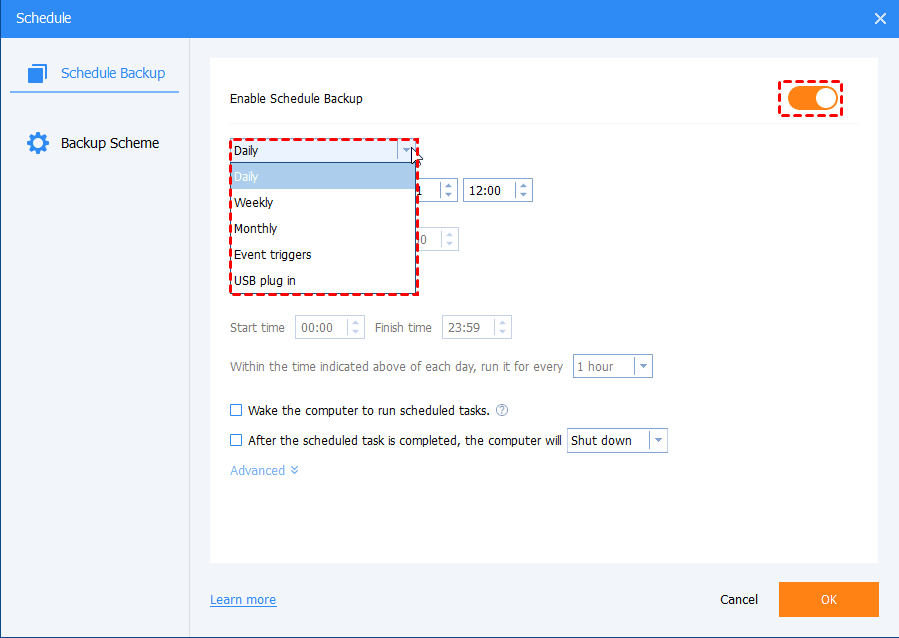
Step 3(Important). Click Schedule to set a free schedule. Select from daily, weekly, or monthly basis, or event-triggers. This ensures your Windows 11 always stays up to date. Once done, click Start Backup to get started.
Conclusion
Fixing the Automatic Repair loop in Windows 11 may feel overwhelming at first, but by following a step-by-step troubleshooting process, from simple power cycles and Safe Mode rollbacks to deeper command-line repairs and full system resets, you can tackle the problem easily and quickly.
While the loop can be frustrating and often appears without warning, it’s wise to schedule backup Windows 11 using AOMEI Backupper Standard to keep copies. This way, no matter what happens, even worse, you can quickly restore your computer.
