




How to Transfer Photos from iPhone to PC Using iTunes: What Actually Works
iTunes can include iPhone photos in a device backup, but it cannot export them as viewable files. This guide explains the difference and presents three practical photo transfer methods.

By Ivy Updated on August 14, 2026


You connect your iPhone to a Windows PC, open iTunes, and look for a button that exports your photos. The device appears, but there is no option for selecting pictures and saving them to a PC folder.
That is because iTunes cannot directly export viewable photos from an iPhone to a PC. It can include photos in a complete iPhone backup, but you cannot open that backup and browse the pictures normally.
If you want accessible photo files, use AOMEI FoneBackup for selective transfer, Microsoft Photos for an official Windows import, or iCloud Photos for wireless access.
Can You Transfer Photos from iPhone to PC using iTunes?
The answer depends on what you mean by “transfer”.
iTunes can back up an iPhone to a Windows computer. If your photos are stored locally on the device, they may be included in that backup. However, the result is a set of backup files designed for restoring an iPhone. It is not a regular photo folder.
iTunes also has a Sync Photos feature, but its direction is mainly from the PC to the iPhone. It does not export your iPhone Photos library to the computer.
| iTunes function | Transfer direction | Accessible? |
|---|---|---|
| Sync Photos | PC to iPhone | No, not an iPhone export method |
| Back Up Now | iPhone to PC backup | No, not as regular photo files |
| File Sharing | Between a PC and supported apps | No, does not export the Photos library |
You can still make an iTunes backup if your goal is to prepare for device recovery.
Step 1. Install and open iTunes. Connect your iPhone with a USB cable, unclock it and tap Trust when prompted.
Step 2. In iTunes, click the Device button and select Summary.
Step 3. Under the Backup section, select This Computer, and click Back Up Now.
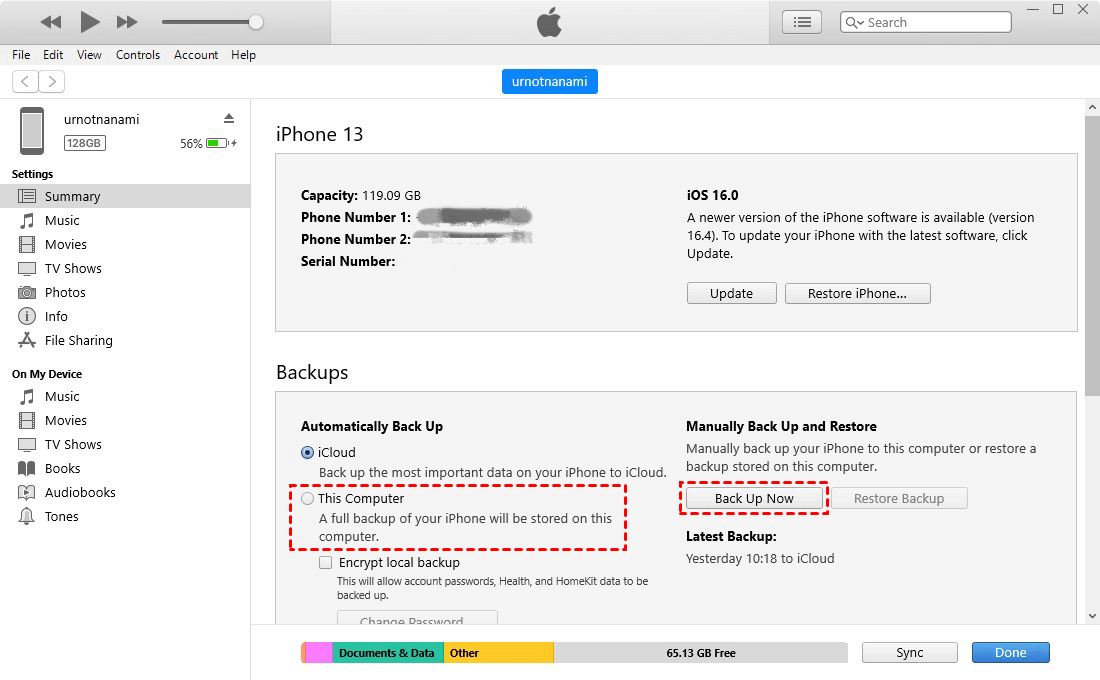
Keep the iPhone connected until the backup finishes. Remember that this process does not create a folder of photos you can open, edit, or copy individually.
Choose the Right Photo Transfer Method
Use the following guide before starting. The right choice depends on whether you need selective transfer, an official tool, cloud access, or a recovery backup.
| ❓ Your situation | 🎯 Recommended method | 💡 Why |
|---|---|---|
| You want to select photos and choose a PC folder | Method 1: AOMEI FoneBackup | Exports selected photos as accessible files |
| You prefer an official Windows import tool | Method 2: Microsoft Photos | Built into Windows and supports connected devices |
| Your full-resolution photos are already in iCloud | Method 3: iCloud Photos | Downloads cloud photos without relying on local iPhone copies |
| You need a device recovery copy | iTunes backup (See Previous Section) | Saves a backup for later restoration |
| You need more than 30 files in one transfer | Microsoft Photos, iCloud, or upgrade AOMEI FoneBackup | The free AOMEI FoneBackup transfer workflow is limited to 30 files per day |
Method 1. Transfer Photos from iPhone to PC using AOMEI FoneBackup
👍 Best for: Exporting selected photos to a chosen Windows folder or external drive. Photos stored only in iCloud must first be downloaded to the iPhone.
Unlike an iTunes device backup, AOMEI FoneBackup is designed to transfer photos from iPhone to PC and keep them accessible anytime.
 AOMEI FoneBackup
-
Choose what to export: Preview photos and select individual items.
-
Choose custom destination: Save to any folder on your PC, external hard drive, USB drive, NAS, or other storage.
-
Preview before backup: See exactly what's inside the backup. No more digging.
-
Your backup, always accessible: View it anytime, anywhere.
-
Add without replacing: No need to restore or overwrite your phone during transfer.
-
Free to use: Free transfer supports up to 30 files per day; The backup features are always free.
 100% Secure
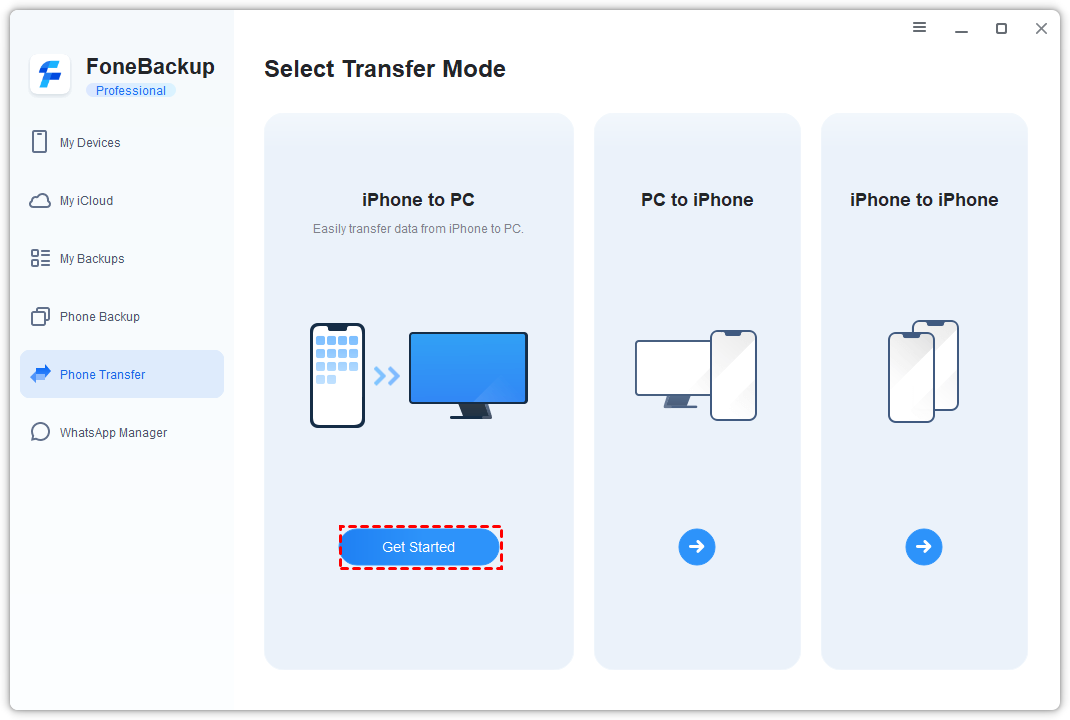
Step 1. Install and launch AOMEI FoneBackup on the Windows PC. Connect your iPhone with a USB cable. When prompted, tap Trust and enter your passcode.
Step 2. Select Phone Transfer > iPhone to PC, and tap Get Started.
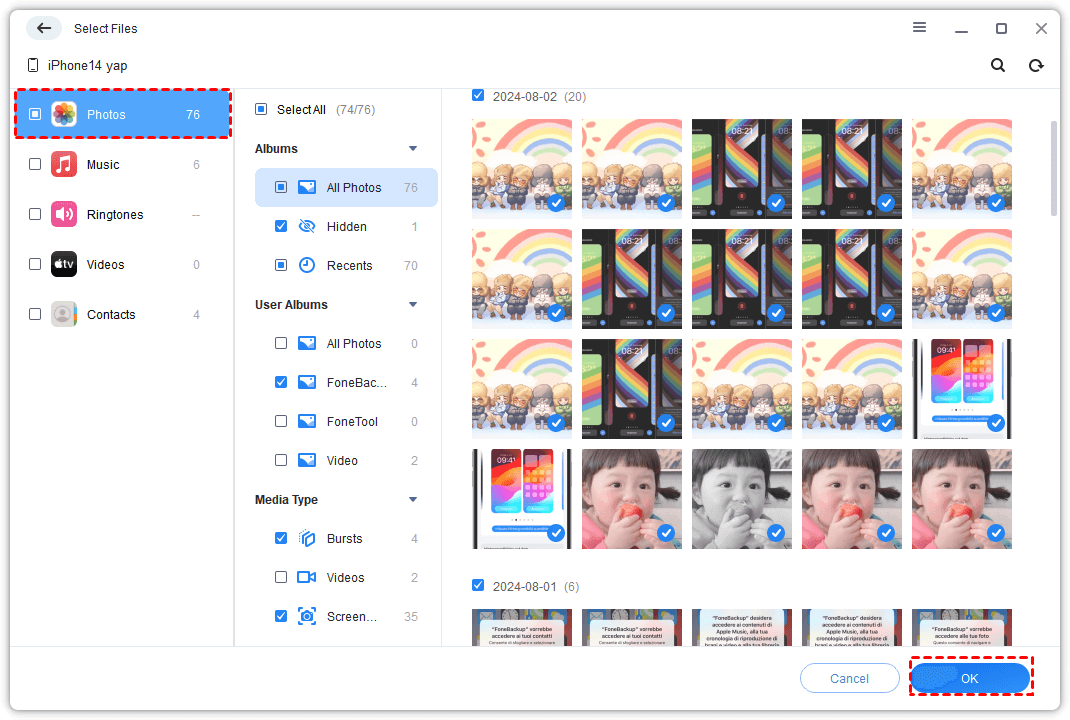
Step 3. Click the Photos icon to preview and select the pictures you want to move.
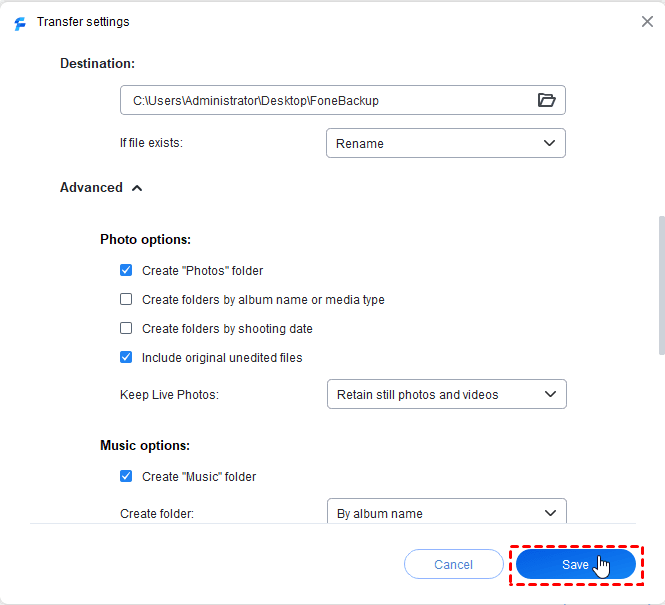
Step 4. Click Transfer Settings to choose where to save the backup. You can select any folder on your PC, external hard drive, USB drive, NAS, etc., and click Save > Start Transfer.
Method 2. Transfer iPhone Photos to PC with Microsoft Photos
👍 Best for: Importing photos with an official Windows tool. It is free, but large libraries may take time to scan and import.
Apple currently directs Windows users to install Apple Devices and use Microsoft Photos for photo imports. Apple Devices helps Windows communicate with the iPhone, while the Photos app handles the actual import.
Step 1. Install or update Apple Devices from Microsoft Store. Connect your iPhone to the PC with a compatible USB cable. Unlock the iPhone and tap Trust if prompted.
Step 2. Open the Windows Photos app, select Import > From a USB device to choose your iPhone.
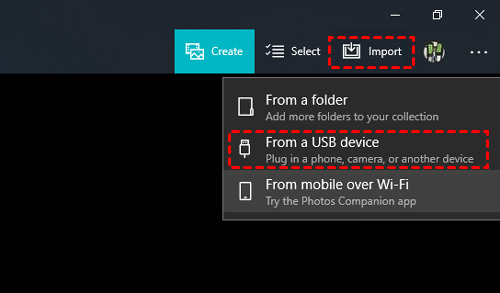
Step 3. Wait while Photos scans the device. Select the photos you need and choose where to save them.
Method 3. Download iCloud Photos to PC Wirelessly using iCloud
👍 Best for: Accessing photos already synced with iCloud. This method requires an internet connection and enough iCloud storage.
iCloud Photos is useful when optimized storage means some original photos are no longer stored locally on the iPhone. You can use iCloud for Windows for ongoing access or iCloud.com for occasional downloads.
Option 1. Use iCloud for Windows
Step 1. Install iCloud for Windows from Microsoft Store, open it, and sign in with the same Apple Account on your iPhone.
Step 2. Turn on iCloud Photos and apply the change.
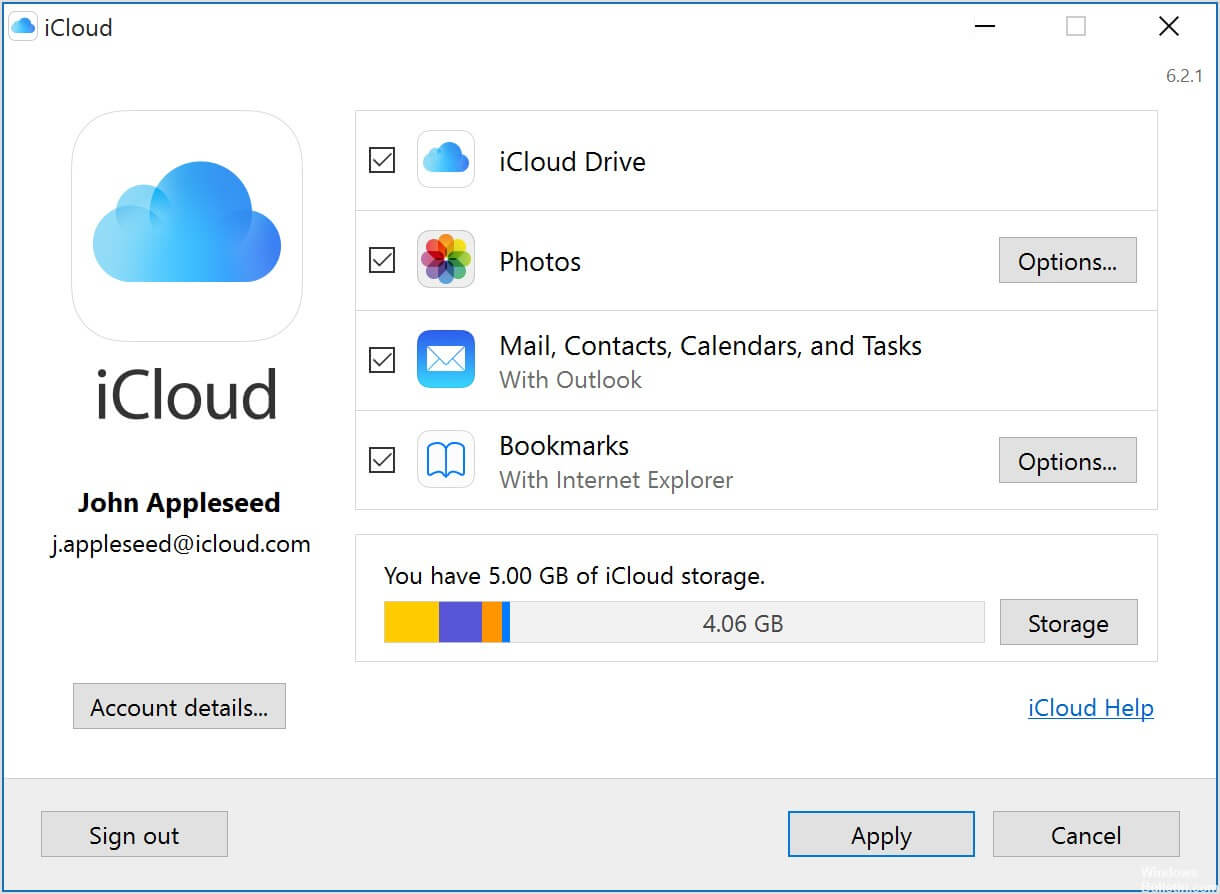
Step 3. Open File Explorer, then select iCloud Photos. You can then open or download the photos you want available on the PC.

A photo may first appear as a thumbnail or placeholder. Allow it to finish downloading before copying it to another folder or external drive.
Option 2. Download from iCloud.com
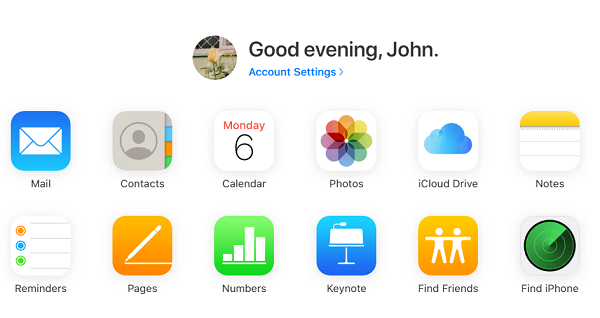
Step 1. Visit iCloud.com in a browser and sign in to your Apple Account.
Step 2. Open Photos, select the required pictures or videos and click Download to save them to your PC.
Check the Transfer Before Deleting Photos
A completed progress bar does not always prove that every item is usable. Check the transferred files first:
- Open several photos from different dates.
- Play a few transferred videos from beginning to end.
- Compare the transferred date range with the iPhone library.
- Confirm that HEIC photos and HEVC videos open on the PC.
- Keep both parts of a Live Photo if it appears as a photo and a short video.
- Copy important files to a second drive before deleting the originals.
If a file is missing or cannot be opened, keep it on the iPhone. Try a smaller batch, download the original from iCloud, or use a different transfer method.
Compare All Ways to Transfer iPhone Photos to PC
| Method | Viewable photo files | Selective transfer | Internet needed | Main limitation |
|---|---|---|---|---|
| iTunes backup | No | No | No | Designed for device restoration |
| AOMEI FoneBackup | Yes | Yes | Not for local photos | Free transfer: 30 files per day |
| Microsoft Photos | Yes | Yes | No | Large imports may scan or fail |
| iCloud Photos | Yes | Yes | Yes | Depends on cloud storage and download speed |
🔥Top recommendations:
- Choose iTunes only when you need a recovery backup.
- Choose Microsoft Photos for a free official import.
- Choose iCloud when your originals are already stored there.
- Choose AOMEI FoneBackup when you want to preview photos and control the Windows destination.
Why iPhone Photos May Not Transfer to a PC (How to Fix)
Even after choosing a suitable transfer method, you may find that the PC cannot detect your iPhone, some photos are missing, or the transfer stops halfway. These problems are usually related to the USB connection, iCloud storage settings, file formats, or the size of the photo library.
The PC Does Not Recognize the iPhone:
- Keep the iPhone unlocked and confirm that you have tapped Trust.
- Try another cable or USB port, then restart both devices if necessary.
- Updating Apple Devices or the Apple device driver may also restore the connection.
- If the problem continues, see iPhone files not showing on a PC.
Only Some Photos Appear:
When iCloud Photos and Optimize iPhone Storage are enabled, some full-resolution originals may exist only in iCloud. USB-based tools cannot transfer files that are not stored locally on the iPhone.
You can download the originals to the iPhone first or access them through iCloud for Windows or iCloud.com.
A Large Transfer Stops or Fails:
Large photo libraries can take a long time to scan and may fail if the connection is interrupted. Keep the iPhone unlocked, avoid USB hubs, and transfer photos in smaller groups.
Still fails, check methods in "The requested value cannot be determined".
FAQs
1. Can I open the photos in an iTunes backup?
Not as regular image files. An iTunes backup is intended for restoring data to an iPhone. It does not create a normal folder where you can browse and edit individual photos.
2. Why are some iPhone photos missing on my PC?
The originals may be stored in iCloud while optimized copies remain on the iPhone. The phone may also be locked, the USB connection may have failed, or Windows may still be scanning a large library.
3. Does transferring iPhone photos reduce their quality?
A direct file transfer should preserve the source file. However, format conversion or some sharing services may change the file. Check the dimensions, file type, metadata, and appearance after transferring.
4. Why does a Live Photo appear as two files?
A Live Photo contains a still image and a short video component. Some Windows workflows display them as separate files. Keep both files if you may want to preserve the motion portion.
5. Can I delete the photos from my iPhone after transferring them?
Yes, but only after opening the transferred files, checking the date range and file count, and creating another copy of important photos. With iCloud Photos, remember that deletion may sync to other devices.
6. Do I need both Apple Devices and iTunes on Windows?
Not for ordinary photo imports. Apple currently recommends Apple Devices with Microsoft Photos on modern Windows PCs. Use iTunes only if you specifically need an iTunes-based backup or another remaining iTunes function.
Summary
How to transfer photos from iPhone to PC using iTunes? iTunes offers users a backup feature, but it's all or none. The sync is mainly designed to transfer photos to from PC to iPhone.
Is it any better choices? Yes, you can try the following options:
- Use Microsoft Photos for a free, official Windows photo import.
- Use iCloud Photos when your originals are already stored in iCloud.
- Use AOMEI FoneBackup when you want to preview selected photos and choose their destination on the PC.
For a normal photo export, do not rely on an unreadable iTunes backup. Select a method that saves accessible files, verify the results, and only then remove photos from your iPhone.

 as a preferred
source on Google
as a preferred
source on Google