




How to Transfer Photos from Laptop to iPhone (5 Easy Ways)
Transfer photos from laptop to iPhone doesn't have to be complicated. Here are 5 proven methods -wired and wireless, plus a quick comparison to help you choose the right one.

By Ivy Updated on August 6, 2026


You know that feeling - you just spent way too long editing photos on your laptop, and now you want them on your iPhone. A quick share, a new wallpaper, or just to have them with you.
So you plug in your phone, open File Explorer, and… nothing. Can't drag. Can't paste. Just stuck.
Annoying, right?
Here's the deal: iPhones aren't like Androids. Apple just doesn't let you treat your phone like a flash drive.
So what do you actually do?
Luckily, you've got a few choices. Some are super fast but need a cable. Others work wirelessly but they're slower or might squish your photo quality. And iTunes? Yeah, it works, but it can also wipe out photos you already have on your iPhone. Not ideal.
Let's go through each option so you can pick what works best for you. Here's a quick comparison:
| ❓ If you want... | ✅ Choose this method |
|---|---|
| Fastest transfer, bulk photos, no compression | Method 1: AOMEI FoneBackup |
| A free, official Windows tool | Method 2: Apple Devices App |
| The traditional Apple way (with caution) | Method 3: iTunes |
| Wireless, cloud-based syncing | Method 4: iCloud / Google Drive / Dropbox |
| Just 1–2 photos, quick and dirty | Method 5: Email |
Method 1. Transfer Photos from Laptop to iPhone with AOMEI FoneBackup (Fastest & Easiest)
If you have hundreds or thousands of photos to transfer and don't want to spend hours waiting, or risk losing your existing iPhone photos, AOMEI FoneBackup is your best bet.
 AOMEI FoneBackup
- 3 transfer modes: iPhone to PC, PC to iPhone, iPhone to iPhone. No iCloud or Apple ID needed.
- Selective Transfer: Transfer only what you need - photos, messages, songs, Safari data, and more. Preview files before transferring.
- Fast and Lossless: Transfer 1,000+ photos in about 10 minutes. No compression, no resolution loss.
- Wide format support: Work with JPG, HEIC, PNG, RAW, and more.
- Flexible storage: Save photos directly to your computer, external drive, or USB stick
- Wide compatibility: Compatible with iPhone x/12/14/15/16/17, including the latest iOS version.
 100% Secure
How to transfer photos from laptop to iPhone with AOMEI FoneBackup:
Step 1. Download and install AOMEI FoneBackup on your laptop. Connect your iPhone to the computer using a USB cable. When you see the "Trust This Computer" prompt on your phone, tap Trust and enter your passcode.
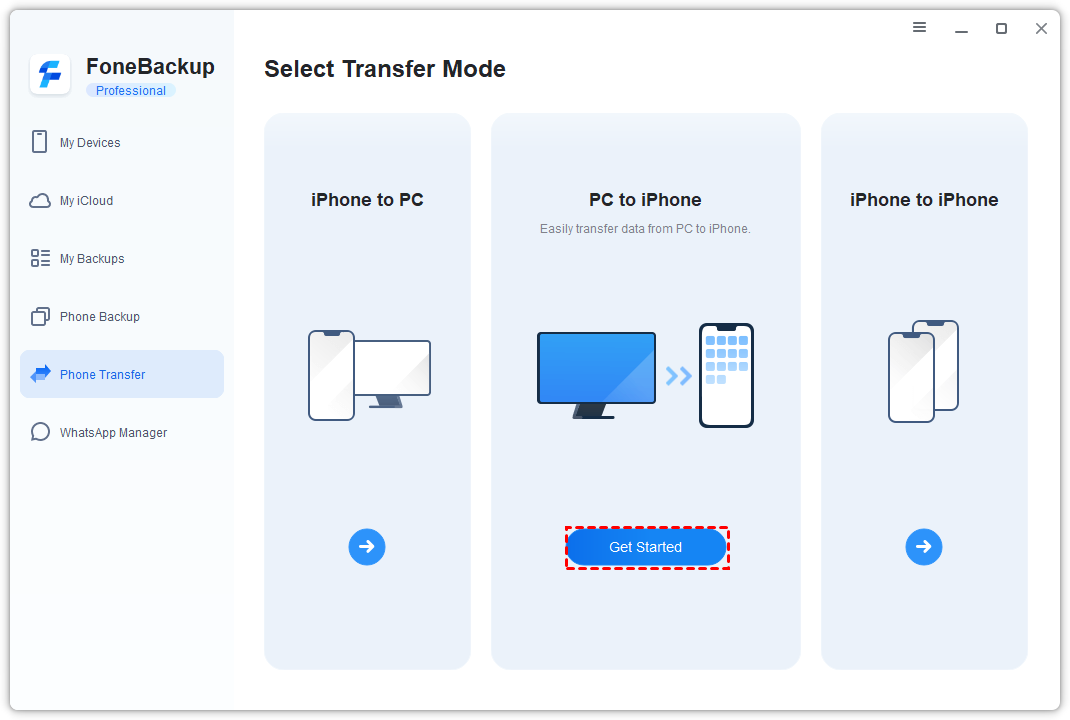
Step 2. In AOMEI FoneBackup, tap Phone Transfer in the left panel. Then, choose PC to iPhone and click Get Started.
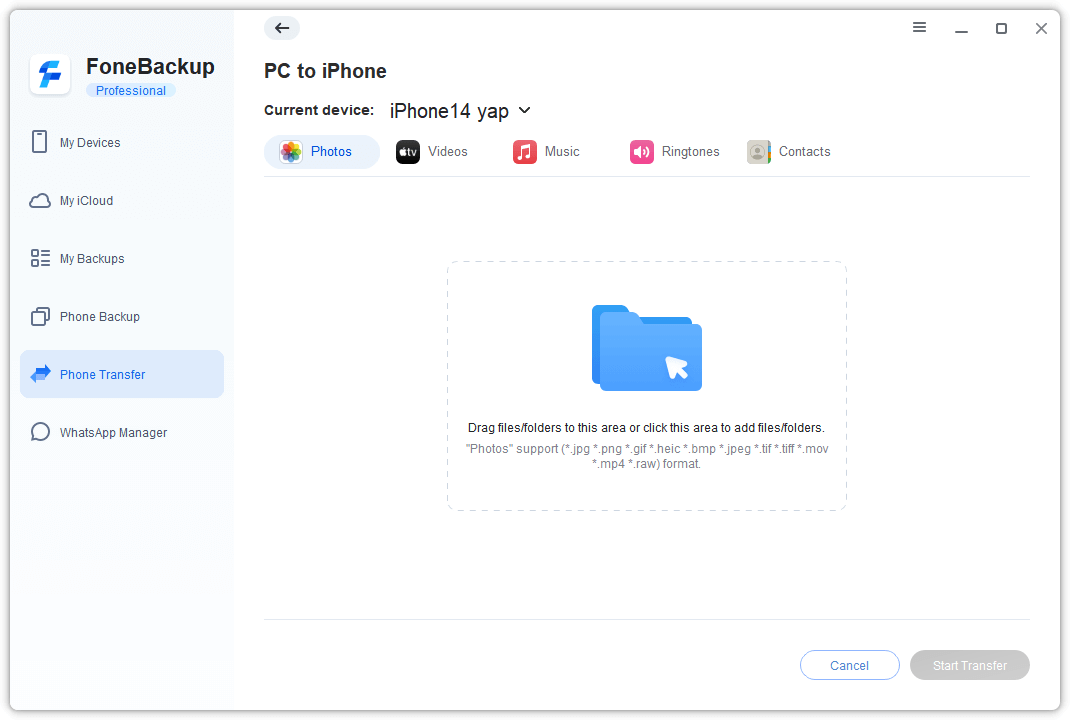
Step 3. Click the Photos icon. You'll see a box where you can either:
-
Drag and drop photos directly from your laptop, or
-
Click the folder icon to browse your laptop and select photos manually.
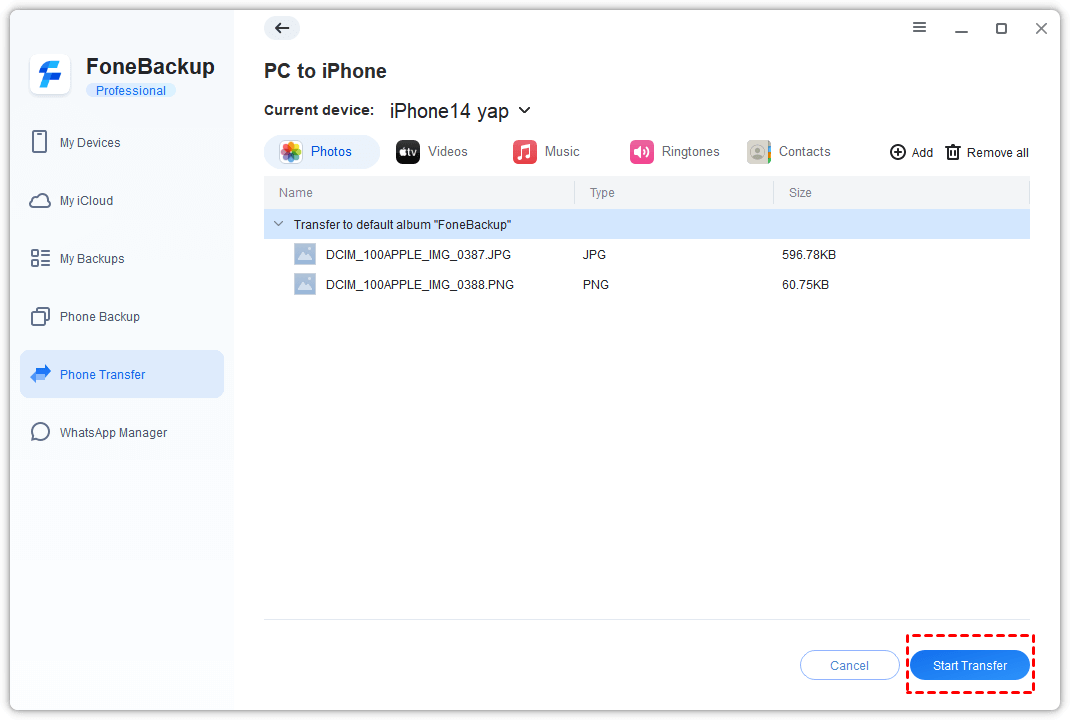
Step 4. Once you've selected all the photos you want to transfer, click Start Transfer. Within a few minutes, your photos will appear in the Photos app on your iPhone.
⭐Bonus features to explore later:
-
Transfer videos, music, and contacts between laptop and iPhone with the same drag-and-drop simplicity.
-
Back up iPhone to PC, or from PC to iPhone with a single click, so you never lose important data.
-
Manage cloud data freely - download, upload, delete photos, videos, contacts, etc., as you like.
Method 2. Transfer Photos from Laptop to iPhone with Apple Devices App (Official Windows Tool)
If you prefer using an official Apple tool and don't want to install third-party software, the Apple Devices App is a solid choice, especially if you're on Windows 10 or later.
This app is Apple's modern replacement for iTunes on Windows. It allows you to sync photos from a specific folder on your laptop to your iPhone. It's free, official, and does the job without any extra bells and whistles.
💡 What to know before you start:
-
This method works best for ongoing, organized photo libraries - not for one-off transfers of random photos.
-
Apple Devices replaces your existing synced photos. Every time you sync, the new folder overwrites the old one. If you're not careful, you could lose photos you wanted to keep.
-
If iCloud Photos is enabled on your iPhone, photo syncing via Apple Devices App will be blocked. You'll need to disable it temporarily or use a different method.
How to transfer photos from laptop to iPhone with Apple Devices App:
Step 1. Connect your iPhone to your laptop via USB cable. Open the Apple Devices App. If you don't have it installed, you can download it for free from the Microsoft Store.
Step 2. In the Apple Devices app, click your device icon in the left sidebar.
Step 3. From the Settings menu, select Photos and check Sync Photos onto ... from Pictures. You can also tap Choose folder to select what you want.
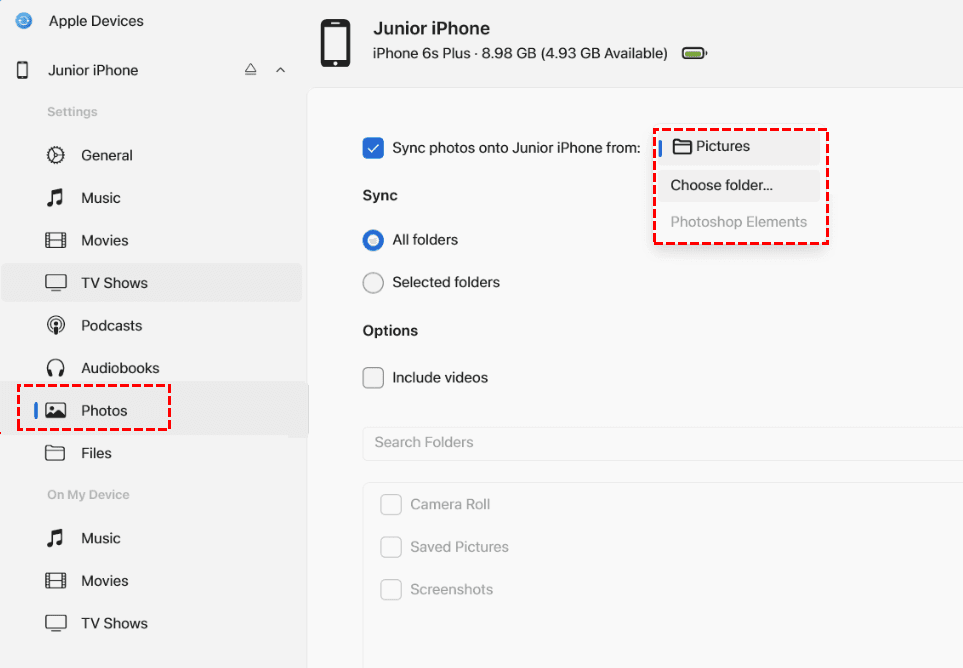
Step 4. Under the Sync section, select All folders or Selected folders and click Apply to start syncing. . The "Selected folders" option gives you more control to choose which subfolders to sync.
Once it's done, you'll find your photos in the Photos app of your iPhone.
Method 3. Transfer Photos from Laptop to iPhone with iTunes (The Traditional Way)
iTunes has been around for years and can still handle photo transfers from laptop to iPhone. But like the Apple Devices App, it relies on a folder-sync system - meaning each sync replaces the previous one.
However, iTunes is an older tool, the process is less intuitive and more prone to user error, making it the least recommended option for most people. If you're on Windows 10 or later, you may need to use the Apple Devices App instead.
How to transfer photos from laptop to iPhone using iTunes:
Step 1. Connect your iPhone to your laptop and open iTunes. Click the device icon.
Step 2. Under Settings, click Photos and check Sync Photos From Pictures. You can also tap Choose folder to select a different folder.
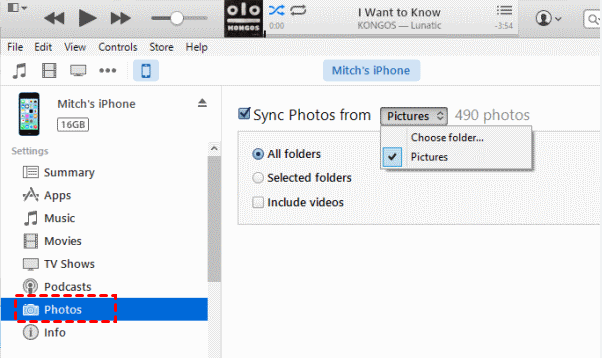
Step 3. Select to sync All folders or Selected folders. Then, click Apply to transfer photos from laptop to iPhone.
Method 4. Transfer Photos from Laptop to iPhone Wirelessly via Cloud Services
If you prefer to go cable-free, or if you don't have a USB cable handy, cloud services offer a simple way to transfer photos from laptop to iPhone. The idea is straightforward: upload photos to the cloud on your laptop, then download them on your iPhone
Here's how the major cloud services compare:
| Cloud Service | Free Storage | 👍 Best For |
|---|---|---|
| iCloud | 5 GB | Apple users who want seamless integration |
| Google Drive | 15 GB | Users who need more free space or use Android/Windows |
| Dropbox | 2 GB | Users who prefer a simple, reliable sync |
Option 1: Transfer via iCloud
Since iCloud is built into the Apple ecosystem, it's the most seamless wireless option. Any photos you upload to iCloud Drive can be downloaded directly on your iPhone.
Step 1. On your laptop, open a browser and go to iCloud.com. Sign in with your Apple ID and password.
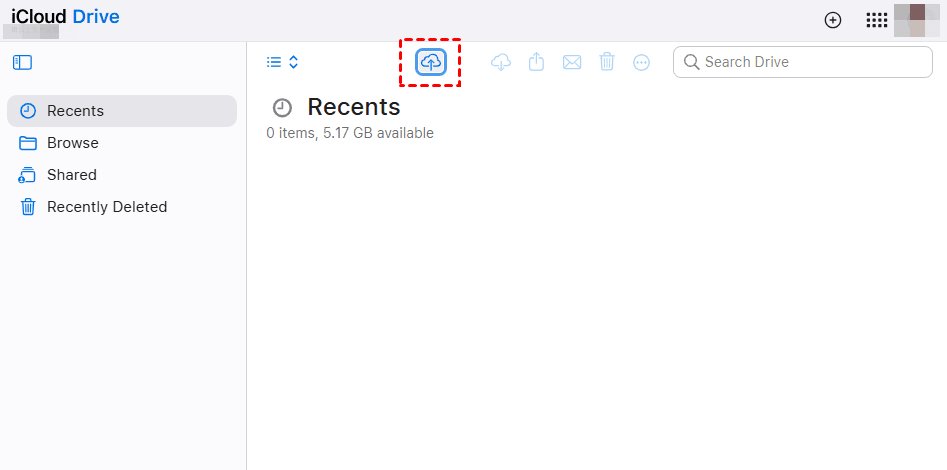
Step 2. Click iCloud Drive, then click the upload icon (cloud with an up arrow) and select the photos from your laptop. It will upload your photos automatically.
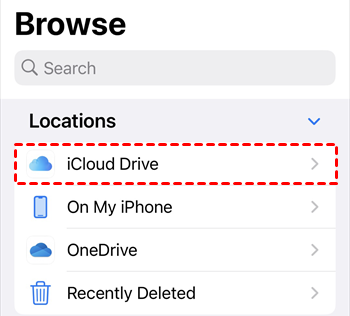
Step 3. Back on your iPhone, open the Files app. Tap Browse in the bottom-right corner, then select iCloud Drive from the Locations list.
Step 4. Find the photos you just uploaded, tap the Share icon and select Save Image. They'll be saved to your Photos library.
Option 2: Transfer Photos using Google Drive or Dropbox
Google Drive offers 15 GB of free storage, making it a great choice for larger photo batches, especially if you're not already using iCloud heavily.
Step 1: On your laptop, go to drive.google.com, sign in and click the upload icon to add photos you want to transfer.
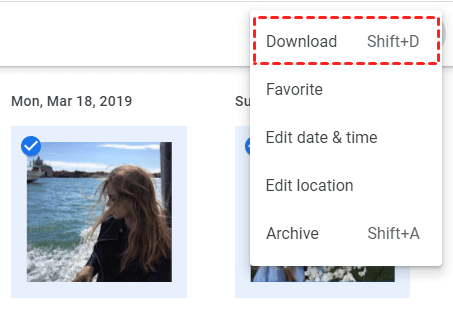
Step 2: Open the Google Drive app on your iPhone. Find the photos you uploaded, tap the three dots (⋯) next to each file, and select Save to Files or Download. The photos will be saved to your Photos library.
Dropbox works similarly, but its free storage is only 2 GB, suitable for small, occasional transfers.
Method 5. Transfer Photos from Laptop to iPhone using Email (Quick, Small Batches)
Sometimes you just need one or two photos from your laptop on your iPhone - nothing fancy, no setup required. For those moments, email is the simplest solution.
How to transfer photos from laptop to iPhone via email:
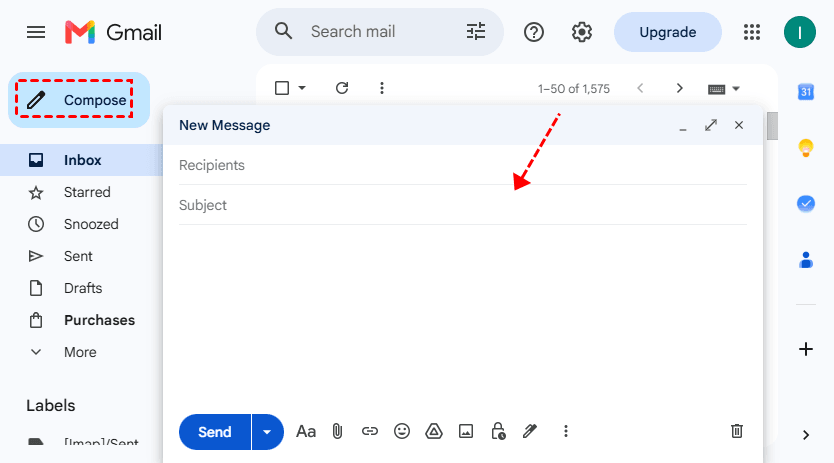
Step 1: On your laptop, open your email client (Gmail, Outlook, or any other). Compose a new email, address it to yourself, and attach the photos you want to transfer. Send it.
Step 2: Go back to your iPhone, open the Mail app (or whatever email app you use). Find the email you just sent and open it.
Step 3: Tap the attachment to preview it, then tap the share icon and select Save Image.
Frequently Asked Questions
Q: Will transferring photos from my laptop to iPhone reduce the image quality?
It depends on the method.
- AOMEI FoneBackup preserves original quality with no compression.
- iCloud, Google Drive, and Dropbox also keep original files intact when you download them.
- However, email attachments are often compressed to reduce file size, so for high-resolution photos, avoid email.
Q: Why can't I just drag and drop photos from my laptop to iPhone?
Apple designs iOS devices to prevent direct file system access for security and stability reasons. Unlike Android, the iPhone's internal storage isn't exposed as a standard drive, so File Explorer and Finder can't write new files directly to the Photos app.
Q: What happens if my transfer gets interrupted?
If you're using AOMEI FoneBackup or Apple Devices App, simply reconnect and restart the transfer - most tools will skip already-transferred files if you start over.
For cloud services, you can pick up where you left off as long as you upload in small batches.
For iTunes, it's best to restart the sync from scratch.
Q: After transferring, I can't delete some photos from my iPhone. What should I do?
This is a common issue when photos are synced via iTunes or Apple Devices App - they're managed by the computer, not directly editable on the iPhone. Check out cannot delete photos to fix it, along with step-by-step instructions.
Final Thoughts
For most users, especially those with large photo collections, AOMEI FoneBackup offers the best balance of speed, simplicity, and safety. It's significantly faster than iTunes, doesn't compress your photos, and won't delete anything already on your iPhone. Plus, if you ever need to transfer videos, music, or contacts, it handles those too.
That said, the best method is always the one that fits your specific needs whether that's speed, convenience, or just getting the job done with what you already have.
| Your situation | Best method for you |
|---|---|
| Need to transfer hundreds or thousands of photos quickly and without compression | AOMEI FoneBackup |
| Windows user who prefers an official, free tool | Apple Devices App |
| Already familiar with iTunes and understand its limitations | iTunes |
| Want a wireless solution with free cloud storage | iCloud or Google Drive |
| Just need to transfer 1–2 photos in a pinch |

 as a preferred
source on Google
as a preferred
source on Google