



Transfer Photos from iPhone to Computer Windows 7 [6 Ways🔥]
Still using Windows 7 and need to transfer photos from your iPhone? Here are 6 easy methods – USB, AutoPlay, iCloud, OneDrive, Dropbox, and AOMEI FoneBackup.

By Lily Updated on August 19, 2026


How to Transfer Photos from iPhone to PC Windows 7
If your iPhone is running out of storage, you may want to move photos and videos to your computer for backup or editing. However, transferring photos from an iPhone to an older Windows system such as Windows 7 can be less straightforward than expected.
This guide offers several ways to transfer photos from iPhone to computer in Windows 7. Let's take a glance of each method first, and then check out detailed steps in the following parts.
|
Method |
Connection |
Best for |
|
AOMEI FoneBackup |
USB |
Large photo transfers and selective transfers |
|
AutoPlay |
USB |
Quick transfers without extra software |
|
File Explorer |
USB |
Basic manual photo copying |
|
iCloud |
Wi-Fi |
Accessing iCloud Photos wirelessly |
|
OneDrive |
Wi-Fi |
Users already using Microsoft cloud storage |
|
Dropbox |
Wi-Fi |
Users who already use Dropbox |
Method 1. Best Free Tool to Transfer Photos from iPhone to Windows 7
If you want a straightforward way to transfer photos from iPhone to Windows 7, AOMEI FoneBackup is a practical choice. It is designed for transferring data between iPhones, iPads, and Windows PCs and lets you preview and select the files you want to move.
 AOMEI FoneBackup
- Transfer large numbers of full-resolution photos efficiently.
- Preview and select specific photos before transferring.
- Support various iPhone and iOS versions.
- Use a USB connection for a stable transfer.
- Transfer photos to a USB drive, external hard drive, or local drive on your computer.
 100% Secure
Here's how to use AOMEI FoneBackup to import photos from iPhone to Windows 7. This method is especially useful when you need to copy many photos at once and want more control over which files are transferred.
Step 1. Install and launch AOMEI FoneBackup on your computer. Connect your iPhone to the PC using a USB cable.
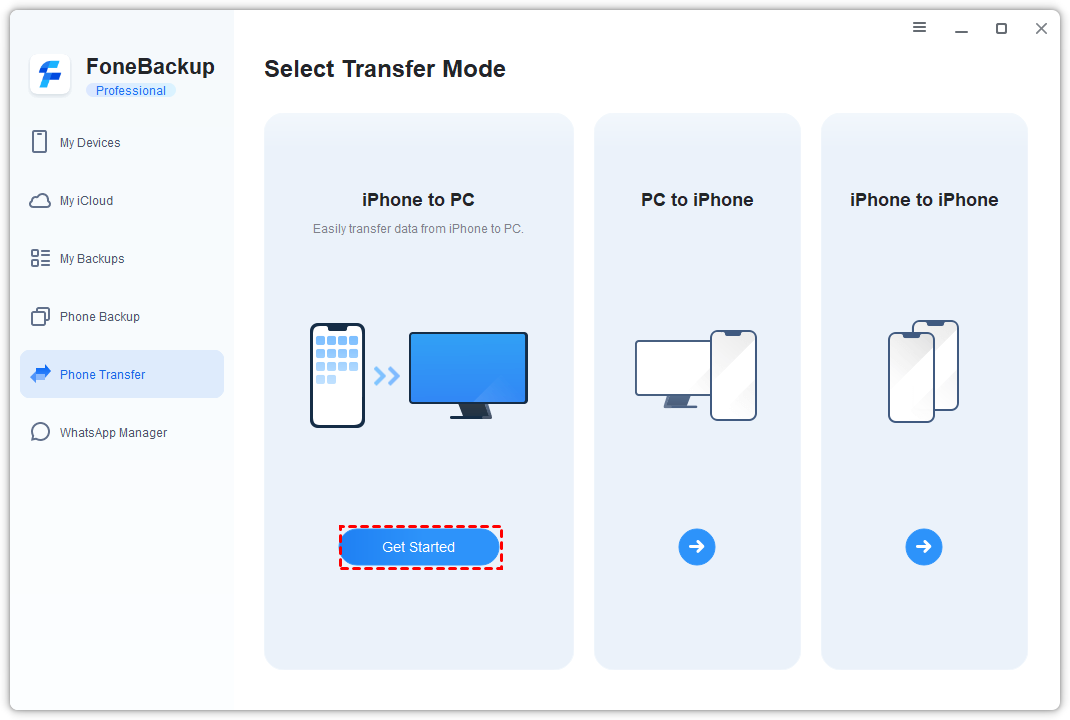
Step 2. After the device is recognized, go to Phone Transfer > iPhone to PC and click Get Started.
Step 3. Click the Photos icon. Preview the available pictures and check the photos you want to move. Click OK to continue.
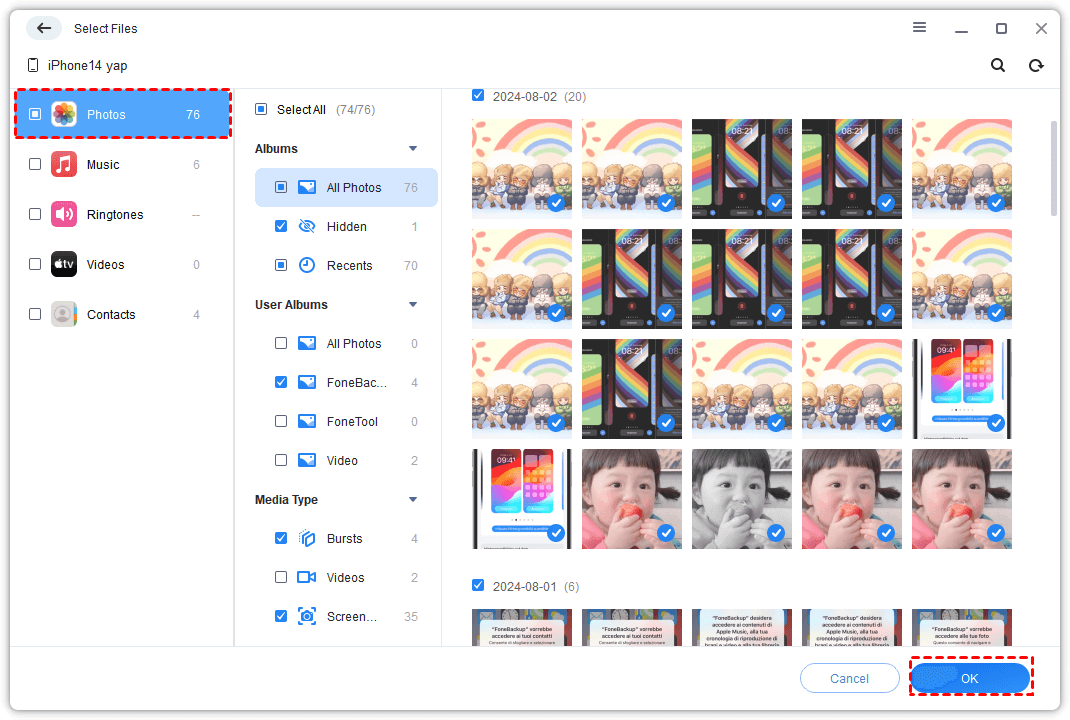
💡 Note: If you also need to transfer videos, select Videos instead.
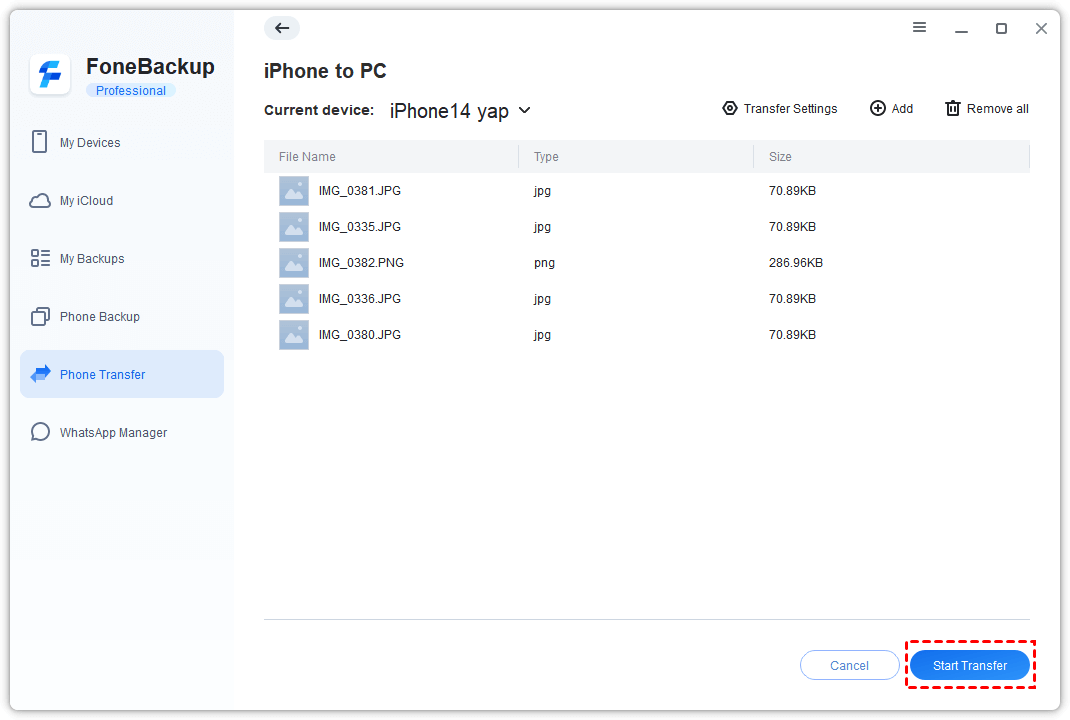
Step 4. Open Transfer Settings if you want to change the destination. You can save the photos directly to your computer or an external storage device. Click Start Transfer to begin.
Method 2. Transfer iPhone Photos to Windows 7 with AutoPlay
Windows 7 includes AutoPlay, which may automatically appear when you connect an iPhone to the computer. If your PC recognizes the iPhone correctly, you can use it to import pictures and videos without installing additional software.
Step 1. Connect the iPhone to your Windows 7 computer with a USB cable. Unlock your iPhone and tap Trust if prompted.
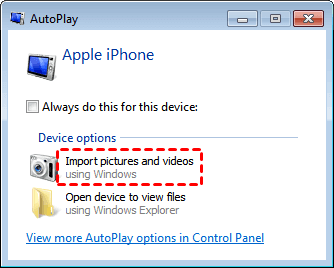
Step 2. When the AutoPlay window appears, choose Import pictures and videos.
Step 3. In the import settings, select an existing folder or create a new folder for the photos.
Step 4. Select the pictures you want to copy and click Import. Windows will transfer the selected photos to your computer.
💡 Note: AutoPlay may not appear if Windows does not properly recognize your iPhone. In that case, try another method below.
Method 3. Copy Photos from iPhone to Windows 7 via File Explorer
Another way to copy photos from iPhone to Windows 7 PC is Windows File Explorer. This method doesn't require third-party transfer software, although it generally works best for photos stored in the iPhone's accessible camera storage.
Step 1. Use a USB cable to connect your iPhone to the PC. Unlock the device and select Trust if the trust prompt appears.
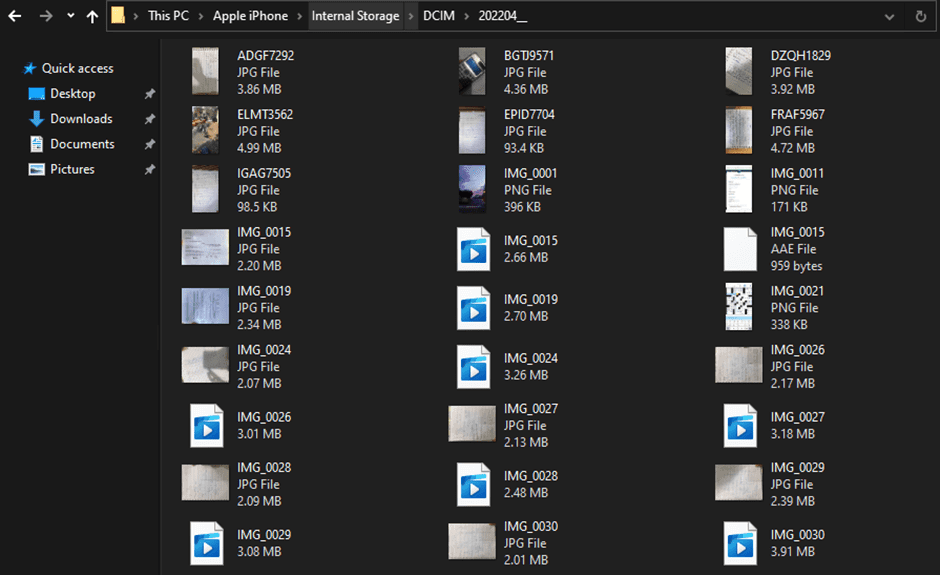
Step 2. Open Computer on Windows 7. Locate your iPhone under portable devices and double-click it.
Step 3. Open Internal Storage > DCIM. You should see folders containing photos and videos captured or stored in the camera roll.
Step 4. Open the relevant folder, select the photos you need, and copy or drag them to a folder on your Windows 7 computer.
💡 Note: If you encounter iPhone internal storage is not showing on PC, check this guide to fix it.
Method 4. Transfer Photos from iPhone to Windows 7 Wirelessly with iCloud
If you don't want to connect your iPhone to your computer with a cable, iCloud provides a wireless option. After your photos are synchronized with iCloud Photos, you can access and download them on your Windows 7 computer.
✅ Prepare your iPhone for iCloud Photos
- Make sure your iPhone is connected to a stable Wi-Fi network.
- Enable iCloud Photos by going to Settings > Photos and turning on iCloud Photos. Wait for your photos to finish syncing.
Option 1. Download iCloud Photos with iCloud for Windows
Apple provides an iCloud client for Windows that can synchronize iCloud content with your computer.
Step 1. Install iCloud for Windows on your computer and sign in with the same Apple Account used on your iPhone.
Step 2. To the right of iCloud Photos, click the Arrow button (>).
Step 3. Turn On iCloud Photos to access your iCloud Photos and iCloud Shared Photo Library on your PC. Click Done.

Step 4. iCloud will download photos to the designated folder on your Windows computer. The folder path is C:\Users\[user name]\Pictures\iCloud Photos\Photos.
💡 Note: Compatibility and functionality of Apple's current software may vary on older Windows versions such as Windows 7. If the official iCloud client doesn't work on your system, consider using another method in this guide.
Option 2. Download iCloud Photos with AOMEI FoneBackup
AOMEI FoneBackup can also help manage and download photos stored in iCloud. This option can be useful when you only need certain photos instead of downloading your entire iCloud photo library.
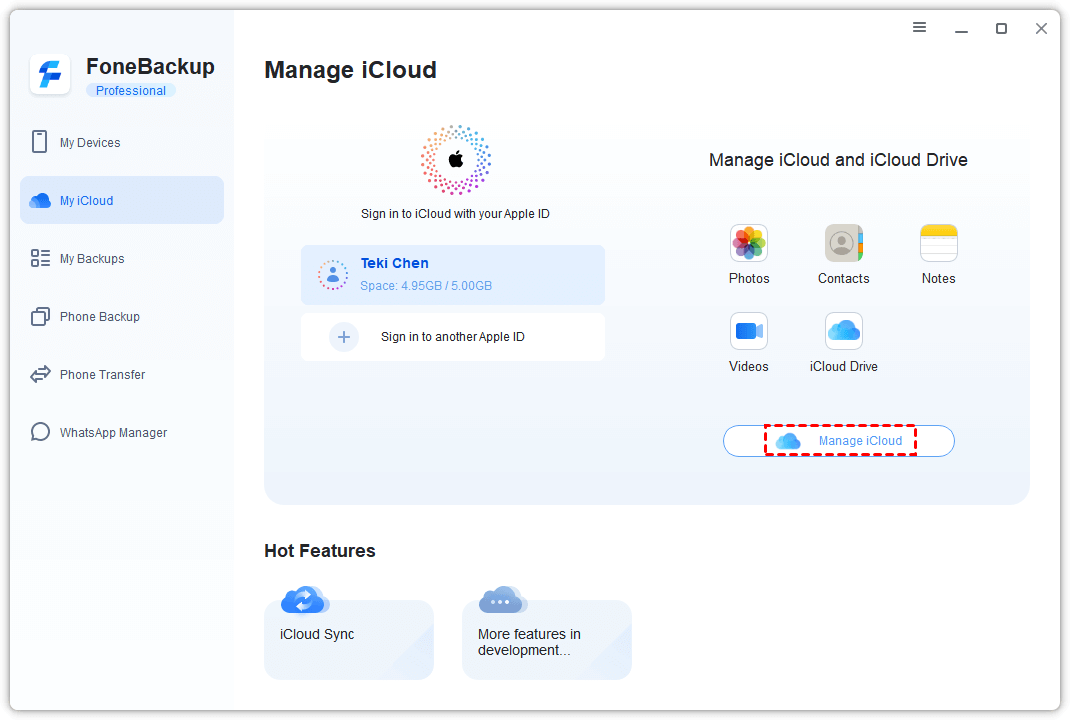
Step 1. Launch AOMEI FoneBackup and go to My iCloud. Sign in with your Apple Account, then select Manage iCloud.
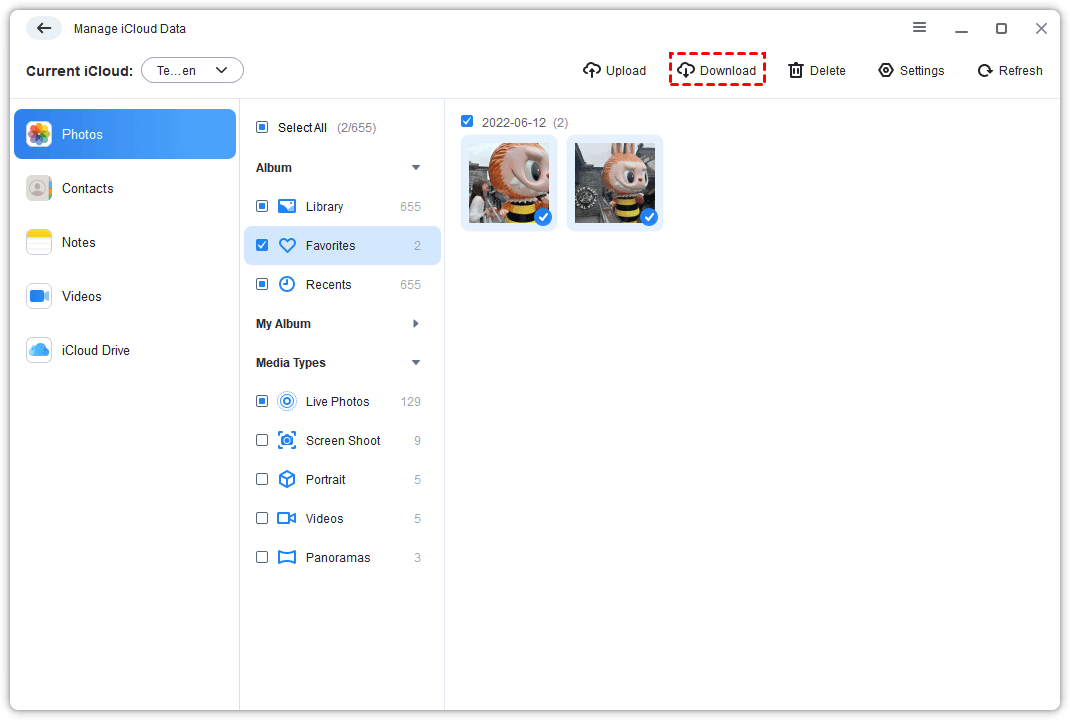
Step 2. Open Photos and select the pictures you want to download. Then click Download to save the selected iCloud photos to your computer.
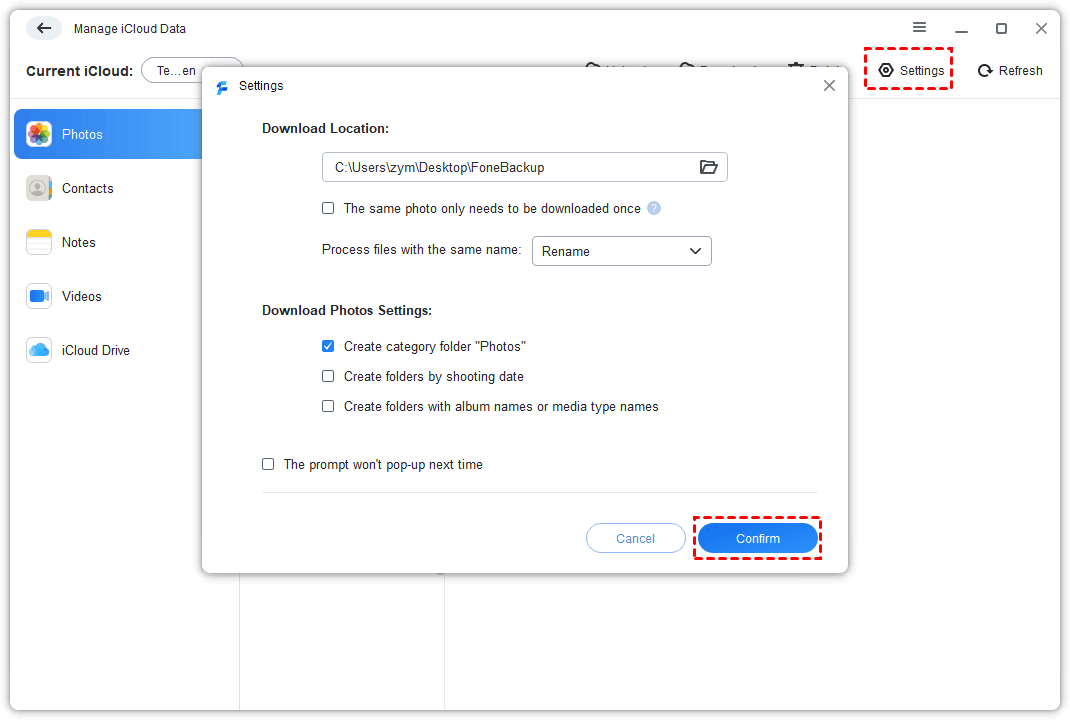
Step 3. (Optional)You can click Settings in the upper-right corner to change the default download location and other settings as necessary.
Method 5. Transfer iPhone Photos to PC with OneDrive
OneDrive is another cloud-based solution for moving photos from an iPhone to a Windows computer. Upload your photos from the iPhone first, then download them from OneDrive on your PC.
Step 1. Install the OneDrive app on your iPhone and sign in to your Microsoft account. Tap the Add button, choose Upload, and select the photos you want to transfer.
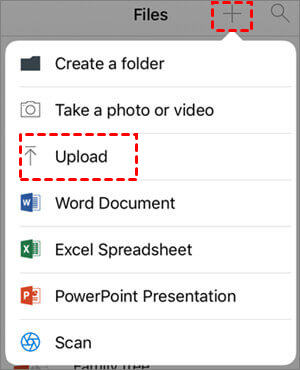
Step 2. Keep your iPhone connected to Wi-Fi and allow OneDrive enough time to upload the selected photos.
Step 3. On your Windows 7 computer, open OneDrive through the website and sign in to the same account.
Step 4. Locate the folder containing your uploaded pictures. Select the photos or folder and choose Download.

💡 Note: If Windows downloads a ZIP file, extract it to access your photos.
Method 6. Download iPhone Photos to Windows 7 with Dropbox
Dropbox provides another wireless option for users who already have a Dropbox account. You can upload photos from your iPhone and download them to your Windows 7 PC.
Step 1. Install the Dropbox app on your iPhone and sign in. Open Files to select the folder where you want to save the pictures.
Step 2. Tap the three dots in the upper-right corner. Choose Upload File > Photos, then pick the images you want to upload. Wait for the upload to complete.

Step 3. Visit Dropbox in a web browser or install the Dropbox desktop application. Sign in using the same account.
Step 4. Open the folder containing the uploaded pictures, select the photos you need, and click Download to save them to your Windows 7 computer.
FAQs About Transferring Photos from iPhone to Windows 7
1. Can I transfer photos from iPhone directly to Windows 7?
Yes. You can transfer photos directly with a USB cable using AutoPlay, File Explorer, or AOMEI FoneBackup. Cloud services such as iCloud, OneDrive, and Dropbox provide wireless alternatives.
2. Why is my iPhone not showing up on Windows 7?
First, unlock the iPhone and check whether it asks you to Trust This Computer. You can also try another USB cable or port and reconnect the device. If Windows still doesn't detect it, a dedicated transfer tool may be easier to use.
3. Can I transfer photos from iPhone to Windows 7 without iTunes?
Yes. iTunes isn't required for all photo-transfer methods. You can use AutoPlay, File Explorer, AOMEI FoneBackup, iCloud, OneDrive, or Dropbox instead.
4. Why can't I see all my iPhone photos on Windows 7?
Windows File Explorer generally provides access to photos that are available through the iPhone's camera storage. If some photos are optimized and stored in iCloud rather than locally, they may not appear in the DCIM folder. In that situation, iCloud or another transfer method may be necessary.
Conclusion
There are several ways to transfer photos from iPhone to computer in Windows 7. Whether you prefer a USB connection or a wireless cloud service, you can find a feasible method in this article.
If you need to transfer a large number of photos and want to preview and select specific files before moving them, AOMEI FoneBackup is a convenient option. What’s more, it solves the problem that File Explorer can’t transfer photos from PC to iPhone. Don’t hesitate to try it out!

 as a preferred
source on Google
as a preferred
source on Google