




How to Transfer Photos from iPad to Computer | 5 Ways
Want to transfer photos from your iPad to your computer without losing quality? Learn easy methods – built-in tools and third-party software – that also free up storage.

By Lily Updated on July 31, 2026


As you continue using your iPad, photos and videos can quickly take up a large amount of storage space. When your iPad is running out of space, moving photos to a computer is a practical solution. You can create a backup of your important pictures and safely remove unnecessary files from your iPad to recover storage.
This guide will show you how to transfer photos from iPad to PC or Mac step by step.
Method 1. Transfer Photos from iPad to PC Using AOMEI FoneBackup
For Windows users who want a simple and efficient way to transfer iPad photos, AOMEI FoneBackup is a reliable choice. Unlike traditional methods, it allows you to preview and select specific photos before transferring them to your computer.
 AOMEI FoneBackup
- Preview photos and select only the files you need.
- Transfer photos quickly without complicated settings.
- Keep original photo quality during the transfer process.
- Use a USB connection to protect your personal data.
- Support various iPad models, including iPad Pro, iPad Air, and iPad mini.
 100% Secure
Download and install AOMEI FoneBackup on your Windows PC. Then follow the steps below to transfer photos from iPad to computer without iTunes:
Step 1. Connect your iPad using a USB cable and unlock it. Tap Trust if your iPad asks for permission to allow the computer to access your device.
Step 2. Open AOMEI FoneBackup. Click Phone Transfer from the left panel, choose iPhone to PC, and click Get Started.
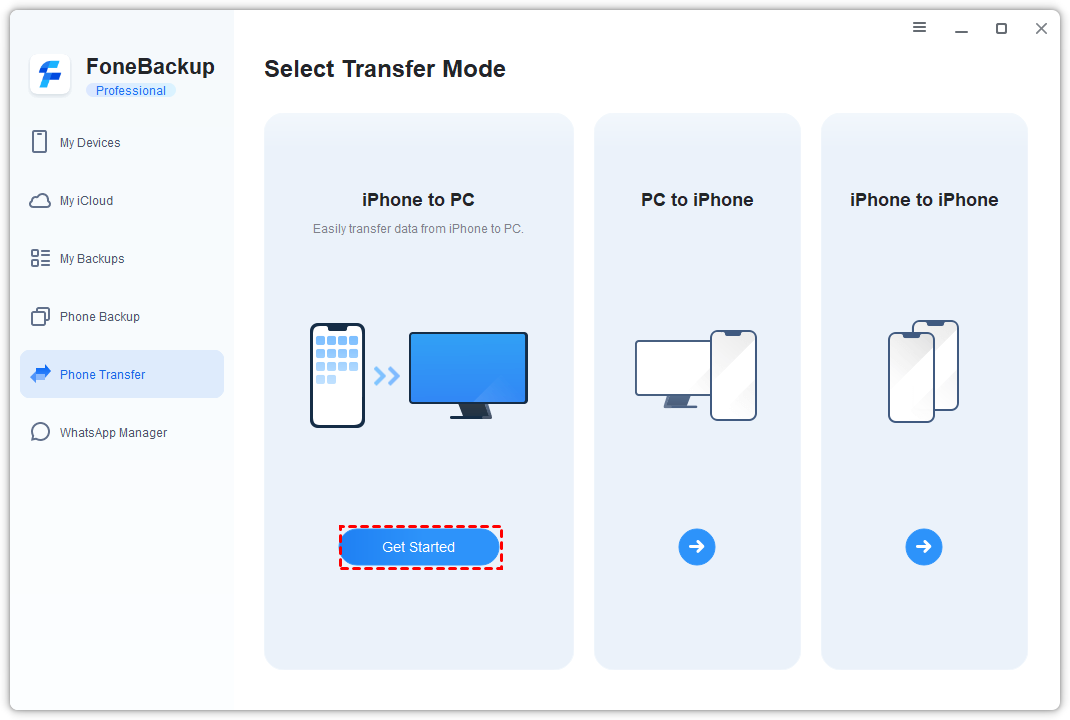
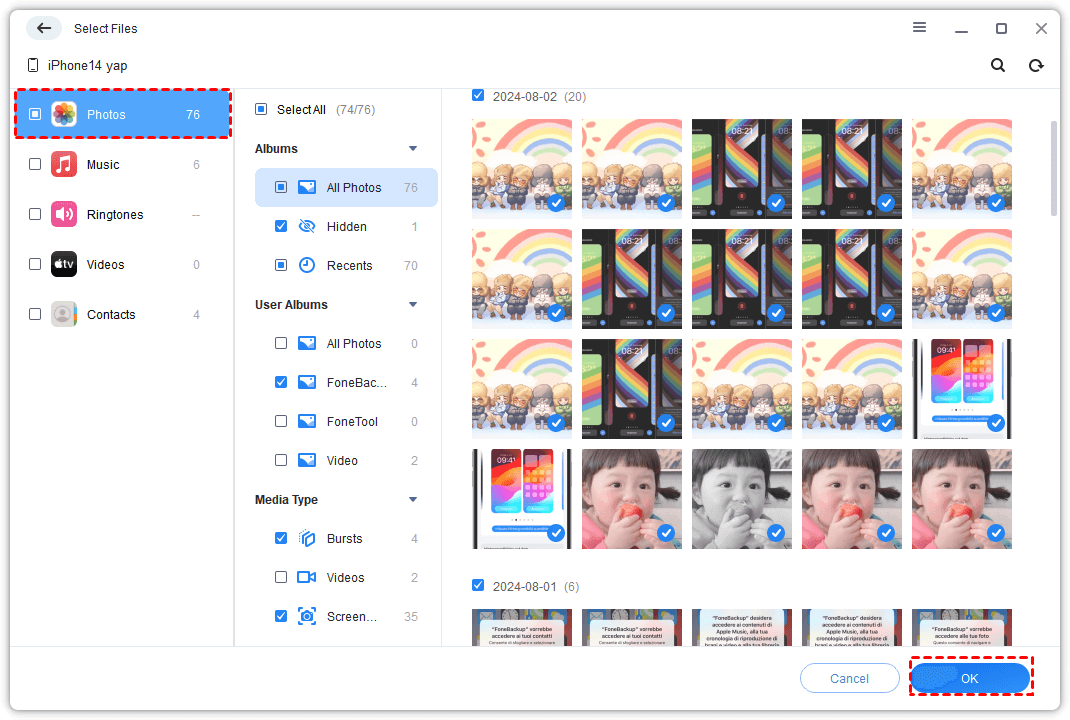
Step 3. Select Photos from the data categories. In the next window, preview your pictures, choose the photos you want to transfer, and click OK.
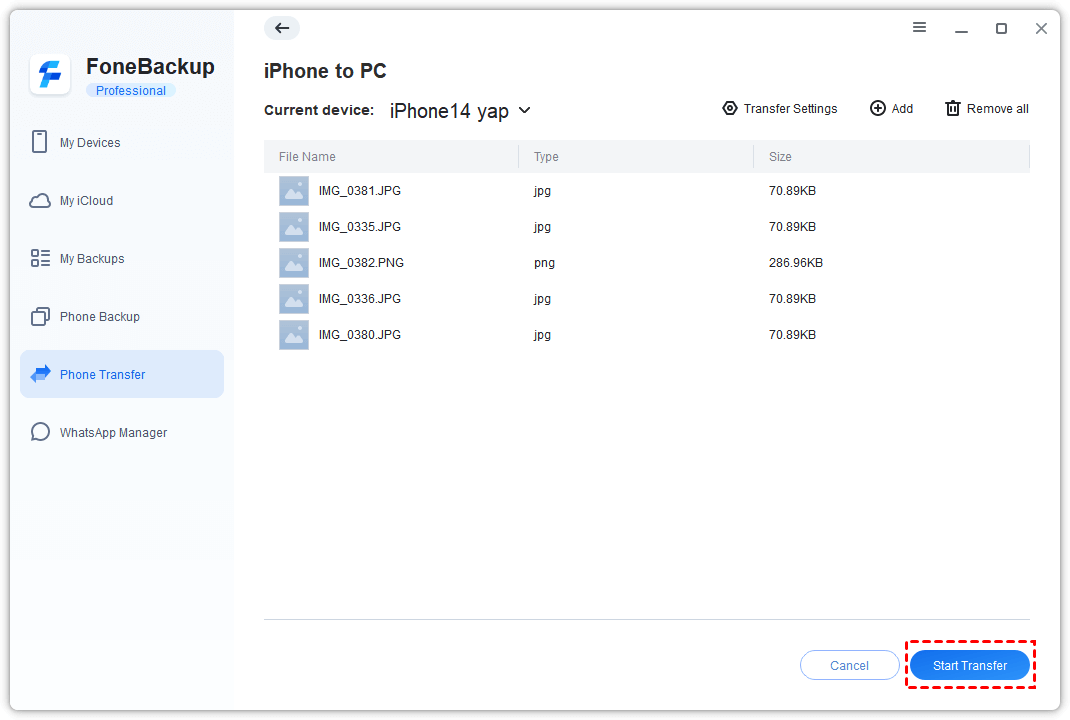
Step 4. Choose a destination folder in Transfer Settings, then click Start Transfer to move photos from your iPad to your computer.
✍ Tip: Besides transferring photos from iPad to PC, AOMEI FoneBackup also supports transferring data between iPhone, iPad, and other Apple devices.
Method 2. Transfer iPad Photos to PC Using File Explorer
Windows File Explorer is a built-in tool that allows you to access photos stored on your iPad. It treats your iPad like a digital camera and lets you manually copy photos from the device.
However, your computer may need iTunes installed so that Windows can properly recognize your iPad. Learn how to copy photos from iPad to PC with File Explorer below:
Step 1. Connect your iPad to your Windows PC using a USB cable.
Step 2. Open This PC and locate your iPad under Devices and drives.
Step 3. Open your iPad, then navigate to Internal Storage > DCIM.
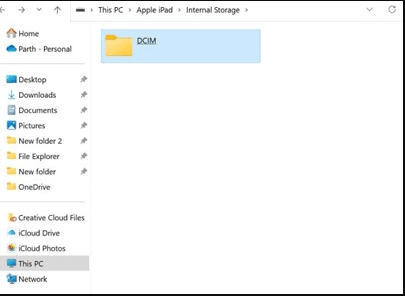
Step 4. Select the photo folders, copy the pictures you need, and paste them into a folder on your computer.
✍ Tip: This method only allows access to photos stored in the iPad Camera Roll. Photos synced from other sources may not appear.
Method 3. Import Photos from iPad to PC with the Windows Photos App
The Windows Photos app provides another built-in way to import pictures from your iPad. It is especially useful when you only need to transfer Camera Roll photos. Installing iTunes may help establish communication between your PC and iPad. Follow the steps below to transfer photos from iPad to Windows PC:
Step 1. Connect your iPad to your computer with a USB cable. Unlock your iPad and tap Trust when prompted.
Step 2. Open the Photos app. Then click Import > Apple iPad. Wait while Windows scans your iPad.
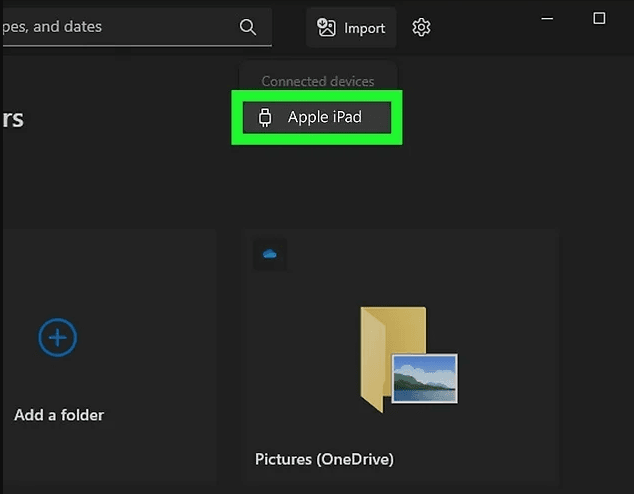
Step 3. Select the photos you want to transfer and click the blue button Add xx items (xx stands for the number of selected photos).
Step 4. Confirm the destination folder (C:\Users\Username\Pictures). Then click Import to save the selected photos to your computer.

✍ Tip: You can also click the Pictures folder to select a subfolder in it as the destination location. Or you can click Create folder to create a new folder as the destination.
Method 4. Transfer Photos from iPad to PC Using iCloud
If you prefer a wireless method, iCloud Photos can automatically sync your iPad pictures to your computer. This option is convenient because it does not require a USB cable.
However, iCloud only provides 5GB of free storage. If your photo library exceeds this limit, you may need to upgrade your iCloud plan. Follow the instructions below:
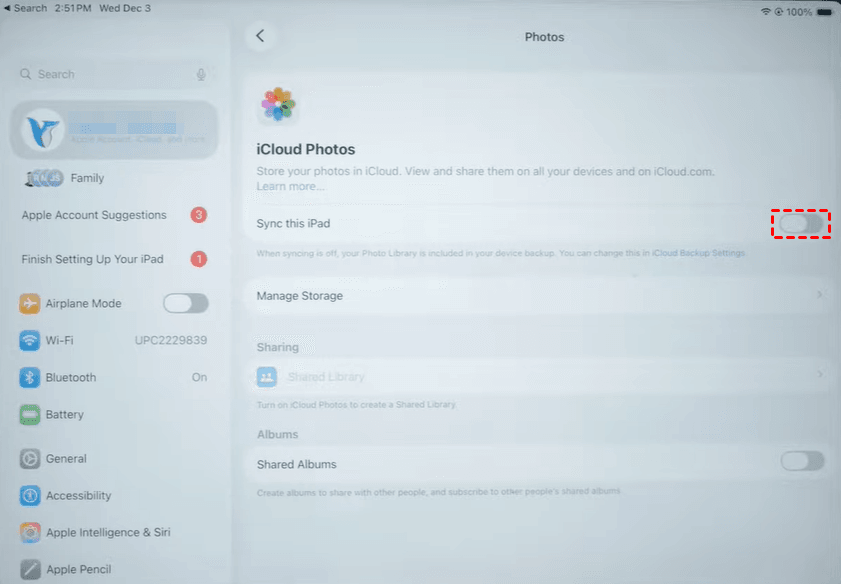
Step 1. Open Settings on your iPad and tap your Apple ID at the top.
Step 2. Select iCloud > Photos. Then turn on Sync this iPad. Wait for your photos to upload to iCloud.
Step 3. On your computer, open a browser and visit iCloud.com/photos. Sign in with your Apple ID.
Step 4. Select the pictures you want to download and click the Download button in the upper-right corner.

✍ Tip: You can select up to 1,000 photos to download at a time.
Step 5. After the download completes, go to the download folder on your computer (the default is C:\Users\Username\Downloads). Then open the iCloud Photos.zip file to find all your photos.
Method 5. Import Photos from iPad to Mac Using USB Cable
For Mac users, the built-in Photos app provides a convenient way to transfer pictures from iPad. If iCloud Photos is enabled on both devices and they use the same Apple ID, photos can sync automatically.
However, USB transfer is usually faster when you need to move a large number of photos or do not have enough iCloud storage. Learn how to transfer photos from iPad to Mac via a USB cable below:
Step 1. Connect your iPad to your Mac using a USB cable. If you see a prompt to allow your accessory to connect to your computer, click Allow.
Step 2. Open the Photos app on your Mac. It shows an Import screen with all the photos and videos that are on your connected device.
✍ Tip: If the Import screen does not appear automatically, select your iPad from the Photos sidebar.
Step 3. Unlock your iPad and tap Trust if requested.
Step 4. Next to Album, you can choose an existing album or create a new one to import your photos.
Step 5. Select the photos you want to import and click Import Selected, or click Import All New Photos.
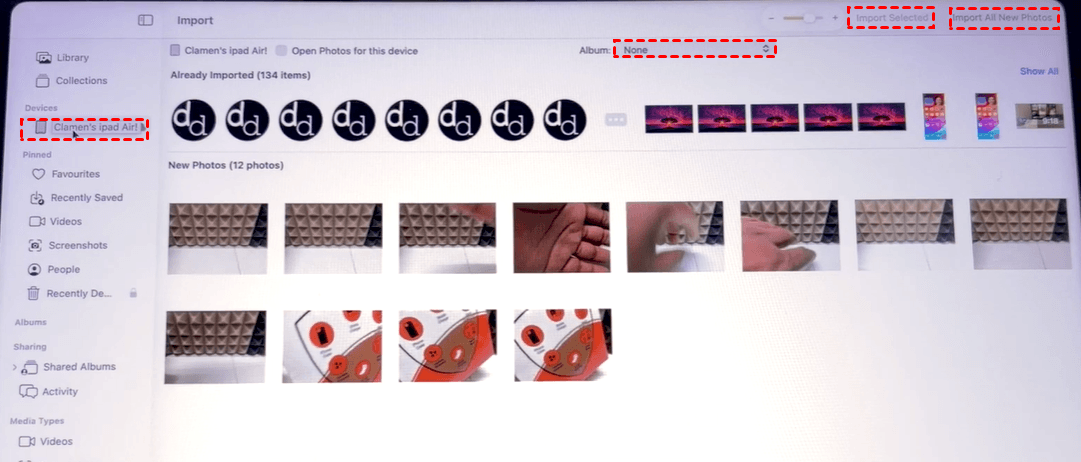
Step 6. Wait for the transfer process to finish, then safely disconnect your iPad.
FAQs About Transferring Photos from iPad to Computer
1. Why can't I transfer photos from iPad to PC?
Common reasons include:
- The iPad is not unlocked or trusted by the computer.
- The USB cable is damaged or not compatible.
- iCloud Photos optimization prevents local files from being available.
- Windows does not recognize the iPad properly.
Try reconnecting the device, using another cable, or using AOMEI FoneBackup for a more stable transfer process.
2. Can I transfer photos from iPad to PC wirelessly?
Yes, iCloud Photos is an available option. It syncs your library automatically in the background. You can access your photos on iCloud.com or via the iCloud for Windows app on your computer.
3. Can I transfer photos from iPad to PC without iCloud?
Yes. You can transfer photos without iCloud by using AOMEI FoneBackup, File Explorer, or the Windows Photos app with a USB connection.
Verdict
There are five effective ways to help you transfer photos from iPad to computer. Windows users can choose from File Explorer, the Photos app, iCloud, and AOMEI FoneBackup. Mac users can quickly import pictures through the built-in Photos app.
If you need to move many photos from different albums or want a faster and more flexible solution, AOMEI FoneBackup is worth trying. In addition to photo transfers, AOMEI FoneBackup also lets you back up your entire iPhone with one click. Download it now to discover more!

 as a preferred
source on Google
as a preferred
source on Google