




How to Transfer iTunes Library to iPhone: 4 Easy Methods
Want to transfer your iTunes music library to an iPhone? This guide explains 4 practical methods for moving songs from your computer to your iPhone, for flexible music transfers.

By Jonna Updated on September 2, 2026


For music lovers and iOS users, an iTunes library is often a carefully built collection of custom playlists, imported CD tracks, purchased albums, audiobooks, and podcasts. When upgrading to a new device or refreshing your media setup, knowing how to transfer iTunes library to iPhone efficiently is essential to enjoying your tracks anywhere.
While Apple provides native sync tools, traditional sync methods can sometimes overwrite your existing media or lock you into rigid single-computer pairing rules. In this guide, we explore 4 reliable, step-by-step methods to transfer your iTunes library to your iPhone, covering both official Apple options and flexible third-party PC to iPhone transfer tools.
Method 1. Transfer iTunes Library to iPhone via Standard iTunes USB Sync
If your iPhone is brand new or you do not mind overwriting existing media on your device, using the official iTunes software is a standard method. If your device is currently linked to another iTunes library, iTunes will prompt a warning stating that syncing will erase and replace your current media files.
Step 1. Launch the latest version of iTunes on your computer. Connect your iPhone via USB cable and click the device icon in the top-left toolbar.
Step 2. Under the Settings section in the left sidebar, click Music.
Step 3. Check the box for Sync Music.
Step 4. Select whether to transfer your Entire music library or Selected playlists, artists, albums, and genres.
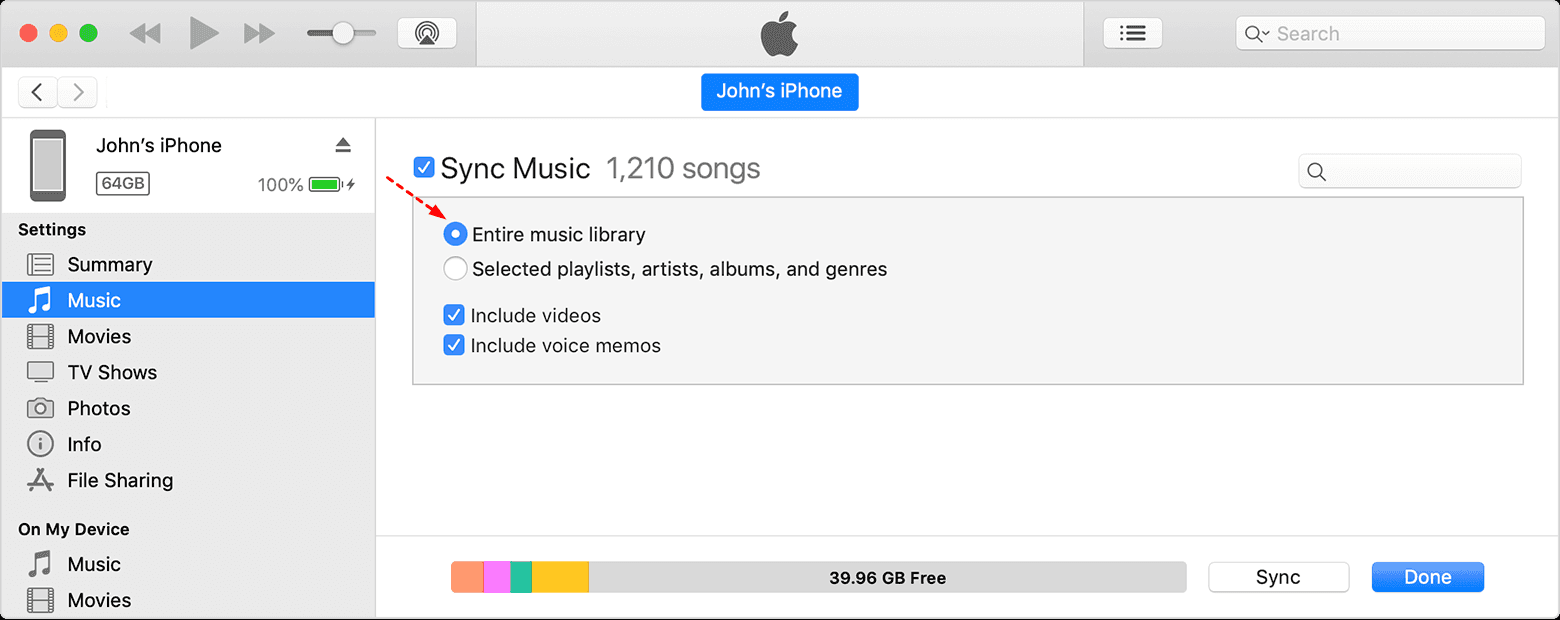
Step 5. Click Sync in the bottom-right corner to begin the transfer.
Method 2. Transfer iTunes Library Wirelessly via Sync Library
If you subscribe to Apple Music or iTunes Match, manual cable transfers are optional. Apple allows you to upload your entire computer-based library to the cloud and stream or download it directly on your iPhone.
Step 1. On Computer: Open iTunes, navigate to Preferences > General, and check Sync Library (or iCloud Music Library). Click OK to start uploading your local songs.
Step 2. On iPhone: Open Settings, scroll down, and tap Music.
Step 3. Toggle Sync Library on.
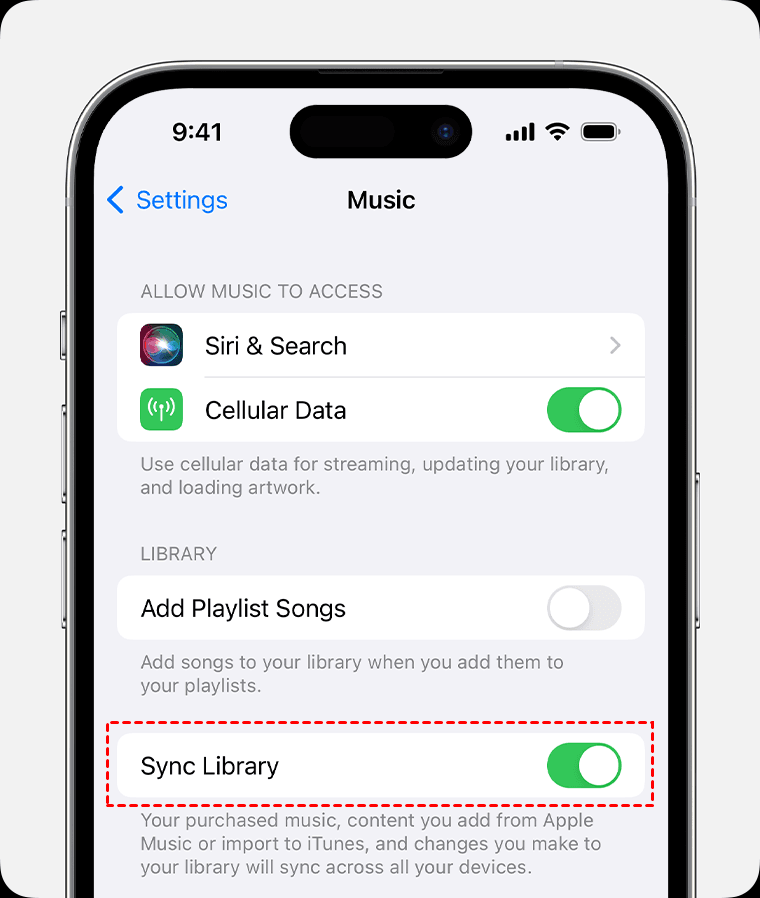
Step 4. Open the Music app on your iPhone. Your cloud-synced iTunes tracks and playlists will load automatically over Wi-Fi or cellular data.
Method 3. Transfer iTunes Library to iPhone via macOS Finder
Beginning with macOS Catalina (10.15), Apple replaced iTunes with standalone apps (Music, TV, Podcasts). However, local device syncing functions have been integrated directly into macOS Finder.
Step 1. Connect your iPhone to your Mac using a Lightning or USB-C cable.
Step 2. Open Finder and select your iPhone under Locations in the left sidebar.
Step 3. Click the Music tab in the top navigation menu. Check Sync music onto [Your iPhone's Name].
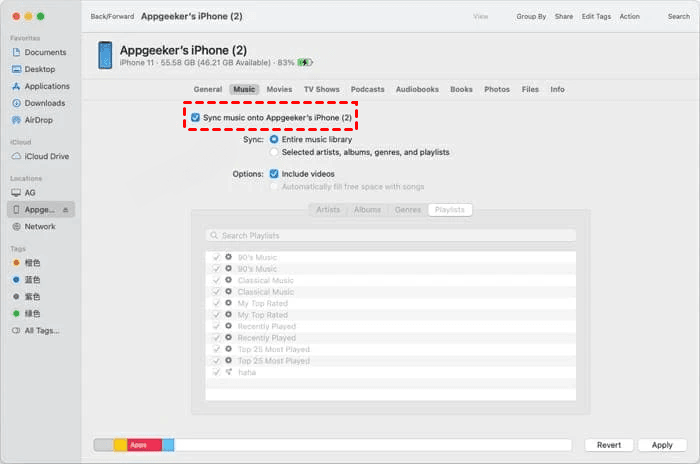
Step 4. Choose between syncing your entire music library or selected playlists and artists.
Step 5. Click Apply at the bottom-right corner to start syncing.
Method 4. Transfer iTunes Library to iPhone via AOMEI FoneBackup (No Data Overwriting)
One major limitation of official iTunes sync is its "one-way replace" model: syncing a new iTunes library to your iPhone will automatically erase existing songs, ringtones, and videos on the device. If you want to transfer iTunes library to iPhone safely without deleting existing content, AOMEI FoneBackup is an ideal solution.
It provides a seamless solution to transfer both purchased and non-purchased music from iPhone to PC or from PC to iPhone without the risk of data deletion.
 AOMEI FoneBackup
- Zero data loss: Safely adds music and media files to your iPhone without wiping existing music libraries.
- Selective transfer: Preview and select specific albums, audio files, or playlists instead of forcing a full library sync.
- Cross-Apple ID support: Seamlessly move music from different computers or multiple Apple IDs onto a single iPhone.
- Fast USB speed: Enables rapid local transfers via USB cable without relying on network speed.
 100% Secure
Step 1. Download and launch AOMEI FoneBackup on your Windows PC. Connect your iPhone to the computer using a USB cable, unlock the screen, and tap Trust if prompted.
Step 2. On the home screen, click Phone Transfer, navigate to PC to iPhone, and click Start Transfer.
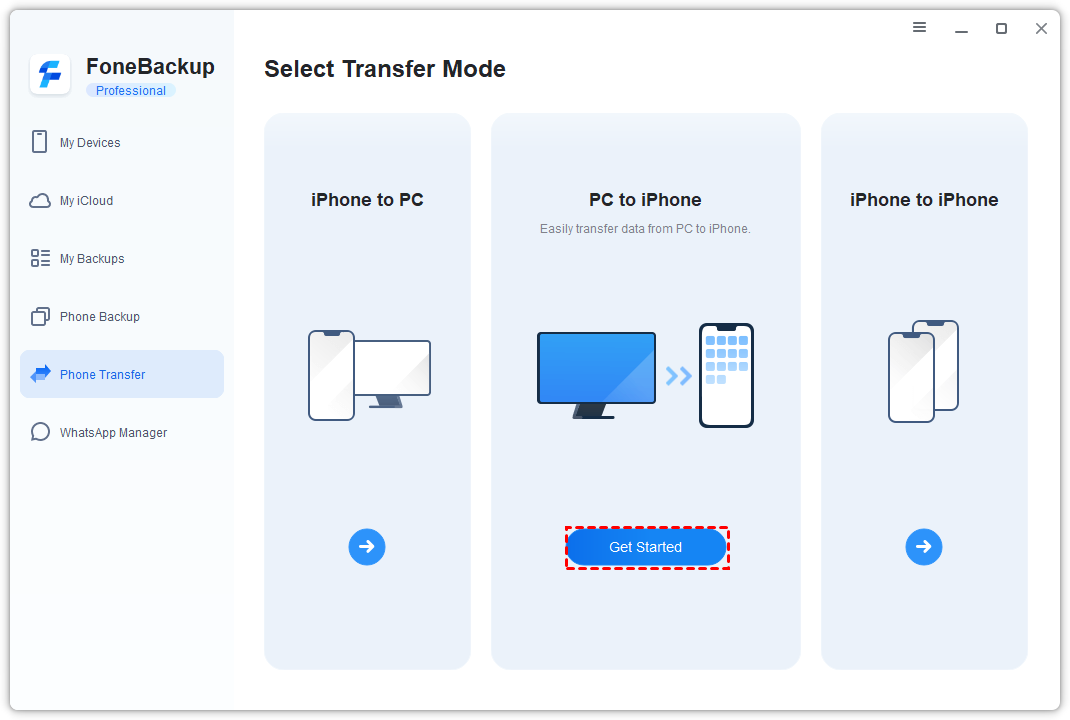
Step 3. Click the Music icon to browse your local storage. Locate your iTunes Media folder (default path: C:\Users\[Username]\Music\iTunes\iTunes Media).
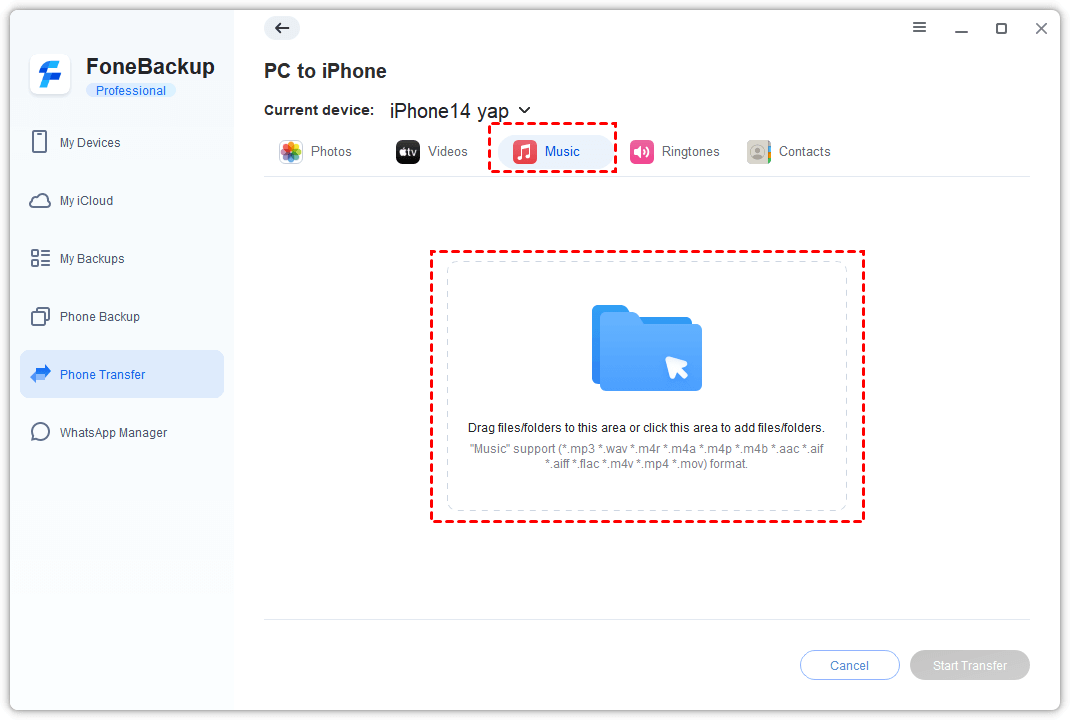
Step 4. Select the songs, audiobooks, or playlists you wish to transfer to your iPhone.
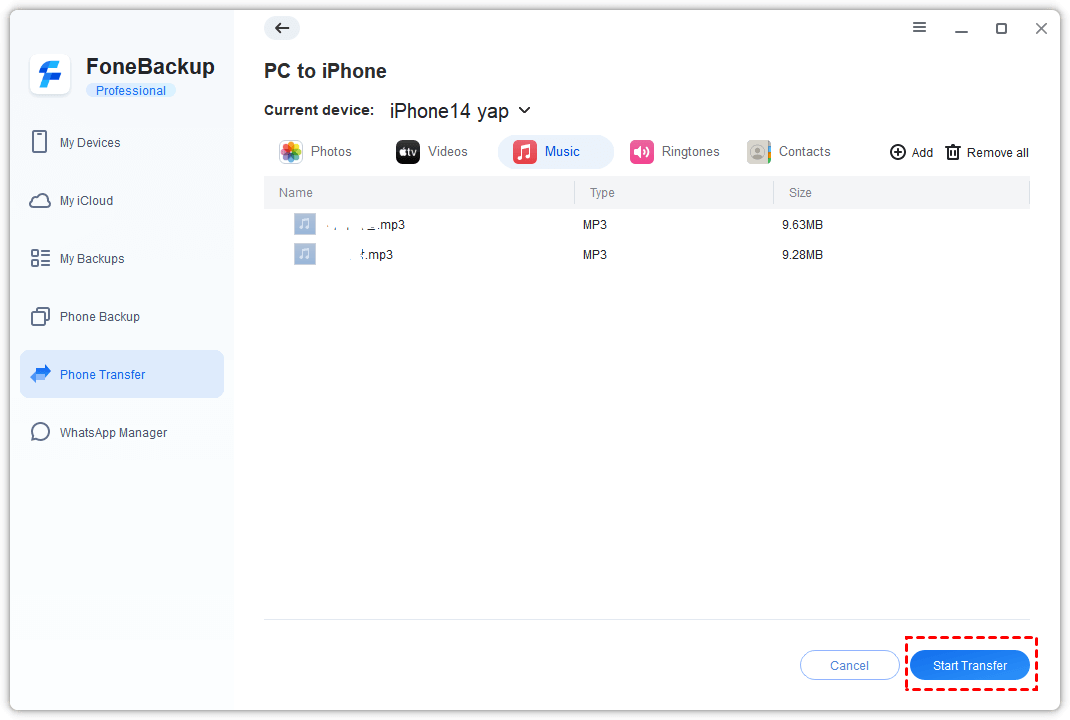
Step 5. Review your selection and click Start Transfer to push your iTunes library files to your iPhone.
💡Tips:
- There is also an AOMEI FoneBackup mobile app, a free tool that is available on both the App Store and for Android, capable of transferring music from Android to iPhone over Wi-Fi.
- If you wish to export playlist from iPhone to iTunes, you may go to the related article for detailed guidelines.
FAQs on Transferring iTunes Library to iPhone
Can I transfer my entire iTunes library to my iPhone?
Yes, provided your iPhone has sufficient storage and the music is eligible for transfer. You can use iTunes, Finder, or a synchronization service depending on your setup.
Will syncing music erase my existing songs?
The effect of synchronization can depend on your existing device settings and music library configuration. Review your sync options carefully before applying changes.
Where do transferred songs appear on an iPhone?
The location can depend on the transfer method. Music synchronized through Apple's ecosystem generally appears in the Music library, while AOMEI FoneBackup documents that music transferred through its software is stored in the downloaded section of the Apple Music library by default.
Why isn't my iTunes music transferring to my iPhone?
- Check Sync Library Settings: If you subscribe to Apple Music or iTunes Match, your device defaults to cloud syncing, which disables manual iTunes USB transfers. Go to Settings > Music on your iPhone and toggle off Sync Library to allow local syncing.
- Enable Manual Music Management: Connect your iPhone to your computer via USB. In iTunes, click the iPhone icon, navigate to the Summary section, check Manually manage music and videos, and click Apply.
- Check File Formats and DRM Restrictions: Incompatible formats (such as FLAC or WMA) must be converted to MP3/AAC inside iTunes first. Additionally, Apple Music offline tracks or older DRM-protected files cannot be manually transferred via drag-and-drop.
- Re-authorize Computer and Cable Connection: In iTunes, go to Account > Authorizations > Authorize This Computer. Ensure you tap Trust on your iPhone when connecting, and try using a different USB port or cable if your device is not recognized.
Conclusion
Knowing how to transfer iTunes library to iPhone gives you complete control over your offline and online media collections. Subscribers to Apple Music can take advantage of wireless cloud syncing, while standard iTunes transfers handle basic device setups. However, if you want to avoid overwriting your existing music, bypass Apple ID restrictions, or selectively manage songs without hassle, AOMEI FoneBackup offers the most secure and intuitive solution.

 as a preferred
source on Google
as a preferred
source on Google