




How to Transfer Data from Broken iPhone to New iPhone
A broken iPhone does not always mean lost data. This guide helps you transfer data from broken iPhone to new iPhone using different tools.

By Jonna Updated on August 24, 2026


If you are currently holding a damaged device and wondering how to transfer data from broken iPhone to new iPhone, you can take a deep breath. A broken screen or a malfunctioning device does not necessarily mean your data is gone forever. Whether your screen is slightly cracked, completely unresponsive to touch, or the device appears seemingly dead, there are several proven methods to extract your valuable information and migrate it safely to your newly purchased iPhone.
Preparations: Check the State of Your Broken iPhone
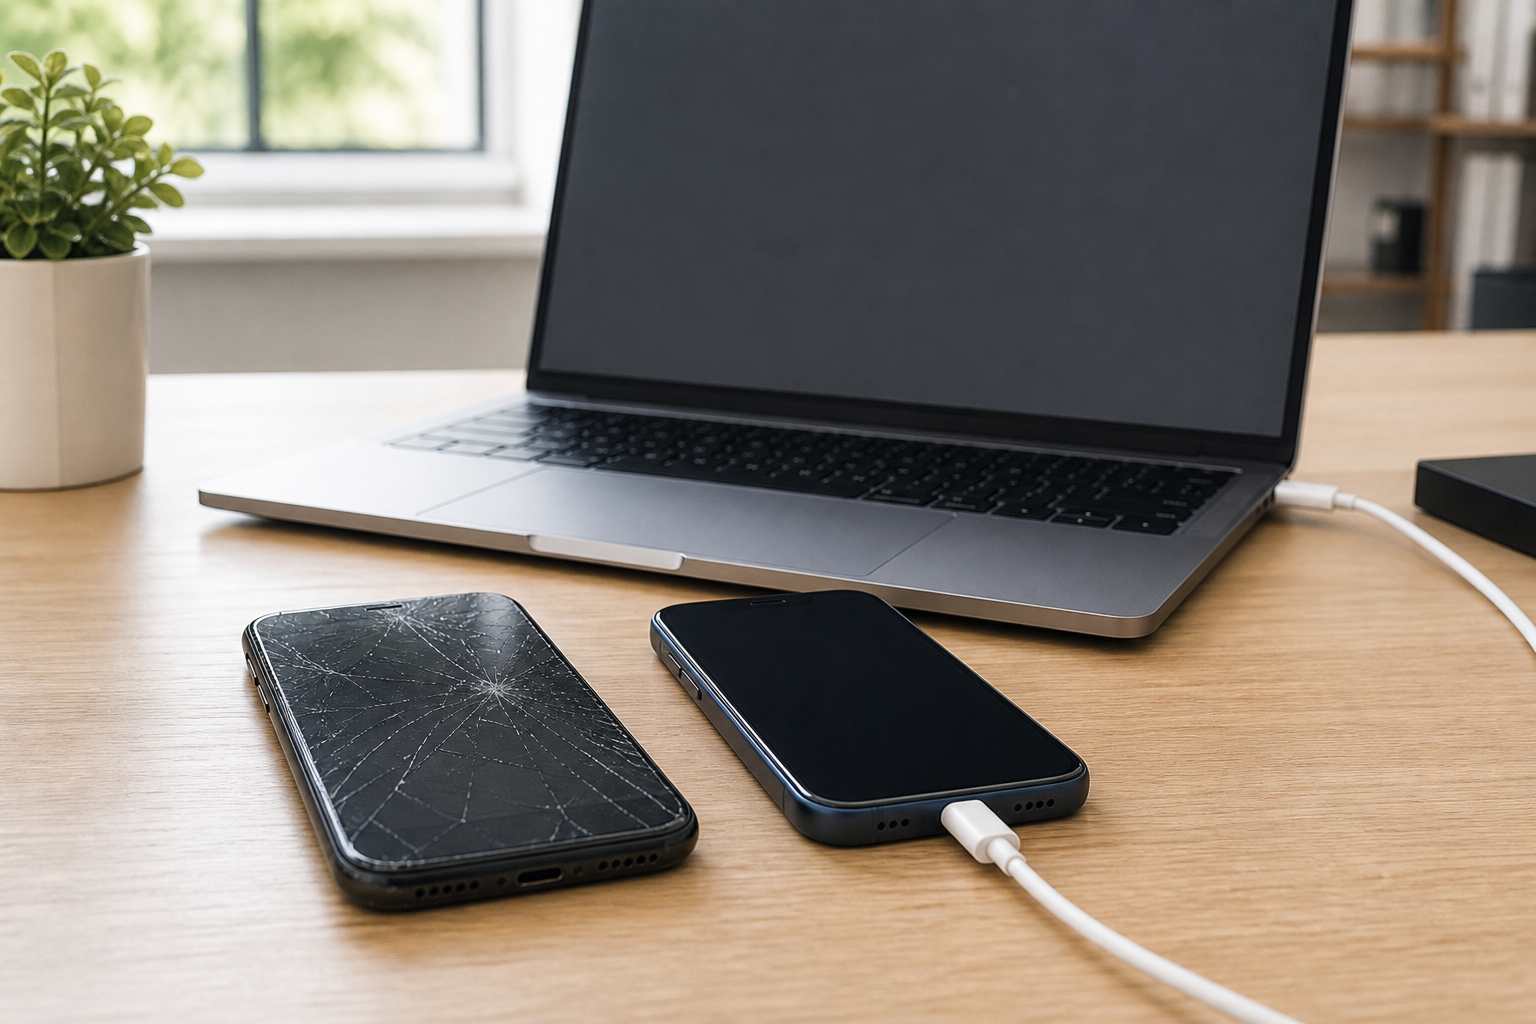
Before diving into the transfer methods, you must first determine the actual condition of your broken iPhone. The method you choose will heavily depend on whether the device can still turn on, whether it can connect to a computer, and whether the touch screen has any remaining functionality.
- The Screen is Broken, But the Phone Turns On: If your alarm still goes off, you hear notification sounds, or you feel haptic feedback when you plug it into a charger, the motherboard is still alive. This is a highly favorable scenario.
- The Touch Screen is Unresponsive (Ghost Touch or Dead Zones): You can see the display, but you cannot tap anything. You might need to rely on wired computer connections or automatic cloud backups.
- The Phone Appears Completely Dead: The screen is black, and there are no sounds or vibrations. You might be dealing with a dead battery, a broken display panel, or a damaged motherboard.
Once you have assessed the damage, choose the method below that best fits your specific situation for broken iPhone data transfer.
Way 1. How to Transfer Data from Broken iPhone to New iPhone with iCloud
If you are staring at a shattered device and wondering, "iPhone screen broken how to transfer data to new iPhone without plugging it into anything?", Apple’s iCloud is your immediate answer.
iCloud is designed for full iPhone backup. By default, iPhones are configured to automatically back up your data to iCloud whenever the device is locked, connected to Wi-Fi, and plugged into a power source. Therefore, even if your iPhone was destroyed an hour ago, there is a very high probability that a near-perfect copy of your data was saved to the cloud while you were sleeping last night. This method requires absolutely no physical interaction with the broken iPhone's screen.
👉 Prerequisites:
-
You must have previously enabled iCloud Backup on the broken iPhone.
-
You need enough iCloud storage to accommodate your data.
-
You need to know the exact Apple ID and password associated with the broken device.
-
A stable Wi-Fi connection for the new iPhone.
Step-by-Step Guide on Transferring Data from Damaged iPhone to New iPhone:
Step 1. Turn on your newly purchased iPhone and begin the standard initial setup process. Follow the on-screen prompts until you reach the Wi-Fi selection screen. Connect to a fast, reliable network, as downloading a backup uses a significant amount of data.
Step 2. When you reach the Apps & Data screen, continue past the Face ID/Touch ID setup until you land on a screen titled "Apps & Data."
Step 3. Tap the Restore from iCloud Backup option. Then, enter the Apple ID and password that you used on your broken iPhone.
Step 4. You will be presented with a list of available iCloud backups. Look at the date and time stamps and select the most recent one.
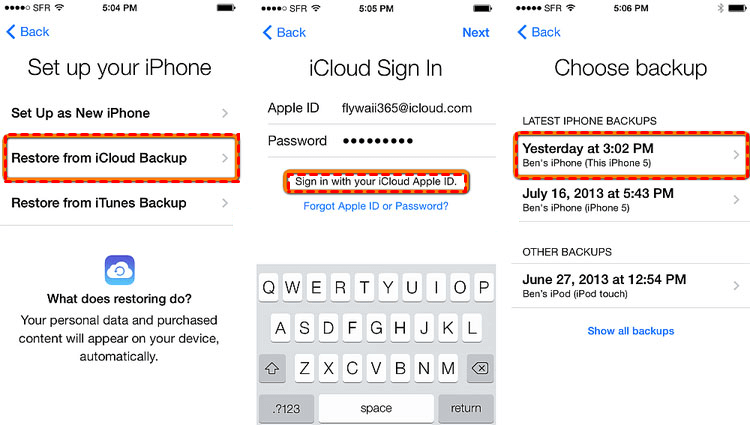
Step 5. A progress bar will appear. Depending on the size of your backup and the speed of your Wi-Fi, this could take anywhere from a few minutes to an hour. Keep the new iPhone plugged into a charger. Once the core setup is complete, your apps, photos, and messages will continue downloading in the background while you use the phone.
Way 2. How to Transfer Data from Broken iPhone to New iPhone without iCloud
While iCloud is a convenient iPhone backup software, it is not always practical. Apple only provides 5GB of free iCloud storage, which is rarely enough to back up a modern iPhone full of 4K videos and high-resolution photos. If you haven't been paying for a premium iCloud+ subscription, you might find that your last cloud backup is months or even years old. Furthermore, if you have a massive amount of data, waiting for a wireless download can take an agonizingly long time.
If you need a direct, offline solution, you need a professional desktop tool. For this, we highly recommend using AOMEI FoneBackup. This tool is a powerful, user-friendly iOS data management software for Windows PCs. It completely bypasses the need for internet connections and cloud storage limits by allowing you to back up & restoring iPhone without cloud and transfer data directly from the broken device to the new one via USB cables.
 AOMEI FoneBackup
- 1-click iPhone to iPhone transfer: It migrates everything - photos, contacts, call history, text messages, app data, Safari history, and system settings.
- iPhone backup & restore: It supports full iPhone backup as well as selectively backup messages, contacts, music, and various personal data.
- No storage limits: It relies on your computer's processing power and direct USB connections, meaning you don't need to pay for extra cloud storage.
- Fast speed: Wired transfers are vastly faster than downloading heavy backups from the cloud.
- No Apple ID sync issues: It bypasses common iTunes errors, syncing glitches, and has no limitations on Apple IDs.
 100% Secure
Step-by-Step Guide to Using AOMEI FoneBackup to Transfer Data from Broken iPhone to New iPhone:
-
For this method to work smoothly on a phone with an unresponsive screen, you should ideally use a computer that you have previously connected the broken iPhone to, so that the "Trust This Computer" permission is already granted.
Step 1. Connect both your broken iPhone and your new iPhone to the computer simultaneously and run the AOMEI FoneBackup software.
Step 2. On the left-hand navigation pane of the software interface, click on Phone Transfer. Locate the "iPhone to iPhone" option and click the Get Started button beneath it.
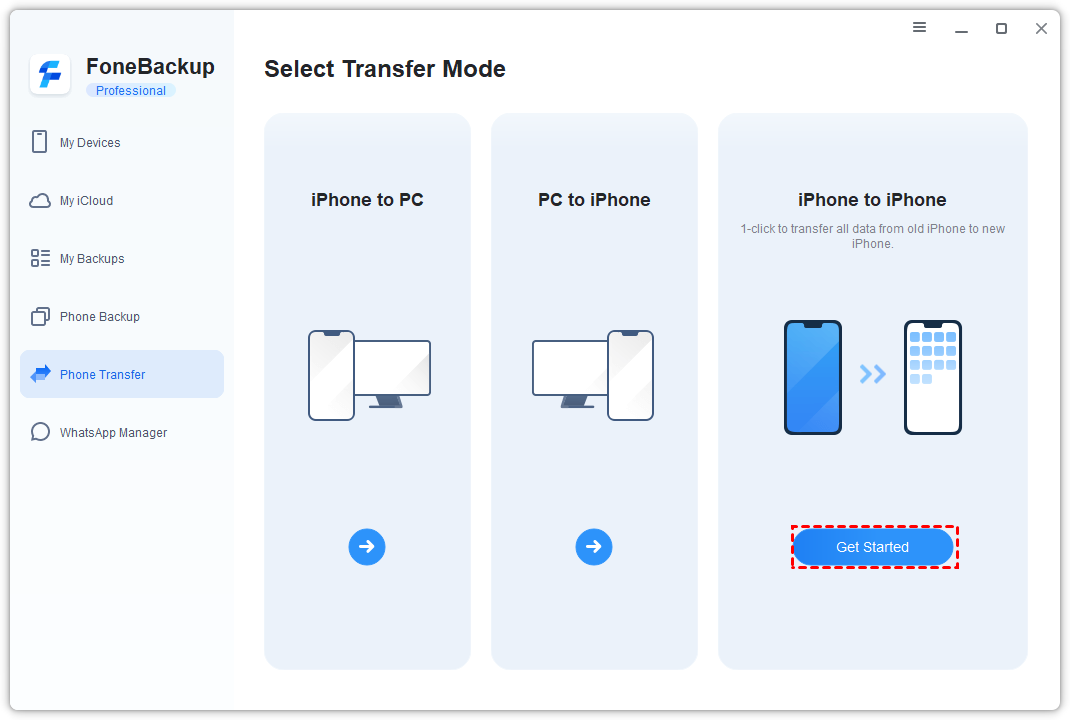
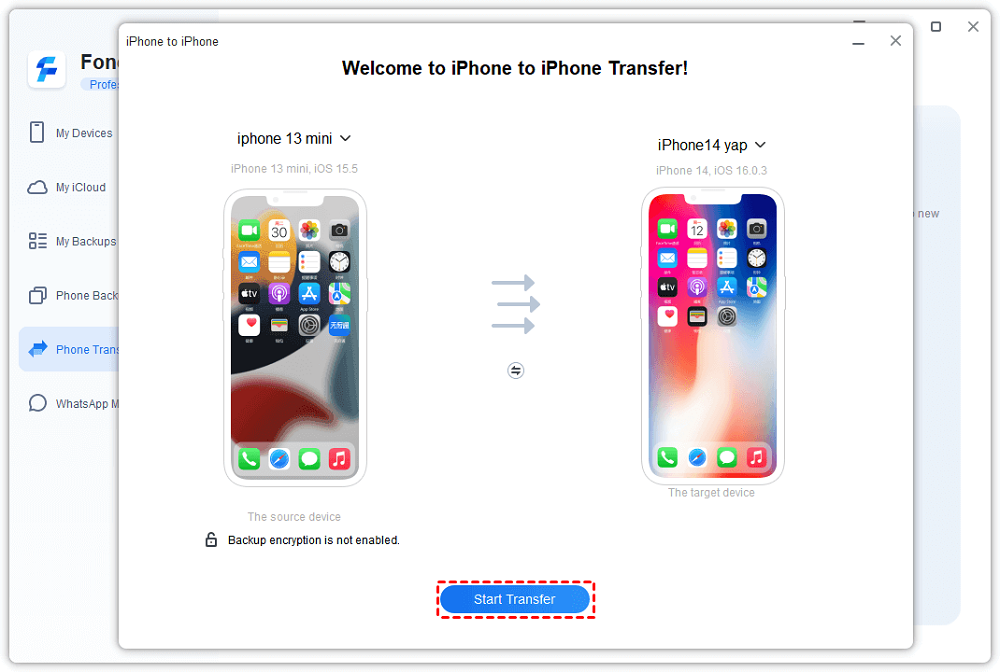
Step 3. The software will display your two connected devices. Ensure that the broken iPhone is listed on the left side as the source device, and the new iPhone is listed on the right side as the target device.
Step 4. (Optional) You may Enable Backup Encryption, which ensures that highly secure private data, such as your saved passwords, Wi-Fi networks, Health data, and HomeKit configurations, are transferred to the new phone.
Step 5. Click Start Transfer to execute the migration safely and efficiently. Do not disconnect the cables during this process. Once finished, your new iPhone will automatically restart and be ready to use, populated with all your old data.
💥Tip: If you have used this tool to backup your iPhone to computer or external hard drive, you may also use it to restore backup to the new iPhone for data migration.
Way 3. How to Transfer Data from Broken iPhone to New iPhone using iTunes
If you prefer to stick strictly to first-party Apple software and you have a computer available, iTunes (for Windows PCs and older Macs) or Finder (for Macs running macOS Catalina or newer) is the traditional fallback method. Similar to AOMEI FoneBackup, this method creates a full local backup on your computer's hard drive and then restores it to the new device. It is an excellent choice if you do not have adequate iCloud space.
👉 Prerequisites:
-
You must have previously trusted the computer with your broken iPhone. If the screen is completely dead and the phone has a passcode, you cannot grant permission to a new computer.
-
Adequate free space on your computer's hard drive to hold the backup.
Step-by-Step Guide using iTunes/Finder to recover data from broken iPhone:
Step 1. Plug your damaged device into your previously trusted PC or Mac. Open iTunes or Finder, and you should see a small iPhone icon appear in the top-left toolbar of iTunes, or under "Locations" in the left sidebar of Finder. Click on it.
Step 2. Go to the Summary tab (iTunes) or General tab (Finder).
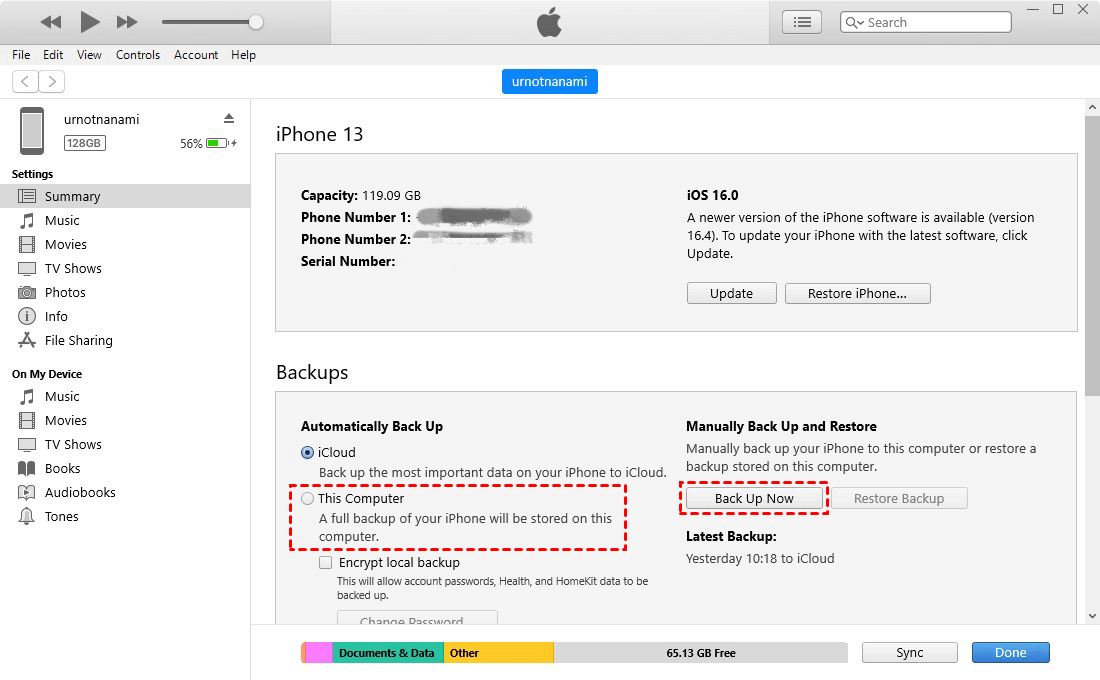
Step 3. Under the "Backups" section, change the selection from iCloud to This Computer (or "Back up all of the data on your iPhone to this Mac"). And check the box that says Encrypt local backup and create a password if needed, then click on Back Up Now.
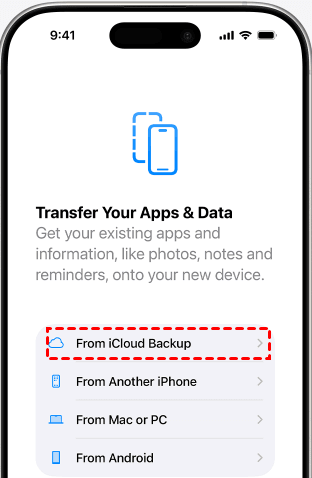
Step 4. Disconnect the broken phone and plug in your new iPhone. Turn it on and proceed through the initial setup screens until you reach "Apps & Data."
Step 5. Select restore From Mac or PC. Follow the prompts on your computer screen to select the backup you just created, enter your encryption password, and allow the data to flow onto your new device.
FAQs on Transferring Data from Broken iPhone to New iPhone
Q1: How can I bypass the "Trust This Computer" prompt if my iPhone screen is broken?
This is the most common roadblock. If the touch screen is completely dead and the phone is locked with a passcode, you cannot tap "Trust."
-
Solution A: If you previously backed up to iCloud, abandon the computer method and use the iCloud restore method (Way 1).
-
Solution B: If the display is visible but touch is broken, you can purchase a Lightning to USB OTG adapter, plug in a basic wired USB computer keyboard, and use the keyboard to type your passcode and hit 'Enter' to trust the computer.
-
Solution C: You may need to take the phone to a repair shop and have them temporarily connect a working screen just long enough for you to enter your passcode and run a backup.
Q2: What if my iPhone is completely dead and won't turn on at all?
If the device has zero power and cannot be recognized by a computer, software cannot help you. Your only options are to rely on an old iCloud backup, or send the device to a professional data recovery lab. These experts can perform microsoldering to bypass the damaged power circuits and extract data directly from the memory chips, though this is often an expensive service.
Q4: Will I lose my WhatsApp or iMessage history?
Not if you do it correctly. iMessages are saved in standard iCloud or encrypted local backups. WhatsApp data requires that you specifically had WhatsApp iCloud backups enabled within the app settings, or you must use a full encrypted local backup to transfer the app's internal data sandbox to the new phone.
Conclusion
Dealing with a damaged smartphone is a stressful ordeal, but a shattered screen shouldn't mean the loss of your digital history. By assessing the true condition of your device, you can choose the most effective recovery solution to transfer data from broken iPhone to new iPhone.
If you have been utilizing Apple's ecosystem correctly, restoring your information wirelessly via iCloud is a seamless and stress-free process. However, if cloud storage limitations or internet speeds are holding you back, turning to a dedicated offline solution is the smartest move. By utilizing AOMEI FoneBackup, you can swiftly and securely transfer everything from your damaged device to your new one with just a few clicks, bypassing Apple's restrictive cloud limits. Also, the traditional iTunes backup remains a solid, free alternative for those with previously trusted computers.

 as a preferred
source on Google
as a preferred
source on Google