



How to Transfer CD to iPhone Without Data Loss: 2 Easy Ways
Want to listen to your favorite CD music on your iPhone? This guide explains how to transfer CD to iPhone in two ways. You can do it with or without iTunes.

By Lily Updated on September 3, 2026


Although streaming services and digital downloads have become the most common ways to enjoy music, CDs are still valuable to many music lovers. If you have a collection of CDs and want to listen to those songs on your iPhone, you can convert the tracks into digital files and add them to your device.
You cannot simply drag songs from a CD directly onto an iPhone. Instead, you need to complete the process in two stages: first, copy or rip the music from the CD to your computer, and then transfer the supported music files to your iPhone.
This guide explains how to transfer CD to iPhone with and without iTunes.
Before You Transfer CD Music to iPhone
Before getting started, make sure you have:
- A computer with a CD or DVD drive. If your computer does not have one, you may need an external CD/DVD drive.
- The CD containing the music you want to transfer.
- A USB cable for connecting your iPhone to the computer.
- Enough available storage space on your iPhone.
For the best compatibility, it is generally recommended to rip CD tracks into a commonly supported format, such as MP3.
Solution 1. How to Transfer CD Music to iPhone Without iTunes
If you want to transfer music from CD to iPhone without iTunes, you can first rip the CD to your computer and then use AOMEI FoneBackup to add the music files to your iPhone.
AOMEI FoneBackup is an iOS data management tool that supports transferring supported files between an iPhone and a Windows PC. You can select the CD songs you want to add instead of syncing your entire music collection.
 AOMEI FoneBackup
- Selective transfer: Choose only the CD tracks you want to put on your iPhone.
- Flexible file selection: You can browse your computer or drag supported music files into the transfer window.
- No iTunes syncing required: Transfer supported music files without using the traditional iTunes sync process.
- Data management: It also provides additional functions for transferring and backing up supported iPhone data. You can use it to backup iPhone to Synology NAS.
 100% Secure
Now follow the instructions below:
Step 1. Rip Music from CD to Your Computer
Windows Media Player can help you copy music from an audio CD and save the tracks as digital audio files on your computer.
1. Insert the music CD into your computer's CD or DVD drive.
2. Open Windows Media Player. You can search for it from the Windows Start menu if it is available on your PC.
3. Wait for Windows Media Player to recognize the CD and display the available tracks.
✍ Tip: If the CD does not appear automatically, open File Explorer, locate the CD or DVD drive, right-click it, and choose the available option to play or open it with Windows Media Player.
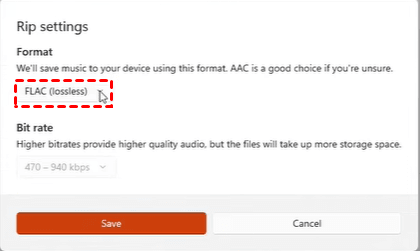
4. In Windows Media Player, click Rip settings. Under Format, choose MP3 if you want to save the CD tracks in a widely compatible format. Then click Save.
5. Click Rip CD to begin extracting all songs from CD to your computer.
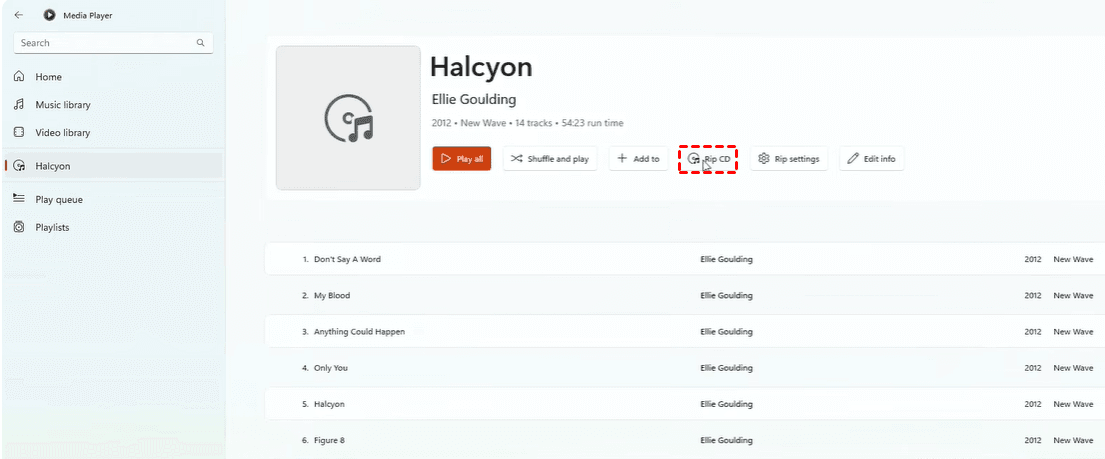
6. Wait for the ripping process to finish. The songs are typically saved in your Windows Music folder, although the exact location may depend on your Windows Media Player settings.
Step 2. Transfer CD Music to iPhone Without iTunes
After ripping the CD, you can use AOMEI FoneBackup to transfer the music files from your computer to your iPhone. Learn how to put CD music on iPhone with AOMEI FoneBackup below:
1. Download and install AOMEI FoneBackup on your Windows computer.
2. Connect your iPhone to the computer using a USB cable. Unlock the iPhone and tap Trust if prompted.
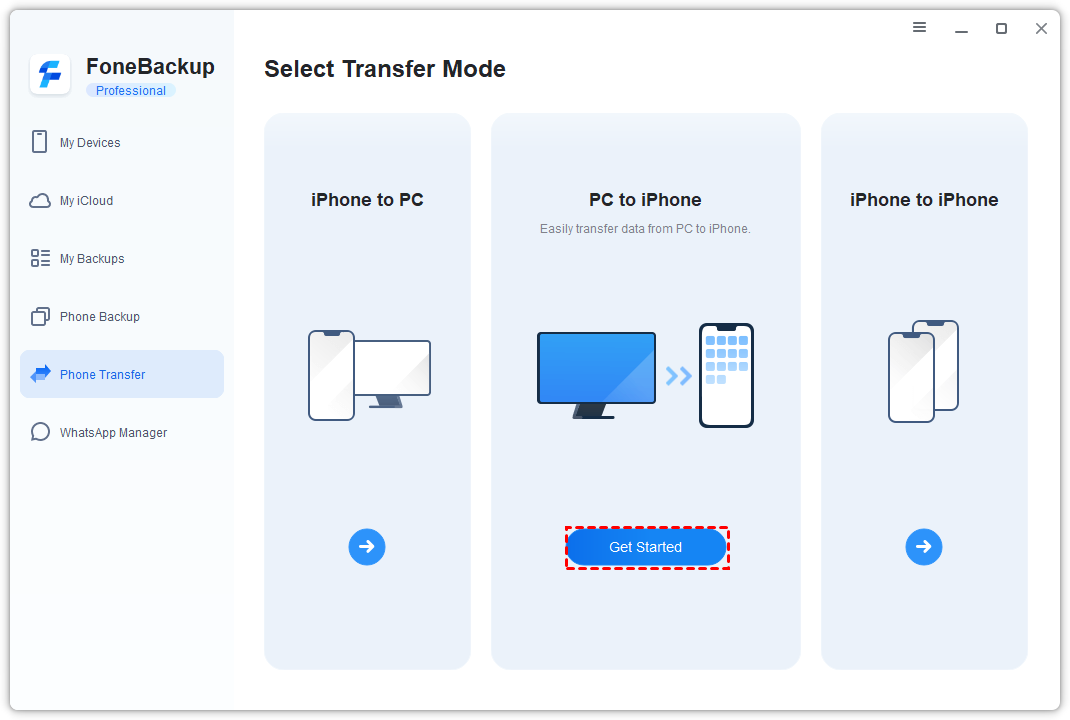
3. Launch AOMEI FoneBackup and select Phone Transfer. Then choose PC to iPhone and click Get Started.
4. Click the Music icon and add the music files by dragging and dropping them into the window or clicking the blue folder to browse to the songs you just saved to your computer.
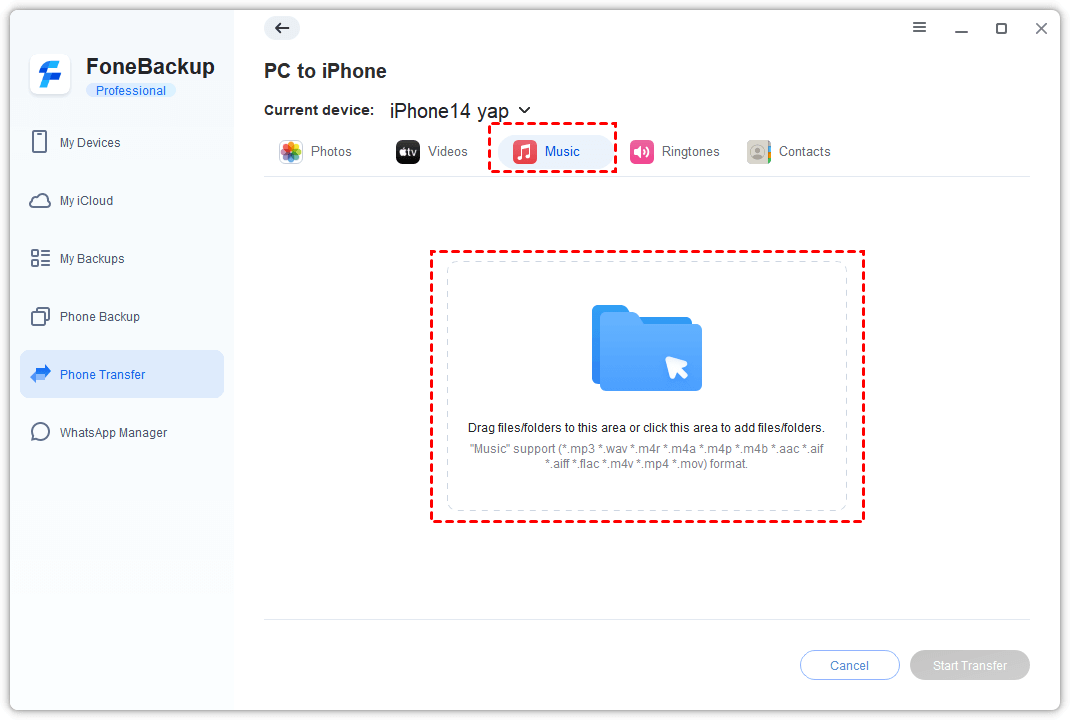
5. Review the selected songs and click Start Transfer.
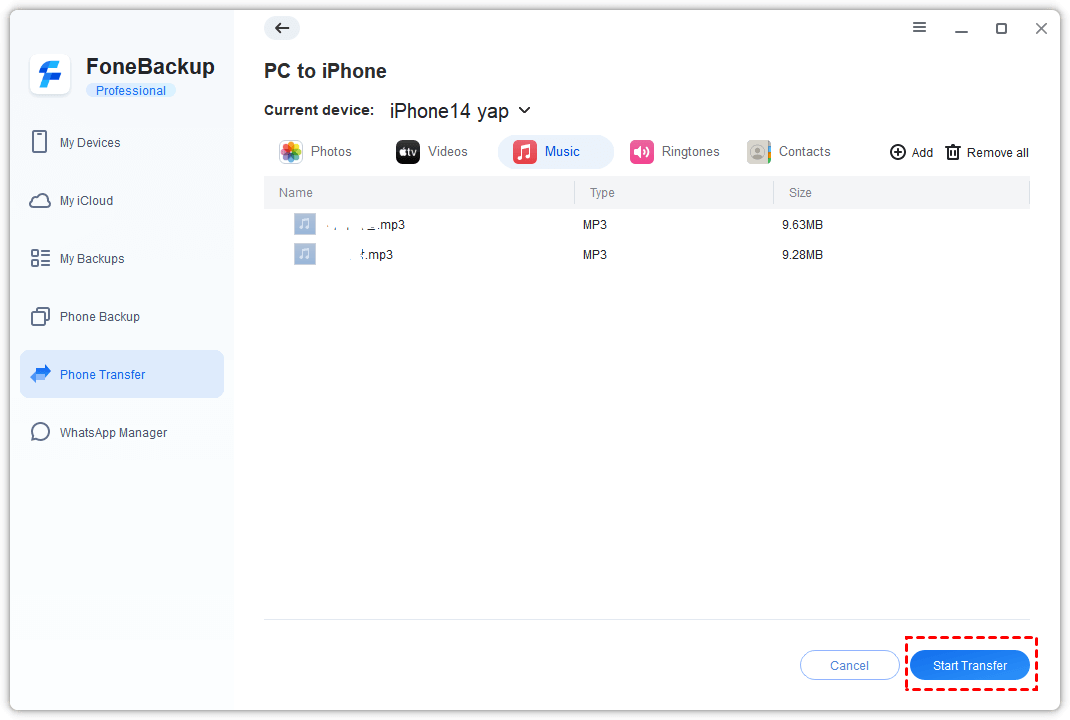
6. Keep your iPhone connected until the transfer is complete. You can then check the transferred music on your iPhone.
Solution 2. How to Rip CD to iPhone with iTunes
If you already use iTunes to manage your music library, you can import songs from a CD into iTunes and then synchronize them with your iPhone. This method also requires you to first convert the CD tracks into digital files. iTunes can perform the import process directly.
Before syncing music, pay attention to your existing music library and sync settings. Depending on how iTunes is configured, syncing may replace music that is already synchronized with the iPhone.
Step 1. Import CD Music into iTunes
1. Open iTunes on your computer. Then click Edit > Preferences.
2. Under the General tab, click the “When a CD is inserted” drop-down menu and select Ask to Import CD. Then click Import Settings and choose MP3 Encoder.
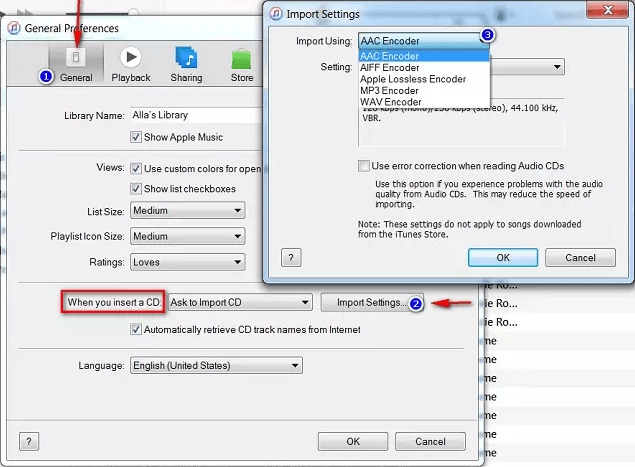
3. Return to the main iTunes window and insert the CD into your computer.
4. In the pop-up window “Would you like to import the CD?”, click Yes to import all songs from your CD.
5. After the import process is complete, you will be able to see and play your CD tracks directly from iTunes without having to insert your CD.
Step 2. Sync CD Music from iTunes to iPhone
1. Connect your iPhone to the computer with a USB cable.
2. Open iTunes and click the Device icon.
3. Select Music from the sidebar and enable Sync Music.
4. Choose whether you want to sync the entire library or selected songs, artists, albums, or playlists. Then click Apply or Sync to start transferring the music.
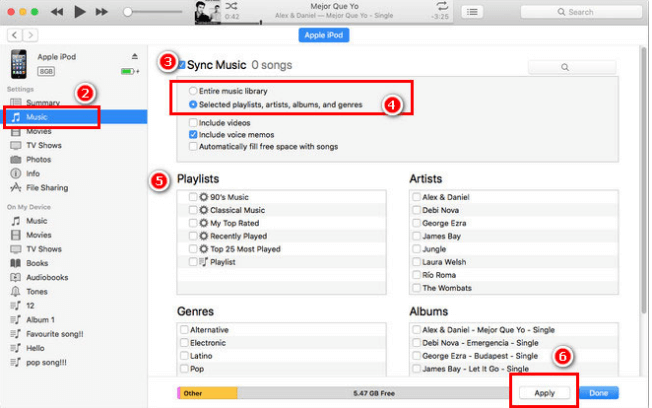
5. Wait for the synchronization process to finish before disconnecting your iPhone.
✍ Tip: Music synchronization settings can affect songs already synced to your iPhone. If you only want to add selected CD tracks while minimizing changes to your existing music, solution 1 is more suitable.
FAQs About Transferring CD Music to iPhone
1. Can I transfer a CD directly to my iPhone?
No. An iPhone cannot directly read a standard audio CD. You need to first rip the CD tracks to a computer and then transfer the resulting music files to the iPhone.
2. What is the best format for CD music on iPhone?
MP3 is a widely supported audio format and is a convenient choice when ripping a CD. You can select MP3 in Windows Media Player or iTunes before importing the tracks.
3. Will transferring CD music erase my existing iPhone music?
The answer depends on the method you use. iTunes syncing can affect existing synced music depending on your sync configuration. A selective transfer tool such as AOMEI FoneBackup is designed to let you add selected supported files without requiring a full music synchronization.
4. Can I transfer CD music to an iPad too?
Yes. The general process is similar: rip the CD to your computer first, then use a compatible transfer method to add the music files to the iPad.
Conclusion
CDs may be an older music format, but you can still enjoy your favorite CD collection on your iPhone. To transfer CD to iPhone, first convert the CD tracks into digital music files on your computer.
If you prefer to transfer music from CD to iPhone without iTunes, you can rip the songs as MP3 files and use AOMEI FoneBackup to add selected tracks to your device. Alternatively, iTunes allows you to import CD music into your library and synchronize it with your iPhone.
What’s more, AOMEI FoneBackup gives you the option to transfer photos from computer to iPad. Try it now to discover more!

 as a preferred
source on Google
as a preferred
source on Google