




Best Music Transfer App for iPhone and PC
Learn how to move local music between an iPhone and Windows PC. Compare selective file transfer, Apple library syncing, and app-based file sharing before choosing a method.

By Ivy Updated on August 10, 2026


You have a folder of MP3s, music copied from CDs, or personal audio files on your computer. Now you want to play them on your iPhone, but Apple’s combination of Music, Apple Devices, syncing, and subscriptions makes a simple transfer feel more confusing than it should.
The right method depends on where your songs are stored and where you want them to appear. For selective transfers between an iPhone and Windows PC, AOMEI FoneBackup provides a direct computer-based workflow. If you want to maintain an Apple-managed music library, use Apple Music together with Apple Devices instead.
This guide compares 3 practical methods so you can choose one that matches your music, destination, and preferred playback app.
Local Music Files or Streaming Playlists?
“Music transfer” can describe two different tasks. This guide focuses on moving local audio files, such as MP3s, CD imports, and personal recordings, between an iPhone and computer.
If you want to move playlists between Spotify, Apple Music, YouTube Music, or another streaming platform, you need a playlist-transfer service instead. Those services recreate matched playlists between online accounts; they do not copy the original audio files to or from your iPhone.
Identifying your goal first helps you avoid downloading an app designed for a completely different type of transfer.
What Can an iPhone Music Transfer App Actually Move?
Not every song on an iPhone is a transferable audio file. Before choosing an iPhone music transfer app, identify which of these situations matches yours.
- Local music files: MP3, AAC, or other audio files that you own and keep on a computer or device.
- Music purchased from the iTunes Store: You may be able to download previous purchases using the Apple Account used to buy them.
- Apple Music subscription downloads: These tracks are protected and tied to your subscription. They cannot be exported as ordinary MP3 files.
- Audio in the Files app: A downloaded or shared audio file may be playable from Files without appearing in the Music app.
- Files stored by another player: Music copied through File Sharing normally remains inside the selected player or file-management app.
This distinction matters because a tool that transfers local MP3 files cannot turn protected Apple Music downloads into reusable audio files.
Quick Guide: Choose the Best Music Transfer Method for iPhone
| ❓ Your situation | 🎯 Recommended method | ⚠️ What to know |
|---|---|---|
| Move selected local songs between an iPhone and PC | Method 1: AOMEI FoneBackup | Direct Windows workflow without syncing an entire library |
| Maintain an organized Apple music library on Windows | Method 2: Apple Music + Apple Devices | Apple Music manages the library; Apple Devices syncs it |
| Put audio into a compatible third-party player | Method 3: Apple File Sharing | Files normally remain inside the receiving app |
| Move playlists between streaming services | A playlist-transfer service | It transfers playlist matches, not original audio files |
Method 1: Transfer Music Between iPhone and PC with AOMEI FoneBackup
AOMEI FoneBackup provides a selective transfer workflow between an iPhone and Windows PC. You can add local songs to an iPhone or export applicable music to a computer folder without syncing a complete Apple Music library. This method is suitable when you want more control over individual files.
 AOMEI FoneBackup
-
⚡ Direct Workflow: Transfer music from your PC to an iPhone, or save files directly to a Windows folder.
-
🎵 Selective Control: Pick individual songs instead of syncing your entire music library.
-
📂 Flexible Destination: Choose where to save exported music - your computer, an external drive, USB stick, NAS, etc.
-
💰 Free version available: 30 files/day free; Pro for unlimited transfer
-
📱 Broad Compatibility: Works with all iPhone models and iOS versions, including iPhone 17 and iOS 26.
 100% Secure
The steps depend on whether you want to add music to the iPhone or export music from it.
#1: Transfer Music from PC to iPhone without iTunes
👍 Best for: Adding selected local songs to an iPhone from Windows without managing a complete Apple Music library.
Before starting, confirm that the songs are stored locally on your PC. Connect the iPhone with a data-capable USB cable and unlock it if prompted.
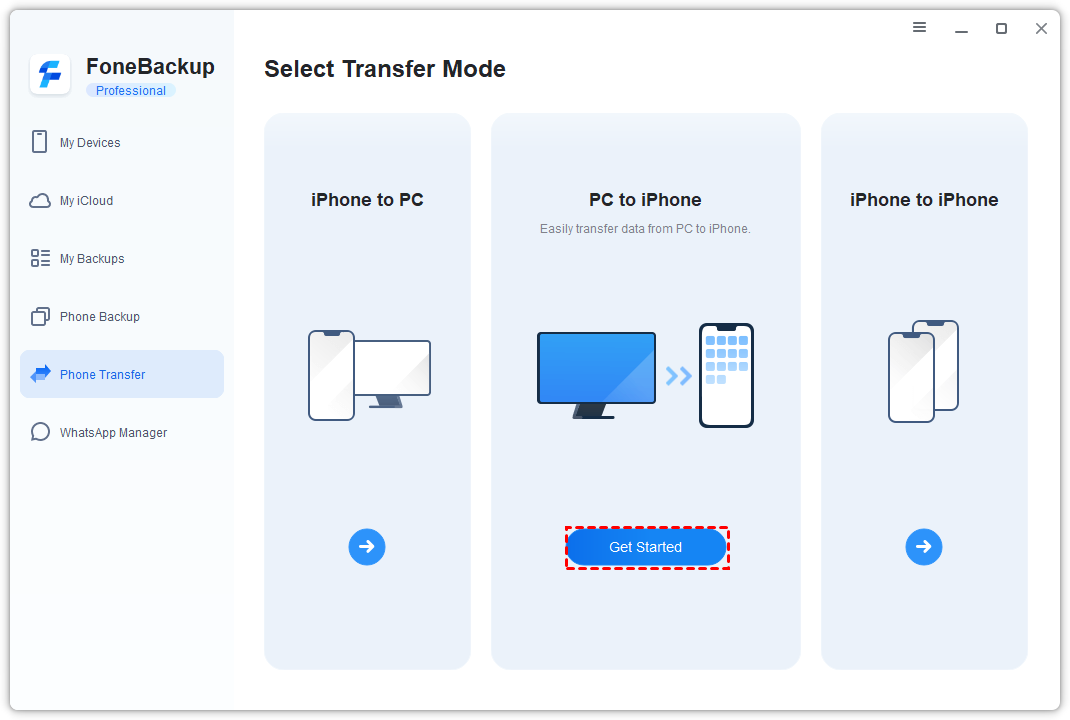
Step 1. Open AOMEI FoneBackup. Select Phone Transfer, choose PC to iPhone, and click Get Started.
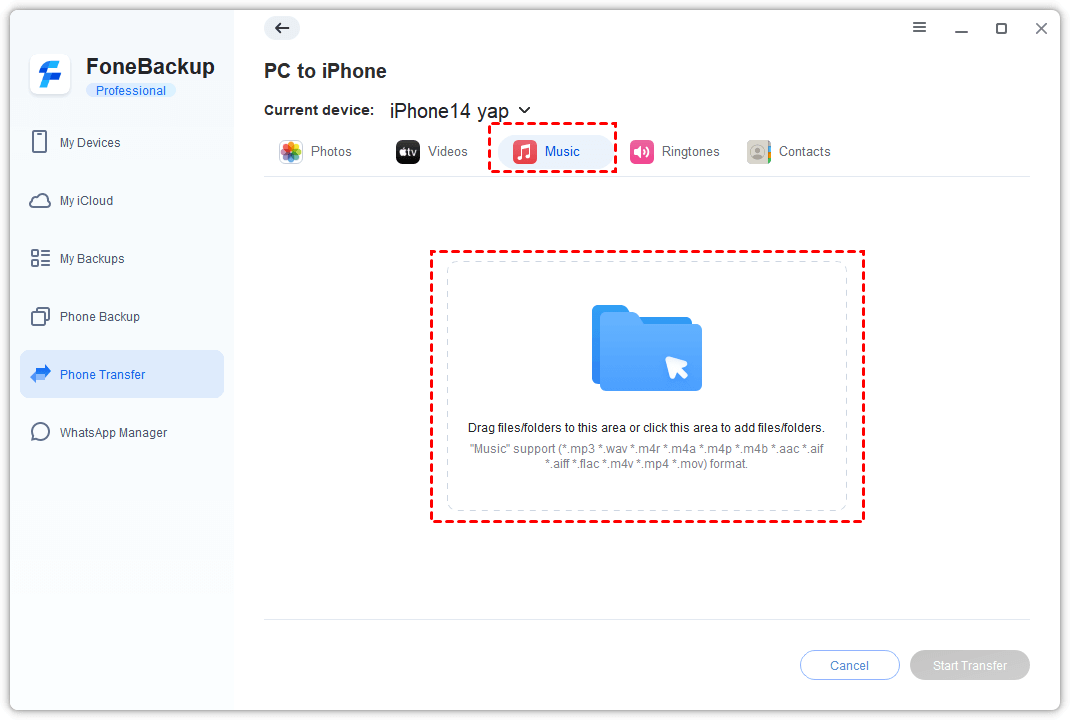
Step 2. Select Music, then click the folder icon to browse your computer and select the songs you want to add.
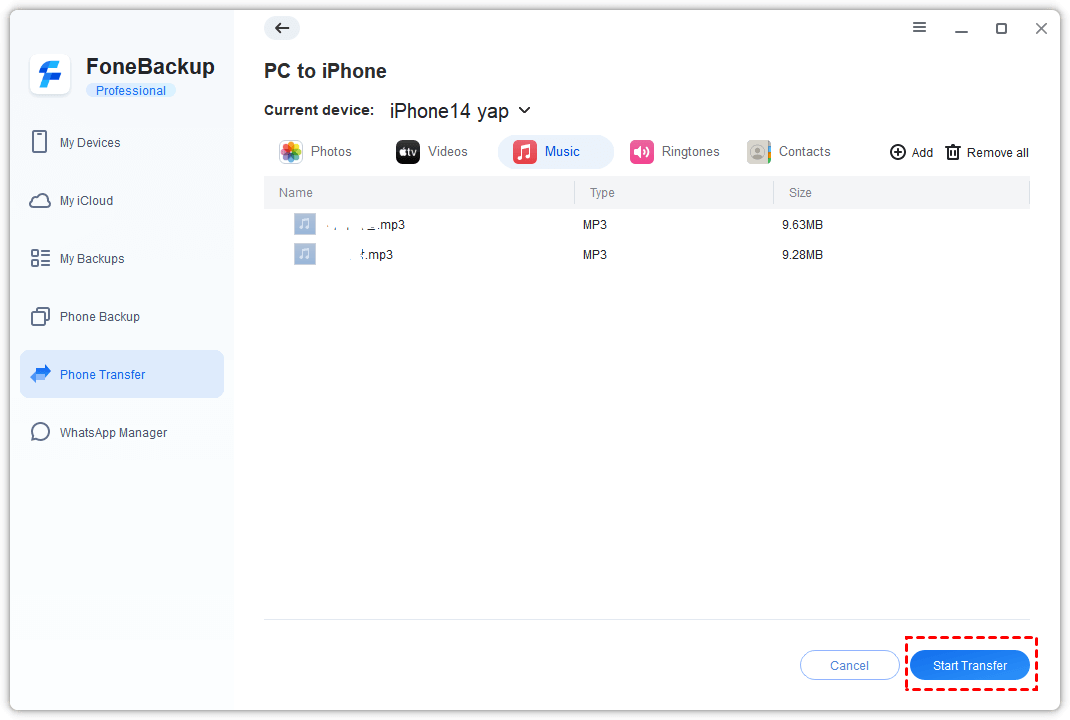
Step 3. Review the selected songs and click Start Transfer. Keep the iPhone connected until the process finishes.
Afterward, open the Music app on your iPhone and play several transferred songs. Check their titles, artists, albums, and artwork before deleting the computer copies.
For more details about wired transfer, learn how to transfer music from a laptop to an iPhone with USB.
#2: Transfer Music from iPhone to Computer
👍 Best for: Saving supported local iPhone music to a normal Windows folder for access or safekeeping.
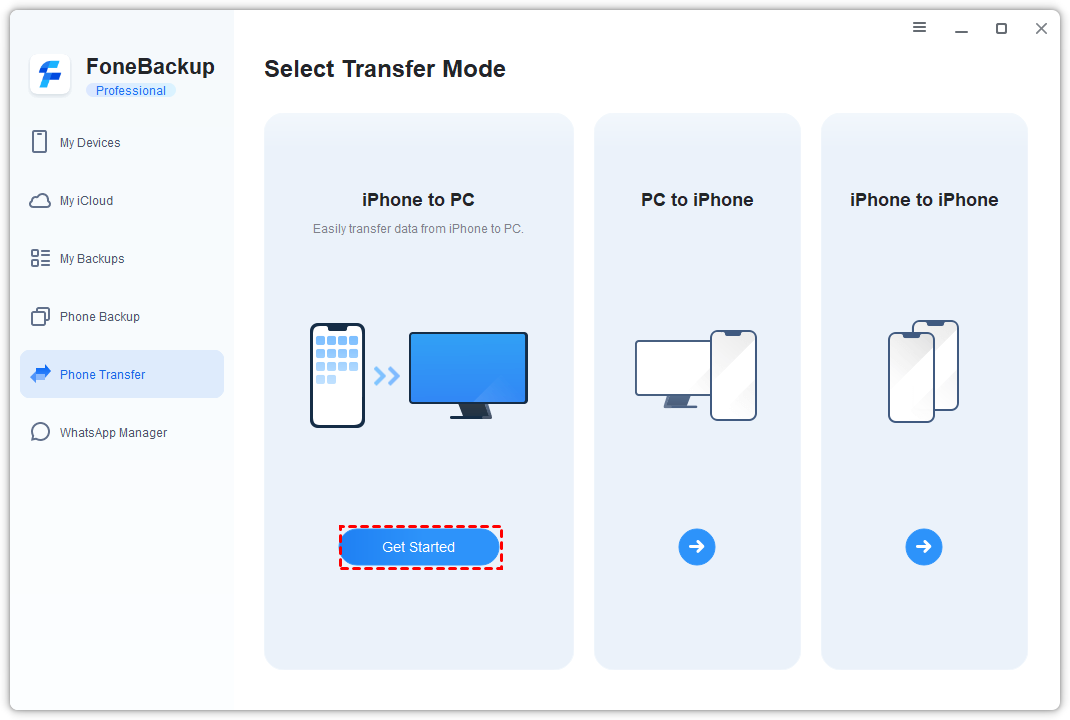
Step 1. Connect the iPhone to your Windows PC, unlock it and tap Trust when prompted. Then, open AOMEI FoneBackup, select Phone Transfer > iPhone to PC, and click Get Started.
Step 2. Click the plus icon and select Music. You can then select the songs you want and click OK.
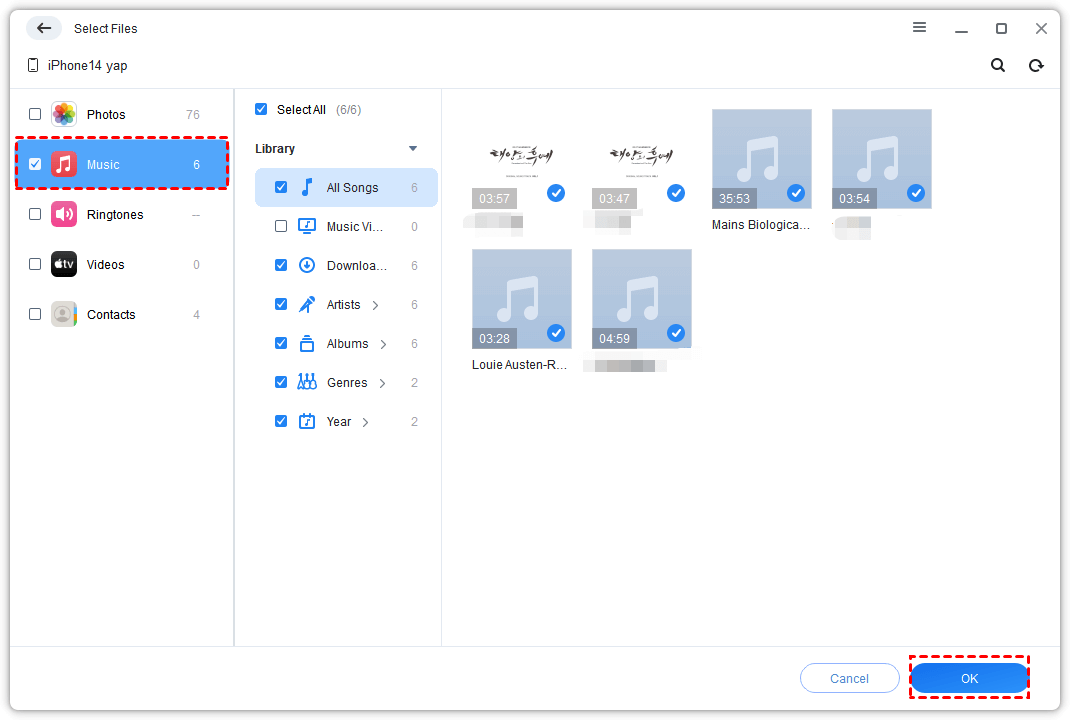
Step 3. Click Transfer Settings to choose where to save. Adjust other settings and click and click Save > Start Transfer.
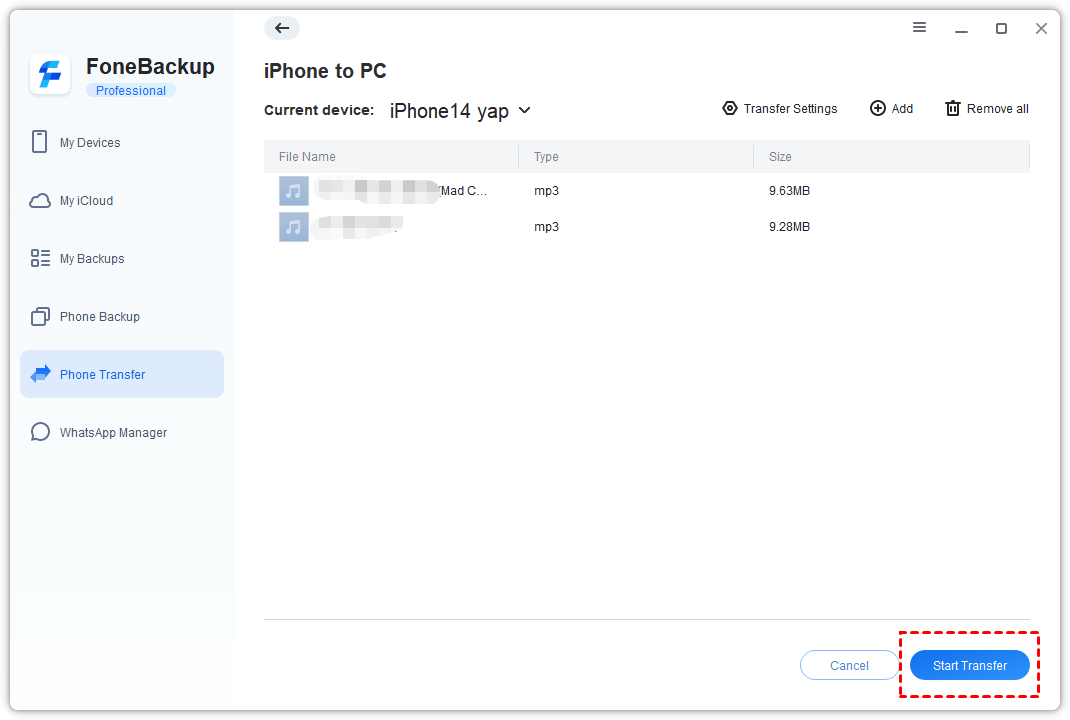
When the process finishes, open the destination folder and try to play music.
If a song does not appear in the selection window, it may be a protected subscription download, an unsupported item, or an audio file stored inside another app.
Songs imported from CDs, copied from an old computer, or obtained outside the iTunes Store require extra attention because their transferability depends on how they are stored. For these situations, see how to transfer non-purchased music from iPhone to computer.
Method 2: Sync Music to iPhone with Apple Music and Apple Devices
👍 Best for: Syncing an entire music library or selected artists, albums, genres, and playlists.
Apple’s official Windows method separates music management from device syncing. The Apple Music app imports and organizes local songs, while Apple Devices sends the selected library content to your iPhone. Choose this method when you want your local songs to become part of an Apple-managed music library.
Add Local Music to Apple Music on Windows
Step 1. Open Apple Music on the Windows PC. Select the 3-dots icon and then Import.
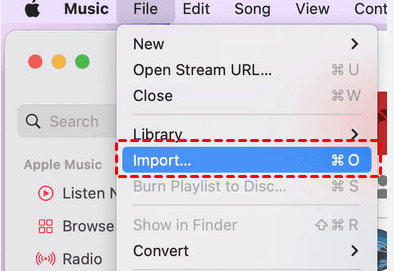
Step 2. Locate the music file or folder on your computer and select Open.
Step 3. Confirm that they appear in the Apple Music library. If you select a folder, Apple Music imports all compatible files inside it.
Sync the Music Library to Your iPhone
Step 1. Open Apple Devices. Connect the iPhone to the PC with a USB cable and tap Trust when prompted.
Step 2. Select your iPhone in the sidebar and click Music.
Step 3. Select Sync music onto [device name] > Entire music library or Selected artists, albums, genres, and playlists and click Apply.
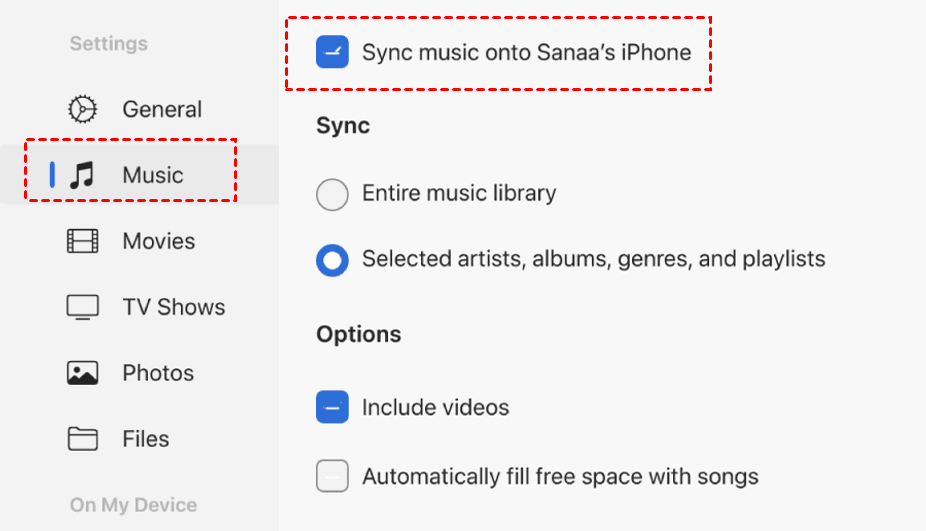
If you check the later option, select the music you need as well.
This method synchronizes a library rather than creating an independent file copy. If an automatically synced song is later removed from the computer, it may also be removed from the iPhone during the next sync.
Method 3: Add Music with File Sharing in Apple Devices
👍 Best for: Transferring audio files to an app that supports both the file format and Apple File Sharing.
Apple Devices includes a File Sharing feature that copies audio files from a Windows PC to a compatible app on an iPhone or iPad. It does not add the files to Apple’s Music app. The music remains in the third-party app selected during the transfer.
Step 1. Open Apple Devices on your Windows PC, connect your iPhone, and unlock it. If a trust prompt appears, tap Trust and enter your passcode.
Step 2. Select the iPhone in Apple Devices, then click Files > Select the receiving app from the list. If Files does not appear, the iPhone has no installed app that supports File Sharing.
Step 3. Click Add File, select the audio files, and click Add.
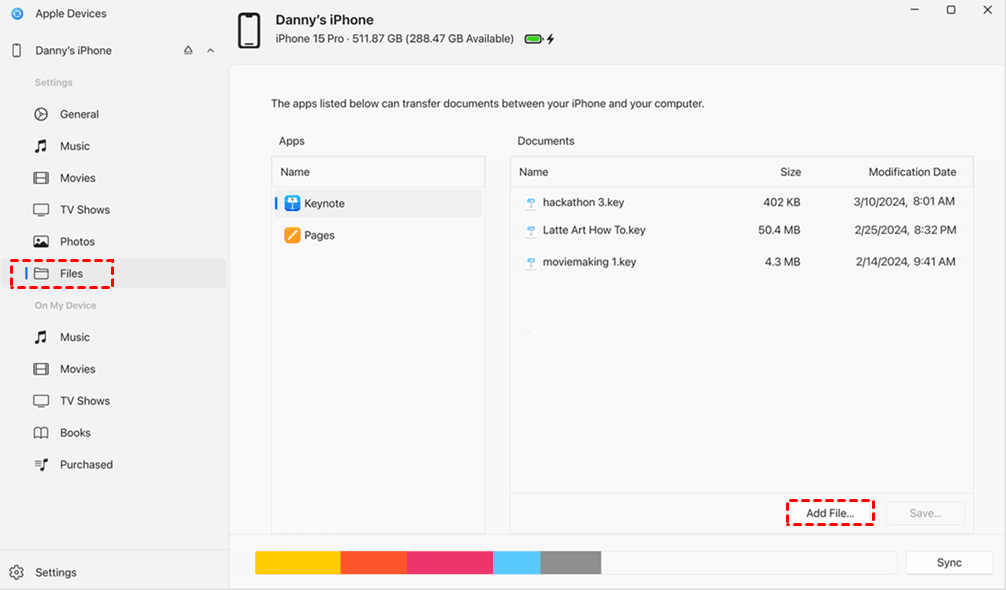
Open the receiving app on the iPhone to access the transferred audio. The files will not automatically appear in Apple’s Music app. Deleting the receiving app may also delete the files stored inside it.
How to Check Music After an iPhone Transfer
A completed progress bar does not prove that every song is usable. Check the transferred music before deleting or changing the originals.
- Open several songs on the destination device.
- Confirm that each full track plays without an Internet connection.
- Check the title, artist, album, and artwork where applicable.
- Confirm whether the music appears in Music, Files, or a third-party player.
- Compare the number of transferred files with your original selection.
- Keep the original files until you have verified the result.
If verification fails, reconnect the iPhone and retry the same method over USB. If the files still do not appear, confirm that they are local, unprotected files.
When a song appears in Files or a third-party player but not in Music, the transfer may have succeeded. It was simply copied to a different app location. Use Apple Music and Apple Devices if you specifically want eligible local songs to appear in Apple’s Music app.
iPhone Music Transfer Apps and Methods Compared
| Factor | AOMEI FoneBackup | Apple Music + Apple Devices | Apple File Sharing |
|---|---|---|---|
| 🔥 Best for | Selective music transfer between an iPhone and PC | Apple music library synchronization | Copy audio to a compatible third-party app |
| Apple Music subscription required | No | No for manual local syncing | No |
| Works with ordinary local files | Yes, when supported | Yes | Yes, when supported by the receiving app |
| Transfer from PC to iPhone | Yes | Yes | Yes, but files remain in the selected app |
| Transfer from iPhone to PC | Supports applicable music transfer workflows | Not designed for general reverse export | Only for files stored by a File Sharing app |
| Where music appears | Music app for applicable transfers | Apple Music library | The selected third-party app |
| Main advantage | Selective transfer without syncing a complete library | Official Apple workflow | Direct app-specific file storage |
| Main limitation | Free Transfer is limited to 30 files per day | Syncing may change or remove previously synced music | Files do not automatically appear in Music |
Choose AOMEI FoneBackup when you want selective music transfers between an iPhone and Windows PC. Use Apple Music with Apple Devices when you want to maintain an Apple-managed music library. Choose Apple File Sharing when you want to copy audio into a specific third-party app.
FAQs
1. Can I transfer MP3 files to an iPhone without an Apple Music subscription?
Yes. You can manually sync eligible local MP3 files with Apple Music and Apple Devices, transfer supported files with AOMEI FoneBackup, or copy them to a compatible third-party player through File Sharing.
2. Why don’t transferred songs appear in the Music app?
They may have been copied to Files or a third-party app instead of the Apple Music library. File Sharing keeps files inside the selected app, so use Apple’s music-syncing workflow if you want compatible local tracks in Music.
3. Can I export downloaded Apple Music songs as MP3 files?
No. Apple Music subscription downloads are protected for playback under the subscription. They are not unrestricted MP3 files and cannot be permanently exported as ordinary local music.
4. Will syncing music erase songs already on my iPhone?
It can change music previously synced from another computer or library. Review any Erase and Sync warning carefully and keep a separate copy of important local music before proceeding.
5. Can I transfer music between a Mac and an iPhone?
Yes. Use Finder for manual music syncing, or enable Sync Library if you subscribe to Apple Music or iTunes Match. If Finder displays Erase and Sync, review the warning carefully because music synced from another library may be replaced.
6. Can an iPhone music transfer app move Spotify playlists?
A local file-transfer app does not normally move playlists between streaming platforms. Use a dedicated playlist-transfer service for that task. Such a service matches songs between accounts instead of copying the original audio files.
Summary
For Windows users who want to move selected local songs without maintaining a complete synchronized library, AOMEI FoneBackup offers the most direct workflow covered in this guide.
You can also try the following options:
- Choose Apple Music + Apple Devices to organize and sync an Apple-managed library.
- Choose Apple File Sharing when you want to play audio inside a compatible third-party app.
- Use Finder or Sync Library on a Mac, depending on whether you want manual or subscription-based syncing.
- Use a dedicated playlist-transfer service when your goal is to move playlists between streaming platforms.

 as a preferred
source on Google
as a preferred
source on Google