



Top 4 Ways to Backup iPhone to Synology on iPhone/Mac/PC
Want to back up your iPhone to a Synology NAS but not sure which tool to use? This guide walks you through Synology Photos, Drive, Finder, and AOMEI FoneBackup.

By Lily Updated on August 24, 2026


Why Backup iPhone on Synology?
If you have a Synology NAS, you can use it as a convenient local storage destination for your iPhone backups. Instead of relying entirely on iCloud or keeping backups on your computer, storing a copy on Synology gives you greater control over your data and available storage space.
Here are some key reasons why you may want to back up your iPhone to Synology:
- Local backup – Keep photos, videos, and contacts on your own NAS, not just in the cloud.
- Save iCloud space – Reduce reliance on paid iCloud storage by offloading large media libraries.
- Cross-device access – Access your backup files from any device on your network.
- Extra data protection – Adds a recovery layer if your iPhone is lost, damaged, or reset.
- Large storage capacity – NAS offers far more space than a phone for long-term file storage.
- Full control – Manage and organize backups on your own hardware, your way.
How to Backup iPhone to Synology on iPhone
Synology provides dedicated mobile apps that make it easier to back up iPhone data directly to a Synology NAS. Depending on the type of content you want to save, you can use Synology Photos for photos and videos or Synology Drive for other files.
Method 1: Backup iPhone Photos to Synology via Synology Photos
If your main goal is to back up photos and videos from your iPhone, Synology Photos is a straightforward option. It can automatically upload photos from your iPhone to your Synology NAS, so you don't have to transfer them manually one by one.
Before you start, make sure Synology Photos is installed on a Synology NAS running DSM 7.2 or above. Then learn how to automatic backup iPhone to Synology NAS below:
Step 1. Install the Synology Photos app from the App Store and open it on your iPhone.
Step 2. Enter your Synology NAS account information and sign in to connect the app to your NAS.
Step 3. After logging in, tap Enable…Backup.
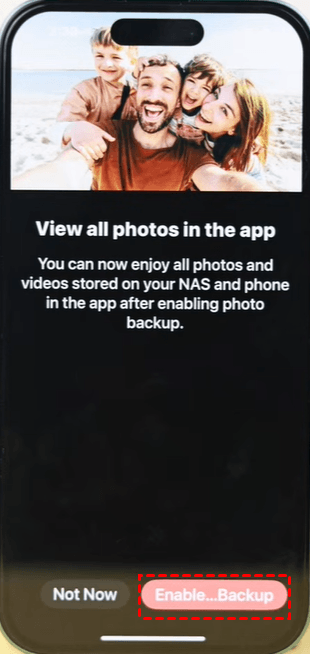
Step 4. Tap Enable and configure the backup settings.
- Choose whether to back up all photos or new photos only.
- Pick your destination folder on the NAS.
- Toggle Wi-Fi only on or off depending on your mobile data plan.
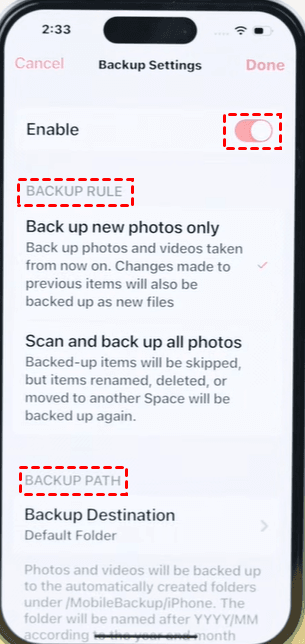
Step 5. Tap Done and keep your iPhone connected to the network to allow Synology Photos to upload the selected content.
Step 6. Once the backup is complete, you can check the corresponding folder on your NAS to confirm that your photos and videos have been backed up.
✍ Tip: If you have a large photo library, the initial upload may take some time. Connecting your iPhone to Wi-Fi and power can help make the backup process more convenient.
Method 2: Backup iPhone Files to Synology via Synology Drive
Synology Drive is useful when you want to back up or upload documents, PDFs, and other files from your iPhone rather than just photos and videos. It can also help you organize files in your Synology NAS and access them from multiple devices.
Before you start, install Synology Drive Server on a Synology NAS running DSM 6.2.2 or above or DSM Enterprise. Then follow the instructions below:
Step 1. Download and install Synology Drive from the App Store on your iPhone.
Step 2. Open Synology Drive and sign in with your Synology account to connect to your NAS.
Step 3. Go to the More tab and tap on Backup and Sync Tasks > Sync Tasks.
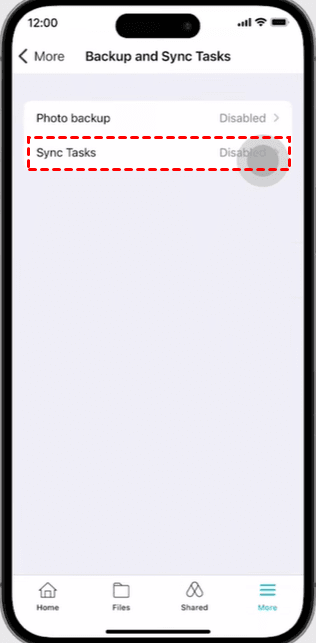
Step 4. Tap the + button in the upper-right corner and configure the following:
- Folder path – Select a server folder. A local "Drive" folder is auto-created in the iOS Files app, with synced files stored in the Sync Folder.
- Sync rules – Choose the Two-way sync mode. Optionally sync all subfolders, filter by file type, and set max file size.
- File conflict resolution – Choose from Retain version or Rename to keep other version.
- Auto sync settings – Enable auto sync on app launch/resume, with options to restrict to Wi‑Fi, charging, or both.
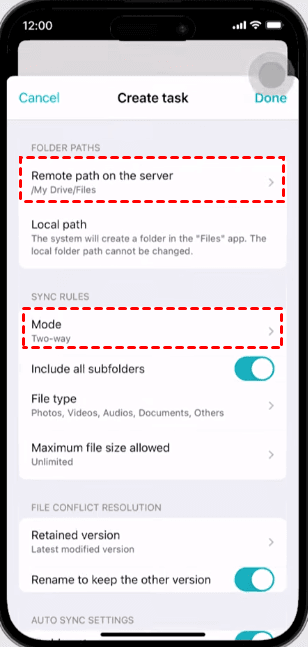
Step 5. Click Done to launch the sync process. Files in the remote folder and the local folder on your iPhone will be synced to the other side according to your sync settings.
✍ Tip: Synology Drive is particularly useful for documents and files that are stored in the iPhone's Files app.
How to Backup iPhone to Synology on Mac
On macOS Catalina and later, you can use Finder to create a local backup of your iPhone. You can then transfer or copy the backup to your Synology NAS for additional protection.
Step 1. Connect your iPhone to your Mac using a USB cable. Unlock your iPhone and tap Trust if prompted.
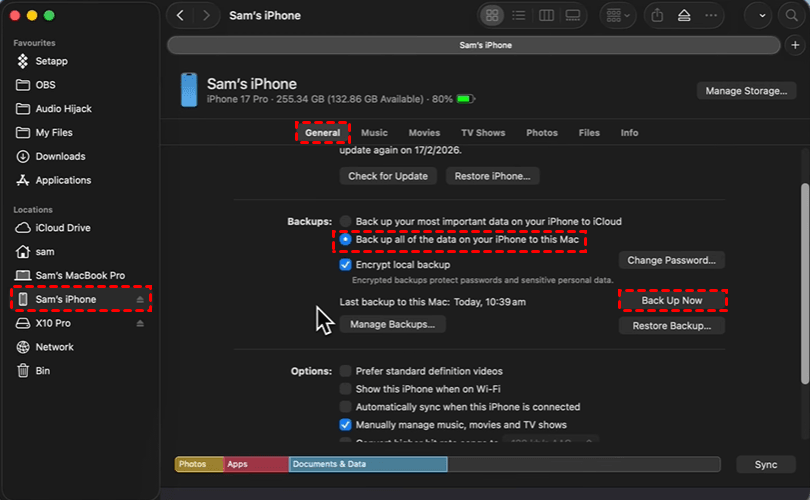
Step 2. Open Finder on your Mac and select your iPhone from the sidebar.
Step 3. Under the General tab, select Back up all of the data on your iPhone to this Mac.
Step 4. If you want to save Health and Activity data, enable Encrypt local backup and create a password that you can remember.
Step 5. Click Back Up Now and wait for Finder to complete the iPhone backup.
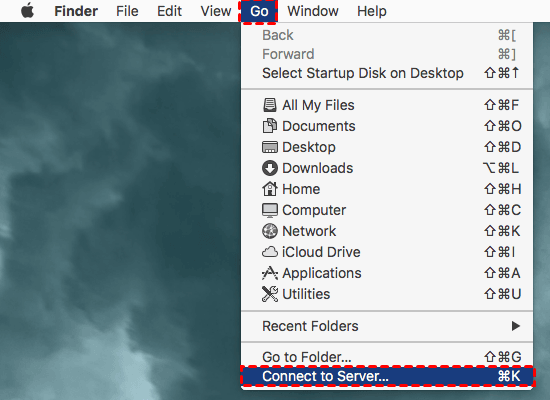
Step 6. Connect your Mac to the Synology NAS. You can open Finder > Go > Connect to Server and enter the network address of your NAS to mount the shared folder.
Step 7. Locate the iPhone backup on your Mac. Finder stores local iPhone backups in the ~/Library/Application Support/MobileSync/Backup/ folder.
Step 8. Copy the iPhone backup folder to a suitable shared folder on your Synology NAS.
✍ Tip: This method allows you to keep the original iPhone backup on your Mac while storing another copy on Synology. However, manually copying the backup folder can be inconvenient if you need to perform backups regularly.
How to Backup iPhone to Synology on PC
If you use a Windows PC and want to back up your iPhone to a Synology NAS, AOMEI FoneBackup provides a convenient way to transfer and back up iPhone data.
 AOMEI FoneBackup
- Flexible backup options: Use Full Backup to backup everything on iPhone or Selective Backup to backup only selected data categories according to your needs.
- Supports multiple data types: Backup or transfer photos, videos, music, contacts, messages, and other supported iPhone data.
- NAS-friendly: You can save backups to a Synology NAS or other network storage when the NAS is accessible from Windows.
- Fast data transfer: Move large amounts of iPhone data more efficiently than manually transferring files one by one.
 100% Secure
Download AOMEI FoneBackup and learn how to backup iPhone to Synology on PC step by step below:
Step 1. Connect your iPhone to the PC with a USB cable and unlock the device. If prompted, tap Trust on your iPhone.
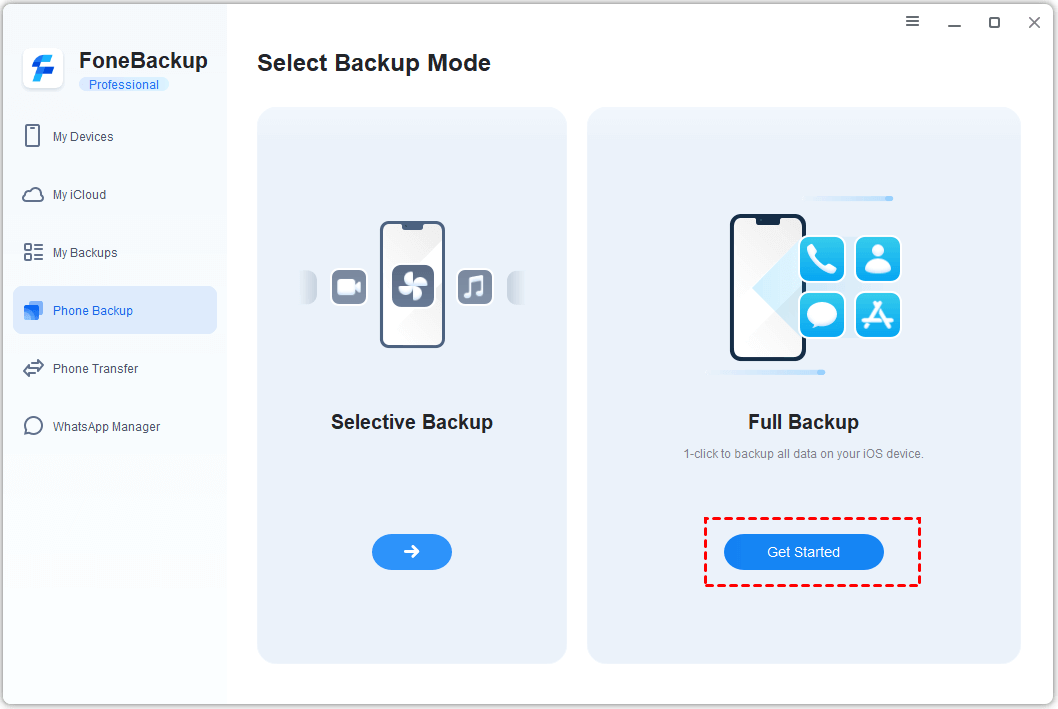
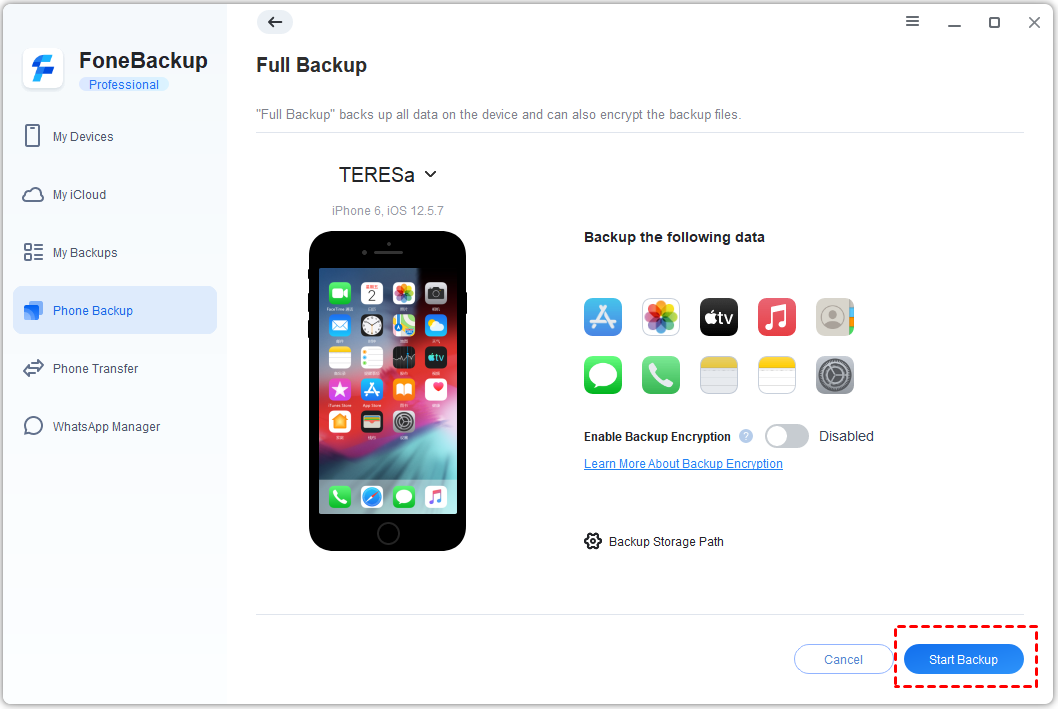
Step 2. Launch AOMEI FoneBackup and select Phone Backup > Full Backup > Get Started.
Step 3. Turn on Backup Encryption if you want to protect the backup with a password.
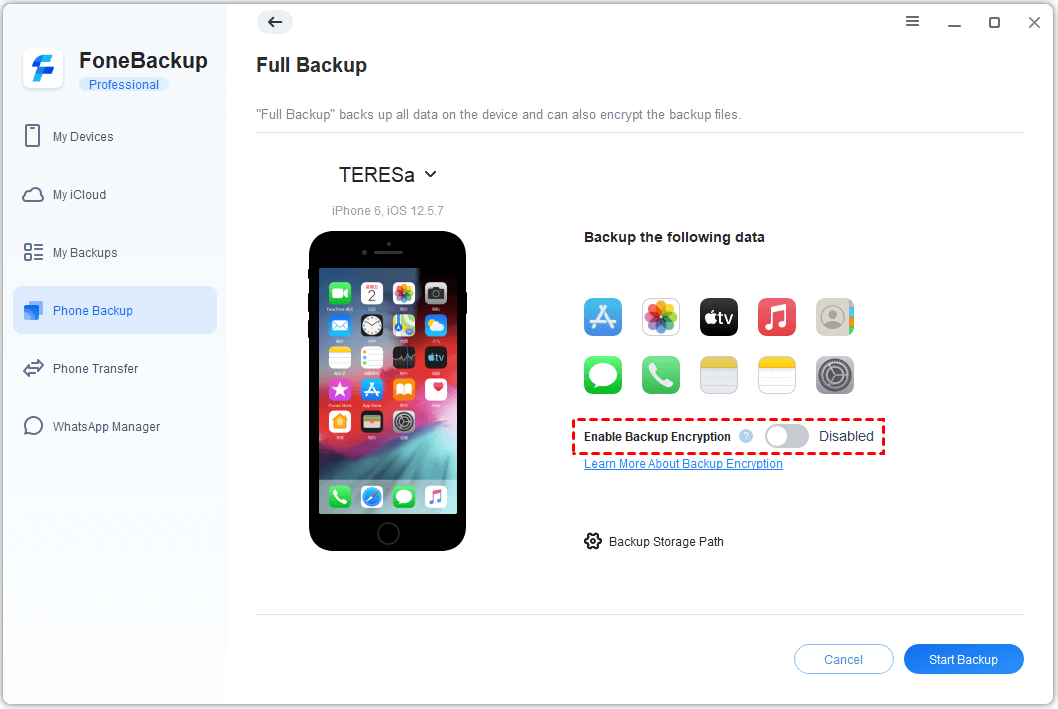
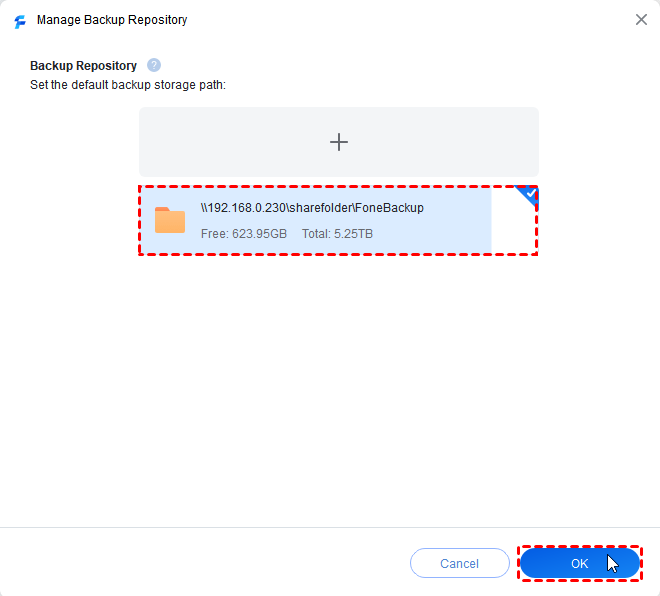
Step 4. Under Backup Storage Path, click the + button. In the pop-up window, type the IP address of your Synology NAS in the address bar and hit Enter. Then select a folder on your Synology NAS as the destination path.
Step 5. Click Start Backup to begin backing up your iPhone data to Synology.
Summary
That’s all for how to backup iPhone to Synology NAS. Depending on the device you use, you can choose different approaches:
- Synology Photos is ideal for backing up photos and videos directly from your iPhone, while Synology Drive works well for documents and other files.
- On a Mac, you can create a local iPhone backup with Finder and then store a copy on your Synology NAS.
- If you use a Windows PC, AOMEI FoneBackup provides a simpler way to back up and transfer iPhone data.
What’s more, AOMEI FoneBackup can help you get music off an old iPod. Don’t hesitate to try it out!

 as a preferred
source on Google
as a preferred
source on Google