



AirDrop for Windows 11: Best 3 Alternatives in 2026
AirDrop not available on Windows 11? No problem. Discover 3 reliable alternatives to transfer files wirelessly or via USB – fast and easy.

By Lily Updated on August 25, 2026


Can You Use AirDrop on Windows 11?
If you are an Apple user, you already know how effortless it is to share files between iPhones, iPads, and Macs using AirDrop. So when you need to move photos, documents, or videos from your iPhone to a Windows 11 PC, it is natural to wonder: "Does Windows 11 support AirDrop?" The short answer is no – Apple keeps this feature exclusive to its own ecosystem.
That does not mean you are out of luck, though. This guide walks you through three practical AirDrop alternatives for Windows 11. Whether you prefer a wireless connection or a more stable wired transfer, there is a solution here for you. Let us dive in.
Option 1. Best Wired AirDrop Alternative for Windows 11
Wireless transfers are undeniably convenient, but they are not always reliable. A weak Wi-Fi signal, Bluetooth interference, or large file sizes can slow things down dramatically. If you are transferring a large batch of photos or high-resolution videos, a wired USB connection is often faster and more stable.
That is where AOMEI FoneBackup comes in. This dedicated iOS data transfer tool allows you to move files between your iPhone and Windows PC quickly and securely, without worrying about network hiccups.
 AOMEI FoneBackup
- Transfers unlimited files between iPhone and Windows 11/10/8/7.
- Delivers impressive speed – you can transfer over 100 photos in just seconds.
- Lets you preview and selectively choose photos, videos, music, ringtones, and contacts before transferring.
- Saves files to any location on your PC. You can even transfer iPhone data or backup iPhone to Synology NAS, USB drive, or external hard drive, etc.
- Supports a wide range of iOS devices and versions, including the latest iPhones and iOS updates.
 100% Secure
Learn how to airdrop from iPhone to PC on Windows 11 using AOMEI FoneBackup below:
Step 1. Download and install AOMEI FoneBackup on your Windows 11 PC. Launch the program and connect your iPhone to the computer using a USB cable.
Step 2. In the main interface, select Phone Transfer, then choose iPhone to PC > Get Started to start moving files from your phone to the computer.
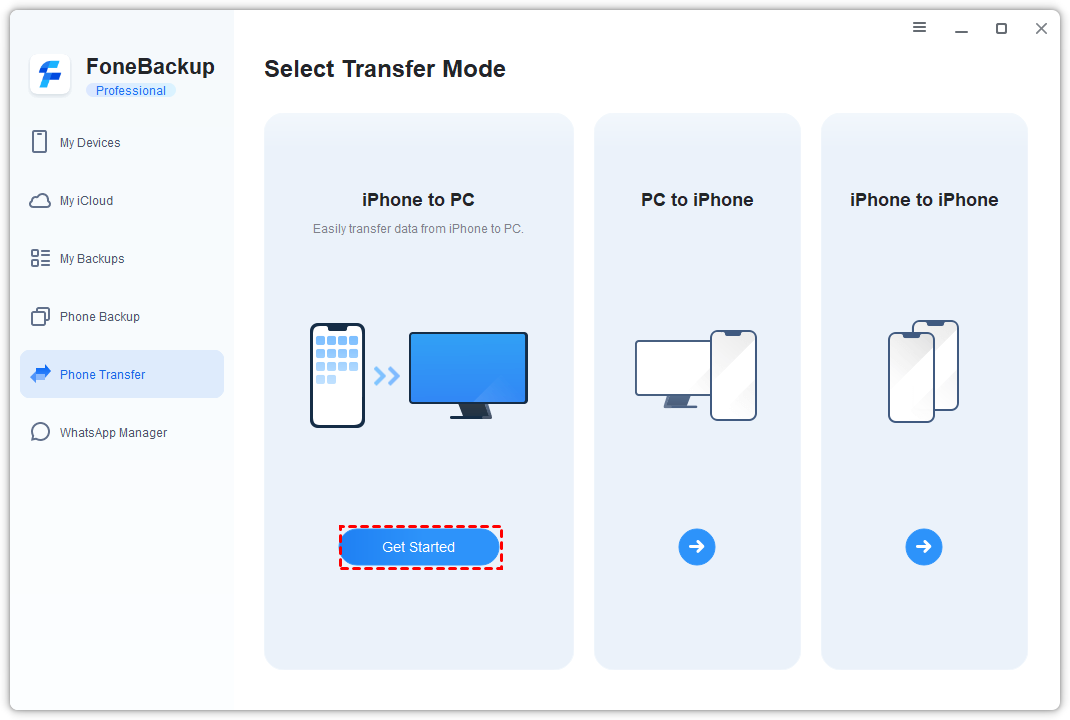
✍ Tip: If you need to transfer files in the opposite direction (e.g., transfer photos from PC to iPhone), simply select PC to iPhone instead.
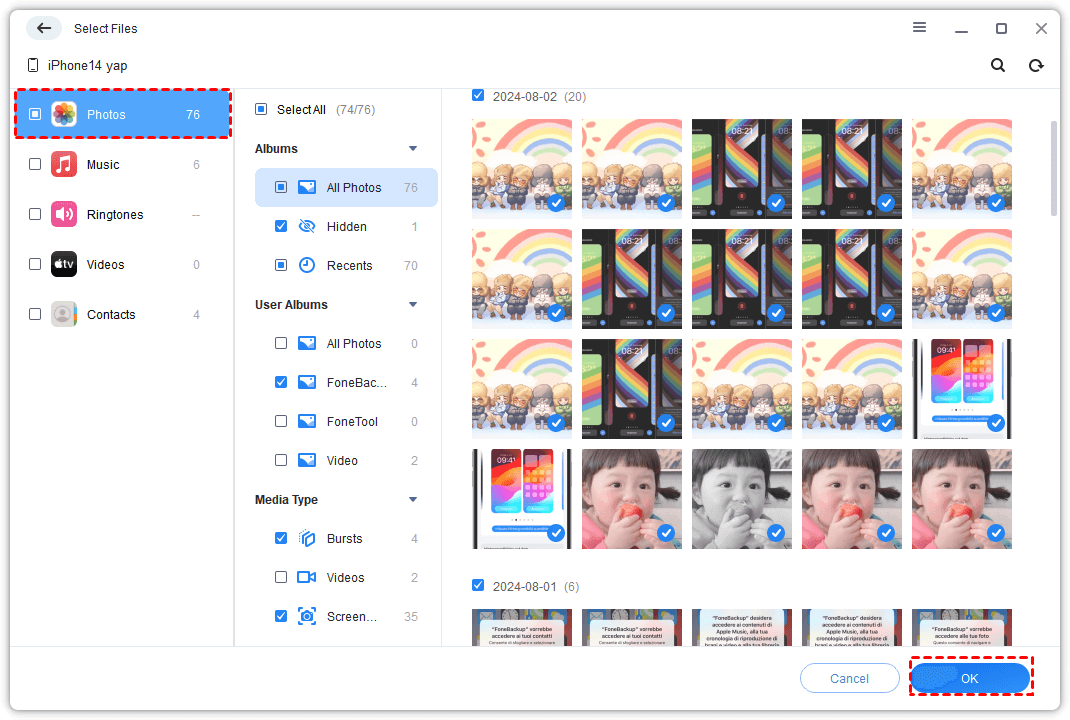
Step 3. Select the types of data you want to move. To transfer photos from iPhone to PC on Windows 11, click the Photos icon and select the desired photos in the Select Files window.
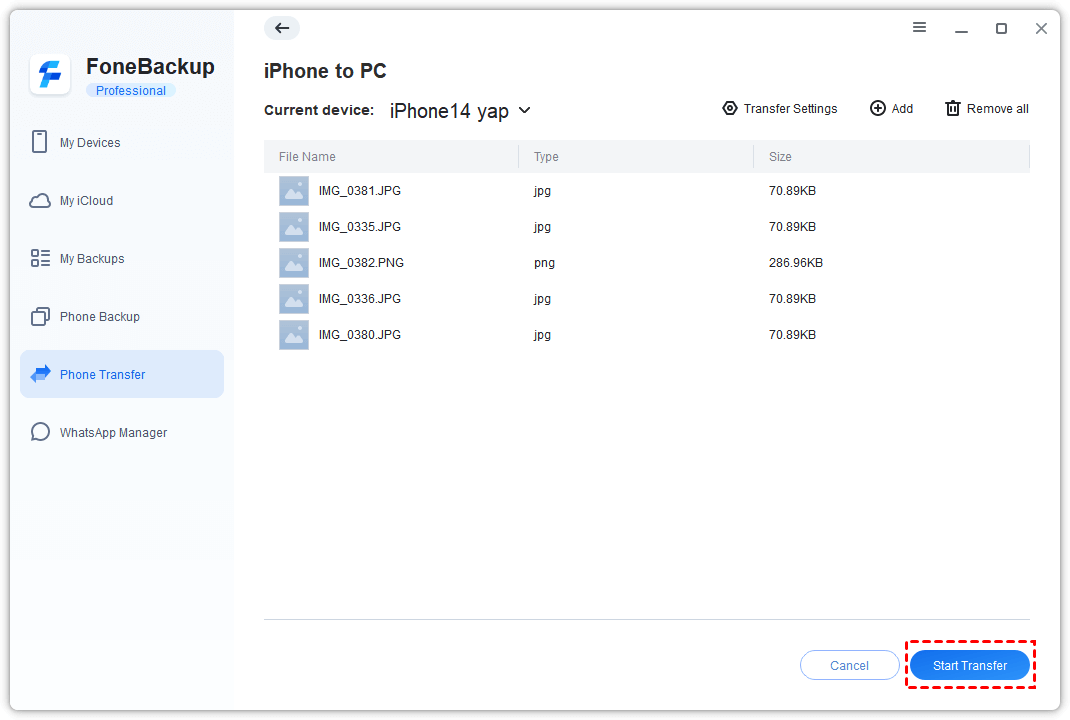
Step 4. Under Transfer Settings, select a destination folder on your computer. Then click Start Transfer to begin the process. AOMEI FoneBackup will handle the rest, and you will find your files saved to your PC shortly after the transfer completes.
Option 2. Use Snapdrop as Wireless AirDrop for Windows 11
If you want a quick, software-free way to airdrop from iPhone to Windows 11, Snapdrop is one of the most popular choices. It works entirely in your browser and mimics the simplicity of AirDrop remarkably well. Below are the benefits of using Snapdrop:
- Requires zero downloads or installations – just open your browser and go to the Snapdrop website.
- Works across all major platforms: iOS, Android, Windows, macOS, and even Linux.
- Uses your local Wi-Fi network to discover nearby devices, making the process almost identical to using AirDrop.
- Does not store or log your transferred files, so your privacy stays intact.
Learn how to airdrop from iPhone to Windows 11 using Snapdrop below. Take transferring photos as an example:
🔔 Important: Always use a password-protected Wi-Fi network when transferring sensitive files. Public or unsecured networks can expose your data to others on the same connection.
Step 1. Connect both your iPhone and Windows 11 PC to the same Wi-Fi network. This is mandatory for Snapdrop to work.
Step 2. Open a web browser on both devices and navigate to the Snapdrop website. Each device will automatically be assigned a random nickname so you can identify who you are sending files to.
Step 3. On your iPhone, tap the name or icon representing your computer. From the pop-up menu, choose Photo Library, Take Photo or Video, or Browse. Then select the photos or other files you want to transfer.
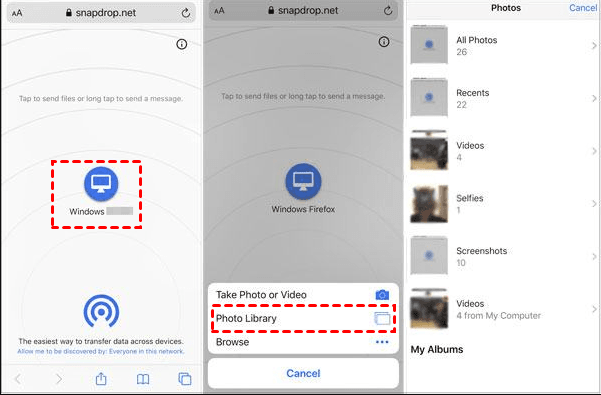
Step 4. On your Windows 11 PC, a notification will appear asking you to accept the incoming file. Click Save to download it to your default downloads folder.
Option 3. Transfer Files via a Network Shared Folder on Windows 11
If you want to transfer files from your iPhone to a Windows 11 PC without using a USB cable, a network shared folder is a convenient option. By creating a shared folder on your PC and connecting to it through the iPhone Files app, you can wirelessly copy photos, videos, documents, and other supported files between the two devices.
Before starting, make sure your iPhone and Windows 11 PC are connected to the same Wi-Fi network.
Step 1. Create a Shared Folder on Windows 11
1. On your Windows computer, create a folder where you want to receive the iPhone files.
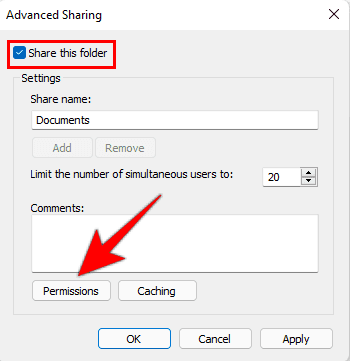
2. Right-click the folder, select Properties, open the Sharing tab, and click Advanced Sharing.
3. In the Advanced Sharing window, enable Share this folder and configure the sharing permissions as needed.
4. Find your PC's local IPv4 address by opening Settings > Network & Internet > Properties and locating IPv4 address.
Step 2. Connect Your iPhone to the Shared Folder
1. Open the Files app on your iPhone, tap the three-dot icon, and select Connect to Server.
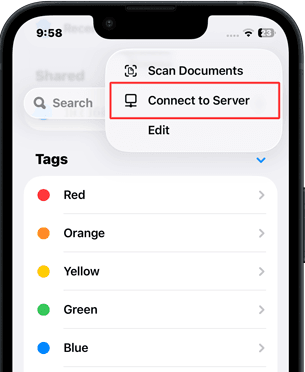
2. Enter your Windows PC's local IP address and tap Connect.
3. Select Registered User, then enter your Windows account username and password.
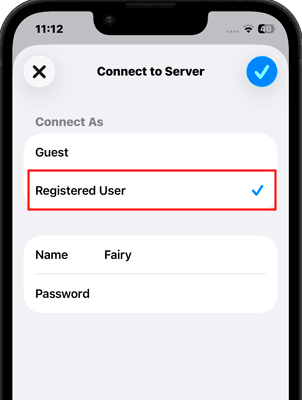
4. Tap Next to connect. After the connection is established, the shared folder should appear under Shared in the Files app.
Step 3. Transfer Files from iPhone to PC
1. Open the Files app and locate the files you want to transfer.
2. Tap the three-dot icon on the top right > Select.
3. Select the files you want to transfer, tap the three-dot icon on the bottom right, and choose Copy xx Items (xx stands for the number of selected files).
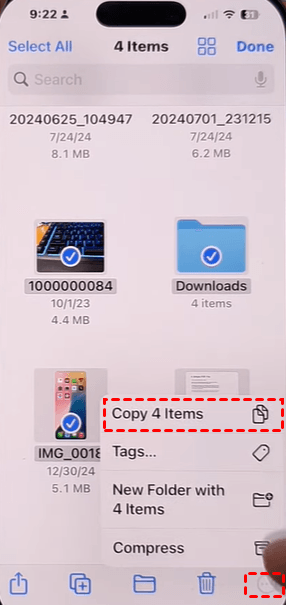
4. Select the connected Windows PC under Shared. Choose the shared folder you created, tap and hold on the empty space, and select Paste.
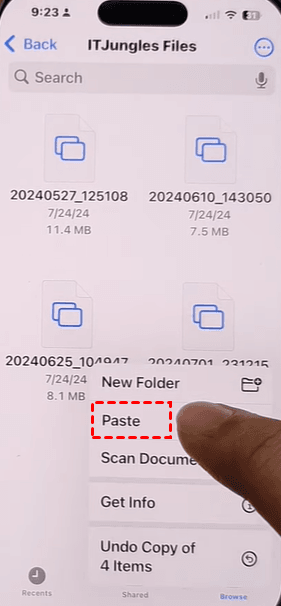
5. Open the shared folder on your Windows 11 PC to access files transferred from iPhone.
FAQs about AirDrop for Windows 11
1. Can I download AirDrop for Windows 11?
No. AirDrop is a proprietary Apple technology and is not available for Windows 11. However, you can use third-party tools like Snapdrop or AOMEI FoneBackup to achieve similar results.
2. Is Snapdrop safe to use?
Yes, Snapdrop is generally safe for personal use. It does not store your files on any server – transfers happen directly between devices over your local network. Still, avoid using it on unsecured public Wi-Fi.
3. Which AirDrop alternative for Windows 11 is the fastest?
For large files or bulk transfers, AOMEI FoneBackup via USB cable is the fastest and most reliable option. Snapdrop is great for small to medium files, but speed depends on your Wi-Fi quality.
4. Does Nearby Sharing work with iPhones?
No, Nearby Sharing is a Windows-to-Windows feature. It does not support iOS devices. If you need to share between iPhone and Windows, use Snapdrop, AOMEI FoneBackup, or a network shared folder instead.
Final Thoughts
While you cannot install AirDrop on Windows 11, you have several capable alternatives to choose from. For quick, wireless transfers without installing anything, Snapdrop and a network shared folder are your available options. If you need speed, reliability, and the ability to handle large volumes of data, AOMEI FoneBackup offers a robust wired solution that works flawlessly.
What’s more, AOMEI FoneBackup offers many other practical features. For example, you can use it to transfer iCloud data to a new iCloud account. Don't hesitate to try it out!

 as a preferred
source on Google
as a preferred
source on Google