




Can You AirDrop Photos from iPhone to PC? Try These 3 Alternatives
You cannot directly AirDrop photos from iPhone to PC because Windows does not support AirDrop. Compare 3 practical wired and wireless alternatives and choose the right method for your photos.

By Ivy Updated on August 21, 2026


You’ve filled your iPhone with vacation pictures, family photos, or work images. Now you want to move them to your Windows PC before your storage runs out. AirDrop seems like the obvious choice, but your computer never appears in the AirDrop list.
The short answer is no: you cannot use Apple AirDrop to send photos directly from an iPhone to a Windows PC. AirDrop works with nearby iPhones, iPads, and Macs, but Windows is not a supported destination.
Fortunately, you can get the same result in other ways.
- Use Windows Photos for a free USB import
- iCloud Photos for wireless access,
- Consider AOMEI FoneBackup when you want to select photos and control where they are saved.
Why Can’t You AirDrop Photos from iPhone to PC?
AirDrop uses Apple technologies to find nearby supported devices and transfer files. Although it depends on both Wi-Fi and Bluetooth, it is not the same as standard Bluetooth file sharing.
A Windows PC cannot appear as a normal AirDrop recipient. Turning on Bluetooth, pairing the iPhone with Windows, or opening the Windows sharing settings will not add AirDrop support.
Some websites and apps describe themselves as AirDrop alternatives. They may provide a similar wireless experience, but they do not add Apple AirDrop to Windows. For photos, the most suitable alternative depends on how many pictures you need to move and whether you prefer a cable or wireless connection.
Choose the Right AirDrop Alternative on Windows
| 🧩 Your situation | 🛠️ Recommended method | 📌 Why |
|---|---|---|
| You want a free local import | Windows Photos | Built into Windows and suitable for a normal USB import |
| You already use iCloud Photos | iCloud Photos | Makes your synced library available wirelessly on a PC |
| You want to preview selected photos | AOMEI FoneBackup | Lets you choose photos and set a PC storage path |
If you have a large library and do not want to upload it first, start with a USB method. If your photos are already in iCloud, downloading them through iCloud is usually more convenient.
Method 1. Import iPhone Photos to PC with Windows Photos
👍 Best for: A free local import of many photos - requires a USB data cable.
The Microsoft Photos app can import photos from a connected iPhone. Before you begin, install or update the Apple Devices app from the Microsoft Store. Use a cable that supports data transfer, since some cables can only charge your phone.
Step 1. Unlock your iPhone and connect it to the PC with a USB cable. If the iPhone displays Trust This Computer, tap Trust, then enter your passcode.
Step 2. Open the Photos app from the Windows Start menu. Select Import, choose the connected iPhone, and wait while Windows loads the available photos.
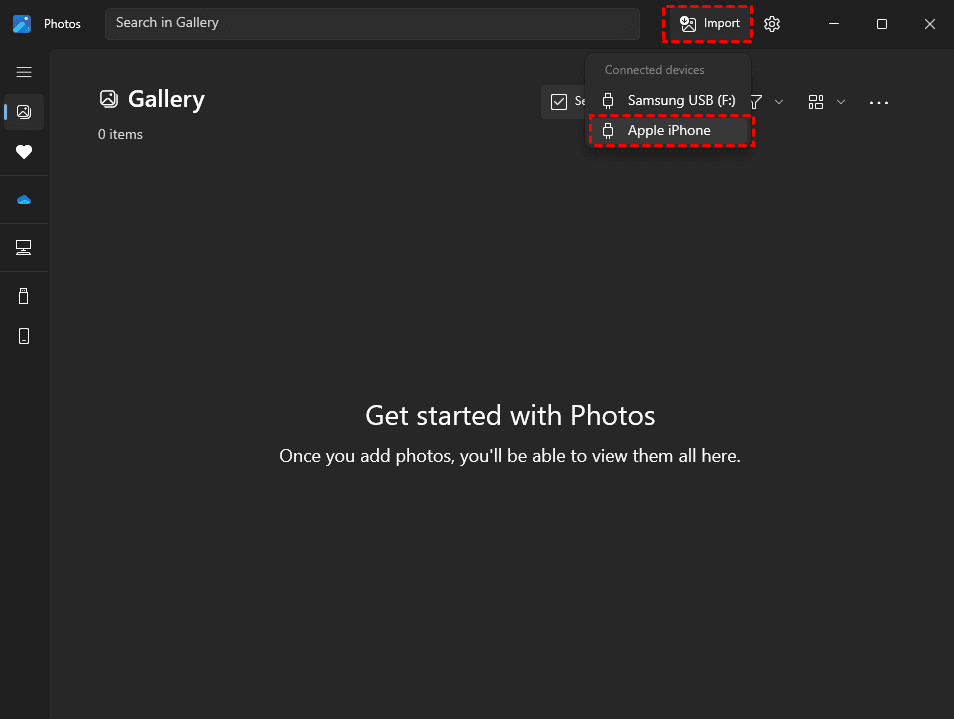
Step 3. Select the pictures you want, change the destination if needed, and click Import again.

Keep the iPhone unlocked and connected until the import finishes. Open several transferred files before deleting anything from the phone.
If the iPhone does not appear, reconnect it while it is unlocked and try another data cable or USB port. For more checks, refer to iPhones not recognized.
Method 2. Transfer iPhone Photos to PC Wirelessly with iCloud
👍 Best for: Wireless access when you already use iCloud Photos - requires internet access and enough iCloud storage.
iCloud Photos synchronizes your photo library. You can download selected pictures through a browser or access your library with iCloud for Windows.
Option 1. Download photos from iCloud.com
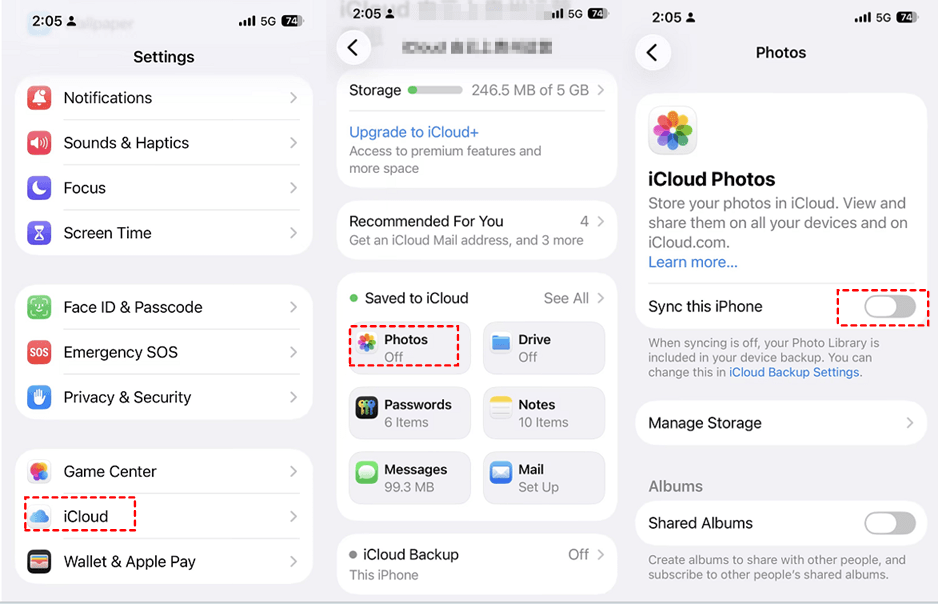
Step 1. On your iPhone, open Settings, tap your name, and choose iCloud > Photos.
Step 2. Turn on Sync This iPhone and allow time for the photos to upload.
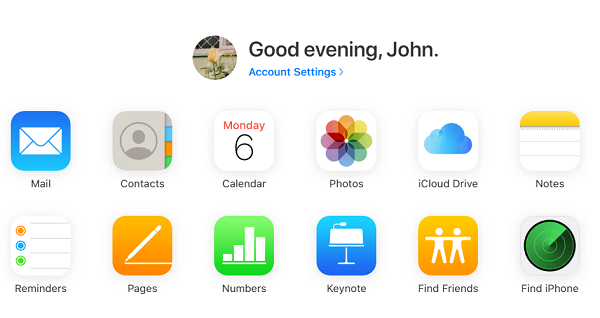
Step 3. On the PC, go to icloud.com and sign in to the same Apple Account.
Step 4. Click Photos and select the photos or videos you need. Hold Ctrl when selecting multiple items on the PC.
Step 5. Click the Download button. If needed, open More Download Options to choose a download format.
Option 2. Use iCloud for Windows
Step 1. Install and open iCloud for Windows, then sign in to your Apple Account.
Step 2. Check iCloud Photos and click Apply.
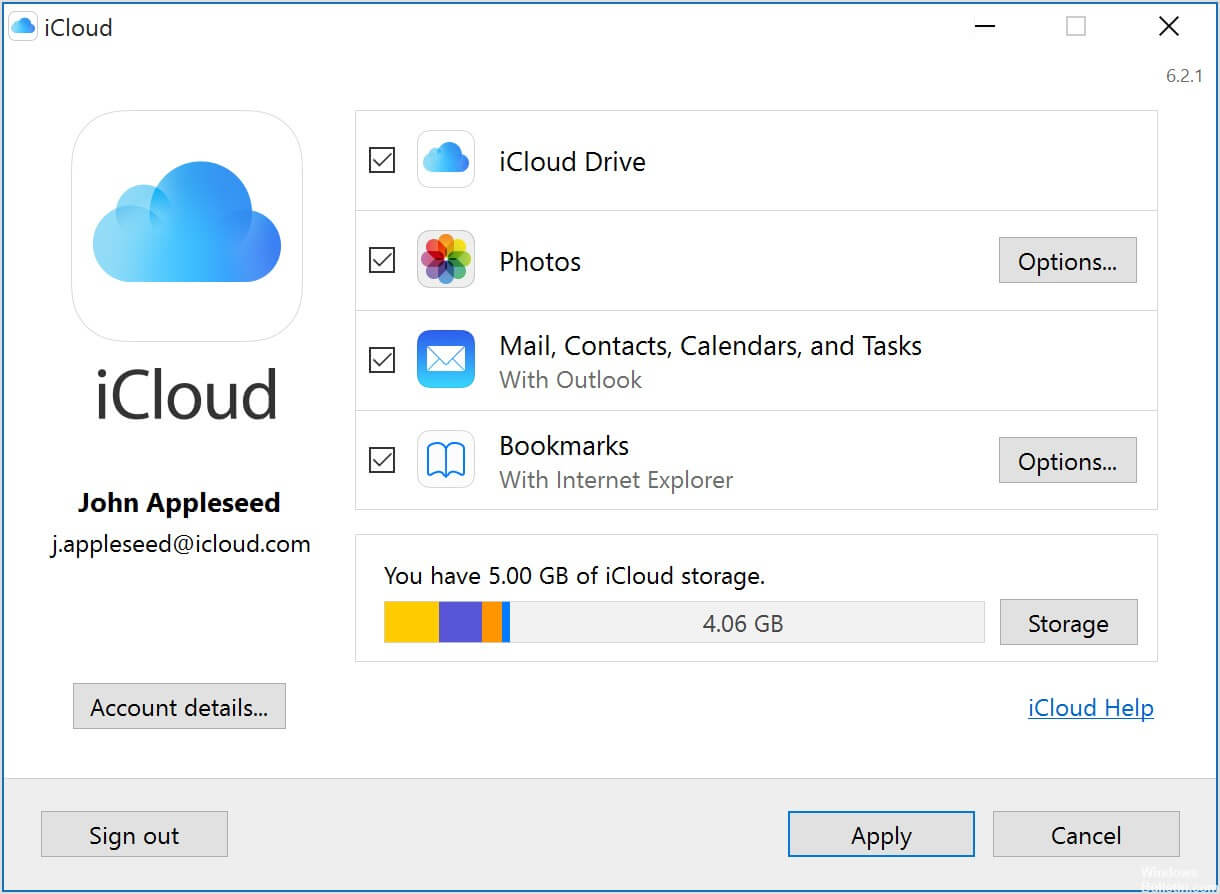
Step 3. Open File Explorer > iCloud Photos. Double-click a thumbnail to download and view the full photo. Hold Ctrl to select multiple items.
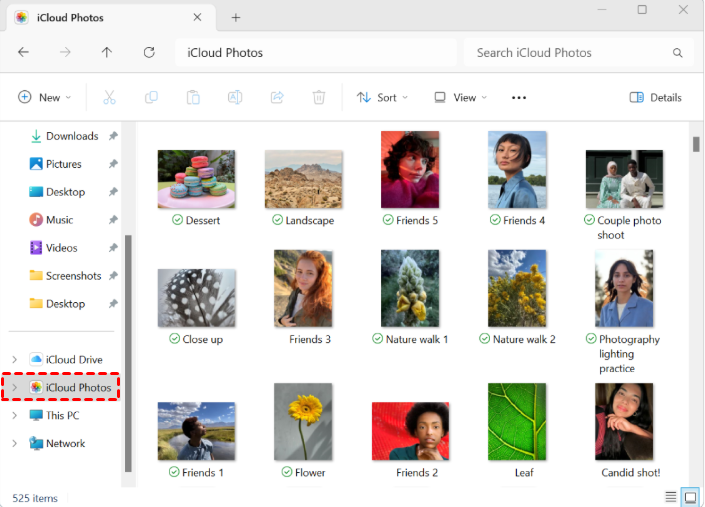
If it is not visible, look under Pictures.
iCloud Photos may first show thumbnails instead of complete local files. Confirm that a photo has downloaded before copying it to another drive or disconnecting from the internet.
Method 3. Transfer Selected iPhone Photos to PC with AOMEI FoneBackup
👍 Best for: Preview selected photos and choose a folder or drive on Windows PC - requires software installation and a USB connection.
AOMEI FoneBackup is an iPhone backup and transfer tool for Windows PCs. It allows you to transfer selected iPhone photos to PC without relying iCloud storage.
- Choose what to move: Preview available photos before selecting them.
- Save files locally: Choose a folder or drive on the PC as the transfer destination.
- Work without cloud storage: The transfer uses a USB cable instead of uploading the library to iCloud.
- Know the free limit: The free Transfer feature is limited to 30 files per day. Its backup features are free if you need a duplicate copy.
 AOMEI FoneBackup
iPhone backup and transfer tool for Windows PCs.
Step 1. Download and install AOMEI FoneBackup on the Windows PC. Connect and unlock your iPhone, then tap Trusted if prompted.
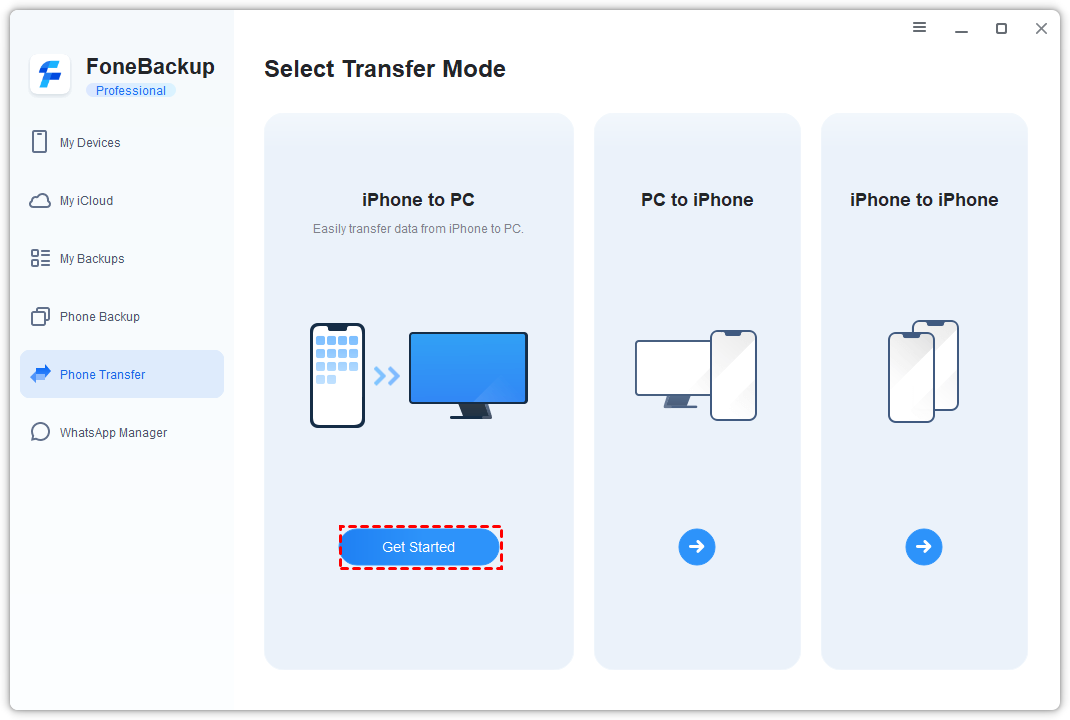
Step 2. Select Phone Transfer, choose iPhone to PC, and click Get Started.
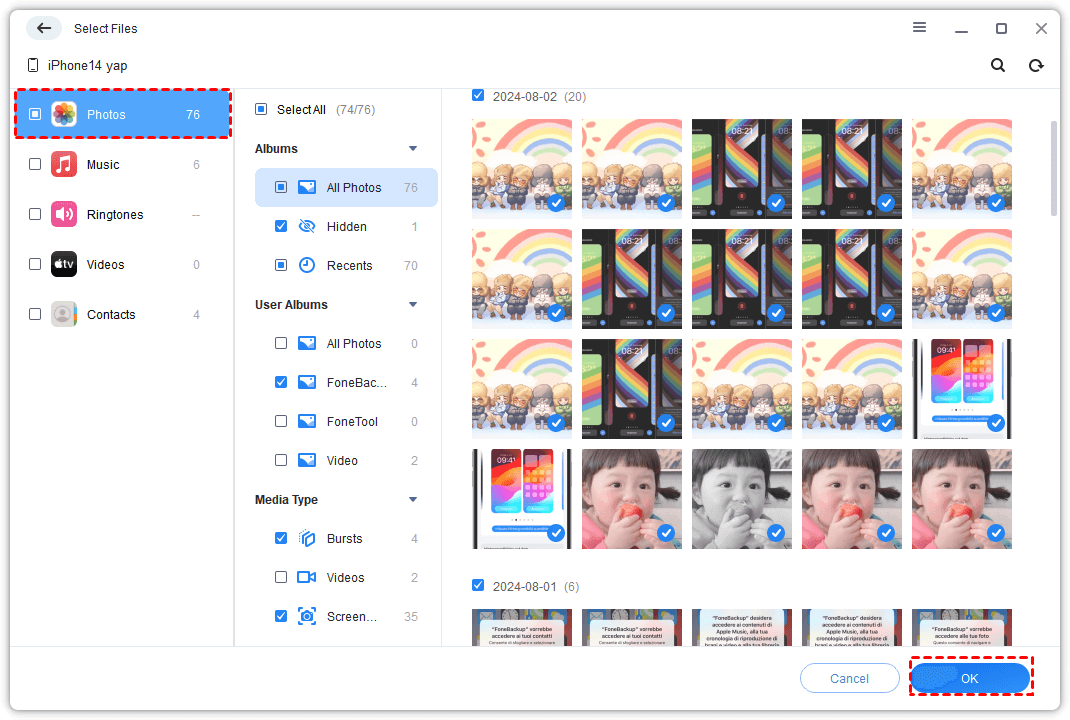
Step 3. Click the Photos icon to preview the available items, and select the photos you want. Click OK to confirm.
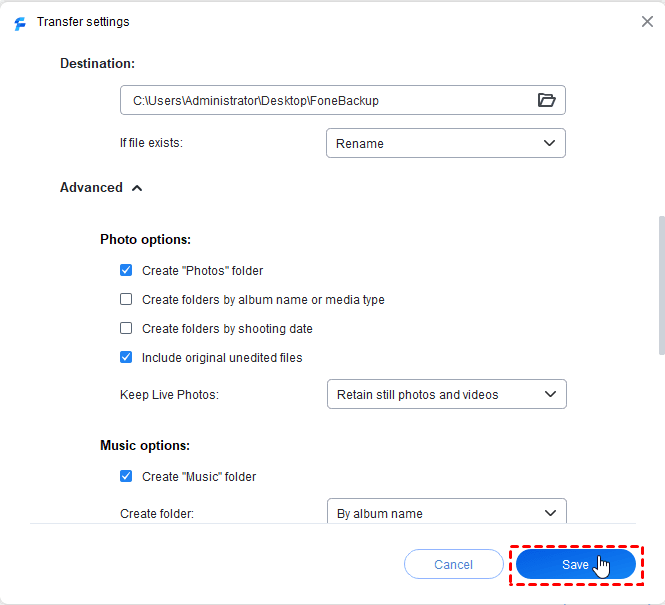
Step 4. Open Transfer Settings, choose where to save the files, and click Save.
Step 5. Click Start Transfer and leave the iPhone connected until the process is complete.
Open the destination folder afterward and check several pictures. If you need to move more than 30 files per day, review the available edition. Or try free backup feature if you want to duplicate copy.
💬 Before removing photos from your iPhone:
- Compare the number of selected and transferred files.
- Open several photos and videos on the PC.
- Check that important images have the expected resolution.
- Confirm that HEIC photos and Live Photo components work with your Windows apps.
- Keep the iPhone copies if any files are missing or unreadable, then repeat the transfer in smaller groups.
Compare the 3 Ways to Transfer Photos
| Method | 👍 Best for | Connection | Key limitation |
|---|---|---|---|
| Windows Photos | Large, free local import | USB | iCloud-only originals must be downloaded first |
| iCloud Photos | Wireless access to a synced library | Internet | Uses iCloud storage and syncs changes |
| AOMEI FoneBackup | Selected photos and destination control | USB | Free Transfer is limited to 30 files per day |
🔥 Top recommendation:
- Choose Windows Photos when you want a free built-in import.
- Choose iCloud when the library is already synchronized and you want wireless access.
- Choose AOMEI FoneBackup when selecting individual photos and flexible destination matter more.
FAQs
1. Can I AirDrop photos from iPhone to Windows 11?
No. Windows 11 is not a supported AirDrop destination. Use Windows Photos, iCloud Photos, or a compatible transfer tool instead.
2. Can I use Bluetooth to send iPhone photos to a PC?
Not through AirDrop. AirDrop uses Bluetooth for discovery but also relies on Apple-supported device communication. Pairing an iPhone with a PC does not make Windows an AirDrop receiver.
3. Why are some iPhone photos missing during a USB import?
The full files may be stored in iCloud instead of on your iPhone. Download the original, full-resolution versions to the device or access them through iCloud for Windows.
4. Will transferring iPhone photos to PC reduce their quality?
A direct file import should not intentionally compress the copied file. However, conversion settings and the chosen download format can affect the resulting file. Open and compare important photos before removing the originals.
5. Can I delete photos from my iPhone after transferring them?
Yes, but only after verifying that the PC copies are complete and readable. For important photos, keep another copy on a separate drive or in a backup before deleting the phone originals.
Summary
You cannot AirDrop photos from iPhone to PC directly, but you still have practical choices:
- Use Windows Photos for a free USB import.
- Use iCloud Photos when you want wireless access to an already-synced library.
- Use AOMEI FoneBackup when you want to preview selected pictures and choose where they are saved on the PC.
For a small, controlled transfer, try AOMEI FoneBackup. For a large free import, start with Windows Photos and verify the copied files before clearing space on your iPhone.

 as a preferred
source on Google
as a preferred
source on Google