



Best Way to Transfer Photos from PC to iPhone: 6 Methods
Looking for the best way to get photos from your PC to your iPhone? Discover 6 simple methods – with or without iTunes – that keep your pictures fast, secure, and high-quality.

By Lily Updated on August 19, 2026


Photos can easily become scattered across devices—on Windows PCs from cameras, edits, or phone backups. When you switch to a new iPhone or want your images on the go, you need a reliable transfer method. Unfortunately, moving files between Windows and iOS isn’t as simple as copying between two Windows devices; you may need a dedicated tool, iTunes, cloud services, or other workarounds.
Below are six methods to transfer photos from PC to iPhone.
|
Transfer Method |
Best For |
|
AOMEI FoneBackup |
Transferring many photos via USB connection. |
|
iTunes |
Transferring many photos via USB connection (if you already manage devices with iTunes). |
|
iCloud |
Wireless transfer (convenient for users already in the Apple ecosystem). |
|
Google Photos |
Wireless transfer (preferred for cross-platform cloud storage users). |
|
|
Transferring just a few images. |
|
Snapdrop |
Quick wireless transfer of a few photos without installing apps. |
Method 1. Transfer Photos from PC to iPhone with AOMEI FoneBackup
iTunes and iCloud are familiar choices for transferring photos, but they aren't ideal in every situation. iTunes relies heavily on synchronization, while iCloud requires an Apple ID and sufficient cloud storage.
If you're looking to transfer photos from PC to iPhone without iTunes, AOMEI FoneBackup offers a direct PC-to-iPhone transfer feature. You can select the photos you want and move them through a USB connection without syncing your entire photo library.
 AOMEI FoneBackup
- Transfer a large number of photos quickly.
- Select and preview individual files before transferring them.
- Transfer through a direct USB connection.
- Support common image formats such as JPG, PNG, GIF, HEIC, and BMP.
- Work with various iPhone models and iOS versions.
 100% Secure
This approach is also useful when you want to transfer photos from computer to iPhone without losing quality because the files can be moved directly rather than being sent through a service that may compress them. Here's how to move photos from PC to iPhone:
Step 1. Launch AOMEI FoneBackup on your Windows PC. Connect the iPhone to the computer using a compatible USB cable. Unlock your iPhone and tap Trust if the Trust This Computer prompt appears.
Step 2. In AOMEI FoneBackup, select Phone Transfer, choose PC to iPhone, and click Get Started.
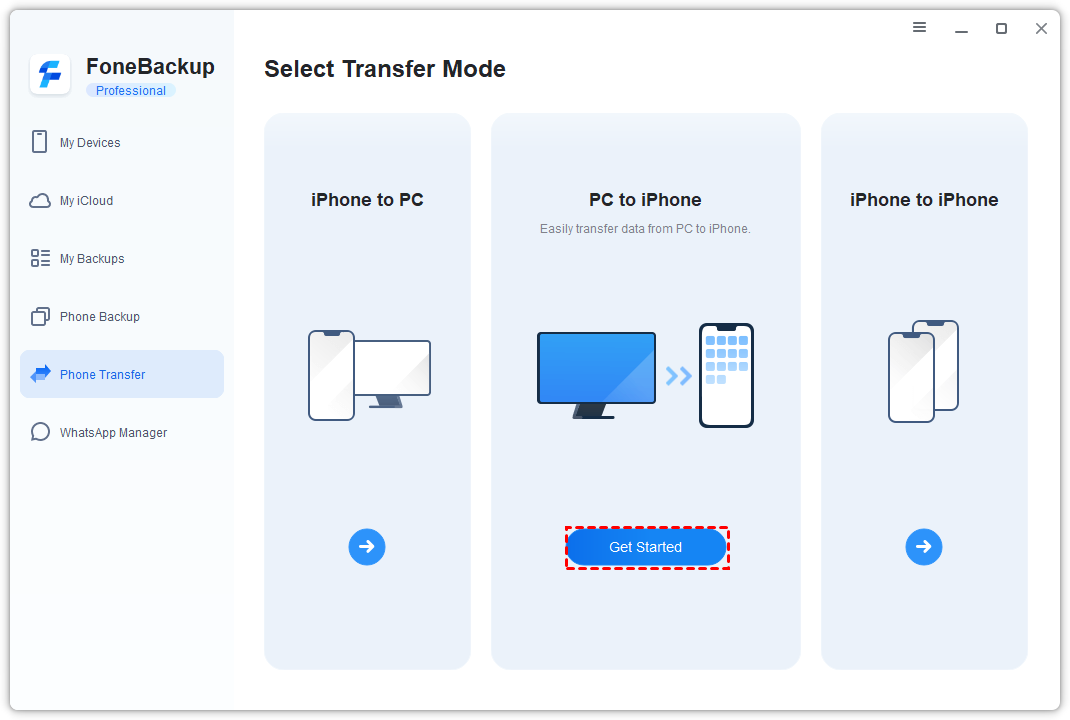
💡 Note: To transfer photos from iPhone to PC, choose iPhone to PC instead.
Step 3. Click the Photos icon and drag the desired pictures into the transfer window. Alternatively, click the blue folder and browse to the photos on the PC.
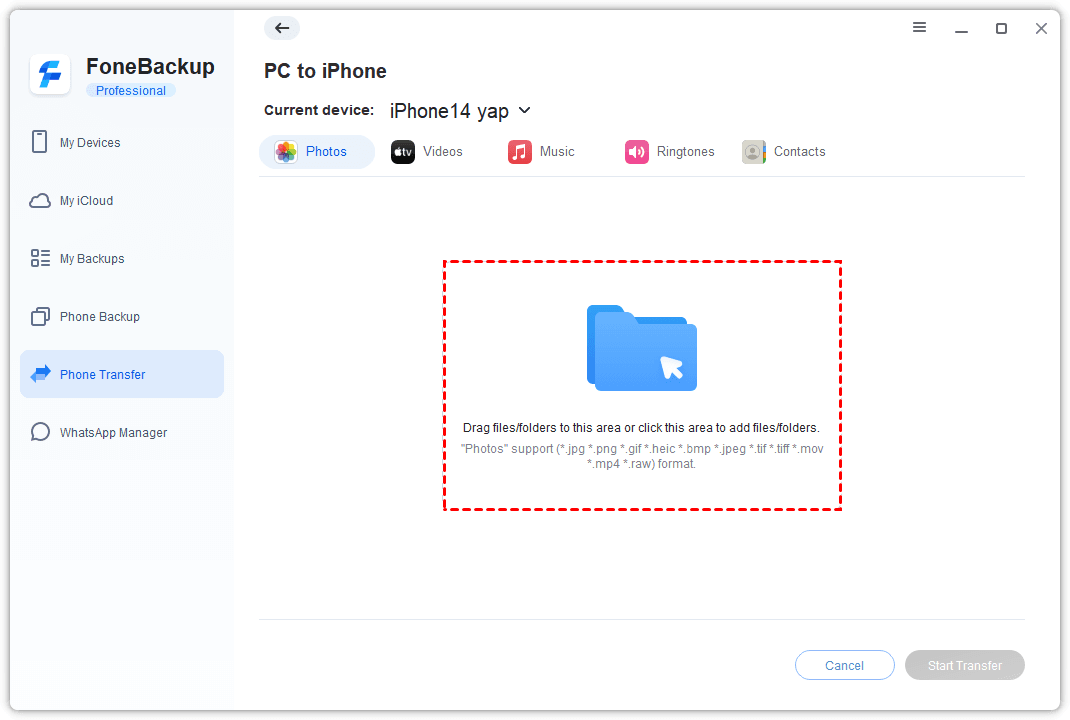
Step 4. Review the selected files and click Start Transfer to begin copying them to your iPhone.
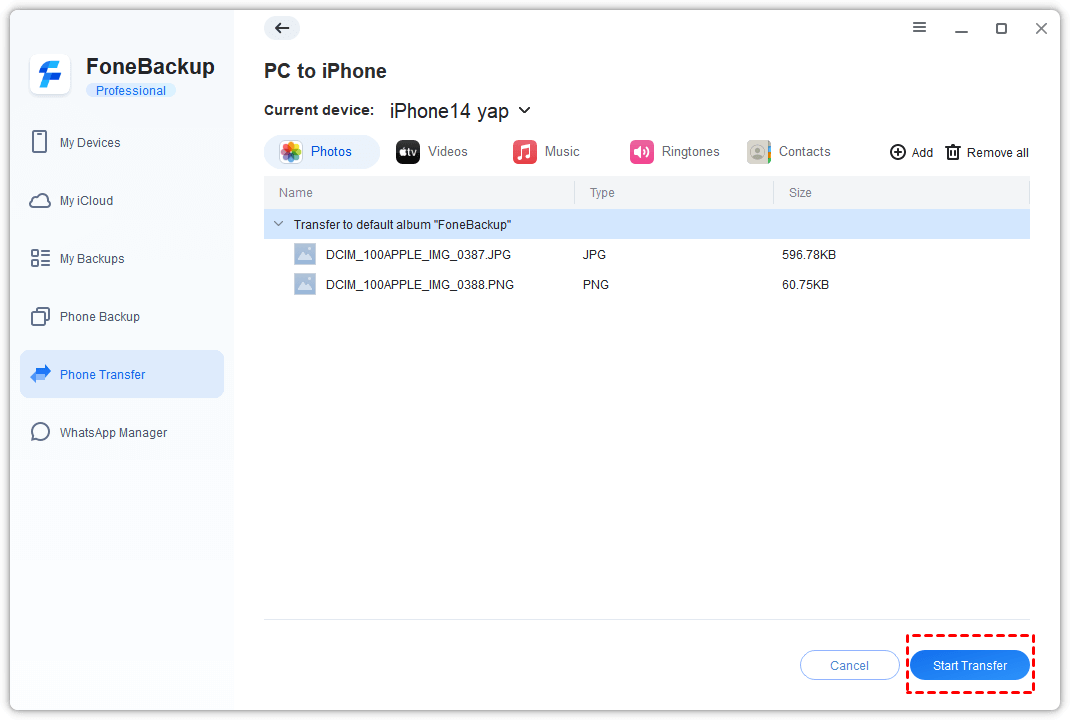
Step 5. Open the Photos app on the iPhone and confirm that the imported pictures are available.
Method 2. Transfer Photos from PC to iPhone with iTunes
iTunes is Apple's traditional Windows solution for managing and synchronizing iPhone content. It can sync an entire photo folder or selected folders from your computer to the iPhone.
The important thing to understand is that iTunes uses synchronization rather than a simple copy-and-paste process. Changes to your synchronization settings can therefore affect photos previously synced to the device. Here's how to transfer photos from PC to iPhone with USB connection:
Step 1. Connect your iPhone to the PC with a USB cable. If iTunes isn't installed, download and install it on your computer, then launch the program.
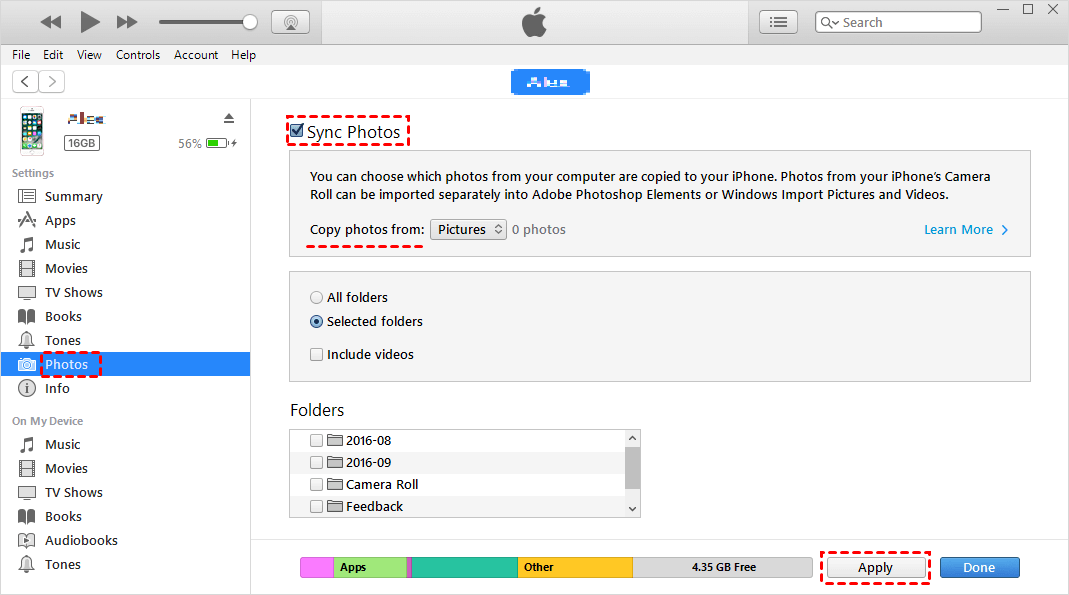
Step 2. Click the Device icon in iTunes and select Photos from the sidebar.
Step 3. Enable Sync Photos. Open the drop-down menu behind “Copy photos from”, choose Choose folder, and select the folder containing the pictures you want to sync.
Step 4. If the selected folder contains subfolders, choose All folders or Selected folders according to your needs.
Step 5. Click Apply to start syncing the selected photos to your iPhone.
💡 Notes:
- If iCloud Photos is currently enabled on your iPhone, you may need to disable it before using iTunes photo synchronization.
- Enabling iCloud Photos after syncing pictures through iTunes can remove the iTunes-synced copies from the iPhone. The original files on your computer aren't affected.
Method 3. Send Pictures from Computer to iPhone with iCloud
If you don't want to rely on a USB cable, iCloud Photos offers a wireless alternative. Once pictures are uploaded to the same iCloud account used by your iPhone, they can become available through the Photos app.
The official iCloud for Windows application lets you integrate iCloud Photos with your Windows computer. Learn how to use it below:
Step 1. Install and launch iCloud for Windows on your PC. Sign in using the Apple ID associated with your iPhone.
Step 2. To the right of iCloud Photos, click the Arrow button (>).
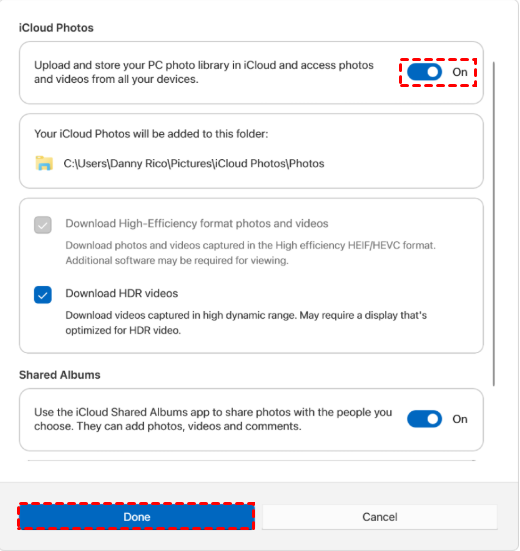
Step 3. Turn On iCloud Photos, then click Done to apply your changes.
Step 4. Open iCloud Photos from File Explorer and drag the pictures you want to transfer into this folder.
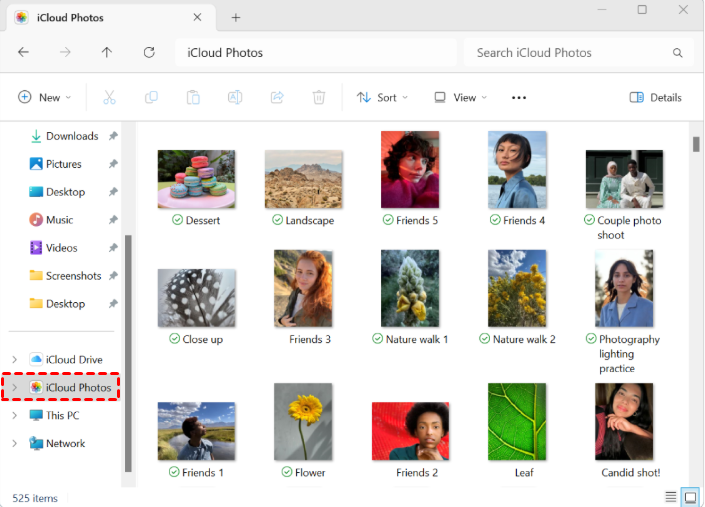
💡 Note: If you don’t see iCloud Photos, click Pictures in the Navigation pane, then double-click iCloud Photos.
Step 5. On your iPhone, make sure iCloud Photos is enabled and allow time for the uploaded pictures to synchronize.
Method 4. Transfer Photos from PC to iPhone with Google Photos
Another way to transfer photos from PC to iPhone without iTunes is to use a third-party cloud storage service. Google Photos is a convenient example because you can upload pictures through a web browser and access them through its iPhone app.
This solution is especially useful if the pictures don't necessarily need to be transferred immediately into the local iPhone photo library.
Step 1. Open Google Photos in a browser on your computer and sign in to your Google account.
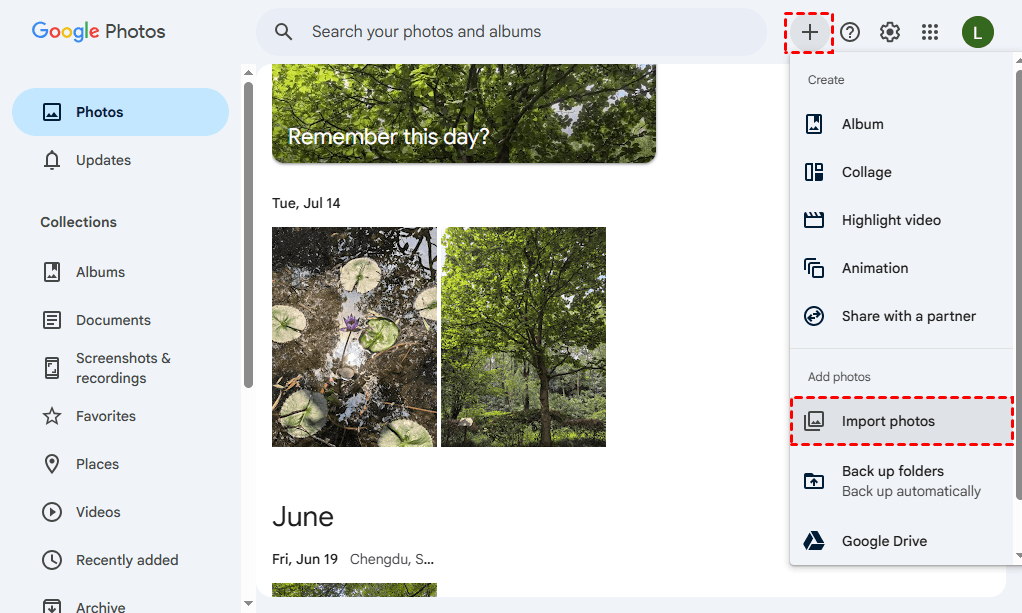
Step 2. Click the plus icon > Import photos to upload the photos you want to transfer. You can also create an album first if you'd like to organize the pictures before uploading them.
Step 3. On your iPhone, install the Google Photos app from the App Store and sign in using the same Google account.
Step 4. Wait for the uploaded pictures to appear in Google Photos on your iPhone.
Step 5. If you want copies stored locally, select the required picture, tap the More icon, and choose Download.
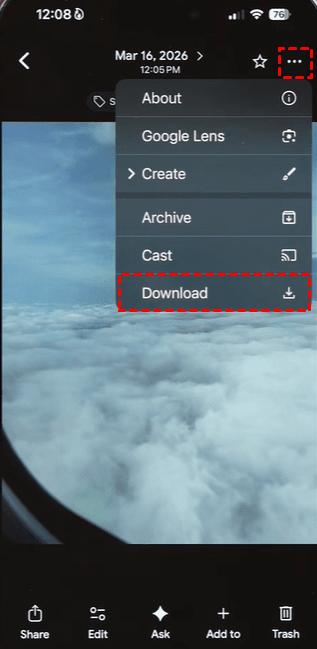
💡 Note: If the photo or video already exists on your camera roll, you can't download it from Google Photos.
Method 5. Email Photos from PC to iPhone
Email is one of the easiest options when you only need to transfer a handful of pictures. There's no USB connection or synchronization process involved—you simply send the images to an email account that you can access from your iPhone.
The main limitation is attachment size. Email providers impose limits on how much data can be attached to a single message, so this method isn't practical for hundreds of photos or large videos. Follow the steps below to transfer a few pictures via email:
Step 1. Open your preferred email service on the PC and click Compose or the equivalent option for creating a new message.
Step 2. Enter an email address that you can access from the iPhone in the recipient field.
Step 3. Click Attach files and select the photos you want to transfer. Then send the message.
Step 4. Open the corresponding email account on your iPhone and find the message in your Inbox.
Step 5. Open each attachment, hold the picture, and select Save Image to store the photos on your iPhone.
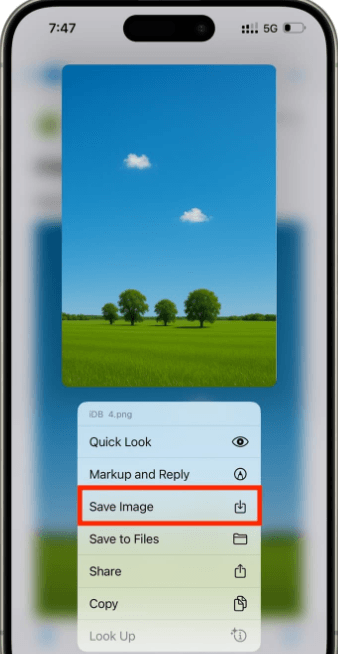
💡 Note: Because attachment limits vary by email provider and may change, check your provider's current restrictions if you're sending larger files.
Method 6. Transfer Photos from PC to iPhone via Snapdrop
If you don't want to install desktop software, Snapdrop provides a simple way to transfer photos wirelessly. It works through a web browser, so you can use it on both your iPhone and Windows PC without installing a dedicated transfer application. Follow the instructions below:
Step 1. Connect the PC and iPhone to the same trusted Wi-Fi network. Then access the Snapdrop website on both devices.
Step 2. On the PC, select the iPhone as the receiving device and choose the photos.
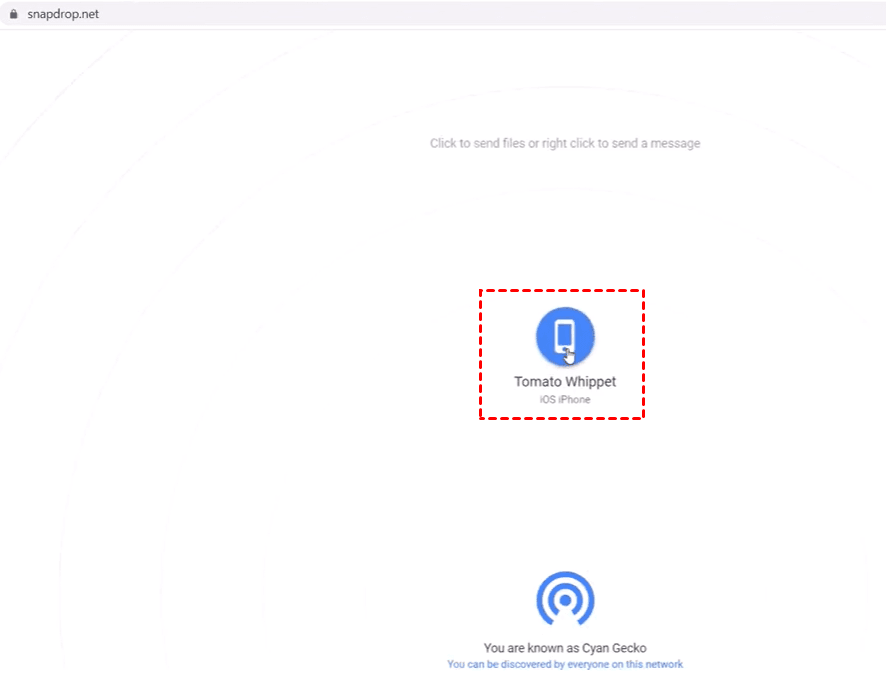
Step 3. On your iPhone, tap Save > Download to save the received pictures to the Downloads folder on your iPhone.
Step 4. Save images to the Photos app.
- Open your Downloads folder in the Files app.
- Tap the three-dot icon in the top right corner > Select. Then tap each image you want to save.
- Tap the Share icon at the bottom > Save [Number] Images to save images to the Photos app.
FAQs About Transferring Photos from PC to iPhone
1. What is the best way to transfer photos from PC to iPhone?
For users who want to select individual pictures and transfer them directly over USB, AOMEI FoneBackup offers a convenient approach without relying on iTunes synchronization. iCloud and Google Photos are useful alternatives if you prefer wireless transfer.
2. How can I transfer photos from PC to iPhone without iTunes?
You can transfer photos from PC to iPhone without iTunes using AOMEI FoneBackup, iCloud, Google Photos, or email. The right method depends on whether you want a direct USB transfer or a cloud-based solution.
3. What's the easiest way to transfer a few photos?
For only a few pictures, email or a cloud service can be convenient because you don't need to set up a full synchronization process. For larger collections, USB transfer or cloud photo synchronization is generally more practical.
Conclusion
You have learned six best ways to transfer photos from PC to iPhone, and each one suits a different situation. iTunes provides traditional photo synchronization, iCloud/Google Photos/Snapdrop enables wireless access, and email is convenient when you only need to send a few images.
If your priority is moving a large photo collection selectively through a USB connection, AOMEI FoneBackup offers a simpler alternative to synchronization-based methods. It lets you choose the pictures you need and transfer them directly. What’s more, it enables you to backup your iPhone with a few clicks. Download it now to discover more!

 as a preferred
source on Google
as a preferred
source on Google