



How to Recover WD My Cloud Drive: Complete Guide
Can't access your WD My Cloud drive? Learn how to mount it and recover your data step by step – plus a professional recovery tool for Windows if you need.

By Lily Updated on September 18, 2026


User Case: My Cloud Is Dead and Need to Recover Data
“So My Cloud is dead and WD sent me a new one. I bought an external hard drive enclosure installed the drive in the enclosure and connected new external drive to my computer through a USB connection. 6 local disk drives appear. All are not accessible unless I reformat.
I cancel and get an error message, ‘The volume does not contain a recognized file system. Please make sure that all necessary file system drivers are loaded and that the volume is not corrupted.’ Any suggestions on recovering the data other than sending out to a data recovery expert for $500?”
- Question from WD Community
If you are in the same situation where WD My Cloud drive is dead and you can’t access data on it, follow this guide to recover data from WD My Cloud.
How to Recover Files from WD My Cloud Hard Drive
It is important to note that WD My Cloud drive uses Linux-based EXT4 file system, so you’ll need specialized software or an alternative operating system to recover data on it. Follow the instructions below to perform WD My Cloud data recovery.
💡 Note: Since Windows cannot natively read EXT4 partitions, connecting the drive to a Windows PC will prompt you to format it—do not proceed with formatting, as doing so will erase your data.
Step 1. Enable SSH
1. Download PuTTy on your computer and open it.
2. In PuTTy Configuration window, type the My Cloud device IP address. Leave the port number as 22 and Connection type as SSH. Then click Open.
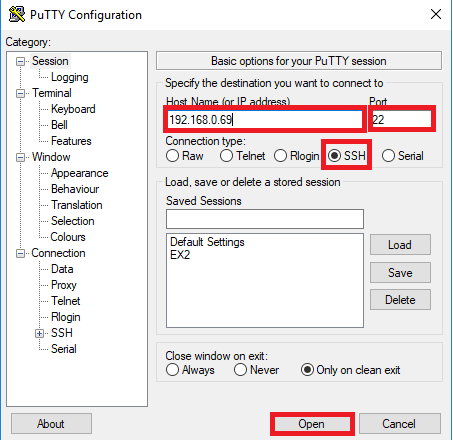
3. In PuTTy Security Alert window, click Yes.
4. Input the username and password based on your firmware version to login to the My Cloud.
|
Firmware Version |
Username |
Password |
|
5.xx.xxx |
sshd |
Default: no password (New password enforced) |
|
2.xx.xxx |
sshd |
Default: no password (New password enforced) |
|
04.xx.xx-xxx |
root |
Default: welc0me (The fifth character is a zero; password change enforced) |
Step 2. Mount Volume
After connecting to your WD My Cloud using SSH, you can mount My Cloud drives using different commands according to your situation:
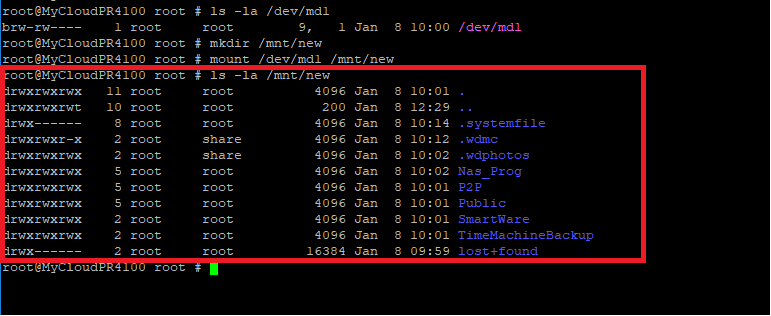
👉 My Cloud Multi Bay (Raid 1 and Raid 5)
- ls -la /dev/md1
- mkdir /mnt/new
- mount /dev/md1 /mnt/new/
- ls -la /mnt/new/
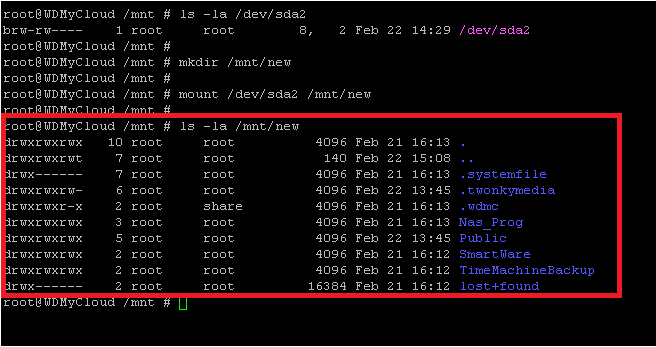
👉 Single Bay (Firmware 02.xx.xxx & 05.xx.xxx)
- ls -la /dev/sda2
- mkdir /mnt/new
- mount /dev/sda2 /mnt/new/
- ls -la /mnt/new/
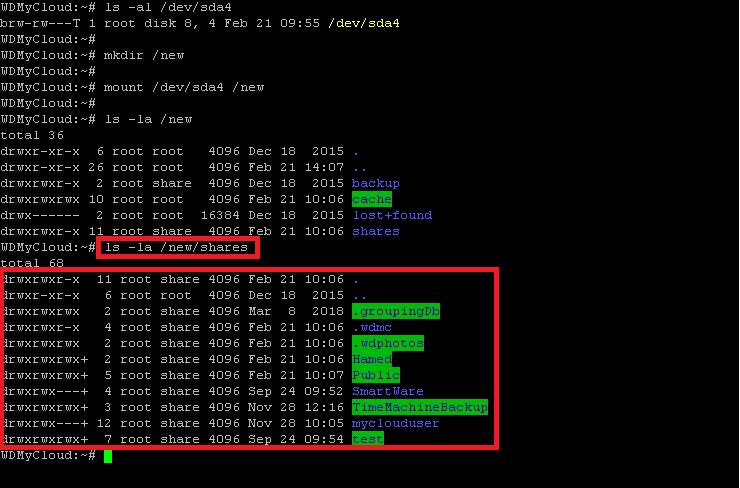
👉 Single Bay (Firmware 04.xx.xx-xxx)
- ls -al /dev/sda4
- mkdir /new
- mount /dev/sda4 /new/
- ls -la /new/shares
Step 3. Use WinSCP to Copy Data
1. Download and install WinSCP on your computer.
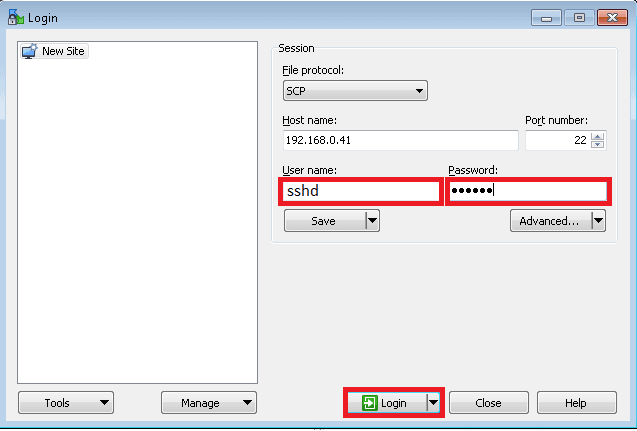
2. Open WinSCP and login to the My Cloud using the following information:
- File protocol: SCP
- Host name: My Cloud IP address
- Port number: 22
- User name: sshd or root (based on your firmware version)
- Password: no password or welc0me (based on your firmware version)
3. Click Yes in the warning window.
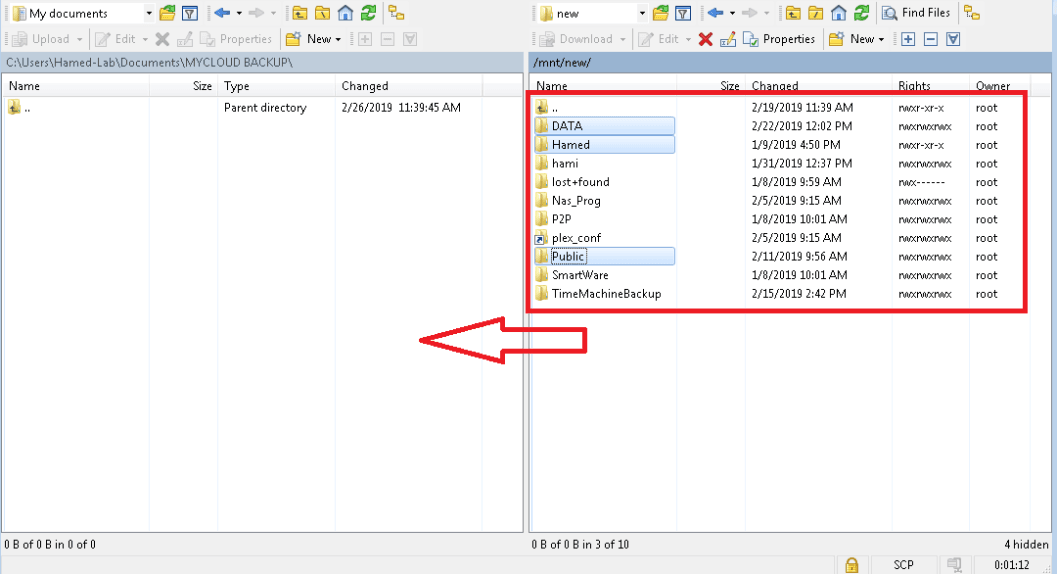
4. After logging in to My Cloud, navigate to your mounted folder in the right window.
- Multi-bay RAID 1/5: /mnt/new
- Single-bay, firmware 02.xx.xxx or 05.xx.xxx: /mnt/new
- Single-bay, firmware 04.xx.xxx-xx: /new/shares
5. In the left window, choose a location on your computer to save the recovered files. Then drag and drop the files and folders from the right window to the left window.
Bonus: Best Data Recovery Software for WD Windows Hard Drives
If you are using a WD hard drive that can be read by Windows directly (e.g., WD Blue, WD Elements, and WD My Passport) and want to recover data from it, AOMEI FastRecovery can give you a hand.
 AOMEI FastRecovery
- It supports Western Digital hard drives along with other HDDs, SSDs, USB drives, and memory cards.
- It provides Quick Scan and Deep Scan to search for lost data.
- You can recover pictures, Word documents, Excel spreadsheets, presentations, and videos, etc.
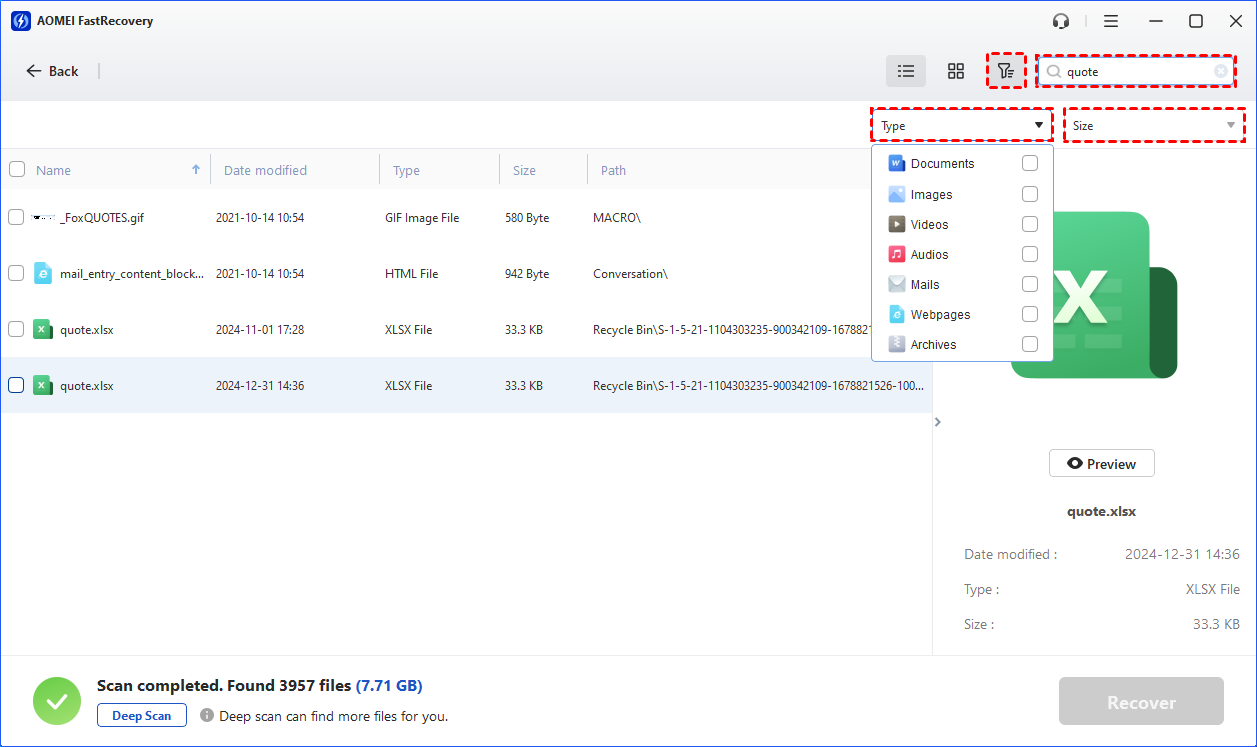
- You can narrow results by file name, extension, file type, size, and other available criteria.
- It supports common Windows file systems, including NTFS, FAT16, FAT32, and exFAT.
 100% Secure
Learn how to recover data from a WD hard drive with AOMEI FastRecovery below:
Step 1. Connect the WD hard drive to your computer and make sure it is detected.
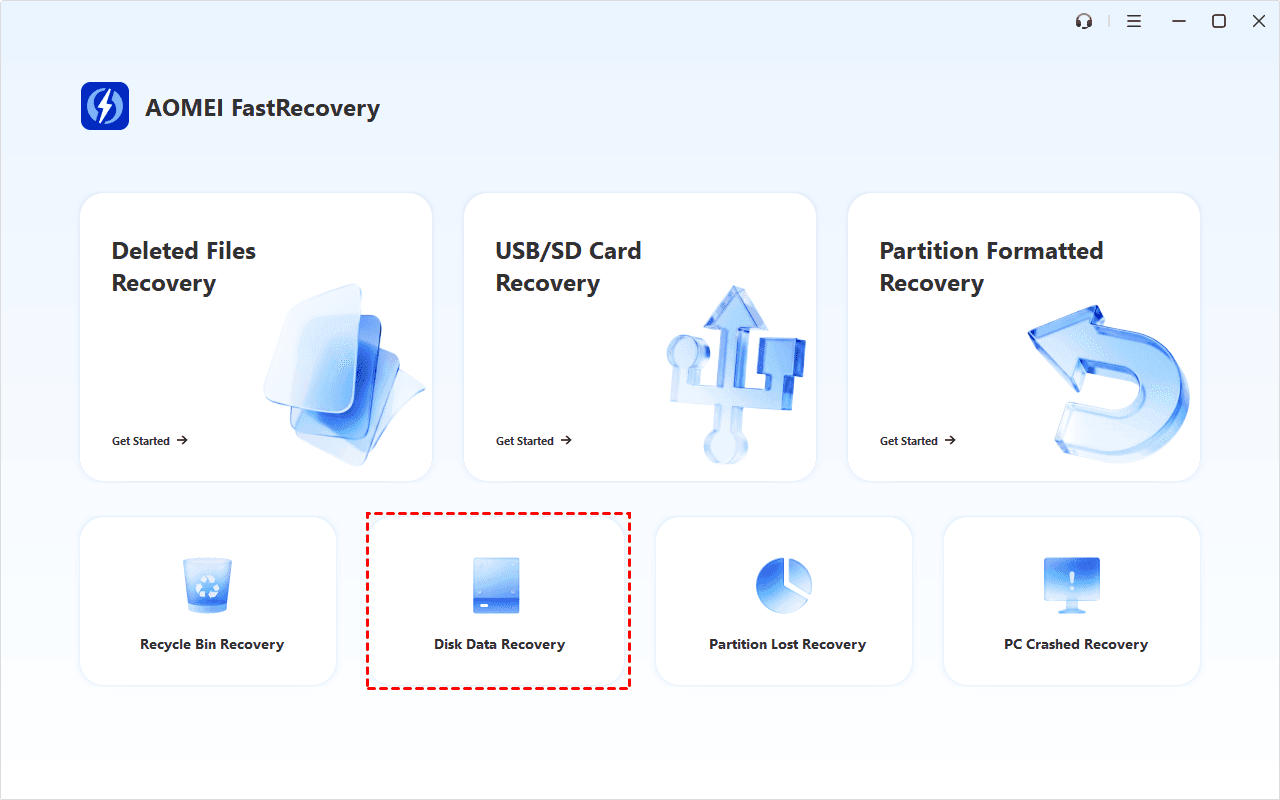
Step 2. Install and open AOMEI FastRecovery. Then select Disk Data Recovery from the main interface.
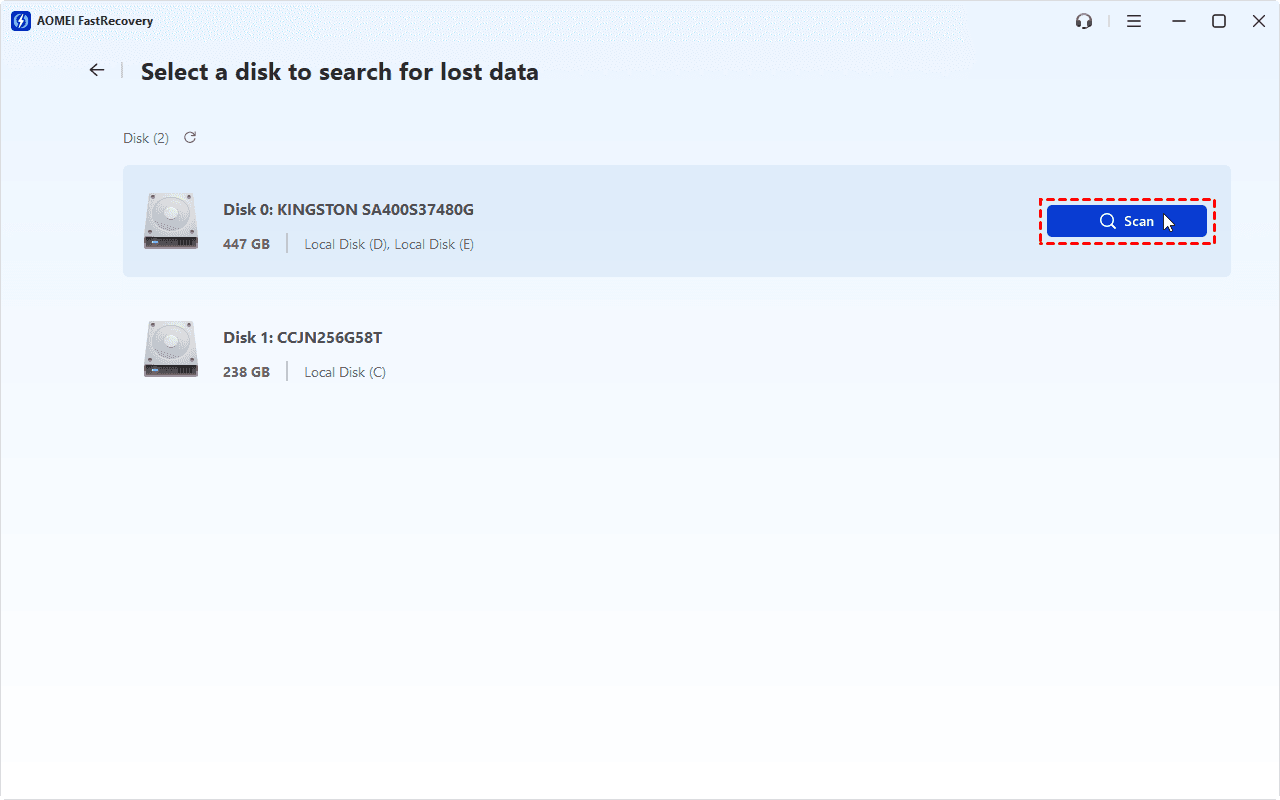
Step 3. Hover over the WD drive and click Scan. AOMEI FastRecovery will perform a deep scan to look for recoverable files, which takes a relatively long time.
Step 4. When the scan results appear, use the available filters to locate the files you need.
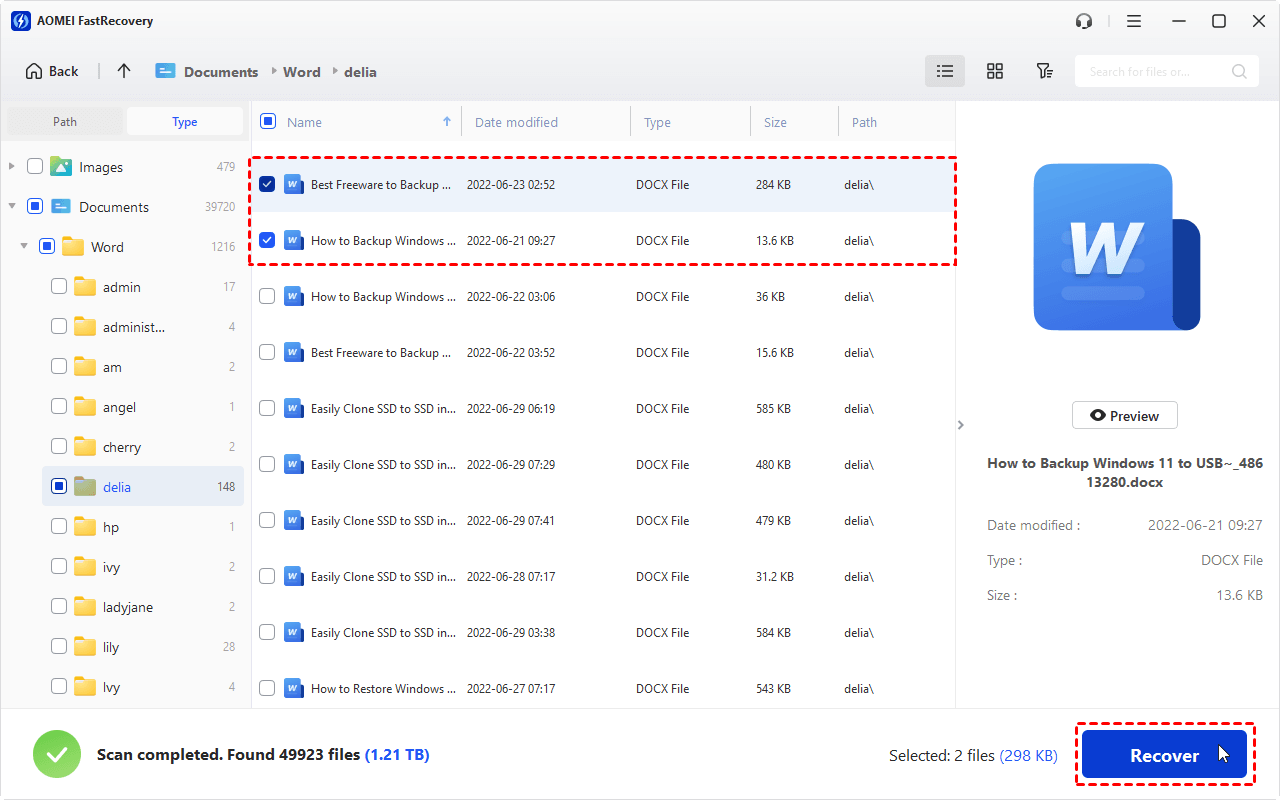
Step 5. Select the files you want to restore and click Recover.
💡 Notes:
- Before recovering a file, you can use the preview function to check whether the file is usable. Please upgrade to enjoy this feature.
- AOMEI FastRecovery allows up to 500 MB of data recovery for free. If you need to recover more data, try paid editions for additional recovery capacity.
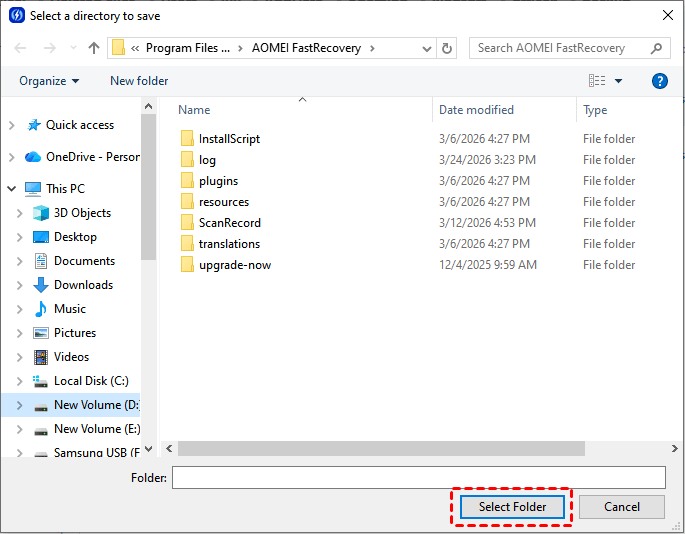
Step 6. In the pop-up window, choose a location on your computer to save the recovered files and click Select Folder.
Summary
Now you know how to recover WD My Cloud drive data. You can use SSH and WinSCP to extract files from supported My Cloud configurations and copy data to a safe place.
If you are using a WD Windows hard drive, such as WD Blue, WD Elements, and WD My Passport, AOMEI FastRecovery can help scan for and recover deleted or lost files. It can also help you with USB bootable data recovery on Windows 10. Why not give it a shot?

 as a preferred
source on Google
as a preferred
source on Google