




All My Pictures Disappeared from My Computer? 5 Fixes
If all your pictures disappeared from your computer, they may not be permanently lost. This guide explains five ways to find or recover missing pictures.

By Lily Updated on September 17, 2026


Help! All My Pictures Disappeared from My Computer!
Have you ever opened a folder on your computer and suddenly realized that all your precious pictures were gone? If all my pictures disappeared from my computer, the first reaction is usually panic, especially when the photos include family memories, work projects, or other files that are difficult to replace.
However, missing pictures are not always permanently deleted. If you are wondering, "Where did all my pictures go on my PC?", don't worry yet. The following are common causes of photo loss:
- Accidental deletion: You or another user may have deleted the pictures unintentionally.
- Hidden files or folders: Changes to file attributes or folder settings can make pictures invisible.
- Moved files: OneDrive, photo-management software, or image-editing applications may move or reorganize pictures.
- File system or folder problems: Improper operations can prevent Windows from correctly recognizing a folder or its contents.
- Hard drive problems: File-system errors or physical damage to the storage device can make stored pictures inaccessible.
- Windows updates: An upgrade or system change may cause files to appear missing or move them to another location.
Before assuming your photos are gone forever, check the Recycle Bin and other possible storage locations.
How to Find Missing Pictures on Your Computer: 5 Ways
If you have already determined that your pictures are genuinely missing, try the following methods. Start with the simplest options and move on to data recovery if the pictures cannot be found.
Way 1. Check the Recycle Bin
If you accidentally deleted your pictures using the normal Delete option, Windows may have moved them to the Recycle Bin instead of permanently removing them. This is one of the easiest ways to find missing pictures on Windows 10 or 11.
Step 1. Double-click the Recycle Bin icon on your desktop.
Step 2. Look through the deleted files for your missing pictures. Select the pictures you want, right-click them, and choose Restore. Windows will return the files to their original locations.
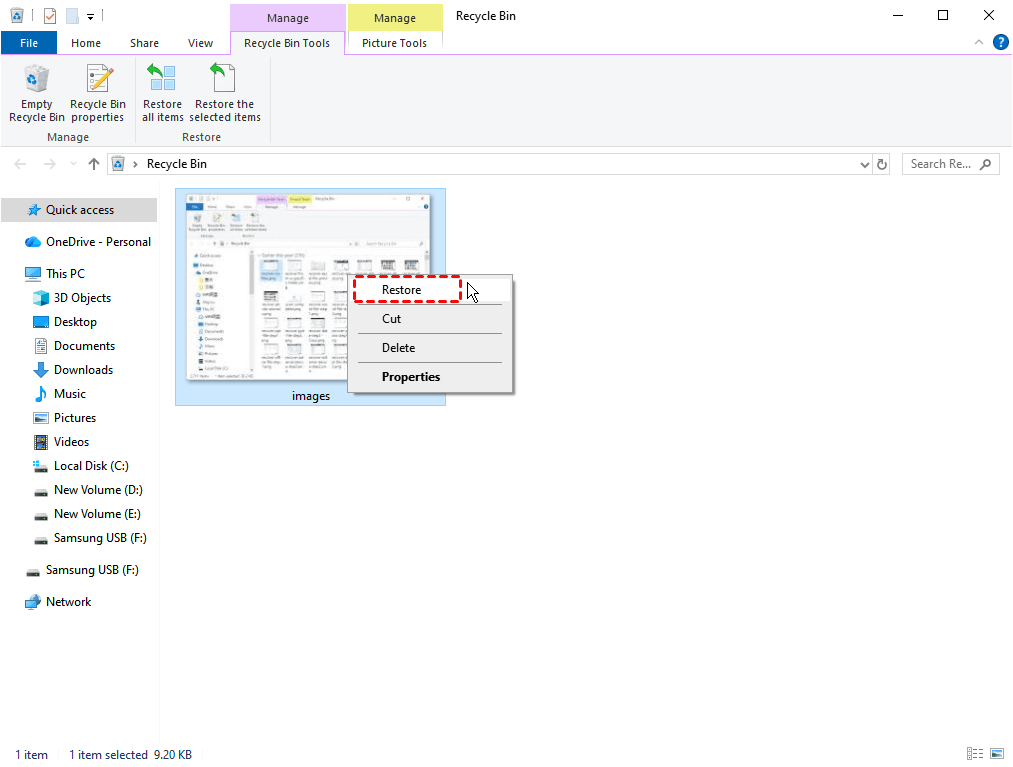
If you have already emptied the Recycle Bin, continue with one of the other recovery methods below.
Way 2. Recover Disappeared Pictures Using Data Recovery Software
If you don't have a backup and the pictures are not in the Recycle Bin, data recovery software can be an option. AOMEI FastRecovery is designed to scan Windows storage devices for deleted or lost files. It supports common image formats and provides search, filtering, and preview functions to help you identify the pictures you need.
 AOMEI FastRecovery
- Quick Scan and Deep Scan: Scan a drive for deleted and lost files using different scanning modes.
- Wide image format support: Recover common formats such as JPG, JPEG, PNG, GIF, TIF, PSD, SVG, and other supported image files.
- Search and Filter: Narrow down scan results by file name, type, size, and other available criteria.
- Different recovery scenarios: Supports deleted file recovery, Recycle Bin recovery, formatted partition recovery, and recovery from USB or SD cards.
- Windows support: Supports data recovery on Windows 11, 10, 8, 7, and Windows Server.
 100% Secure
Learn how to recover deleted photos from hard disk using AOMEI FastRecovery below:
❗ Important: If you need to recover pictures from a particular drive, avoid installing recovery software on that same drive. New data written to the drive could potentially overwrite deleted files.
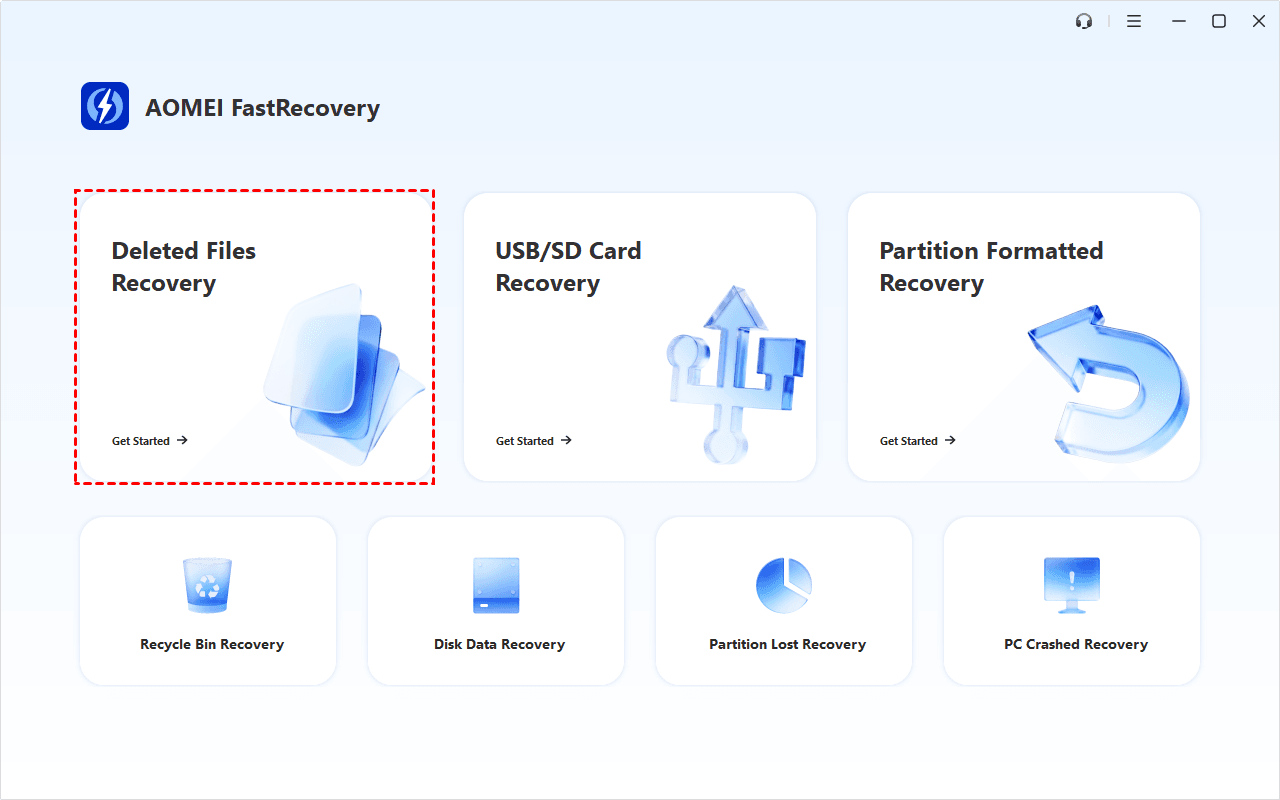
Step 1. Launch AOMEI FastRecovery and select Deleted Files Recovery from the main interface.
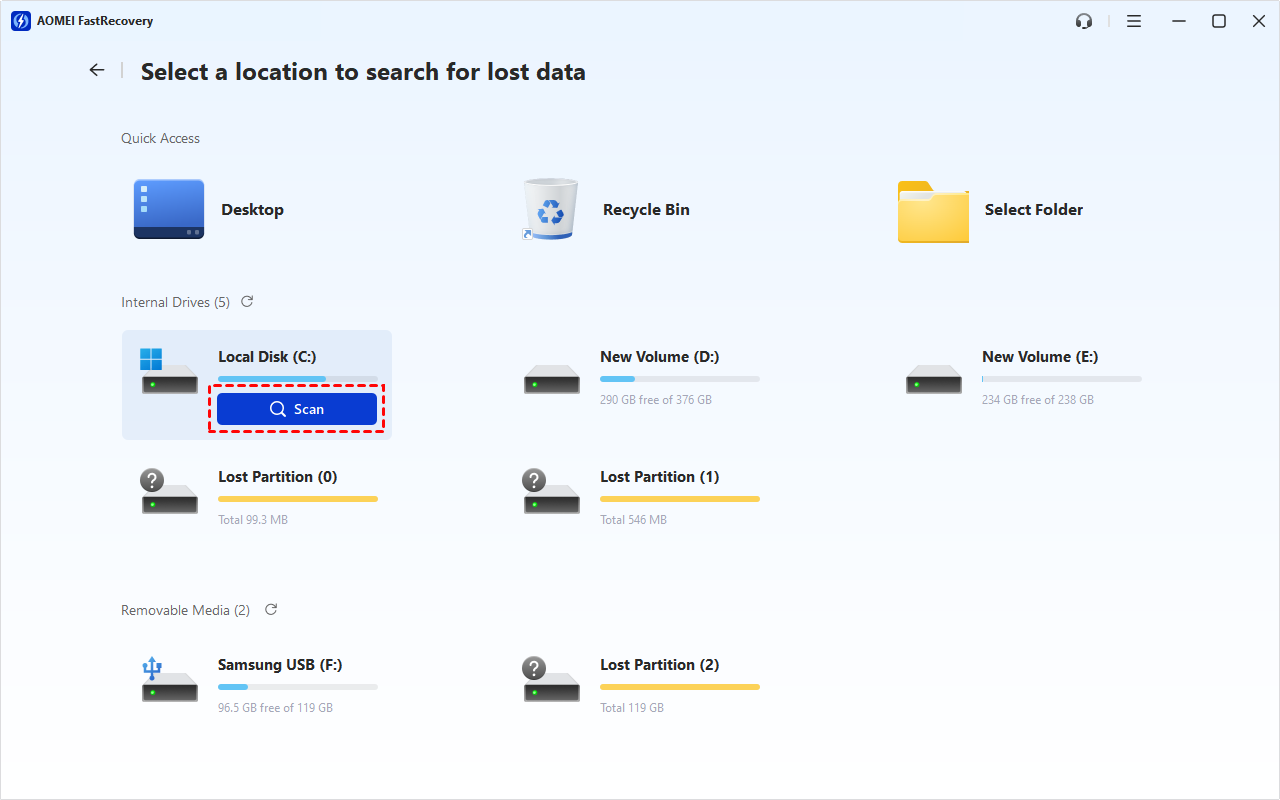
Step 2. Find the drive where the missing pictures were originally stored, hover over the drive and click Scan.
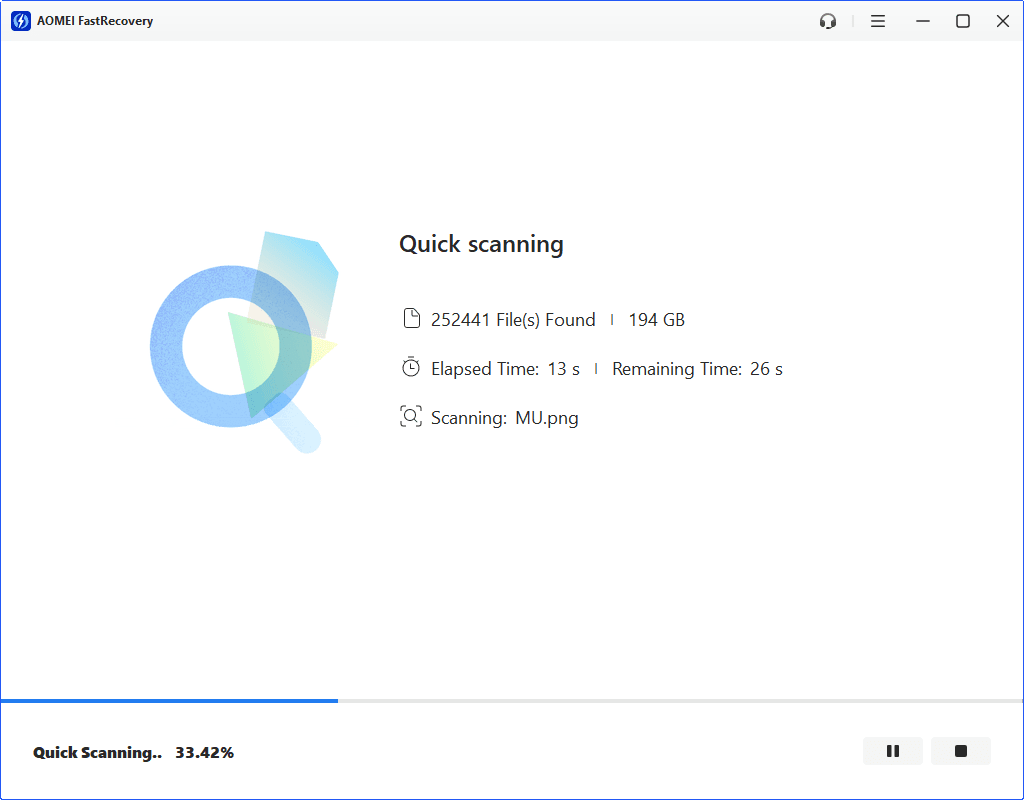
Step 3. AOMEI FastRecovery will begin with a quick scan to look for recoverable files. If you realize that you've selected the wrong drive, you can click the Stop or Pause button rather than continuing with an unnecessary scan.
Step 4. After scanning finishes, use Type, Search, and Filter to narrow down the results. For example, you can:
- Select Images to display picture files.
- Search for a specific file name or extension, such as JPG or PNG.
- Use Filter to narrow files by size or other available criteria.
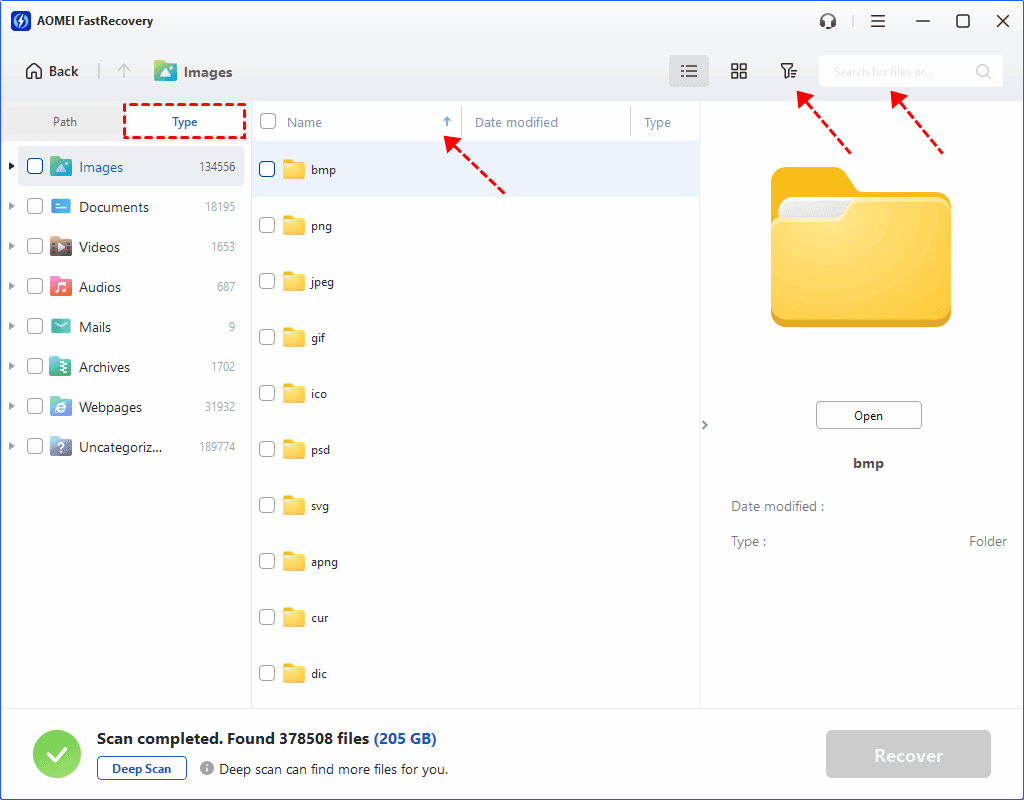
💡 Note: If the initial Quick Scan does not locate your pictures, click the Deep Scan button at the bottom left. It performs a more thorough scan and may take considerably longer.
Step 5. Select the pictures you want to restore and click Recover. When choosing the destination, save the recovered pictures to a different drive or storage device rather than the original location.
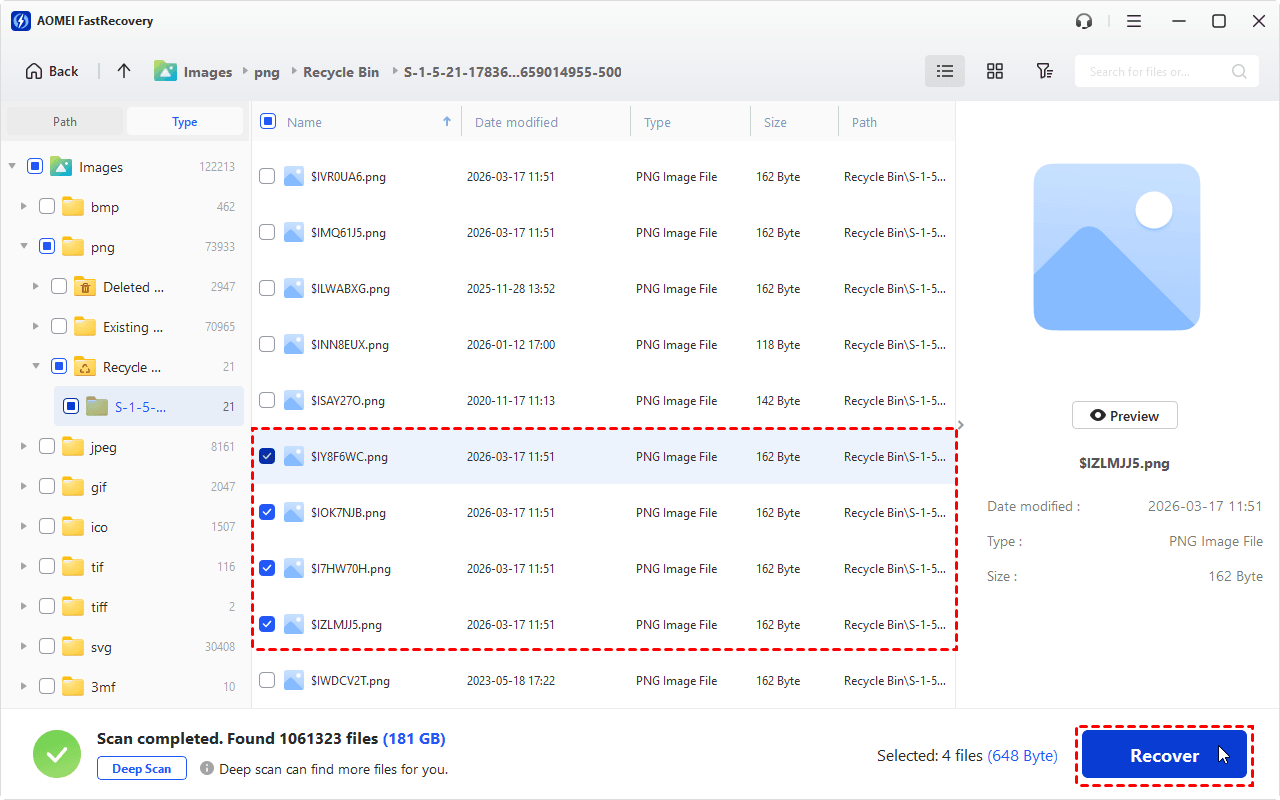
💡 Note: You can double-click a supported image to preview it before recovery. This is a paid feature.
Way 3. Restore Pictures with File History
If you previously enabled File History, you may be able to recover missing pictures from an earlier backup. File History can back up personal files stored in common user folders, including Pictures, Documents, Music, and Videos. Follow the steps below to recover pictures from computer hard drive:
Step 1. Type “file history” in the search bar and choose Restore your files with File History.
Step 2. In the pop-up window, choose what you want to restore by clicking your way through the libraries, folders, and files until you spot the pictures you’d like to restore.
💡 Note: If you cannot find the picture you want, you can type the name in the search box and hit Enter to search for it.
Step 3. If there are multiple backup versions available, click the right arrow and left arrow buttons to find the version you’d like to restore.
Step 4. Click the Restore button to restore your pictures to the original location.
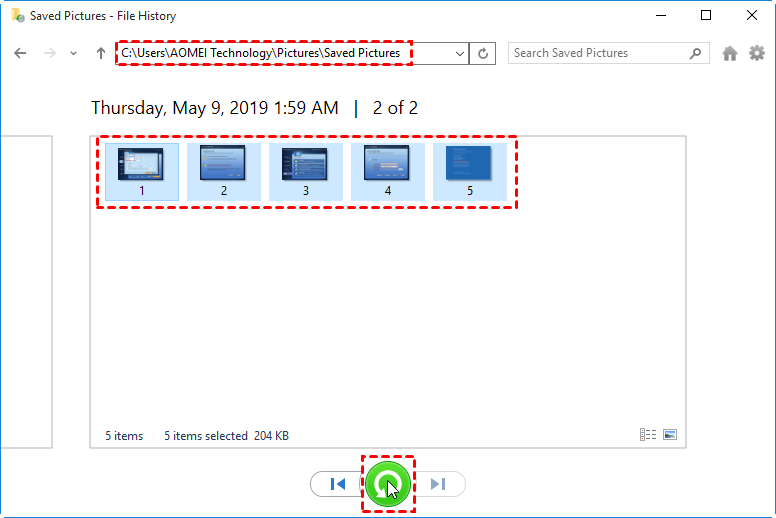
💡 Note: To restore your pictures to a new location, click the Gear icon in the upper right corner and select Restore to.
Way 4. Restore Pictures from Previous Versions
Windows may also provide previous versions of folders if you previously enabled File History or created a system restore point for the drive containing the deleted files. This method can be useful when a folder suddenly becomes empty or pictures disappear after a system change.
Step 1. Open File Explorer and navigate to the folder where your pictures were stored. Right-click the folder and select Restore previous versions.
Step 2. In the pop-up window, you'll see earlier versions of the folder. Select a version from before the pictures disappeared.
Step 3. Expand Open and select Open in File History to preview the content of the selected version. If the missing pictures are available, click Restore to get your pictures back.
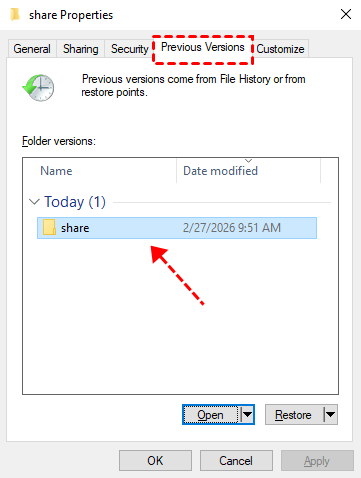
💡 Note: To avoid overwriting the current version, you can also restore to a different location by expanding Restore and selecting Restore to....
Way 5. Recover Pictures with Backup and Restore (Windows 7)
Although its name refers to Windows 7, the Backup and Restore (Windows 7) feature remains available on Windows 10 and Windows 11 systems. If you previously created a backup containing your Pictures folder, follow the instructions below to recover deleted photos from hard drive:
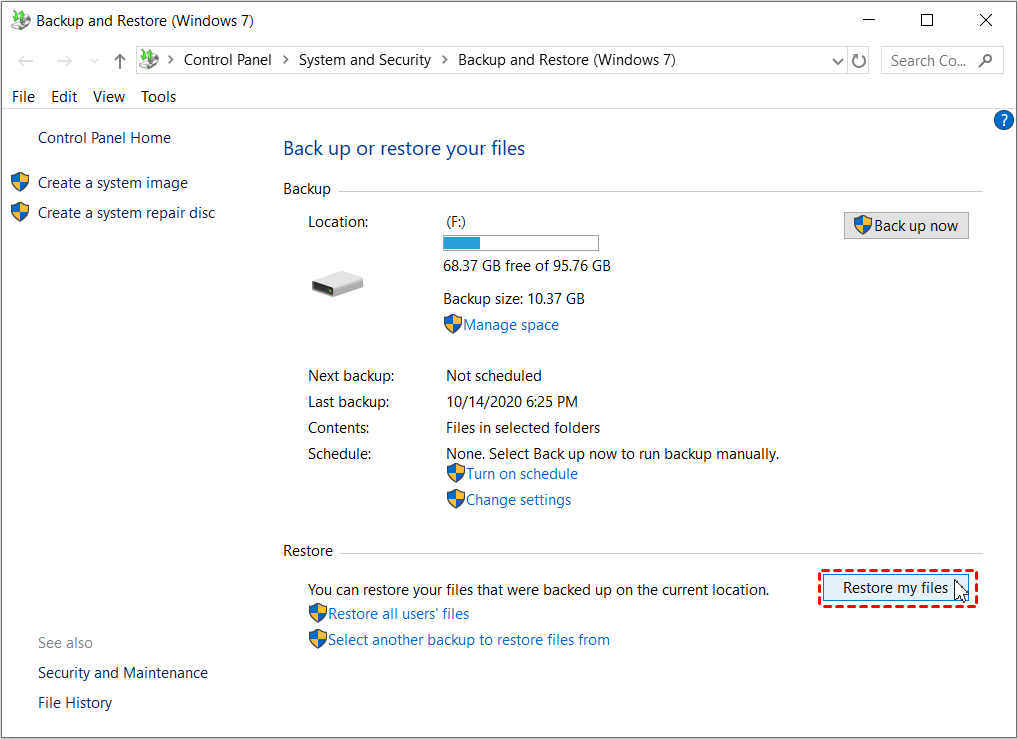
Step 1. Go to Control Panel > System and Security > Backup and Restore (Windows 7).
Step 2. When Backup and Restore (Windows 7) opens, click Restore my files.
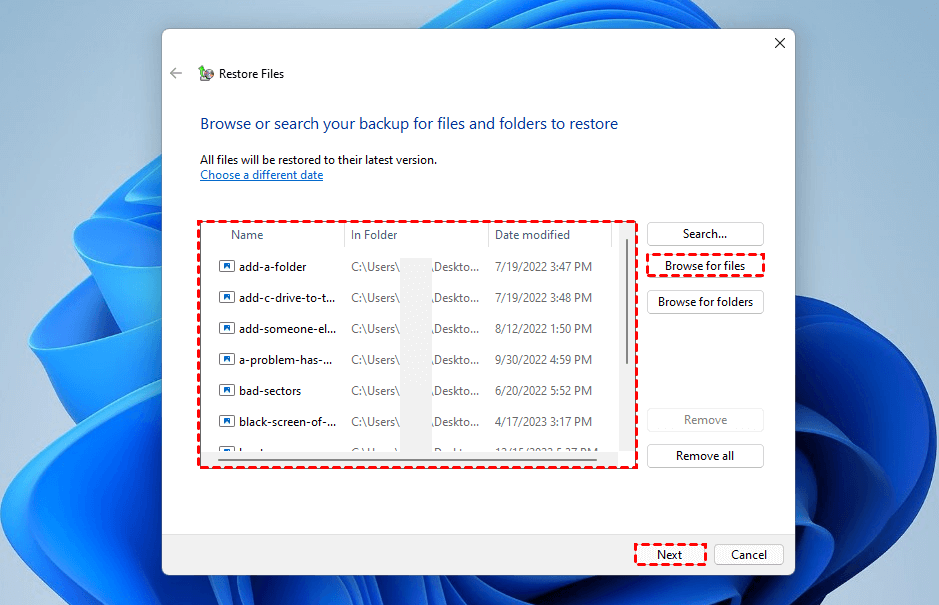
Step 3. Select Browse for files and locate the backup containing your missing pictures. Click Next after selecting the required files.
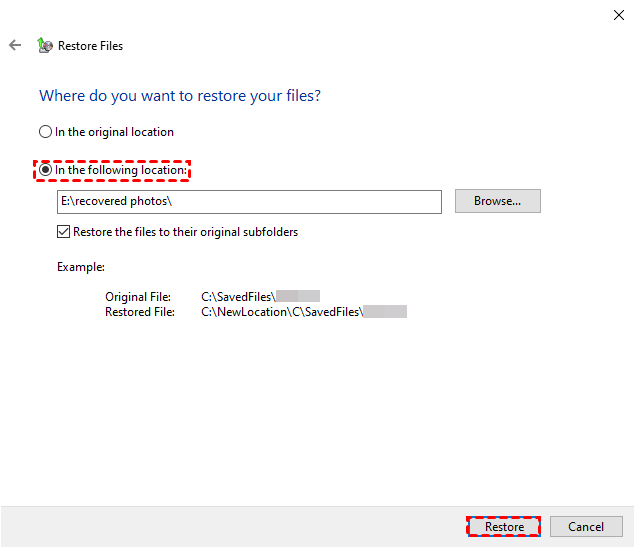
Step 4. Select where you want the recovered pictures to be saved. It is recommended to use a separate location to prevent conflicts with existing files. Then click Restore and wait for Windows to complete the process.
How to Avoid Losing Pictures Again
Once you've recovered your photos, consider creating a backup strategy so a similar problem doesn't become a major data-loss event. You can:
- Back up important pictures to an external hard drive.
- Keep another copy on a NAS or cloud storage service.
- Enable Windows backup features when appropriate.
- Create automatic backups instead of relying on a single copy.
A backup is particularly important for irreplaceable family photos and other personal images because data recovery is not guaranteed in every situation.
FAQs about Recovering Disappeared Pictures
1. How can I recover pictures lost after a Windows update?
Start by checking whether the pictures were moved or are hidden. Then try File History, Previous Versions, or Backup and Restore if a backup was created before the update. If no backup is available, stop using the affected drive as much as possible and try a data recovery tool.
2. How can I recover disappeared photos without overwriting them?
Stop saving new data to the affected drive and avoid formatting it. If you use recovery software, install it on another drive whenever possible and save recovered pictures to a separate storage device. This reduces the risk of overwriting data that may still be recoverable.
3. What should I do if all pictures disappear from an external drive?
Reconnect the external drive and check whether Windows recognizes it correctly. Look for hidden files and verify whether the drive appears in File Explorer and Disk Management. If the pictures remain inaccessible, avoid formatting the drive and use compatible data recovery software to scan it.
Wrapping Up
When all my pictures disappeared from my computer, it doesn't necessarily mean that every photo has been permanently lost. The files may still be in the Recycle Bin, an earlier backup, a previous version of the picture folder, or another location on the computer.
Start with the simplest options, such as checking the Recycle Bin and available backups. If those options don't work and you don't have a backup, AOMEI FastRecovery can scan the affected drive for recoverable pictures. Remember to minimize further use of the drive and save recovered files to a different location to reduce the risk of overwriting potentially recoverable data.

 as a preferred
source on Google
as a preferred
source on Google