
Full Guide | MBR to MBR System Disk Cloning in Windows 11/10/8/7
Look for a simple MBR to MBR cloning way? This guide shows you how to clone MBR to MBR safely using AOMEI Cloner for a smooth, bootable transition.
By Ivy Updated on May 22, 2025
Struggling to Clone MBR to MBR in Windows 11
"My old 120GB HDD holds the MBR and boot files for Windows 11, but my new 200GB drive won’t boot despite a fresh OS install. How do I transfer the MBR to the new disk?"
- Question from Quora
If this sounds familiar, you’re not alone. The Master Boot Record (MBR) is critical for launching your OS, containing partition details and executable code to initiate booting. Without cloning it properly, your new drive remains unbootable. Here’s how to clone MBR system disk effortlessly in Windows 11, ensuring your system starts up smoothly.
Preparations for Safe MBR to MBR Cloning
Before starting, power off your computer and connect the new drive (HDD or SSD) to the old one.
- For desktops, attach a new disk via SATA inside the case or USB if it’s an external enclosure.
- For laptops, install the second drive in the empty bay or use a USB adapter temporarily.
Next, boot into Windows 11 and open Disk Management (Windows + R, type diskmgmt.msc). Locate the new disk (it may be unallocated) to initialize. You will be prompted to choose a partition style: select GPT if you plan to use UEFI boot (recommended for Windows 11), or MBR if your system is legacy BIOS-only.

For most modern Windows 11 setups, GPT is best. This ensures the cloned disk will be fully compatible with UEFI mode and Windows 11 boot requirements. If you set the new disk as GPT, remember to switch your BIOS/UEFI to UEFI mode later. Cloning an MBR disk to a GPT disk requires UEFI boot support.
How to Clone MBR to MBR Easily with AOMEI Cloner
AOMEI Cloner is a powerful yet user-friendly disk cloning software designed to copy data from one hard drive to another quickly. It supports OS migration (system clone), specific partition clone, and entire disk clone, including the Master Boot Record (MBR). It ensures a smooth, error-free migration while preserving your system’s bootability.

- Flexible cloning methods to copy only used space (default clone method) from large disk to smaller disk, or make exact copy with sector-by-sector clone option.
- Optimize SSD by automatically aligning partitions to 4K sectors, boosting SSD performance.
- Full UEFI & Legacy BIOS compatibility to safely clone MBR to GPT (or vice versa) for modern or older systems.
- Bootable Media Creator feature helps you recover or clone disks even if Windows fails to boot.
Step-by-Step: MBR to MBR Cloning in Windows 11/10/Server
With the new disk connected and initialized, you’re ready to clone. AOMEI Cloner makes this straightforward:
Step 1. Install and run AOMEI Cloner. Click the “Clone”, then choose “Disk Clone”. This feature will copy the entire source disk, including all partitions and the MBR.
Step 2. Select your original disk (the one with Windows/boot files) as the source disk. On the next screen, select the new disk (the one you just connected) as the destination.
Step 3. Preview settings and click “Start Clone”. Wait for the process to complete. This may take some time, depending on the disk or data sizes.
- 🎯Pro tips:
- Select System Clone if you migrate OS to SSD or HDD only.
- Enable SSD Alignment if you clone MBR to SSD.
- You can resize partitions or convert MBR/GPT with the Edit Partition option.
After cloning, swap the old drive with the new drive, or just change the boot priority in BIOS to the new drive to boot your computer.
Updated: How to Change Boot Priority in BIOS
After cloning, you need to tell your computer to boot from the new drive:
Step 1. Restart the computer and press the BIOS/UEFI entry key (commonly F2, F10, F12, Esc, or Del) immediately during startup. Consult your PC’s manual if you’re not sure.
Step 2. In the firmware setup, locate the Boot or Startup section. You should see a list of boot devices.
Set the new disk as the first boot device. In UEFI mode, you may see a name or number for the cloned disk (e.g., “UEFI: NewDiskName”). In legacy mode, it may be listed by disk model.
Step 3. Save and exit (usually F10). The system will reboot, and Windows should load from the new drive.
Troubleshooting: Cloned Drive Won’t Boot in Windows
Sometimes, you may find that the target drive will not boot as expected after cloning. Don’t worry. Follow this guide to check and fix it.
The most likely reasons for an unbootable cloned drive:
#1: Incorrect Boot Order in BIOS/UEFI
You can follow the updated guide to change the boot order step by step.
#2: Missing or Corrupted Boot Files
If the cloning process skipped essential boot files (like bootmgr or BCD), Windows won’t load. You can use Windows Recovery to rebuild boot files.
Boot from a Windows installation USB. Select Repair your computer > Troubleshoot > Command Prompt. Run the command:
- bootrec /fixmbr
- bootrec /fixboot
- bootrec /scanos
- bootrec /rebuildbcd
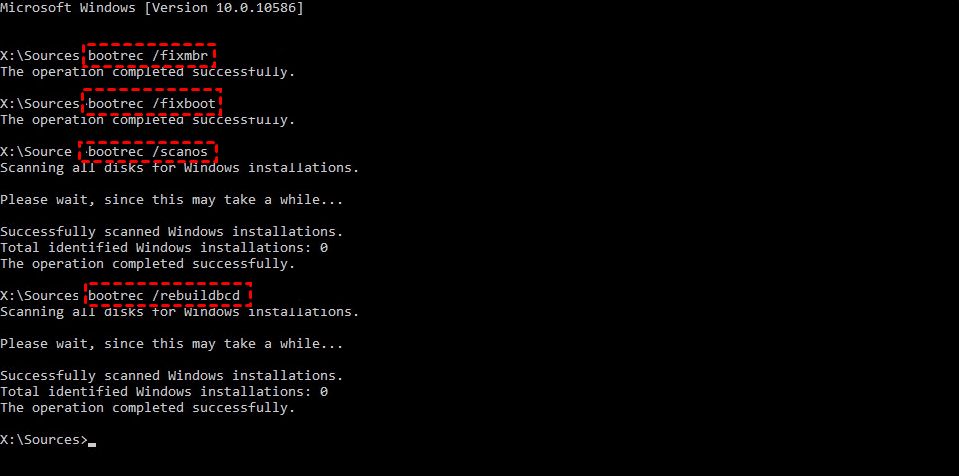
Then, the issue should be fixed.
#3: MBR/GPT Mismatch
If the source disk was MBR but the destination is GPT (or vice versa), your PC may not recognize the bootloader.
For UEFI systems: Ensure the cloned disk is GPT and enable UEFI mode in BIOS. For Legacy BIOS: Convert the disk to MBR using DiskPart (convert mbr).
#4: Drive Not Set as "Active" (MBR Disks Only)
The boot partition must be marked "Active" for MBR disks. You can run these commands in DiskPart (from Windows Recovery or another PC) to fix:
- list disk
- select disk X (replace X with your cloned disk)
- list partition
- select partition Y (select the boot partition)
- active
- exit
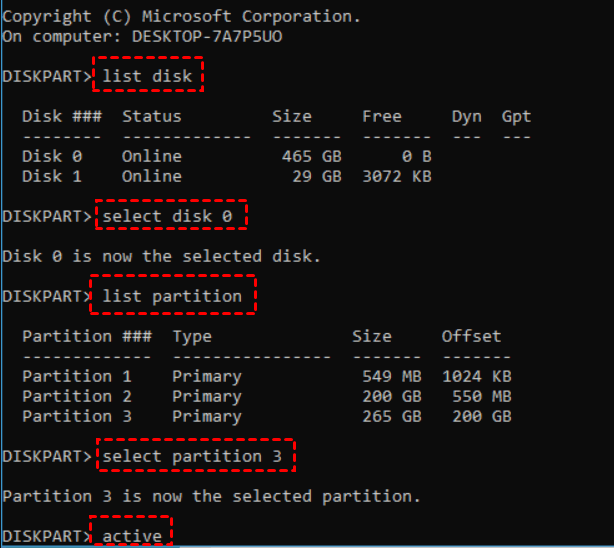
Then restart your computer and try again.
#5: Cloning Errors (Bad Sectors or Incomplete Copy)
If the cloning process is interrupted, the new drive may be corrupted. Re-clone the drive using AOMEI Cloner (ensure "Sector-by-Sector" mode is enabled). Please check the source disk for errors (chkdsk /f /r) before cloning.
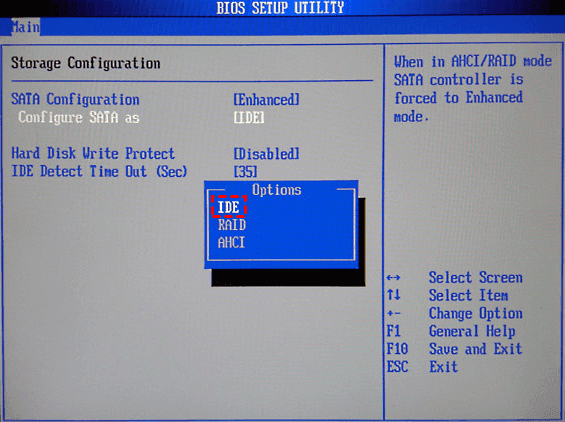
#6: Incompatible Hardware (Storage Controller Mode)
Some systems require AHCI/IDE mode changes for booting. You can enter BIOS and switch SATA mode between AHCI/IDE/Raid.
FAQs on MBR to MBR Cloning in Windows
1. What is MBR to MBR cloning?
MBR (Master Boot Record) cloning copies all partitions, boot files, and the disk structure from one MBR-formatted disk to another, ensuring the new drive is bootable.
2. Can I clone an MBR disk to another MBR disk without losing data?
Yes, cloning is non-destructive if done correctly. However, back up important data before cloning in case of errors.
3. Can I clone an MBR disk to a smaller drive?
Yes, if the used space is smaller than the target disk. Use sector-by-sector cloning in AOMEI Clonerif partitions must stay identical.
4. Can I clone an MBR disk to a USB drive?
Yes, but the USB must be set as bootable in BIOS. Some tools (like Rufus) can help make it bootable after cloning.
Final Thoughts
Performing MBR to MBR cloning in Windows 11 is essential when upgrading to a new drive, especially if you want your system to remain bootable without reinstalling Windows.
This article walked you through every step, from preparing and initializing the new disk to using AOMEI Cloner to perform a full disk clone, optimizing for SSDs, and setting the correct boot order in UEFI. Whether you're upgrading your laptop or desktop, the process is streamlined and beginner-friendly.
