
How to Install Samsung 860 EVO SSD in Laptop [Full Guide]
In this article, you’ll learn how to install Samsung 860 EVO SSD in laptop without reinstalling Windows. All necessary steps are included. Scroll down to learn more.
By Ivy Updated on May 22, 2026
Installing Samsung 860 EVO SSD in laptop can make a big difference. It speeds up how quickly your laptop starts, loads apps, and saves files. SSDs are faster and more reliable than regular hard drives, plus they use less battery. This article will give you a simple, step-by-step guide on how to install Samsung 860 EVO SSD inlaptop.

🌟 To check more scenarios about Samsung SSD clone, please refer to this complete guide: Clone HDD to Samsung SSD.
What Do You Need While Installing Samsung 860 EVO SSD in Laptop?
Before installing your Samsung 860 EVO SSD, it's important to gather the necessary tools and materials. Here’s a list of what you'll need:
- A new, larger Samsung 860 EVO SSD, prefer with double or triple capacity.
- Be sure your laptop supports 2.5-inch SATA drives, as the Samsung 860 EVO is a 2.5-inch SATA SSD.
- A small phillipsscrewdriver(preferably #00 or #000).
- A SATA-to-USB cable, adapter, or enclosure for connecting while cloning.
- Always backup important data before installing.
- A reliable Samsung SSD cloning software.
How to Install Samsung 860 EVO SSD in Laptop without Reinstalling Windows
Here’s how to install Samsung 860 EVO SSD in laptop step by step. To transfer everything, including the current OS, system settings, installed programs, etc., without requiring manual file transfers, it’s suggested to clone hard drive to Samsung 860 EVO SSD. For a fresh install, click: Install Windows 10 on SSD without removing HDD.
Part 1: Initialize Samsung 860 EVO SSD in Disk Management
Initializing Samsung 860 EVO SSD means preparing it for use by creating a partition and formatting it, usually done within Disk Management.
Step 1. Connect the Samsung 860 EVO SSD to your laptop externally using a SATA to USB cable, adapter, or enclosure.
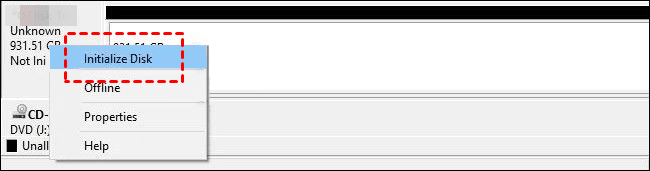
Step 2. Right-click the Start Menu and select Disk Management to access it. Then, locate the Samsung 860 EVO SSD, displaying as Disk 1, Unallocated, etc., with full capacity, right-click it and select Initialize Disk.
Step 3. Select the disk partition style - GPT or MBR, and click OK. GPT disk is recommended for modern systems and larger drives (over 2TB) as it supports UEFI boot mode and is more flexible for future upgrades.

Optionally, you can right-click the unallocated space of the Samsung 860 EVO and select New Simple Volume to create a new partition.
Part 2: Clone Hard Drive to Samsung 860 EVO SSD
Cloning hard drive in laptop to Samsung 860 EVO SSD is the most effective method to transfer everything from HDD to SSD. However, selecting reliable Samsung SSD cloning software is crucial, which AOMEI Cloner can assist with.

- Offers 3 flexible cloning options, including Disk/System/Partition Clone, to meet different migration needs.
- Supports cloning between different disk partition styles without compatibility issues.
- Allows cloning drives of different capacities (e.g., clone larger drive to smaller drive), making disk upgrades and replacements easier.
- Fully compatible with all Samsung SSD series, such as 860 EVO, 870 EVO, 980 Pro, 990 Pro, and 970 EVO Plus.
Step 1. Open AOMEI Cloner after installing, click Clone > Disk Clone.
Step 2. Select the current system drive and Samsung 860 EVO SSD, respectively. Don’t mix them, as the target drive will be deleted during cloning.
Step 3 (IMPORTANT). It will auto-resize the new, larger drive to full capacity. You can click Edit Partitions to confirm this and, optionally, convert MBR to GPT, or GPT to MBR. Also, it’s suggested to enable SSD Alignment for best performance. Confirm and click Start Clone.
⚠️Note: By default, Sector by Sector Clone is unchecked as this software uses Intelligent Clone - cloning only used sectors while skipping bad sectors. This mode is best for cloning large HDD to smaller SSD.
Part 3: How to Install Samsung 860 EVO SSD in Laptop
Now, it’s time to install Samsung 860 EVO SSD in laptopand attempt to boot from it. The installation process varies depending on the laptop model, but the basic steps are largely the same.
- Open the back cover and remove the old drive.
- Install the new SSD.
- Reassemble the laptop and attempt to start it up.
Disclaimer: This is a general step-by-step guide. For specific SSD installation steps for your laptop model, please refer to the corresponding iFixit teardown manual or the manufacturer's official documentation.
Step 1. Shut down your laptop completely and disconnect the power adapter. If your laptop has a removable battery, remove it as well for extra safety.
Step 2. Turn your laptop upside down and locate the drive bay, usually under a panel marked with a hard drive symbol or labeled as "HDD/SSD". Unscrew the panel and remove it using the Phillips screwdriver. You may need to unscrew additional screws to access the drive.
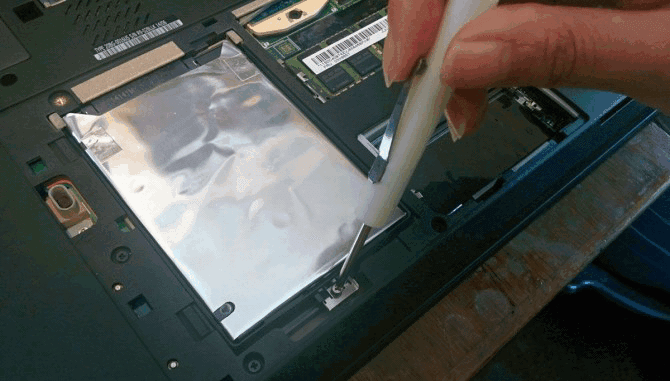
Step 3. Gently lift and pull the existing drive out of the connector. Unscrew or slide the drive out carefully (if there is a plastic tab or mounting bracket holding it in place), and remove the drive. If it is installed with a bracket or caddy, remove the drive from it first.
Step 4. Put the Samsung 860 EVO SSD into the existing bracket or caddy (if there is). Or just slide the SSD into the SATA connector until it’s fully seated. Be sure to carefully align the connectors of the SSD with the SATA slot inside the laptop drive bay.
Step 5. Once the SSD is properly installed, replace the cover panel and screw it back into place. Make sure all screws are tightened and secure. Reinstall the battery (if previously removed) and reconnect the power adapter.
Step 6. Turn on the laptop for the first boot. Sometimes, you still need to adjust the boot order in the BIOS/UEFI settings window. Just restart it and press the BIOS key, usually F2, F10, F12, ESC, etc. Under the Boot tab, set the cloned SSD as the first option, and save changes.
⚠️Note: After startup, you still need to update all necessary drivers. Make sure your computer hasthe latest drivers and firmware to ensure compatibility with the new SSD.
FAQs about Installing Samsung 860 EVO SSD in Laptop
1. Can I install a Samsung 860 EVO SSD in any laptop?
No, you can’t install a Samsung 860 EVO SSD in any laptop. Not every laptop supports the Samsung 860 EVO. You need to check whether your laptop has a compatible 2.5-inch SATA drive bay and supports SATA SSDs.
2. Do I need extra cables or brackets to install Samsung 860 EVO in a laptop?
Usually, you don’t need extra cables or brackets to install Samsung 860 EVO in a laptop. However, some laptop models may need a mounting bracket, spacer, or drive caddy for proper installation.
3. How can I transfer Windows to the Samsung 860 EVO without reinstalling?
You can transfer Windows to the Samsung 860 EVO without reinstalling by using disk cloning software such as Samsung Data Migration or AOMEI Cloner. They can clone your existing system drive to the Samsung 860 EVO.
4. Why does Samsung Data Migration fail or stop midway?
If Samsung Data Migration fails or stops midway, possible causes include bad sectors on the source drive, incompatible drivers, partition errors, fragmented metadata, or unstable USB connections. You may try alternative tools like AOMEI Cloner.
Conclusion
This is a full guide on how to install Samsung 860 EVO SSD without reinstalling, and cloning is the easiest method is transfer everything from HDD to SSD. Be sure to prepare all necessary tools and materials. Of course, if you want a fresh version of Windows, you can choose to clean install Windows.
