
Worry-FREE IDE Hard Drive Cloner Download (Max 4 Steps)
This guide describes a hassle-free and efficient IDE hard drive Cloner tool - AOMEI Cloner, and how to clone IDE to SATA HDD/SSD without reinstalling Windows. Scroll down to learn more.
By Ivy Updated on May 22, 2025
Why Clone IDE Drive to SATA?
IDE and SATA are two disk interfaces for connecting devices to a computer system bus, but IDE is now considered obsolete, while SATA remains the most widely used interface for HDDs and SATA-based SSDs.
What’s more, SATA drive usually has a higher performance, larger capacity, better compatibility, easier connectivity, etc., which makes them a good choice to clone IDE drive to SATA drive. Here are some key differences between them in the following chart:
|
|
IDE |
SATA HDD/SSD |
|
Released date |
1986 |
2003 |
|
Capacity |
Up to 500GB (rarely 1TB max) |
Up to 8TB HDDs/4TB SSDs |
|
Transfer speed |
Up to 133MB/s |
Up to 600MB/s |
|
Hot-plug |
Not support |
Supported |
|
Form factor |
3.5" and 2.5" PATA connectors |
2.5", 3.5", M.2, U.2 (for SSDs) |
|
Connection |
High demand on Jumper settings |
Directly connected to the computer |
|
Common usage |
Legacy system, old desktops or laptops (Windows 7 & earlier) |
Modern Windows PCs and servers |
In addition, cloning IDE drive to SATA HDD/SSD will include the operating system, installed programs, your data, etc., on the IDE hard drive. So you don’t need to reinstall Windows from scratch, saving much time and effort.
4 Steps to Clone IDE Drive to SATA HDD/SSD
Here’s how to clone IDE drive to SATA HDD/SSD in 4 steps. Before cloning, you must be sure your motherboard supports the SATA interface and prepare a SATA connection and a power cable. If not, you must purchase a SATA to IDE converter to connect your SATA drive.
Step 1. Initialize Your SATA Drive(Optionally)
If your SATA HDD/SDD is brand new, you must initialize it before using it. If not, you can skip this step and directly navigate to Step 2.
1. Connect your SATA hard drive to your computer using the SATA cable and power cable or a SATA to IDE converter. Then, press Win + R to open the Run dialog box. Type diskmgmt.msc and press OK to access Disk Management.
2. In Disk Management, locate and right-click your SATA hard drive and select Initialize Disk.
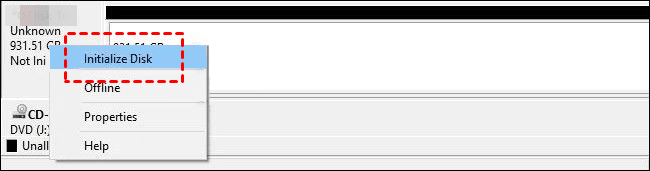
3. Select to initialize disk as MBR (Master Boot Record) or GPT(GUID Partition Table). Then, click OK to start the disk initialization process.

- Note: MBR disk is limited to 2TB while GPT does not have such a limitation. In addition, MBR disk is more suitable for old computers using Legacy BIOS, and GPT disk is for modern UEFI systems.
Step 2. Set SATA Drive to IDE Mode in BIOS
Also, you still need to adjust several BIOS settings for cloning IDE drive, which helps to avoid boot issues to some extent.
1. Restart your computer. When you see the initial screen, press the BIOS key, e.g., F2, F10, ESC, etc., usually in the lower right corner.
2. Click the Main menu, scroll down to SATA Configuration/SATA Mode, and select IDE mode instead. Alternatively, it can also be found in the Advanced or Integrated Peripherals menus.
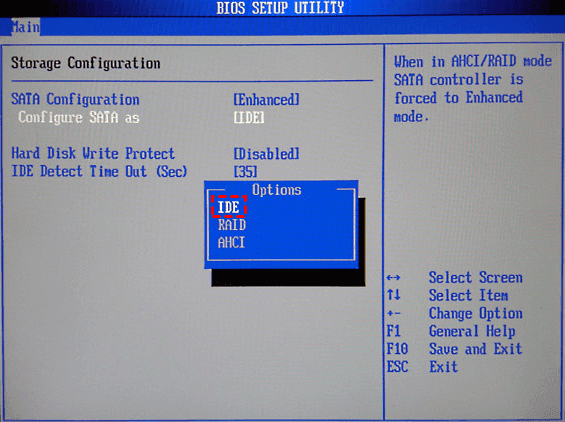
3. Press F10 to save changes and reboot your computer.
Step 3. FREE Download IDE Hard Drive Cloner for Cloning
AOMEI Cloner is a worry-free and effective cloning software for Windows 7, 8, 10, 11, and servers that can clone the entire disk, either HDDs or SSDs, including the operating system, installed software, all the data on the IDE drive, etc.

- 👑 Bootable clone: Clone HDDs/SSDs or MBR/GPT system disks without boot issues.
- Intelligent clone (default): It only clones the used sectors of a drive, saving your precious time and disk space.
- Edit Partitions: It comes in handy when cloning IDE drive to larger SATA HDD/SSD, especially those with different disk partition styles(one MBR, one GPT).
- SSD Alignment: It helps align SSD with 4k technology and improve the lifespan.
- Disk compatible - It works perfectly with different disks, whether they are using IDE, SATA, M.2, NVMe, PCIe, and more.
1. Connect the SATA drive to your computer using SATA to USB adapter. Then, open AOMEI Cloner, click Clone > Disk Clone.
2. You will then be asked to select the source and destination disks. Select the IDE hard drive and prepared SATA drive (with equal or larger capacity) and click Next after each selection.
- Warning: The existing partitions on the destination disk will be overwritten or deleted. Please backup them if there is any important data first. If not, click OK to continue.
3(Important). Configure some necessary settings for cloning. Be sure to check the SSD Alignment feature to align SSD for better performance. You can also enjoy the Edit Partitions feature in the following two situations.
- The target SSD drive is larger. Select “Add unused space to all partitions” or “Manually adjust partition size”, which can avoid cloned hard drive shows wrong size.
- Both drives have different partition styles (one MBR, one GPT). Check the option “Convert the destination disk from MBR to GPT” or vice versa to make them identical.
4. Be sure your settings and click Start Clone to clone IDE drive.
By default, this software will enable the intelligent clone feature to clones only used sectors of a drive. It can avoid the cloned SSD won’t boot issue to the greatest extent possible (if it’s smaller).
Download it to have a try if you want a fast and safe way to clone IDE to SATA HDD/SSD!
Step 4. Boot from the SATA Hard Drive(After Cloning)
After cloning, you still need to replace the IDE hard drive with a SATA HDD or SSD in your laptop or desktop and set the new HDD or SSD as the primary drive in BIOS. So you can boot from it successfully. Here, take a laptop as an example:
1. Press the power button and wait a few seconds to make sure the computer is off completely. Unplug the power source and disconnect the battery as well(If convenient).
2. Remove the screws on the back cover and open it carefully.
3. Then, locate the hard drive slots and unscrews the screws securing it.
4. Gently slide the SATA HDD or SSD into it at a proper angle. Please secure it with the screws.
5. Reinstall the back cover and secure it with the screws. Reconnect the battery and power source as well.
6. Start your computer and press the BIOS key, usually F2, F10, F12, or Del.
7. In the BIOS/UEFI settings window, switch to the Boot tab and set the SATA HDD or SSD as the first drive.
8. Save the changes and restart the computer. It will boot from the SATA HDD or SSD automatically.
Closing Words
With the help of IDEO hard drive cloner, AOMEI Cloner, you can easily clone IDE to SATA HDD/SSD without reinstalling Windows. The installed programs and personal data are still kept intact. Before starting, please initialize the disk and set it to IDE mode. Otherwise, the cloning process may run into issues.
