
How to Clone IDE Drive to SATA HDD/SSD (Bootable)
This article describes how to clone IDE drive to SATA HDD/SSD and make the cloned drive bootable in Windows 7, 8, 10, 11, etc. Click to learn more.
By Ivy Updated on May 22, 2025
How to clone IDE to a SATA for boot drive
I have a 250Gb Samsung IDE HDD and want to "clone" it to a SATA II HDD. I want to remove the IDE HDD and use the SATA HDD as my main drive. Is this possible? If so, what software do I need to do this? I have read that in those who have tried, it didn't work out that well. My OS is WinXP 32 bit.....- From forums.tomshardware.com
Both IDE and SATA are two disk interfaces for connecting hard drive in a computer. What are the differences between IDE and SATA? Why and how to clone IDE drive to SATA HDD/SSD? What should I pay attention to?
- Question from Reddit
IDE vs SATA: Key Differences & Benefits
IDE is an older disk interface released in 1986, typically used in legacy systems, older desktops or laptops (Windows 7 and earlier). SATA HDD/SSD is a newer disk interface introduced in 2003 and is more compatible with modern Windows PCs and servers.
Typically, SATA drives are more popular, offering higher performance, larger capacity, better compatibility, easier connectivity, etc. Thus, many users want to clone IDE drive to SATA drive for boot drive. Check the key differences in the following chart:
|
|
IDE |
SATA HDD/SSD |
|
Capacity |
Up to 500GB (rarely 1TB) |
Up to 8TB HDDs/4TB SSDs |
|
Transfer speed |
Up to 133MB/s |
Up to 600MB/s |
|
Form factor |
3.5" and 2.5" PATA connectors |
2.5", 3.5", M.2, U.2 (for SSDs) |
|
Hot plug |
Not support |
Supported |
|
Connection |
High demand on Jumper settings |
Directly connected to the computer |
In addition, cloning IDE drive to SATA HDD/SSD will include the operating system, installed programs, your data, etc., on the IDE drive. So you don’t need to reinstall Windows, saving much time and effort.
What Do You Need?
Now you may want to clone your IDE drive right away, but don't rush, there are a few things you need to be surebefore that.
#1: Check if your motherboard supports SATA interface. You can then get a SATA cable and power cable to connect the SATA drive. If not, you need to use SATA to IDE adapter. Here are some of the best options:
|
Adapter/Docking |
Standalone Clone |
IDE Support |
USB Version |
Drive Compatibility |
Extra Features |
|
Sabrent EC-UEIS7 (Adapter Cable) |
❌ |
✅ |
USB 3.0 |
2.5"/3.5" SATA & IDE |
Includes power supply, plug & play |
|
StarTech USB3SSATAIDE (Docking Station) |
✅ |
✅ |
USB 3.0 |
2.5"/3.5" SATA & IDE |
LED clone progress, no PC needed; dual-bay design |
|
Unitek Y-3324 (Universal Adapter) |
❌ |
✅ |
USB 3.0 |
2.5"/3.5" SATA & IDE |
Compact design, low cost |
|
WAVLINK WL-ST333U (Docking Station + Clone) |
✅ |
✅ |
USB 3.0 |
2.5"/3.5" SATA & IDE |
LED progress, one-touch clone button; Dual slots for SATA + IDE |
#2: Be sure the SATA drive is larger than or equal to IDE drive. Note that the existing partitions on the destination disk will be overwritten or deleted. Please backup files to external hard drive (if there are).
#3: Optionally, initialize the disk (if it’s a brand-new one).
#4: Set SATA drive to IDE mode before cloning.
#5: Test the cloned drive after cloning to be sure it is bootable (for the system disk).
4 Steps to Clone IDE Drive to SATA HDD/SSD
Cloning IDE drive to SATA HDD/SSD is challenging, especially for those new to hardware and data migration. But if well prepared, you can do it. Note that the IDE drives usually require a dedicated power source. Don’t skip this.
Step 1. Initialize Your SATA Drive(Optionally)
If your SATA HDD/SDD is brand new, you must initialize it before using it. If not, you can skip this step and directly navigate to Step 2.
1. Connect your SATA hard drive to your computer using the SATA cable and power cable or a SATA to IDE adapter.
2. Then, press Win + R to open the Run dialog box. Type diskmgmt.msc and press OK to access Disk Management.
3. In Disk Management, locate and right-click your SATA hard drive and select Initialize Disk.
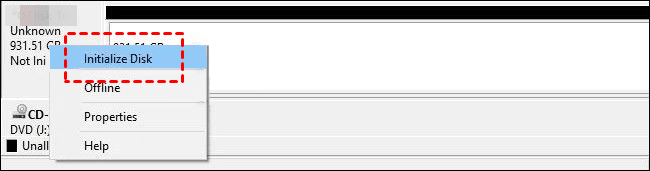
4. Select to initialize disk as MBR(Master Boot Record) or GPT(GUID Partition Table).

💡 Note that MBR is recommended for older computers with legacy BIOS (≤ 2 TB) and GPT for modern UEFI systems (≥ 2 TB). Then click OK.
Step 2. Set SATA Drive to IDE Mode in BIOS
Also, it’s necessary to adjust the BIOS settings to avoid boot issues after cloning.
1. Restart your computer. On the initial screen, press the BIOS key, e.g., F2, F10, ESC, etc., usually in the lower right corner to access the BIOS/UEFI settings window.
2. Click the Main menu, scroll down to SATA Configuration/SATA Mode, and select IDE mode instead. You can also find it in the Advanced or Integrated Peripherals menus.
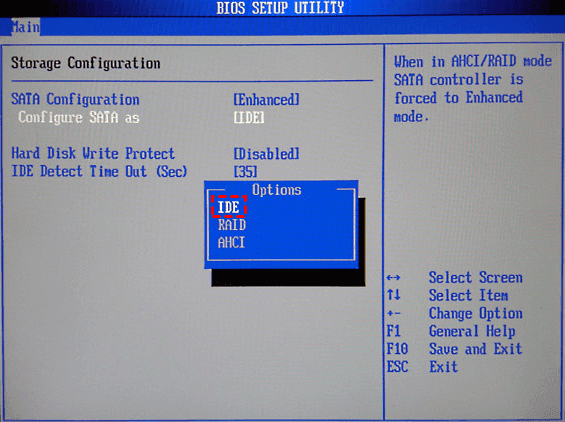
3. Then, press F10 to save changes and reboot your computer.
Step 3. Clone IDE Drive to SATA HDD/SSD with Software
AOMEI Cloner is a reliable IDE hard drive cloner in Windows 7, 8, 10, 11, and servers that can clone the entire disk, either HDDs or SSDs, including the operating system, installed software, all the data on the IDE drive, etc. You can also choose to clone the OS only.

- Bootable clone - The SATA HDD/SSD will remain bootable after cloning.
- Intelligent clone (default) - clones the only used sectors of a drive and can skip bad sectors as well, making cloning disks more flexible.
- Edit partitions - resize partition when cloning IDE drive to larger SATA HDD/SSD, especially those with different disk partition styles(one MBR, one GPT).
- SSD alignment - align SSDs with 4k technology to improve performance and longevity.
- Disk compatibility - work perfectly with different disk brands, such as Samsung, WD, SanDisk, Crucial, Corsair, etc., whether they are using IDE, SATA, M.2, NVMe, PCIe, and more.
1. Connect the SATA drive to your computer using a SATA cable and a power cable or a SATA to IDE adapter. Then, open AOMEI Cloner, click Clone -> Disk Clone.
2. You will then be asked to select the source and destination disks. Select the IDE hard drive and a prepared SATA drive (with equal or larger capacity), and then click Next after each selection.
- 📢Warning: The existing partitions on the destination disk will be overwritten or deleted. Please backup them firstif there are any important data. If not, click OK to continue.
3(Important).Be sure to check the SSD Alignment feature to align the SSD for better performance (if it is). You can also click the Edit Partitions feature for smooth cloning in the following two situations. At last, click Start Clone to clone IDE drive to SATA HDD/SSD.
- The target HDD/SSD is larger. Select “Add unused space to all partitions”or “Manually adjust partition size”, which can avoid unallocated space left after cloning.
- Both drives have different partition styles (one MBR, one GPT). Check the option “Convert the destination disk from MBR to GPT” or vice versa to make them identical.
By default, this software will enable the intelligent clone feature to clone only uthe sed sectors of a drive. It can avoid the cloned SSD won’t boot issue to the greatest extent possible (if it’s smaller).
Download AOMEI Cloner to clone IDE drive in 3 easy steps!
Step 4. Boot from the SATA Hard Drive(After Cloning)
It doesn't end after cloning, and you still need to swap IDE and SATA drives to test if the cloned drive is bootable, especially for system disk. Here is are overview of steps (laptops and desktops are similar):
1. Shut down your computer completely. Press the power button and wait a few seconds to make sure the computer is off completely. Unplug the power source and disconnect the battery as well(If necessary).
2. Remove the screws on the back cover and open it carefully.
3. Then, locate the hard drive slots and unscrews the screws securing it.
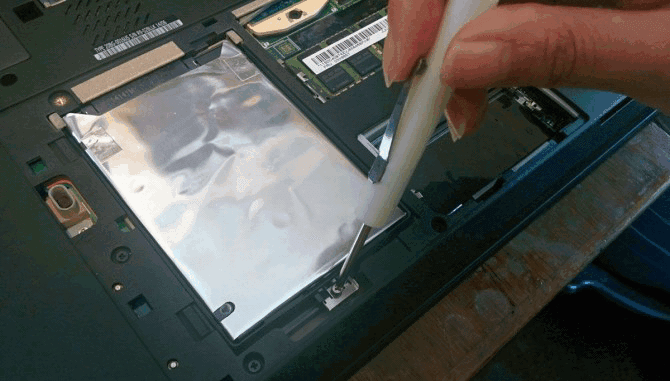
4. Gently slide the SATA HDD or SSD into it at a proper angle. Please secure it with the screws.
5. Reinstall the back coverand secure it with the screws. Reconnect the battery and power source as well.
6. Start your computer and press the BIOS key, usually F2, F10, F12, or Del.
7. In the BIOS/UEFI settings window, switch to the Boot tab and set the SATA HDD or SSD as the first drive.
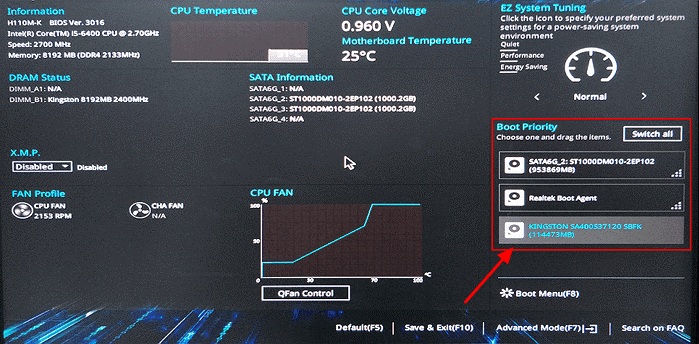
8. Save the changes and restart the computer. It will boot from the SATA HDD or SSD automatically.
Closing Words
With the help of a reliable IDE hard drive cloner - AOMEI Cloner, you can easily clone IDE to SATA HDD/SSD in 3 easy steps. You can then try to boot from the cloned drive and see if it’s bootable.
Before starting, you need to prepare an SATA cable and power cable or SATA to IDE adapter to connect your SATA drive for cloning. Also, please initialize the disk (if it’s brand-new) and set it to IDE mode for smooth cloning.
