
Rufus Not Working on Windows 11? Solved Now!
Having trouble with Rufus on Windows 11? This guide provides solutions for common failures, whether you're creating a bootable USB or installing Windows.
By Lily Updated on December 31, 2025
What Does “Rufus Not Working” Mean on Windows 11?
When users say Rufus is not working on Windows 11, it usually doesn’t mean the tool won’t launch at all. In most cases, Rufus opens successfully but fails at a critical step during bootable USB creation or installation preparation. These failures are often caused by Windows 11’s stricter security requirements, firmware compatibility issues, or incorrect configuration settings.
Read on to get solutions to Rufus not working on Windows 11 during bootable USB creation or Windows installation.
👉 Case 1: Rufus Not Working on Windows 11 When Creating Bootable USB
👉 Case 2: Rufus Windows 11 Not Working When Installing Windows
👉 Bonus: Alternative Tool to Create Windows 11 Bootable USB🔥
Case 1: Rufus Not Working on Windows 11 When Creating Bootable USB
When Rufus fails during the bootable USB creation process on Windows 11, the problem is usually related to incorrect settings, USB drive issues, or Windows 11–specific security restrictions. Below are the most effective solutions.
Solution 1: Run as Administrator and Update Rufus
1. Run as Administrator
Right-click Rufus.exe and select Run as administrator to ensure it has the necessary permissions to access and format the USB drive.
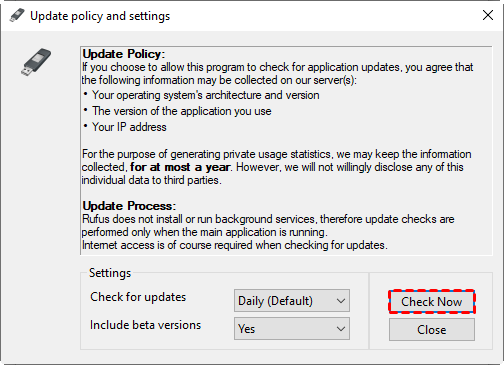
2. Update Rufus
Older versions may not correctly handle the updated partition requirements or large files in newer Windows 11 ISOs (like 24H2/25H2). Here’s how to update Rufus:
- In Rufus, click the icon standing for “Show application settings” in the lower-left corner.
- In the pop-up window, click Check Now to check for an update and install it.
Solution 2: Verify Rufus Settings
Incorrect options are the most common cause of failure. Please check the following settings in Rufus:
- Set Boot selection to your Windows 11 ISO
- Choose Partition scheme: GPT
- Select Target system: UEFI (non-CSM)
- Use NTFS as the file system for large ISOs

Solution 3: Reformat the USB Drive
USB-related errors often interrupt the process. Follow these steps to fix it:
1. Press Windows + X and select Disk Management.
2. Right-click all existing partitions on the USB and select Delete Volume.
3. The USB drive will show as Unallocated. Right-click the unallocated space and choose New Simple Volume to create a new partition and format it as NTFS or FAT32.
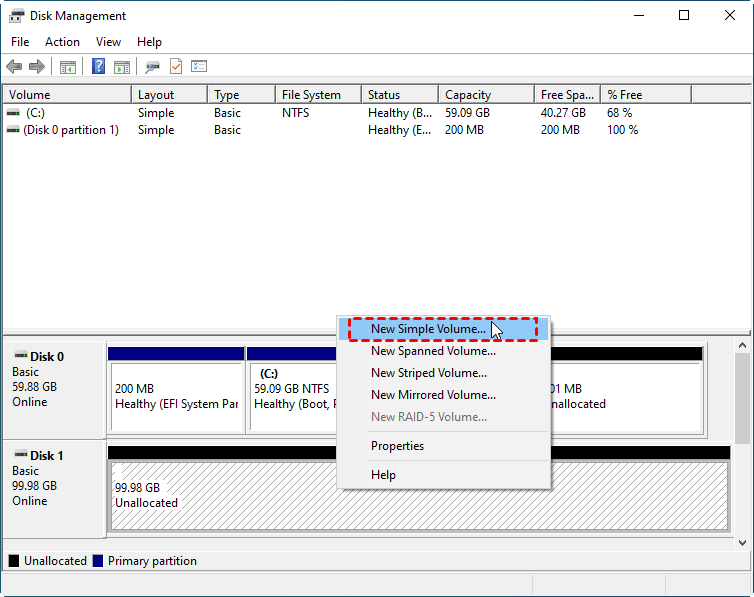
4. Use Rufus to create a bootable USB again.
Solution 4: Disable Antivirus or Windows Security Temporarily
Some security tools block low-level disk access. Follow the steps below to disable security tools temporarily:
1. Turn off real-time protection in your antivirus software and, if necessary, temporarily disable third-party firewalls.
2. Open Windows Security > Virus & threat protection, click Manage settings, and toggle off Real-time protection to disable Windows Defender temporarily.
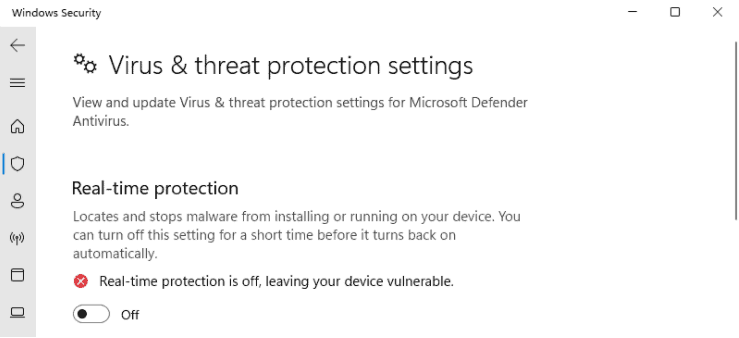
3. With security restrictions lifted, launch Rufus as administrator and attempt to create the installation USB again.
4. Once the bootable media is created successfully, re-enable your antivirus and firewall to keep your system protected.
Case 2: Rufus Windows 11 Not Working When Installing Windows
If Rufus successfully creates a bootable USB but Windows 11 fails to install, the issue usually lies in firmware settings, disk configuration, or Windows 11 hardware checks. You may try the solutions below.
Solution 1: Check BIOS/UEFI Boot Mode
Windows 11 requires UEFI mode on most modern systems. Use these steps to change boot mode in BIOS/UEFI:
1. Restart your computer. Press the BIOS/UEFI key (commonly Del, F2, F10, F12, or Esc) repeatedly during startup to enter the firmware setup menu.
2. Go to the Boot tab and set the boot mode as UEFI. Also, make sure the Rufus bootable USB is the first boot device.
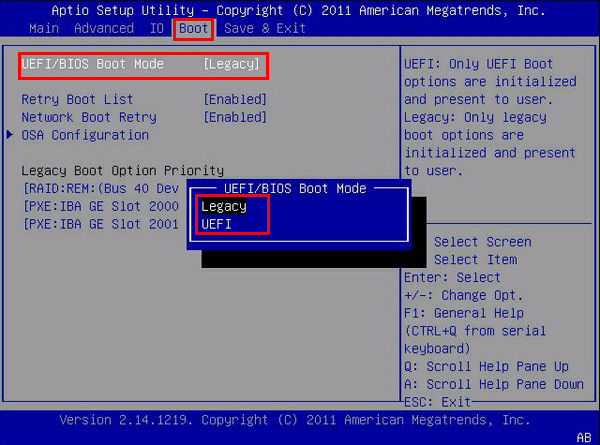
3. Save and exit BIOS/UEFI. Retry installing Windows.
Solution 2: Convert the Target Disk to GPT
Windows 11 installation often fails on MBR disks. Follow the steps below to convert the target disk to GPT:
⚠️ Warning: This process will erase all data on the selected disk. Back up important files before proceeding.
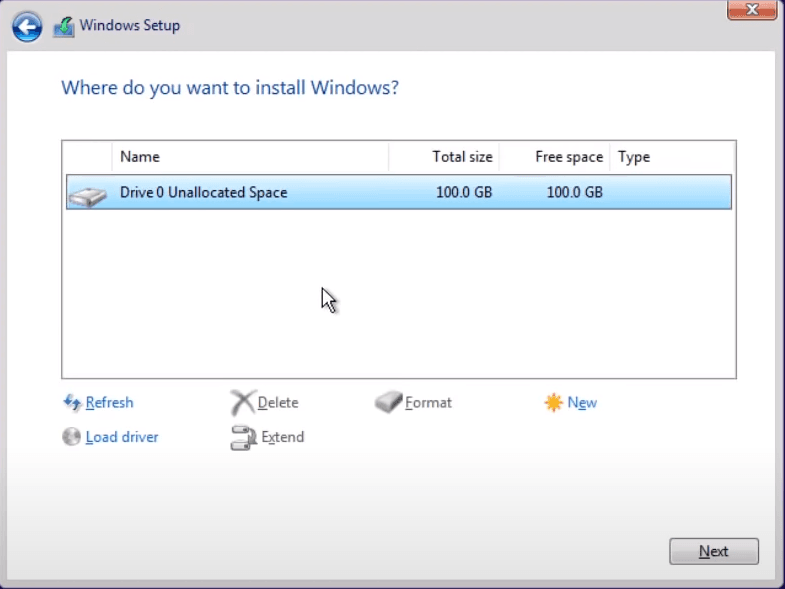
1. On the Where do you want to install Windows? screen, press Shift + F10 to open Command Prompt.
2. Type the following commands one by one and press Enter after each:
- diskpart
- list disk
- select disk X (replace X with the target disk number)
- clean
- convert gpt
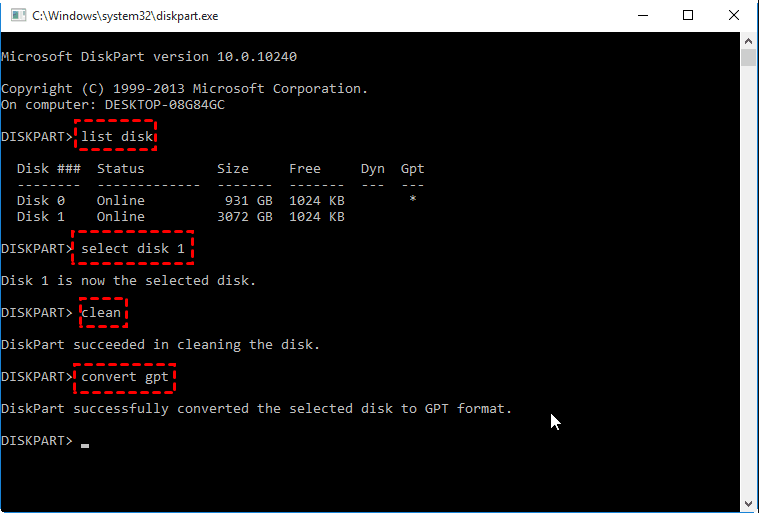
3. Close Command Prompt and click Refresh.
4. Select the unallocated space and click Next to proceed with Windows installation.
Solution 3: Bypass Windows 11 Hardware Checks
Installation may stop due to TPM, CPU, or Secure Boot requirements. Learn how to use Rufus to install Windows 11 on unsupported hardware below:
1. When you click Start in Rufus, a Windows User Experience window appears. Ensure you check Remove requirement for 4GB+ RAM, Secure Boot and TPM 2.0to bypass these specific checks.
2. Some users report errors when Disable BitLocker automatic device encryption is checked. Try unchecking this option and recreating the bootable USB.
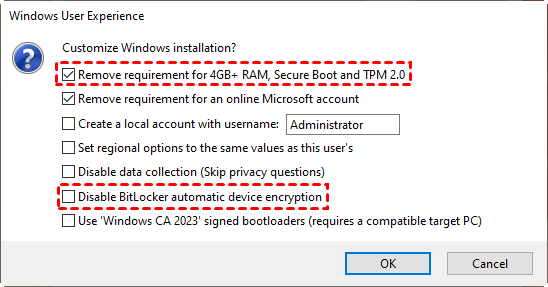
3. Reinstall Windows 11 with the newly created installation USB.
💡 Note: Starting with Windows 11 version 24H2, Microsoft requires the SSE 4.2 instruction set. If your CPU is extremely old (e.g., Core 2 Duo), you may encounter Rufus Windows 11 bypass not working.
Bonus: Alternative Tool to Create Windows 11 Bootable USB
If Rufus is still not working on Windows 11 after multiple attempts, switching to a more automated and Windows-oriented tool can save time and reduce configuration errors. AOMEI Backupper Standard is a reliable free alternative.

- Create a system image: Create a complete system image that includes Windows 11, installed programs, system settings, and boot files.
- Create rescue media: Generate a bootable USB or CD/DVD that lets you start your PC even when Windows won’t load.
- Fast recovery: Its streamlined recovery process helps restore your system image quickly, even on modern Windows 11 hardware.
- High compatibility: It works seamlessly with Windows 11/10/8/7 and supports both UEFI and Legacy BIOS modes.
Download AOMEI Backupper and use it to create a Windows 11 bootable USB:
Step 1. Connect a USB drive (8GB or larger recommended). If the USB drive is not empty, backup important data on the USB, as it will be formatted.
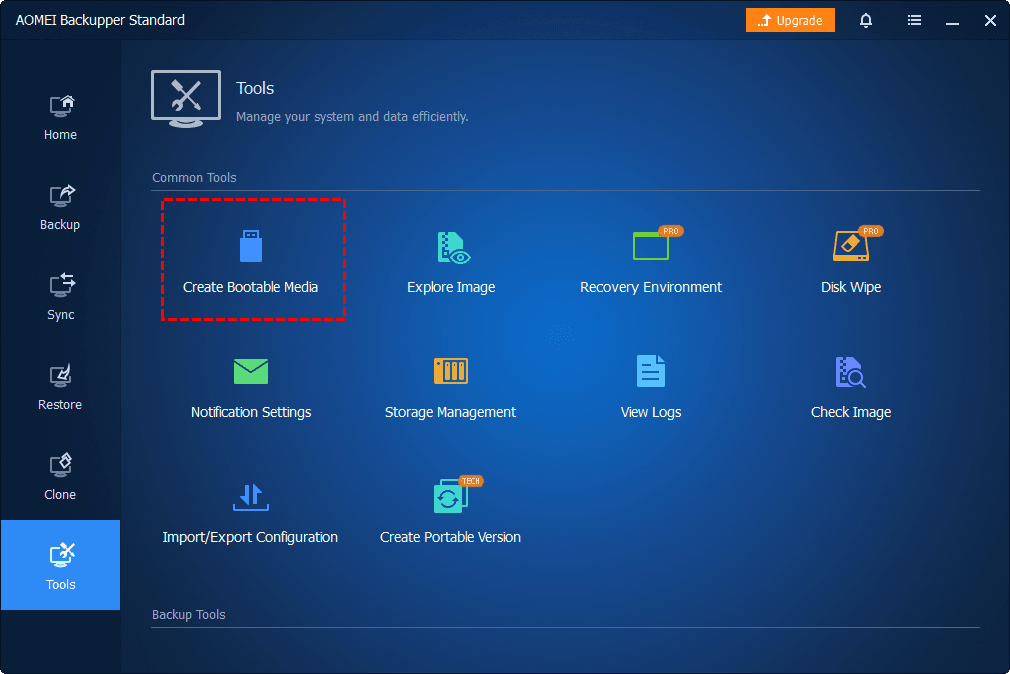
Step 2. Open AOMEI Backupper and go to Tools > Create Bootable Media.
Step 3. Select USB Boot Device as the destination and click Create.
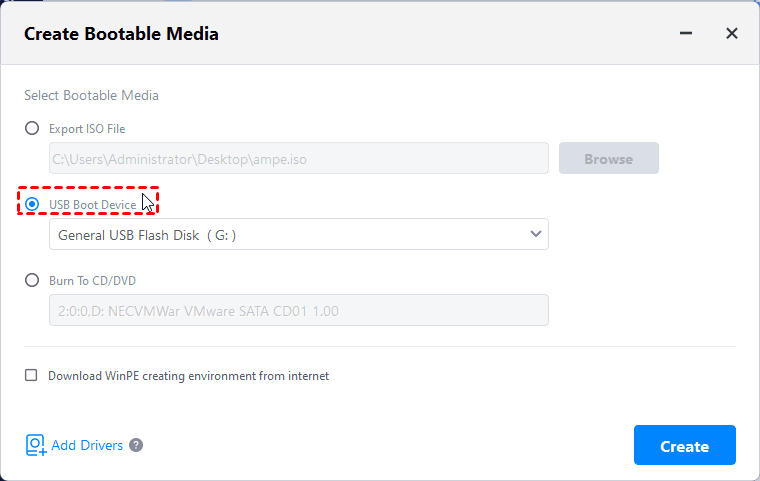
Step 4. You will be prompted that the USB drive will be formatted. Click OK to begin building the bootable media. Once completed, safely eject the USB drive.
💡 Notes:
● To restore Windows 11 in case of system failures, you should create a Windows 11 system image first. Just click Backup > System Backup to do it.
● To restore Windows backup to another computer, you may make use of the Universal Restore feature, which is available in AOMEI Backupper Professional or higher.
Verdict
When Rufus is not working on Windows 11, the issue is often caused by Windows 11–specific restrictions, firmware mismatches, USB errors, or incorrect configuration settings. This article offers you effective solutions to the Rufus not working error during bootable USB creation or Windows installation.
If Rufus continues to fail, AOMEI Backupper Standard is a reliable alternative with easier bootable USB creation, built-in recovery tools, and high compatibility. It enables you to create a Windows 11 local backup and restore whenever needed. Don’t hesitate to try it out!
