
How to Repair Windows Server 2019 [7 Methods]
In this article, you’ll learn how to repair Windows Server 2019 completely, from common symptoms and causes to corresponding methods, along with step-by-step instructions. Scroll down to explore more!
By Ivy Updated on December 8, 2025
Symptoms and Causes Requiring Boot Repair
Before you can properly repair Windows Server 2019, it’s essential to understand what the system is telling you. Server failures rarely occur without warning, and recognizing the symptoms and causes helps you choose the right method, whether that’s a quick repair or a full restore. Below are common symptoms:
- Blue Screen of Death (BSOD) errors interrupt normal operations.
- Failed or incomplete Windows Updates, especially security patches.
- Boot loops, where the server restarts endlessly and never reaches the login screen.
- Service crashes, including failures within IIS, DNS, DHCP, or other server roles.
- Slow performance or unresponsive applications may indicate deeper system-level issues.
Even though the symptoms may look similar, the underlying causes vary. Some of the most common triggers include failing HDDs/SSDs, faulty or incomplete patches, driver conflicts, malware or unauthorized changes, misconfiguration, etc.
When to Troubleshoot vs. Restore From Backup
Not all issues should be fixed manually- especially on servers where uptime is critical. Follow these guidelines to determine whether repairing or restoring is the wiser choice:
👉 Choose troubleshooting if:
- The server can still boot, even in Safe Mode
- Only certain roles or services are malfunctioning.
- Issues began after a recent update or configuration change.
- You have no recent backups to rely on.
👉 Choose a full restore if:
- The system won’t boot at all.
- Corruption keeps recurring after basic repairs.
- Critical server roles (Domain Controller, DNS, DHCP, etc.) fail repeatedly.
- Data integrity is questionable due to malware or hardware failure.
How to Repair Windows Server 2019 [5 Methods]
Here are some common methods to repair Windows Server 2019, 5 methods in total.
#1: Run SFC to Fix Corrupted System Files
SFC checks protected system files and replaces corrupt/missing copies from the component store.
Step 1. Log in to Windows Server 2019 using an administrator's account. Open the Start menu, type cmd, and select Run as administrator.
Step 2. In the elevated Command Prompt window, run sfc /scannow and press Enter.

Step 3. Wait until the verification completes (100%). Read the output and follow the suggestions.
- Windows Resource Protection did not find any integrity violations — no further SFC action needed.
- Windows Resource Protection found corrupt files and successfully repaired them — reboot and retest services.
- Windows Resource Protection found corrupt files but was unable to fix some of them — move to the DISM section below.
#2: Repair Windows Server Image using DISM
Try DISM if SFC cannot repair files or if the component store is damaged. Be sure you have a repair source available: Windows Server 2019 ISOormounted install.wim/install.esd.
Step 1. Open Command Prompt as administrator. Then, run a quick health check:
dism /online /cleanup-image /scanhealth
Step 2. If scanhealth reports corruption, run:
dism /online /cleanup-image /restorehealth
This uses Windows Update as the default source. If the server is isolated or /restorehealth fails, run with a specific source.
Take a mounted ISO as an example:
dism /online /cleanup-image /restorehealth /source:WIM: X:\sources\install.wim:1 /limitaccess
💡Note: Replace X: with the mounted ISO drive. If you have install.esd, use the proper index or convert to WIM.
Step 3. After restorehealth completes, run sfc /scannow again to let it replace corrupted or missing system files using the repaired component store.
Step 4. Reboot and verify if your Windows Server 2019 is working properly.
#3: Perform In-Place Upgrade or Repair
You can also perform an in-place upgrade or repair to refresh Windows system files while keeping roles, features, apps, and data.
Step 1. Download Windows Server 2019 ISO from Microsoft. Right-click the ISO file and select Mount.
Step 2. Run setup.exe from the mounted ISO and choose Download and install updates (recommended) if available.
Step 3. When prompted, choose Keep personal files and apps (this is the “in-place upgrade/repair” option).
Step 4. Follow the wizard to perform a Server 2019 repair install. The server will reboot multiple times.
Step 5. After completion, run Windows Update, re-enable antivirus, and validate server roles (AD replication, DNS records, Hyper-V VMs, IIS sites).
#4: Rebuild the Boot Configuration (BCD)
Try to rebuild BCD in the Windows recovery environment when you see error messages, like“Bootmgr is missing”, 0xc000000f, or BCD corruption.
Step 1. Force reboot Windows Server 2019 3 times during startup to access the Windows recovery environment. You can also create a Windows Server 2019 bootable USB to boot your computer.
Step 2. Click Repair your computer >Troubleshoot >Command Prompt.
Step 3. In the Command Prompt window, type the following command to identify the EFI system partition and assign it a drive letter.
- diskpart
- list disk
- select disk 0
- list vol
- select vol
- assign letter=S:
- exit
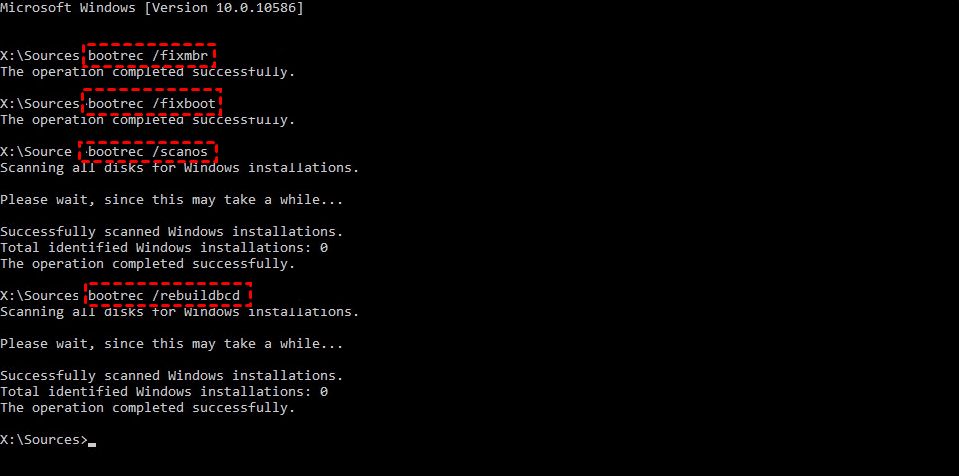
Step 4. Then, run the standard boot repair commands:
- bootrec /fixmbr
- bootrec /fixboot
- bootrec /scanos
- bootrec /rebuildbcd
Step 4. If rebuildbcd fails, back up, then recreate the BCD:
- bcdedit /export C:\BCD_Backup
- attrib S:\EFI\Microsoft\Boot\BCD -h -r -s
- ren S:\EFI\Microsoft\Boot\BCD BCD.old
- bcdboot C:\Windows /s S: /f UEFI
💡Note: For BIOS/MBR systems, use bcdboot C:\Windows /s /f ALL as appropriate.
Step 5. Reboot and verify that Windows boots normally. If not, re-check disk partitions and run chkdsk on system volumes.
#5: Fix Boot Loops After Failed Updates
If the server repeatedly reboots after a recent update, try to uninstall it in the Windows recovery environment.
Step 1. Force boot Windows Server 2019or from ISO. Click Repair your computer> Troubleshoot >Advanced options > Uninstall updates.
Step 2. Choose Uninstall latest quality update or Uninstall latest feature update, depending on the type.
Step 3. Log in to your account with your username and password. Click Continue.
Step 4. Click Uninstall quality update or Uninstall feature update. Then, your server will restart and try to remove them automatically.
Step 5. On the Windows Setup window, press Shift + F10 to open Command Prompt and cancel the pending update to prevent it from being automatically reinstalled.
dism /image:C:\ /cleanup-image /revertpendingactions
Replace C: with the offline Windows volume if different.
In addition, you can also try to manually uninstall drivers, updates in Safe mode if Windows Server 2019 still loops.
How to Restore Windows Server 2019 from Backup [2 Methods]
If Windows Server 2019 boot repair is still not working, you can choose to perform a full system image recovery. Be sure you have a working Windows Server backup image. Usually, there are two ways to create a system image or disk image:
#1: Built-in Windows Server Backup: It’s free and 100% native, supporting creation of Windows Server image backup and performing full or bare metal recovery. It requires you to prepare a hard drive with the same or larger capacity.
#2: Third-party server backup software: AOMEI Backupper Server stands as one of the most outstanding server backup software, offering both system and disk backup alongside a comprehensive suite of backup features, making these tasks faster and more efficient. The biggest advantage is support for dissimilar hardware restore.
#1: Restore Windows Server 2019 to New Hard Drive using WSB
Step 1. Connect the backup drive to Windows Server 2019. Start your server from a bootable USB, then click Next > Repair your computer.
Step 2. Click Troubleshoot > Advanced options> System Image Recovery.
Step 3. Select the operating system (i.e., Windows Server 2019) you want to repair.
Step 4. In the Re-image your computer window, check Use the latest available system image (recommended). Then, click Next.
Step 5. Click Finish > yes to restore Windows Server 2019. Just wait patiently until it is completed.
#2: Restore Windows Server 2019 using AOMEI Backupper [Dissimilar Hardware]
Step 1. Connect the backup drive to Windows Server 2019 and boot from the bootable USB created by AOMEI Backupper.
Step 2. Under the Home tab, click Restore and select a system backup task. Or click Select Image File to manually find the image.
Step 3. Tick Restore this system backup and click Next.

Step 4. Select Restore to original location or new location. You need to select a new location manually.
Step 5. On the summary window, check SSD Alignment for fast speed and click Start Restore to restore Windows Server 2019 to new hard drive.
💡Note: The “Universal Restore” option is checked automatically to install all necessary drivers to start Windows when this software detects different hardware.
Final Thoughts
This article describes how to repair Windows Server 2019 in 7 methods, starting from basic repair to full system image recovery. Note: restoring Windows Server 2019 from image requires you to create a system image first.
WSB offers a free server backup and restore software, while AOMEI Backupper Server offers both System Backup and Disk Backup as well as a wide range of backup features to make the backup task faster and more efficient. More surprisingly, it supports dissimilar hardware restore.
