
Windows 10 Backup Batch File? Here's How (Free)
Stop manually copying files. This guide shows how to write a backup batch file in Windows 10 using robocopy and schedule it. Plus an easier alternative to backup files automatically.
By Ivy Updated on June 9, 2026
Manually copying your important folders, such as documents, photos, work projects, etc., is tedious and easy to forget. A simple Windows batch file (.bat) can automate the process, letting you copy, mirror or sync files with one click or a scheduled task.
However, it lacks features such as backup version, system imaging, incremental backup, etc., while a dedicated backup tool offers full protection. In this guide, you'll learn how to write a backup batch file, schedule it, and know when to upgrade to a free, more powerful solution like AOMEI Backupper Standard.
What Is a Backup Batch File and How Does It Work?
A backup batch file is simply a plain text file containing commands that Windows Command Prompt can execute. Using built-in tools like xcopy, robocopy, or copy, you can automate copying, moving, deleting, or syncing files without installing any extra software.
- Copy: Best for quick, single-file copies. Copies individual files without recursive.
- Xcopy: Suitable for simple, occasional backup scripts. Copies entire folders and subfolders recursively. Supports basic attributes like date and archive flags.
- Robocopy (Recommended): More powerful – supports mirroring (/MIR), multithreaded copying, and retry options.
With bat. file, you can copy important folders (documents, photos, etc.) to external drives or network locations and set up Task Scheduler to automatically back up batch files daily or weekly in the background.
Create Your First Backup Batch File in Windows 10
You may know that using Robocopy is the best option to create backup batch file in Windows 10. Here’s a step-by-step guide to follow:
Step 1. Type Notepad in the Start menu, right-click it, and select Run as Administrator.
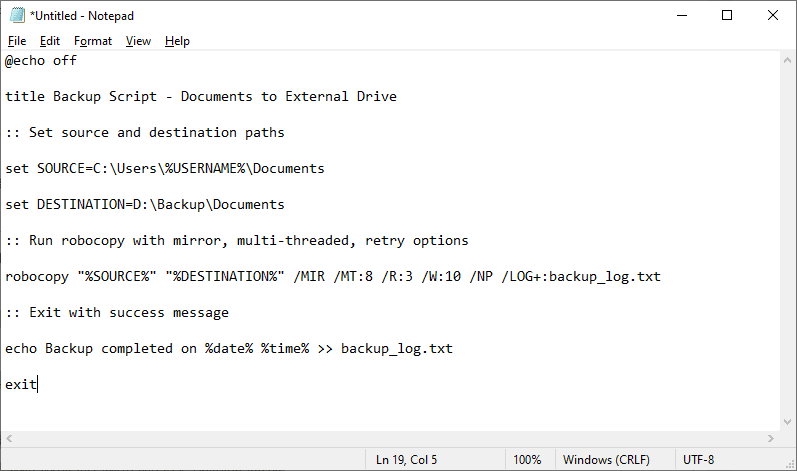
Step 2. Enter the backup batch file commands using Robocopy syntax. Here is an example:
@echo offrobocopy "C:\Users\YourName\Documents" "D:\Backup\Documents" /MIR /R:3 /W:10exit
@echo off
title Backup Script - Documents to External Drive
:: Set source and destination paths
set SOURCE=C:\Users\%USERNAME%\Documents
set DESTINATION=D:\Backup\Documents
:: Run robocopy with mirror, multi-threaded, retry options
robocopy "%SOURCE%" "%DESTINATION%" /MIR /MT:8 /R:3 /W:10 /NP /LOG+:backup_log.txt
:: Exit with success message
echo Backup completed on %date% %time% >> backup_log.txt
exit
-
/E: Replicate the entire folder tree, including empty ones, not just files at the root level.
-
/MIR: Copy everything and delete files in destination that no longer exist in source. (Implies /E and /PURGE).
-
/MT:8 (ultithreaded with 8 threads): Speed up copying, especially for many small files.
-
/R:3: Retry 3 times on failed copy, offering the chance to handle temporary network or disk errors.
-
/W:10: Wait 10 seconds between retries so you have time to resolve the issue.
-
/NP: Keeps the log clean without percentage.
-
/LOG+:backup_log.txt: Add the output to a log file to track what was copied and any errors.
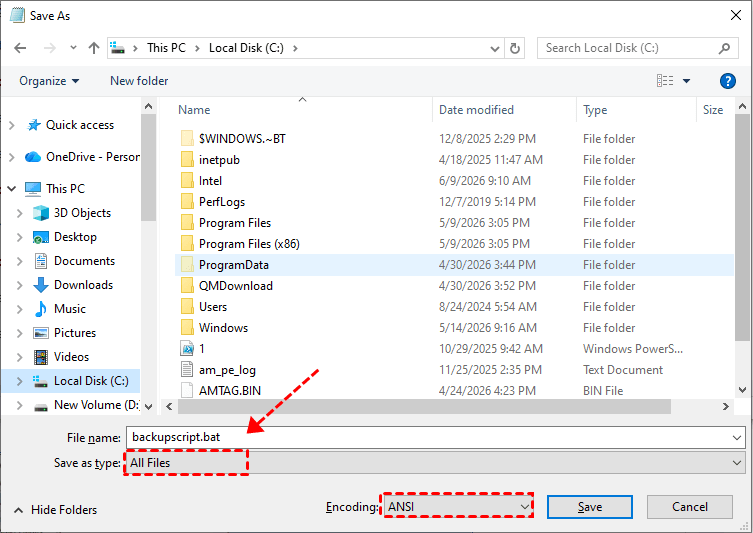
Step 3. Click File >Save As and enter a file name (backupscript.bat). Be sure to set "Save as type" to All Files with Encoding: ANSI and check if it runs well.
Automating Your Backup Batch File with Task Scheduler
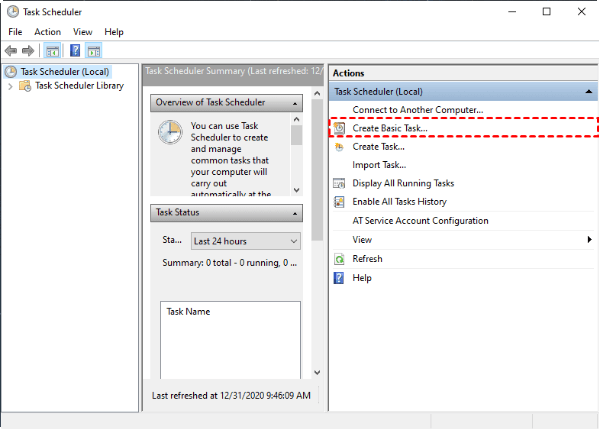
Step 1. Press Win + R to open the Run dialog. Then, type taskschd.msc and click OK to open Task Scheduler, divided into 3 sections. Click Actions > Create Basic Task… on the right pane.
Step 2. On the Create Basic Task Wizard window, type a clear name and click Next.
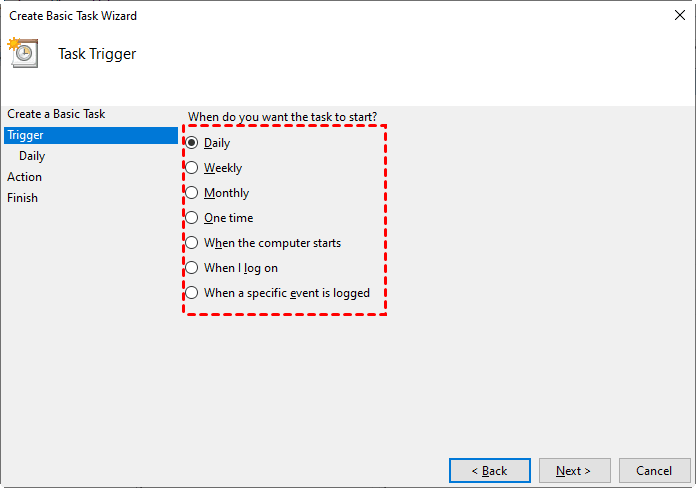
Step 3. Under the Trigger section, select Daily, Weekly, When I log on, etc., to start a backup. Then, click Next.
Step 4. Under the Action section, select Start a program (the default choice) and click Next.
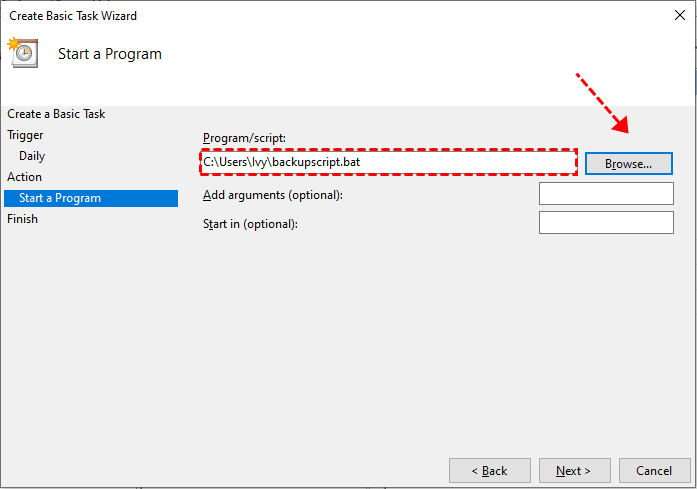
Step 5. Under Program/script, click the Browse… button and navigate to your .bat file (e.g., C:\backupscript.bat) and click Next > Finish. In most cases, leave Add arguments (optional) and Start in (optional) blank.
After setting up, it’s necessary to test the Windows 10 backup batch files task.
- In Task Scheduler, click Task Scheduler Library in the left pane.
- Find your backup task in the middle list, right-click it, and select Run.
- Wait a few seconds and then check your backup destination.
An Easier Alternative to Backup Batch Files in Windows 10 [Free & Auto]
If your batch files no longer meet demands and you are looking for a solution that can alert you promptly when issues arise, maintain multiple backup versions, and restore the entire system, etc., it’s time to consider a professional tool.
AOMEI Backupper Standard is completely free and requires no scripting. Not only does it overcome the limitations of batch files, but it also offers more powerful features, such as system imaging, email notifications, set-and-forget scheduling, and more.

- Complete backup solutions: Support File Backup, System Backup, Disk Backup, etc., to meet different users’ needs.
- Versioning: With multiple backup versions available, you can easily restore files or the OS to a previous date.
- Batch Backup: Select two or more folders in a scheduled task, or create multiple tasks for different files.
- Copy only changes: Integrate incremental backup to backup only new or changed files, significantly saving your time and effort.
- Email notifications: Get alerts for backup success, failure, or user intervention required.
- Continuous backup: Enable daily, weekly, monthly (by date), event triggers, etc., for continuous data protection.
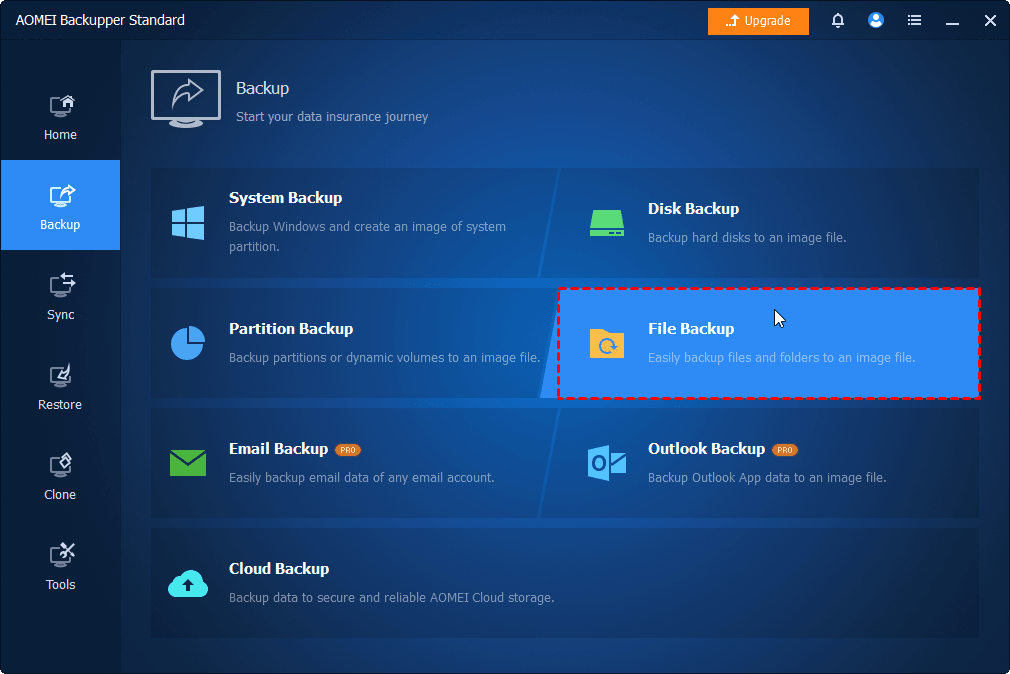
Step 1. Open AOMEI Backupper Standard after installing.Then, go to Backup > File Backup. You can also select other backup solutions (if needed).
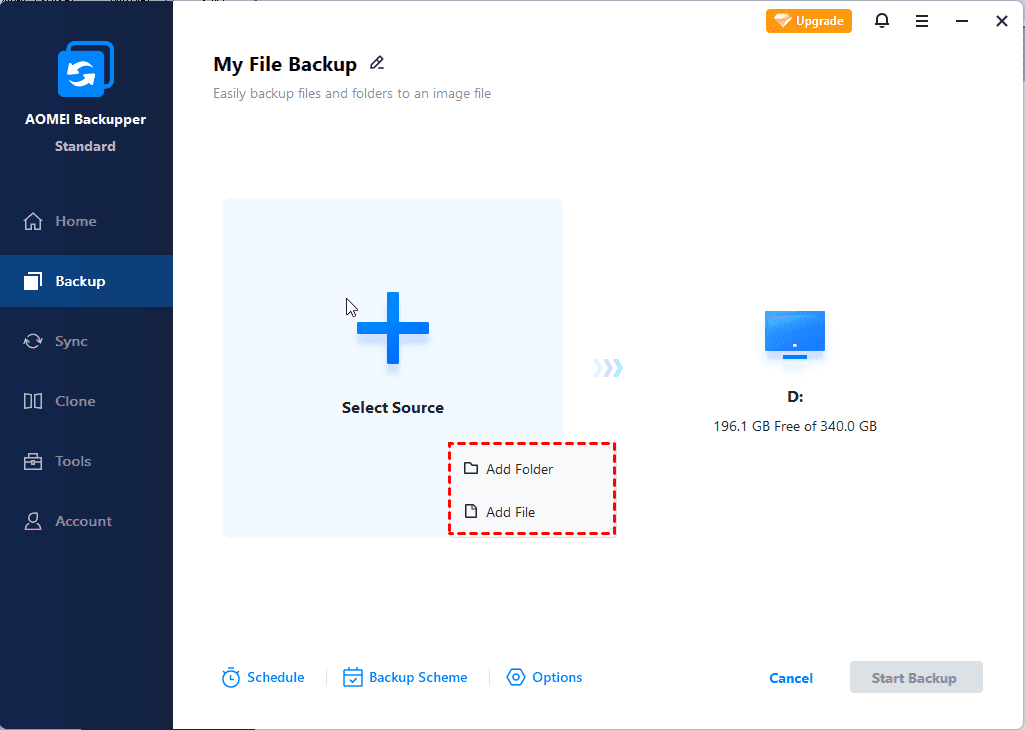
Step 2. Click Select Source > This PC/NAS/Network Share to add any file and folder you want to protect. Click Add Source (shown after first selection) to add two or more files or folders for batch backup.
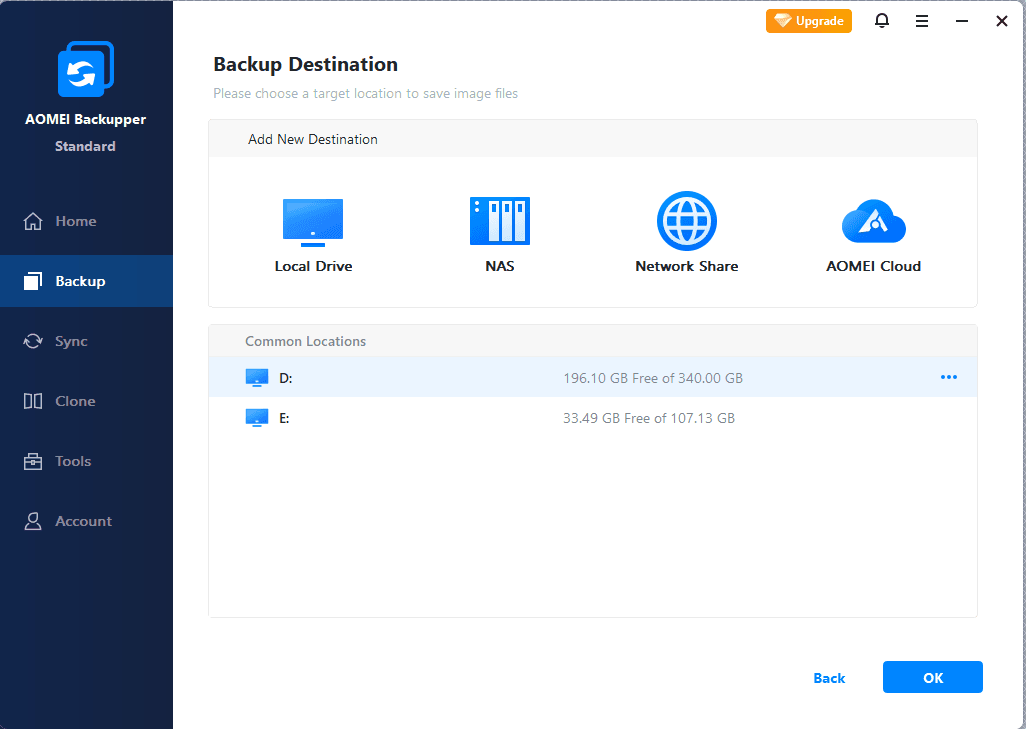
Step 3. Then, click the PC icon to select a destination, from local drives to network share, NAS, or AOMEI Cloud.
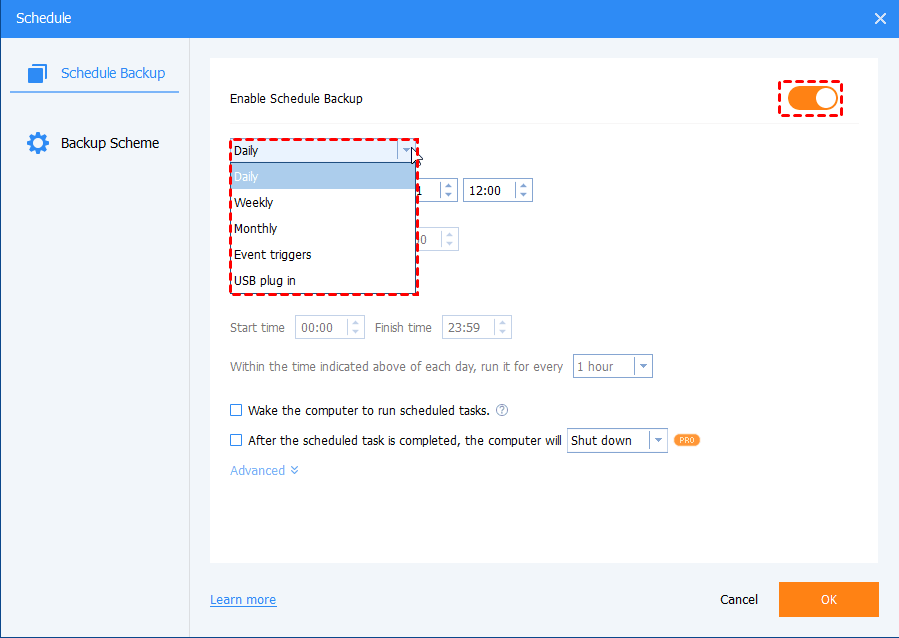
Step 4. To back up files automatically, click Schedule to enable Daily, Weekly, Monthly(By Date), Event Triggers, etc., and click OK. You can also enable Email notification to get alerts timely. At last, click Start Backup.
- By default, the incremental backup is enabled to back up only new or changed files.
- To free up more space, click Options to change compression or splitting level.
You can also repeat Step 1 to Step 4 to add two or more backup tasks for batch backup, particularly useful when creating a 3-2-1 backup strategy or when you need to backup different files.
For more advanced features, upgrade to AOMEI Backupper Professional. Try Differential Backup for fast recovery and Automatic Backup Cleanup to proactively delete backups.
Batch File vs. AOMEI Backupper – A Quick Comparison
|
Feature |
Backup Batch File (Robocopy) |
AOMEI Backupper Standard |
|
Basic file copying |
✅ Yes |
✅ Yes |
|
Set and forgetscheduling |
✅ Task Scheduler Only |
✅ Yes |
|
Version history |
❌ No |
✅ Yes |
|
System backup |
❌ No |
✅ Yes |
|
Email notifications |
❌ No |
✅ Yes |
|
Incremental backup |
❌ No |
✅ Yes |
|
Compression |
❌ No |
✅ Yes |
|
Ease of setup |
Manual scripting required |
Point and click |
Conclusion
A Windows 10 backup batch file is a free, lightweight way to copy files automatically(combine with Task Scheduler), making it ideal for tech users with basic needs. However, batch files fail silently, offer no versioning, and cannot protect your entire system, leaving you vulnerable to data loss without any warning.
For full data protection, including system backup, versioning, failure alerts, compression, etc., switch to AOMEI Backupper Standard. It's free, requires no scripting, and gives you true peace of mind. Download it today and set up a complete backup schedule in under five minutes – no command line required.
