
How to Perform AKASO SD Card Format on an AKASO Camera or PC
Having SD card issues? Learn the correct way to format your AKASO SD card—both in-camera and on a computer—along with key practices to prevent errors and data loss.
By Lily Updated on December 30, 2025
Why Let AKASO Format SD Card?
Formatting an SD card isn’t just routine maintenance—it’s often necessary to keep your AKASO camera recording smoothly. Below are the most common situations where formatting the SD card becomes essential.
✅ SD Card Not Recognized by the AKASO Camera
✅ Recording Errors or Corrupted Files
✅ Switching the SD Card Between Devices
✅ Using a New or Previously Used SD Card
✅ Improving Performance and Stability
Take AKASO EK7000 as an example. Learn how to format SD card on AKASO EK7000 from this page.
Case 1: AKASO EK7000 SD Card Format Directly in the Camera
Formatting the SD card directly on the AKASO EK7000 ensures the file system is fully compatible with the camera and helps prevent recording errors. Here’s how to do it:
Step 1. Power off the camera, then insert the SD card properly into the card slot.
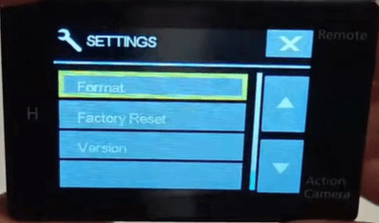
Step 2. Turn on the AKASO EK7000. Press Mode button four times, then Shutter button to enter Camera Setting.
Step 3. Press UP or Down button to locate the “Format” option.
Step 4. Press Shutter button, the screen shows “No/Yes.”
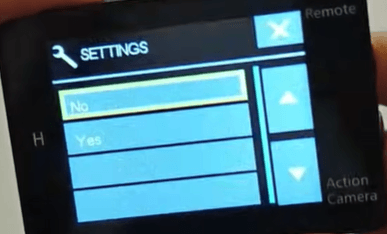
Step 5. Press Down button then Shutter button. The screen shows “Please wait a moment” then “Completed”. Then you format your SD card successfully.
💡 Important Notes:
◆ Formatting will erase all data on the SD card. Back up important videos or photos first.
◆ Use a Class 10, U3, or V30 SD card from a reliable brand for best results.
◆ For brand new cards or cards that have caused issues, you can repeat the formatting process 1-2 times directly in the camera to ensure thorough preparation.
Case 2: AKASO EK7000 SD Card Format on a Computer
If you can’t format the SD card directly on your AKASO EK7000—or the camera keeps showing format errors—using a computer is a practical alternative. Below are two effective methods, depending on your situation and technical needs.
1. Using File Explorer
If the SD card is still recognized by your computer and doesn’t have severe issues, Windows File Explorer provides a fast way to format it.
Step 1. Connect the SD card to your PC.
Step 2. Open This PC and locate the SD card.
Step 3. Right-click the SD card and select Format.
Step 4. Choose file system:
- For cards 32GB and smaller, FAT32 is the standard and recommended choice for AKASO cameras.
- For cards larger than 32GB, select exFAT. This is essential for compatibility.
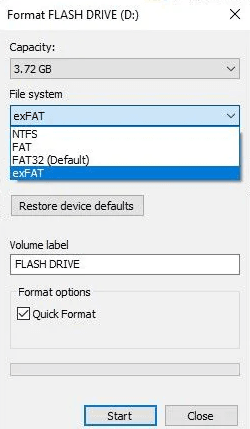
Step 5. Leave Allocation Unit Size as default. Under Volume Label, give the card a name if desired (e.g., "AKASO_Card").
Step 6. Click Start. Wait for the process to finish and safely eject the card.
💡 Note: The Quick Format option is checked by default for a faster process (this is usually sufficient).
2. Using Disk Wipe Software
When an SD card has stubborn errors, corrupted file systems, or leftover data from other devices, standard formatting may fail. In such cases, a dedicated disk wipe tool like AOMEI Backupper Professional offers a more thorough solution.

- Multiple Wiping Standards: From quick overwrites to certified secure erasure using methods like DoD 5220.22-M.
- Flexible Targeting: Apply wipes to entire disks, specific partitions, or unallocated space.
- Bootable Media Creation: Generate a bootable USB/CD/DVD to perform disk wipe outside Windows.
- Broad Device Support: Compatible with HDDs, SSDs, USB flash drives, memory cards, and SD cards.
Download AOMEI Backupper and follow the steps below to format an SD card for AKASO:
Step 1. Insert the SD card into your computer using a card reader.
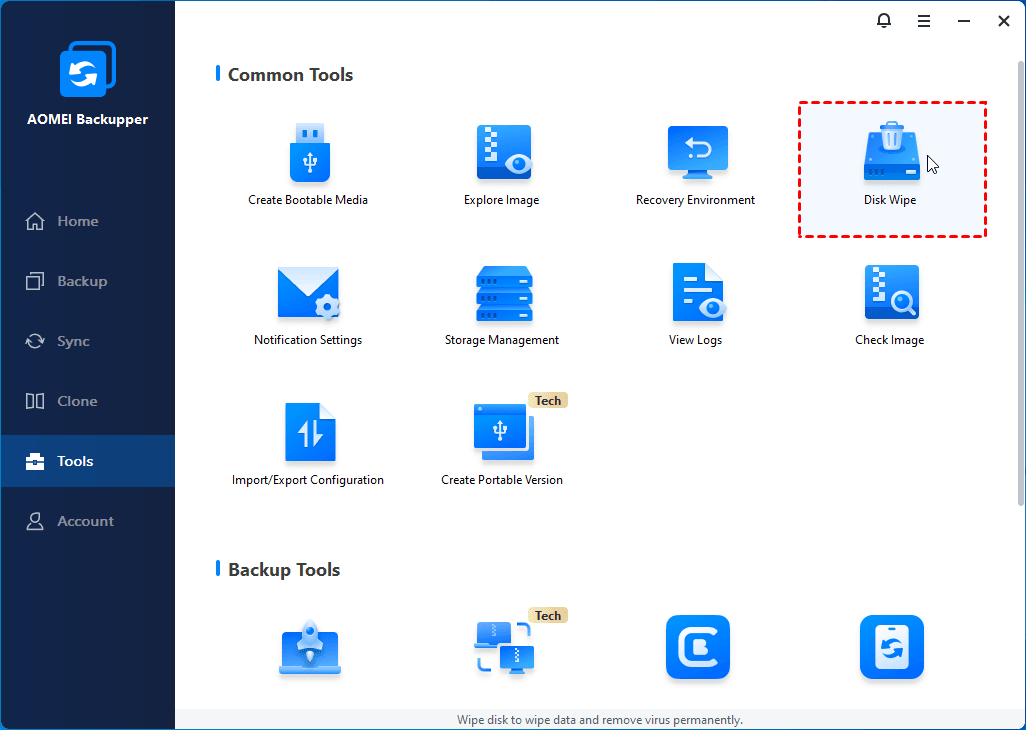
Step 2. Launch AOMEI Backupper Professional. From the main interface, click Tools and select Disk Wipe.
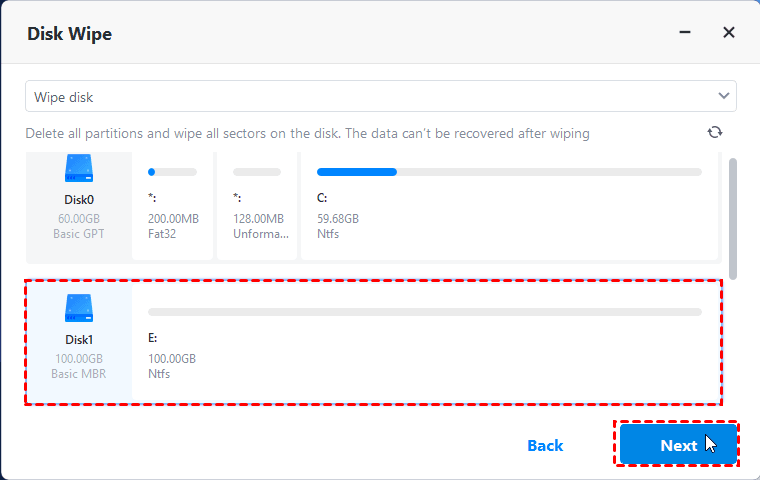
Step 3. In the pop-up window, select Wipe disk from the drop-down menu. Then click on the SD card that needs to be wiped and click Next.
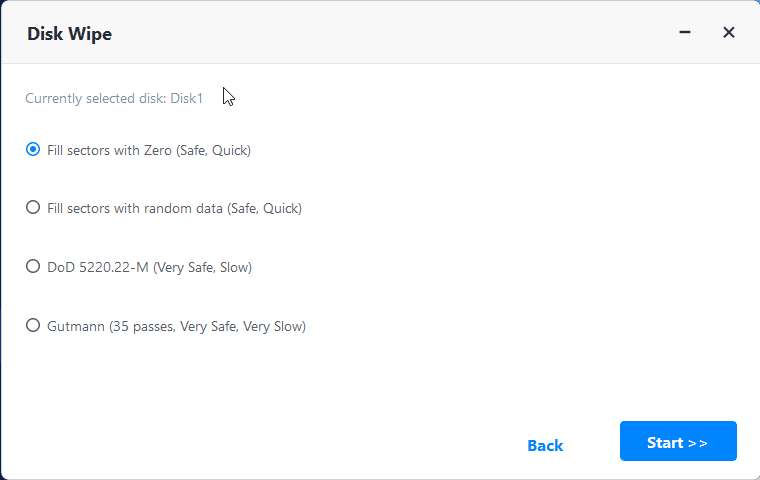
Step 4. Choose Fill sectors with Zero for a quick wipe. Then click Start to begin the wiping process.
Step 5. After wiping, reformat the SD card to FAT32 or exFAT using Windows tools.
Step 6. Safely eject the card and insert it back into the AKASO EK7000.
Tips to Prevent SD Card Issues on AKASO Cameras
SD card problems can interrupt recording and even lead to lost footage. By following these practical tips, you can reduce errors and keep your AKASO camera running smoothly over time.
|
Use the Right SD Card Always choose SD cards that meet AKASO’s recommended specifications. A Class 10, U3, or V30 card from a reputable brand ensures sufficient write speed for high-resolution video and minimizes recording failures. |
|
Format the SD Card Regularly Instead of deleting files one by one, format the SD card periodically—preferably directly in the AKASO camera. Regular formatting clears residual data, reduces file fragmentation, and maintains stable performance. |
|
Avoid Removing the SD Card During Recording Taking out the SD card or powering off the camera while recording can corrupt the file system. Always stop recording first and turn off the camera before removing the card. |
|
Safely Eject the SD Card from Computers When transferring files to a PC or Mac, use the Safe Eject option before removing the SD card. This prevents incomplete writes that often lead to card errors when reinserted into the camera. |
|
Keep the Camera Battery Charged A sudden power loss during recording or formatting can damage data structures on the SD card. Make sure the battery has enough charge, especially when recording long videos or formatting the card. |
Conclusion
Proper AKASO SD card format is essential for stable recording and reliable performance on AKASO cameras. When in-camera formatting isn’t possible, using a computer provides an effective alternative.
Besides the disk wipe feature, AOMEI Backupper offers all-around backup and restore features. You can use it to backup Windows 11 to external hard drive for OS protection. Why not give it a try?
