



How to Transfer Photos from iPad to Flash Drive in 4 Ways
Want to move iPad pictures to external storage for backup or to free up device space? This guide offers 4 effective ways. You can choose a suitable method depending on your iPad model, computer, and USB connection.

By Lily Updated on September 2, 2026


Photos and videos can consume a considerable amount of iPad storage, especially if you regularly take high-resolution pictures or edit images on your device. Instead of deleting valuable photos when storage runs low, you can move them to external storage.
So, how can you transfer photos from iPad to flash drive? Below are four methods to copy photos from iPad to USB stick or flash drive while keeping your original pictures available for backup and later use.
Way 1. Transfer Photos from iPad to Flash Drive with AOMEI FoneBackup
If you use a Windows PC, AOMEI FoneBackup provides a straightforward way to transfer photos from iPad to USB drive. Compared with manually searching through DCIM folders, it allows you to preview and select the pictures you want before starting the transfer.
 AOMEI FoneBackup
- Transfer all photos at once or select individual pictures.
- Access photos from Camera Roll and other photo albums. You can easily transfer hidden photos as you want.
- Transfer pictures without intentionally reducing their original quality.
- Work with various iPad models, including iPad Pro, iPad Air, and iPad mini.
 100% Secure
Download AOMEI FoneBackup, and then follow these instructions.
Step 1. Open AOMEI FoneBackup and connect your iPad and USB flash drive to the computer. If prompted on the iPad, unlock it and tap Trust to authorize the connection.
Step 2. From the main interface, choose Phone Transfer. Find iPhone to PC, and then click Get Started.
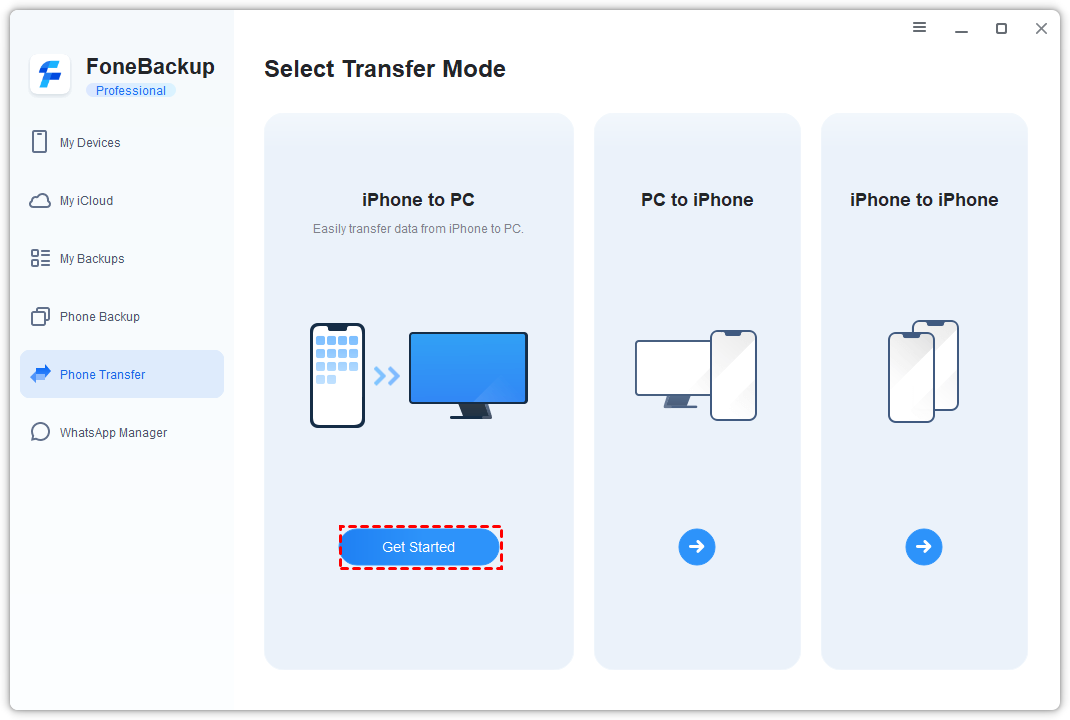
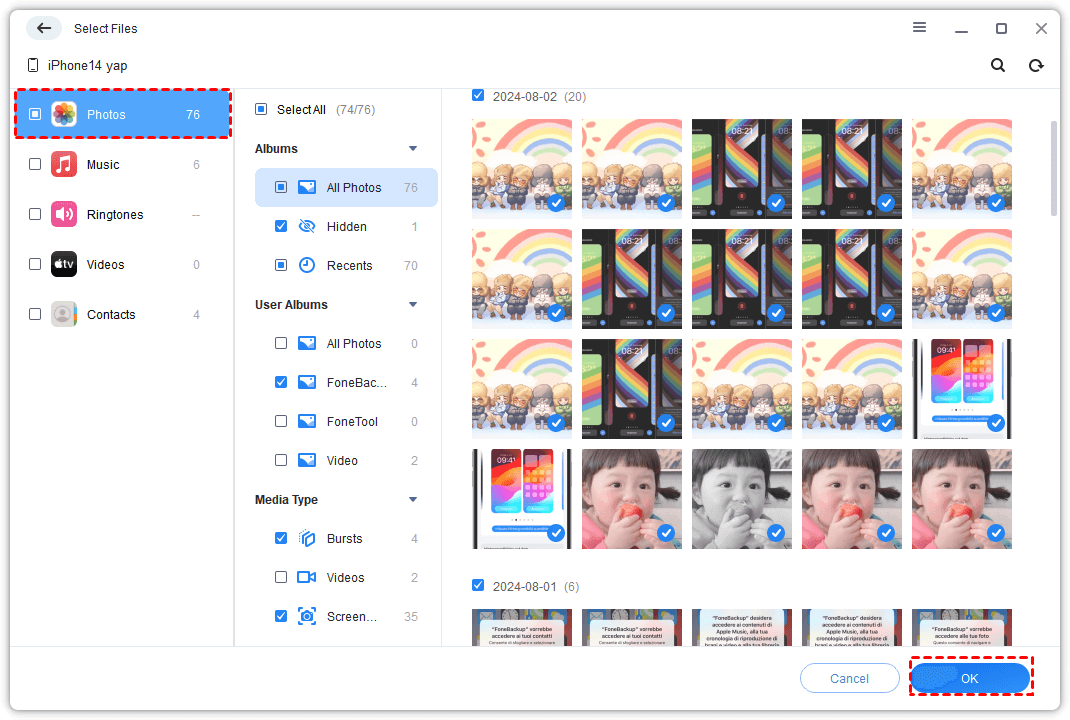
Step 3. Select Photos from the data categories. In the next window, browse the pictures stored on your iPad, select the photos you want to export and click OK.
Step 4. Click Transfer Settings, choose your connected USB flash drive as the destination path, and click Start Transfer to begin copying the selected photos.
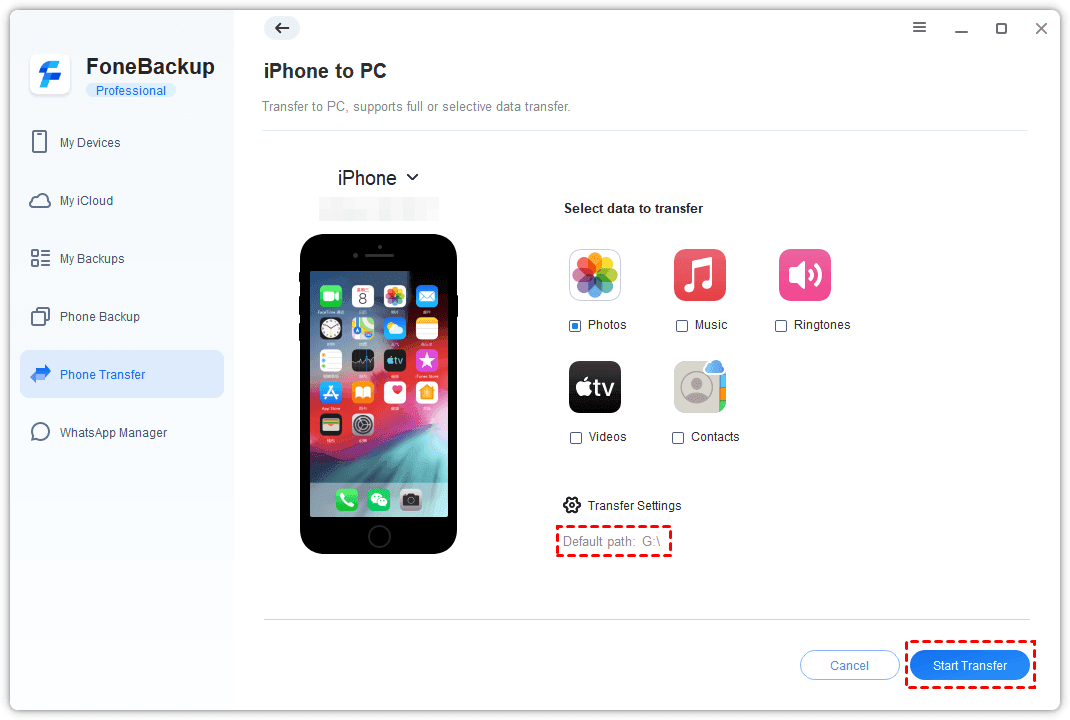
Step 5. When the process finishes, click OK. Open your flash drive afterward to confirm that the transferred pictures are available.
Way 2. Copy Photos from iPad to USB Stick via File Explorer
Windows File Explorer enables you to transfer photos from iPad to flash drive without installing a dedicated photo-transfer program.
When Windows recognizes an unlocked iPad, you can access photos exposed through its DCIM storage. This method is suitable when you simply want to copy Camera Roll pictures, although browsing and organizing large photo libraries can be less convenient than using dedicated transfer software.
Step 1. Connect both your iPad and flash drive to the Windows PC. Unlock the iPad and tap Trust if a trust prompt appears.
Step 2. Open File Explorer, select This PC, and find your iPad under the connected devices.
Step 3. Open Apple iPad > Internal Storage > DCIM. Depending on your device and photo library, the DCIM directory may contain multiple folders.
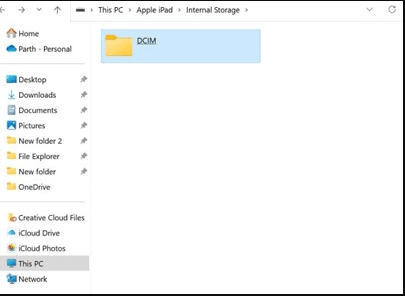
Step 4. Locate and select the pictures you want to transfer. Right-click them and choose Copy.
Step 5. Open your USB flash drive in File Explorer, navigate to the desired destination folder, right-click an empty area, and choose Paste.
Step 6. Wait until Windows finishes copying the files before removing either device.
Way 3. Transfer iPad Photos to Flash Drive Using the Photos App
The built-in Photos application on a computer can also help import pictures from an iPad. This is useful if you prefer importing your photos to the computer first and then copying them to your USB storage device.
The exact interface can vary depending on your Windows or macOS version, but the general process is similar.
👉 On Windows
Step 1. Connect the iPad and flash drive to your computer. Unlock your iPad and authorize the computer if required.
Step 2. Open the Photos app and select Import > Apple iPad.
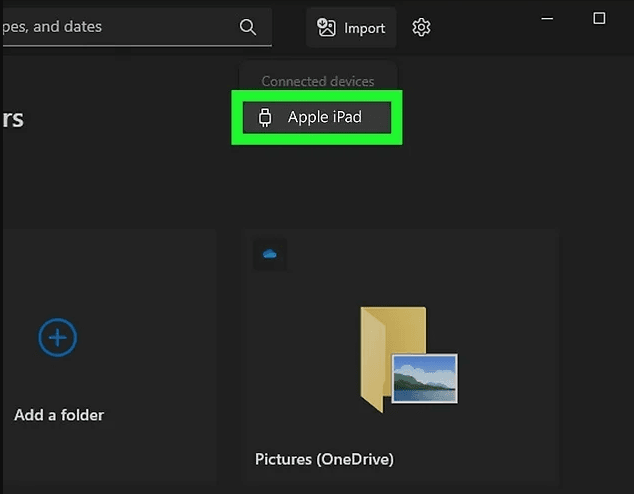
Step 3. Wait while Photos detects the available pictures. Select the images you want to import and click the blue button Add xx items (xx stands for the number of selected photos).
Step 4. Confirm the destination folder (C:\Users\Username\Pictures) and click Import to save the selected photos to your Windows computer.
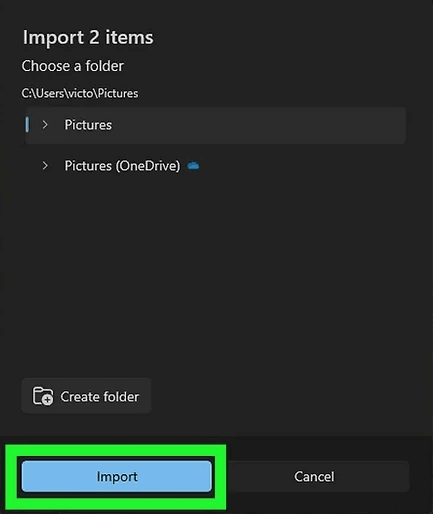
Step 5. Open the imported photo folder in File Explorer, select the pictures, and use Copy and Paste to move them to your USB flash drive.
👉 On Mac
Step 1. Connect your iPad and flash drive to your Mac and unlock the iPad.
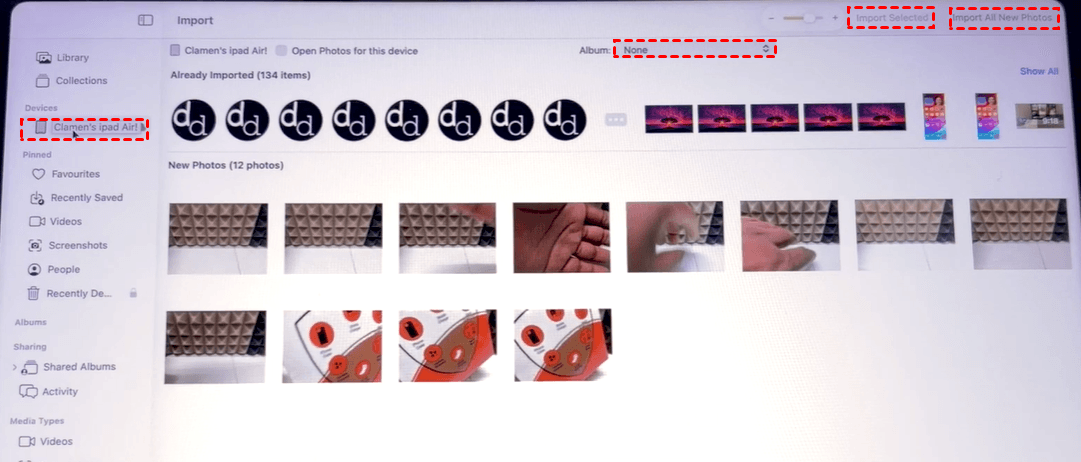
Step 2. Launch the Photos app and select your iPad from the Devices section.
Step 3. Next to Album, you can choose an existing album or create a new one to import your photos.
Step 4. Select the pictures you need, and then click Import Selected. To import everything that hasn't previously been imported, use Import All New Photos when available.
Step 5. After importing, open Finder and locate the Photos Library.photoslibrary file in your account’s Pictures folder (/Users/username/Pictures).
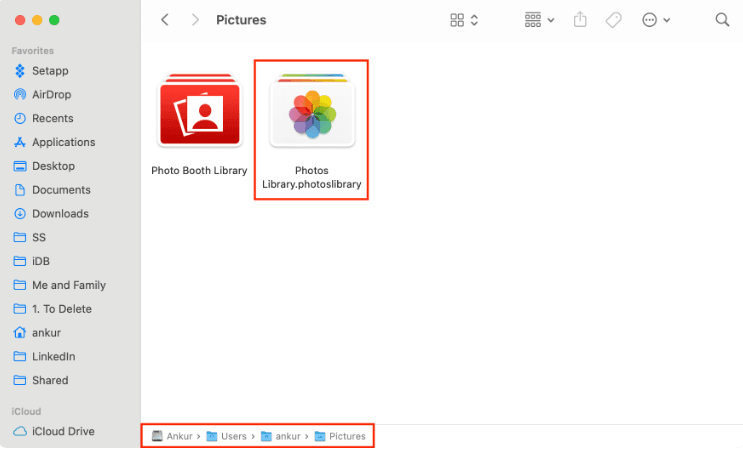
Step 6. Control-click the library file and select Show Package Contents. Then copy the exported photos to your flash drive.
Way 4. Transfer Photos from iPad to Flash Drive Without Computer
Don't have access to a PC or Mac? You may be able to transfer photos from iPad to flash drive without computer by connecting external storage directly to your iPad.
Modern versions of iPadOS support external storage devices through the Files app. However, the connection method depends on the port available on your iPad and the connector used by your flash drive.
For an older iPad equipped with a Lightning connector, you may need a compatible Lightning-to-USB adapter. If your iPad uses USB-C, you can connect a compatible USB-C flash drive directly or use an appropriate USB-C adapter or hub. Follow these steps to move iPad photos to external storage:
Step 1. Connect the USB flash drive to your iPad using the appropriate port, adapter, or hub.
Step 2. Open the Photos app and tap Select. Choose the photos you want to copy to the flash drive.
Step 3. Tap the Share button, scroll through the available actions, and select Save to Files.
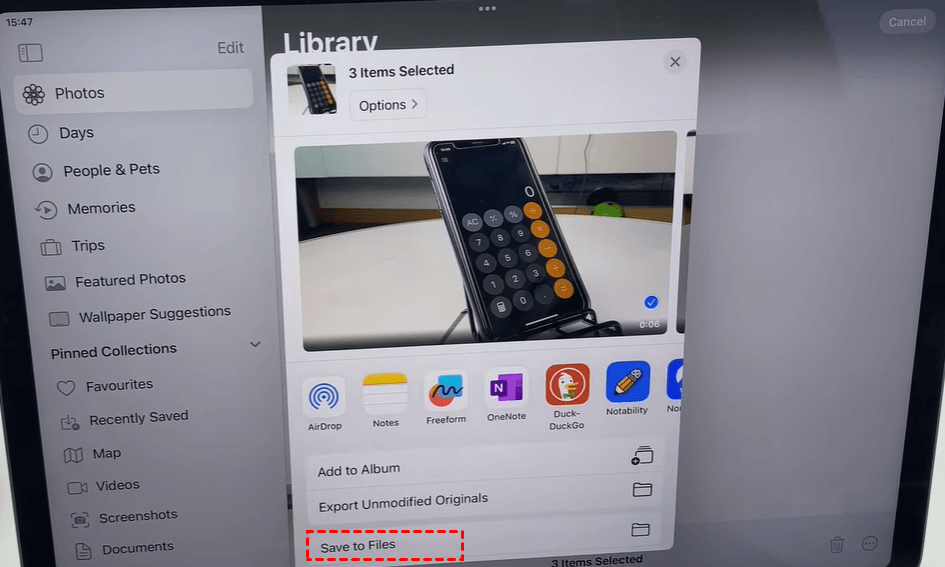
Step 4. Under Locations, select your connected USB flash drive.
Step 5. Open the folder where you want to store the pictures, and then tap Save.
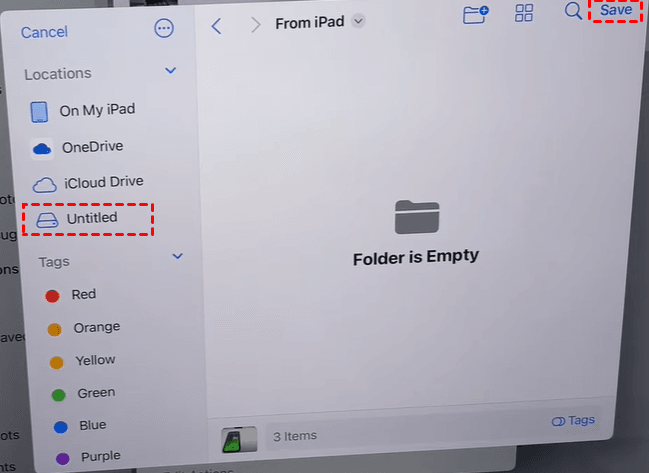
Step 6. After the export finishes, check the drive in the Files app before disconnecting it.
What to Do If iPad Photos Won't Transfer to a Flash Drive
Sometimes an iPad or USB drive may not appear as expected. If you cannot transfer photos from iPad to USB drive, try these quick checks.
✅ Make sure the iPad is unlocked: A computer may not be able to access the iPad's photos while the device is locked.
✅ Trust the computer: If you connect the iPad to a new computer, look for the Trust This Computer? prompt and tap Trust.
✅ Check the USB connection: Reconnect the flash drive or try another USB port. When connecting a drive directly to an iPad, make sure your adapter is compatible with both devices.
✅ Check available space: If the flash drive is nearly full, there may not be enough capacity for your selected pictures or videos.
✅ Transfer fewer photos at once: When moving a very large library, try transferring pictures in smaller batches.
✅ Consider photo formats: iPads can store pictures in HEIC format. If another device cannot open the transferred HEIC photos, convert them to a more widely supported format such as JPEG.
FAQs About Transferring Photos from iPad to Flash Drive
1. How do I transfer photos from iPad to flash drive without computer?
Connect a compatible USB flash drive to the iPad, select the pictures in the Photos app, and choose Share > Save to Files. Select the USB drive under Locations and save your pictures there.
2. Can I copy all my iPad photos to a USB stick at once?
Yes, but the best method depends on the size and organization of your photo library. For Windows users who need to select and transfer a large number of photos, AOMEI FoneBackup provides a more dedicated transfer interface. You can also use File Explorer or import photos through the computer's Photos app.
3. Will transferring photos to a flash drive delete them from my iPad?
Normally, no. The methods above copy or export the photos rather than automatically deleting the originals. After verifying that the files have been successfully saved to the flash drive, you can manually delete unwanted pictures from the iPad if your goal is to free up storage.
To Sum Up
Knowing how to transfer photos from iPad to flash drive gives you an easy way to back up important pictures and reduce the amount of storage occupied on your tablet.
This guide explains 4 effective methods, including AOMEI FoneBackup, Windows File Explorer, the Photos app, and the iPad Files feature. You can choose a method that best fits your needs.
Besides photo transfer, AOMEI FoneBackup provides useful iPhone backup and data management features to help keep your iOS data safe. Why not give it a shot?

 as a preferred
source on Google
as a preferred
source on Google