



Transfer MOV to iPhone Camera Roll: 6 Ways from Files App or PC
Wondering how to move .mov videos to iPhone Camera Roll? This guide covers 6 ways to transfer MOV to iPhone from Files app or computer, with or without iTunes.

By Ivy Updated on July 22, 2026


You download a .mov video on your iPhone: from an email, a website, or a cloud drive. You want it in your Camera Roll to view, share, or edit. But when you tap the file, there's no "Save to Camera Roll" option. Frustrating, right?
You're not alone. It's one of the most common questions on Apple forums. Photos and videos you take with your iPhone go straight to Camera Roll—but .mov files you download from browsers or other apps? Those don't. That's where it gets tricky.
The best approach depends on where your file is right now. Already on your iPhone? Sitting on a Windows PC? Prefer wired or wireless? To cover every situation, this guide walks you through 6 practical methods, each with its own ideal use case.
Pick the one that fits your setup, and you'll have that video in your Camera Roll in no time.
Quick Navigation: Which Method Is Right for You?
| 🔧 Method | 🎯 Best For | 💻 Platform |
|---|---|---|
| Files App + iMovie | MOV already on your iPhone | iPhone only |
| AOMEI FoneBackup | Large files/batch transfer from PC | Windows PC |
| iTunes | Users who already use iTunes | Windows PC |
| iCloud | Small files / wireless transfer | Any computer |
| AirDrop | Mac users with Apple ecosystem | Mac + iPhone |
| Google Drive / Dropbox | Cross‑platform cloud users | Any device |
Method 1: MOV Already on Your iPhone? Use Files App + iMovie
🎯 Best for: The MOV file is already on your iPhone - downloaded from a browser, saved from an email attachment, or synced via a cloud service.
If the file is on your device but not in Camera Roll, here's a native iOS trick that doesn't require any extra apps.
Things to keep in mind:
-
iMovie is free and pre‑installed on most iPhones. If you don't have it, download it from the App Store.
-
Exporting preserves video quality - no compression loss during this process.
Step 1. On your iPhone, open the Files app, then navigate to the folder where the MOV file is stored. Depending on which browser or app you used to download it, the file may be in a Downloads folder, browser folder, or elsewhere.
Step 2. Can't find it? Swipe down from the middle of the Home screen, tap the search field, enter the file name, and tap Go to locate it quickly.

Step 3. Tap the .mov file. It will automatically open in iMovie. If not, select iMovie from the share sheet.
Step 4. Go to the Project page of iMovie, select the video you want to move, tap the Share icon, then tap Save Video.
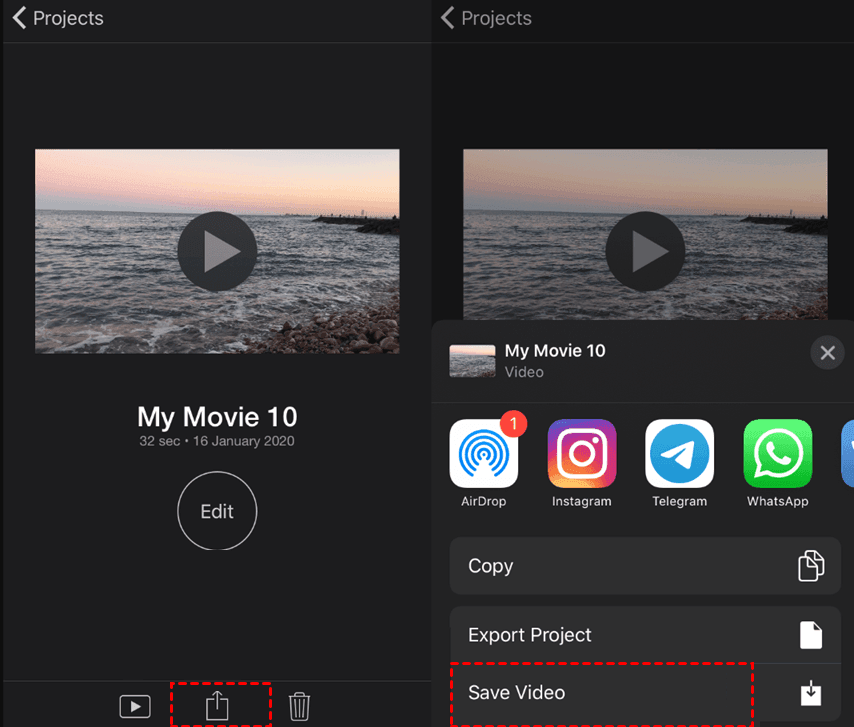
Step 5. Choose a size to export it to Camera Roll. The video will now appear in your Photos app.
This method works best when the MOV file is already on your iPhone. If it's still on your computer, skip to Methods 2–5.
Method 2: Transfer MOV to iPhone Camera Roll with AOMEI FoneBackup (Fastest for Large Files)
🎯 Best for: Large MOV files (over 1GB), batch transfers, or users who want a simple, reliable alternative to iTunes.
If you have .mov files saved on your computer and want to transfer them to iPhone Camera Roll quickly and without hassle, AOMEI FoneBackup is a professional iPhone backup and transfer tool for Windows. It serves as a perfect iTunes alternative and actually outperforms iTunes in several ways.
 AOMEI FoneBackup
- Selective transfer: Transfer all or selected .mov files (plus .mp4, .wmv, etc.), along with other data like photos, music, and messages.
- No Data Loss: Transfer .mov files at high speed without compression, and leave all your existing data completely safe.
- >Simple and Fast: Transfer .mov from computer to iPhone camera roll in simple steps. It doesn't take much time, even for large videos.
- Versatile Transfers: Besides PC to iPhone, it also supports iPhone/iPad to PC and between two iPhones. No Wi-Fi, iCloud, or Apple ID needed.
- Free version available: 30 files/day free; Pro for unlimited transfer
- Wide compatibility: Supports all iOS versions and all iPhone models.
 100% Secure
How to transfer MOV to iPhone Camera Roll with AOMEI FoneBackup:
Step 1. Download and install AOMEI FoneBackup on your Windows PC. Connect your iPhone to the computer with a USB cable and tap Trust if prompted.
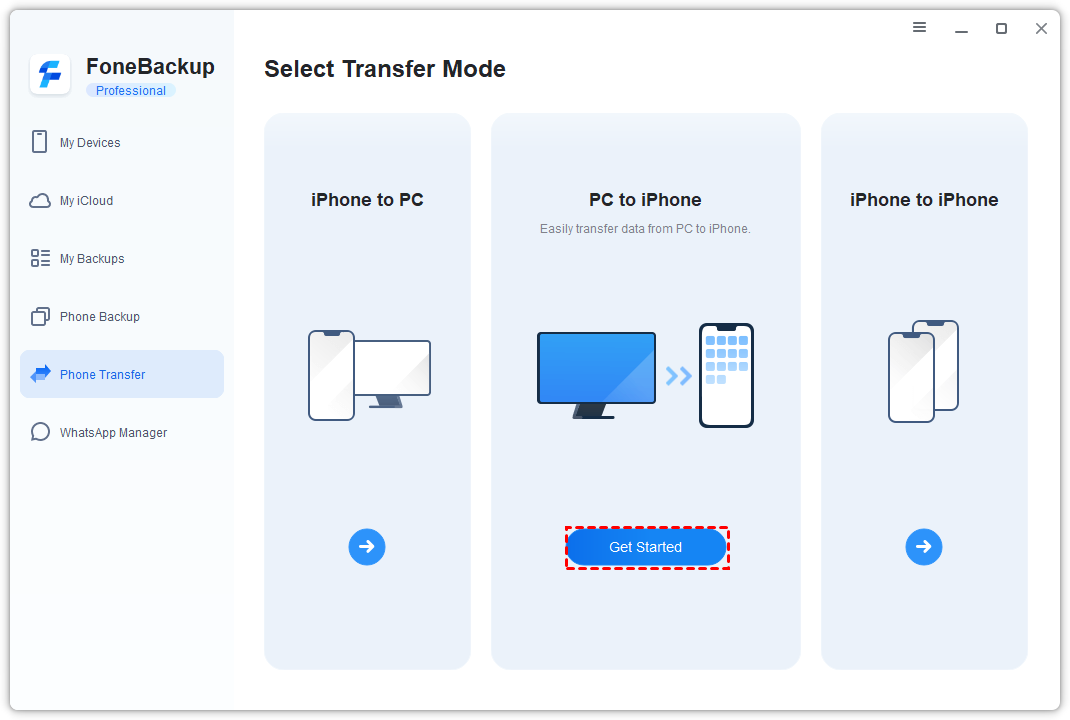
Step 2. Select Phone Transfer, choose PC to iPhone, then click Get Started.
Step 3. Click the Videos icon, then the folder icon to add .mov videos from your computer. Click Open to continue.
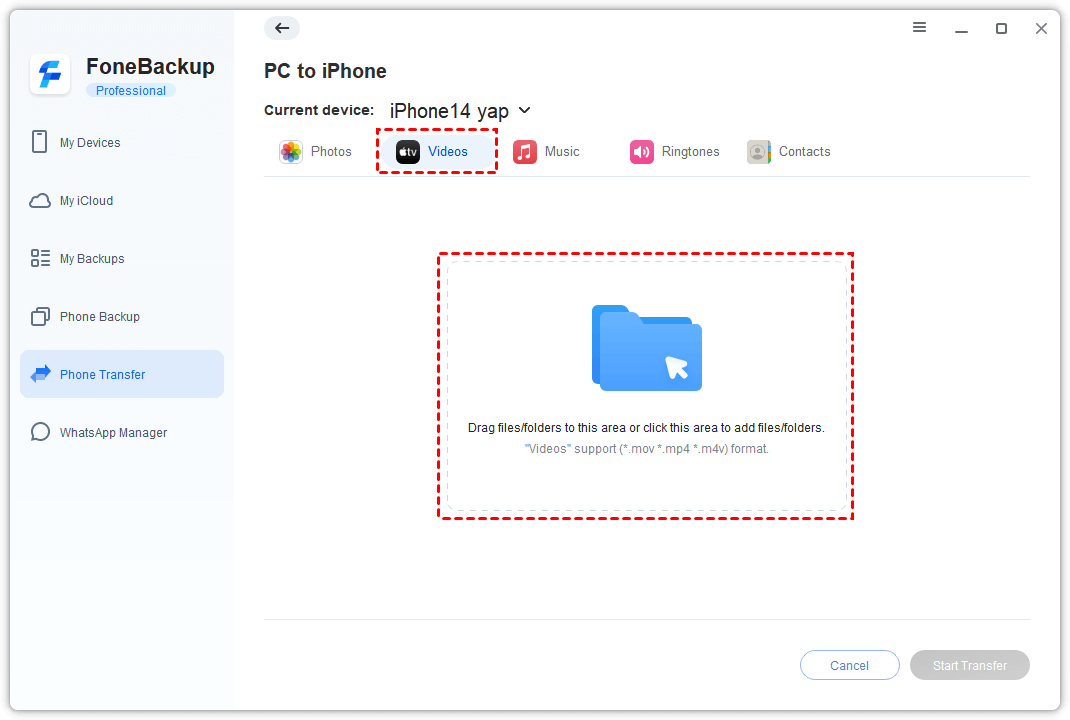
Step 4. Confirm you select all .mov files you want and click Start Transfer.

When it's finished, unplug your iPhone and go to the Photos app to check your videos.
Method 3: Transfer MOV to iPhone Camera Roll with iTunes
🎯 Best for: Users who already use iTunes regularly and don't want to install additional software.
If the .mov files are saved on your computer, you may consider sending .mov from computer to the iPhone Camera Roll with iTunes. iTunes can be used to download and purchase media files, and it's also a reliable way to export .mov videos to iPhone Camera Roll.
Step 1. Download and install the latest version of iTunes. Connect your iPhone to your computer with a USB cable.
Step 2. In iTunes, click the phone icon. Go to Summary, click Options, and turn on the option Manually manage music and videos.
Step 3. Go to File, tap Add File to Library to select .mov videos from your computer.
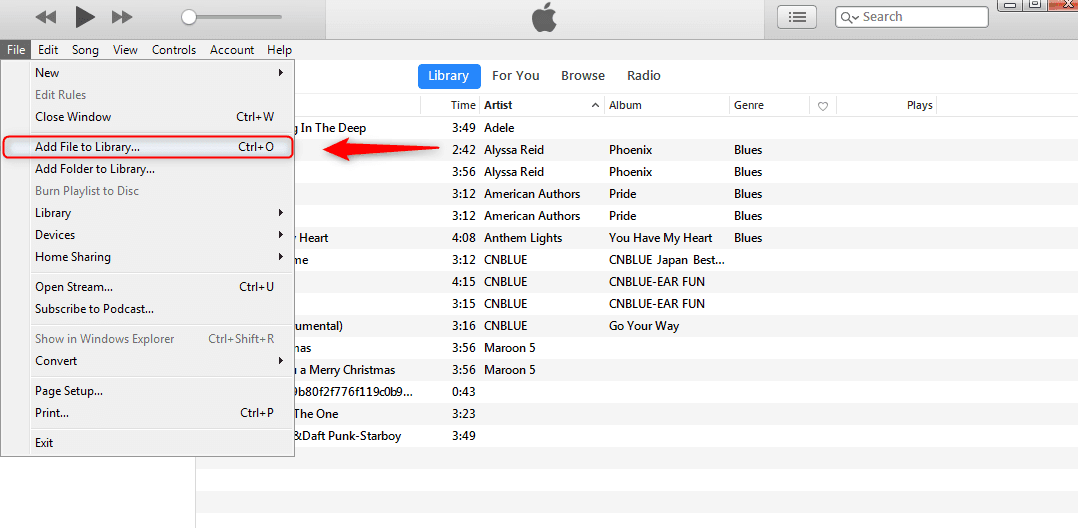
Step 4. Go to Movies, check Sync Movies to choose the wanted files, and click Apply to start the task.
Check our guide on how to fix iPhone is not showing up in iTunes (if needed).
Method 4: Transfer MOV to iPhone Camera Roll Using iCloud (Wireless)
🎯 Best for: Small MOV files (under 5GB) and users who prefer a wireless, no‑cable solution.
If you want to transfer .mov to iPhone Camera Roll wirelessly, iCloud is a good option. You can manually upload .mov videos to iCloud and download them to your iPhone.
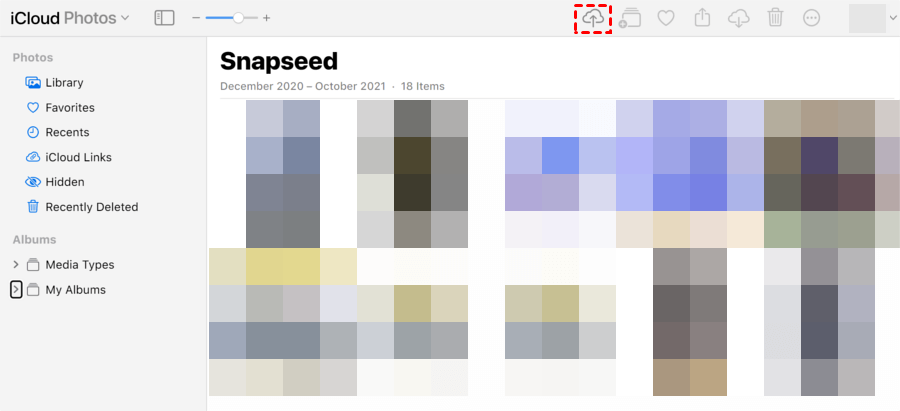
Step 1. On your computer, open a web browser and go to icloud.com.
Step 2. Sign in with your Apple ID and password, then click Photos > Upload and select the .mov videos from your computer.
Step 3. On your iPhone, go to Settings > [your name] > iCloud > Photos. Toggle on Sync this iPhone to download the .mov files to your iPhone.
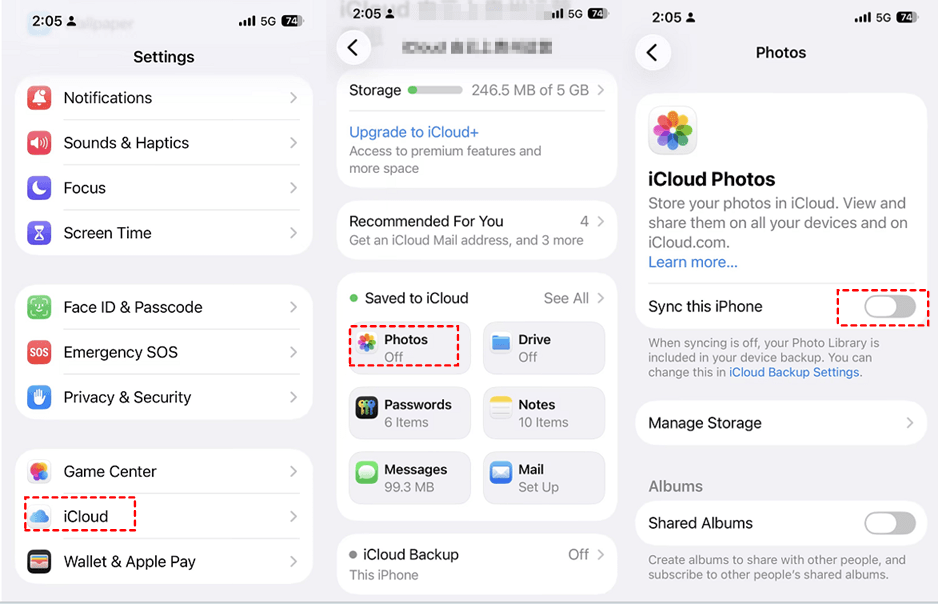
Your .mov files will appear in the Photos app once synced.
Method 5: Transfer MOV to iPhone via AirDrop (Mac Users Only)
🎯 Best for: Mac users who want a fast, wireless transfer between Mac and iPhone with no file size limits.
AirDrop is the gold standard for wireless file transfer within the Apple ecosystem. It uses close‑range wireless communication to move files instantly between Apple devices.
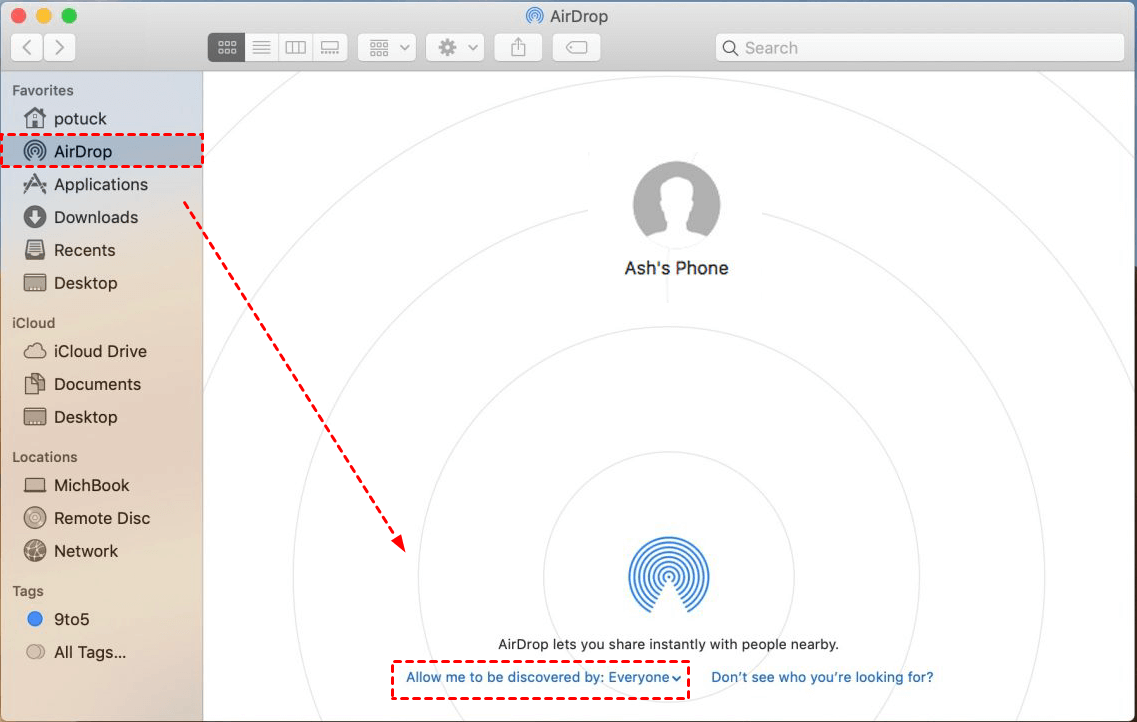
Step 1. On your Mac, open a new Finder window and select AirDrop from the Favorites sidebar.
Step 2. At the bottom, set Allow me to be discovered by to Everyone. Or Contacts Only if your devices share the same Apple ID.
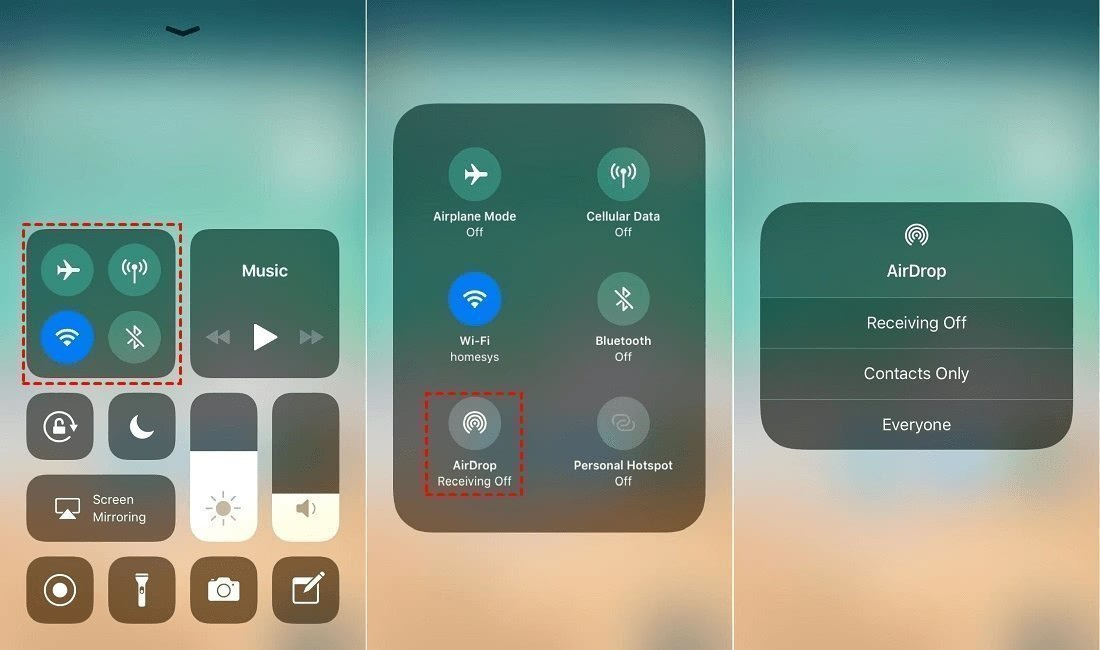
Step 3. On your iPhone, swipe down from the top‑right corner to open Control Center. Press firmly (or long‑press) on the network settings card, tap AirDrop and select Everyone (or Contacts Only).
Step 4. On your Mac, locate the MOV file, right‑click and select Share > AirDrop. Tap on your iPhone's icon when it appears.
Step 5. On your iPhone, a pop‑up will appear, tap Accept.
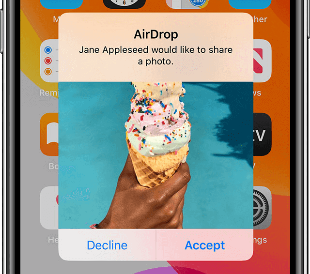
The MOV file will save to your Downloads or Files app. From there, use Method 1 to move it to Camera Roll if needed.
✅ Pros: Fast, wireless, no file size limits, seamless Apple ecosystem integration. ❌ Cons: Mac only; does not work with Windows PCs.
Method 6: Transfer MOV to iPhone via Google Drive or Dropbox (Cross‑Platform)
🎯 Best for: Users who already use cloud storage services and want to access files across multiple devices.
If you use Google Drive, Dropbox, or similar cloud services, you can upload your MOV file from your computer and download it to your iPhone - all without cables or iTunes.
Step 1. On your computer, open your preferred cloud service (Google Drive, Dropbox, OneDrive, etc.) in a web browser.
Step 2. Upload the MOV file to your cloud storage.
Step 3. On your iPhone, open the corresponding cloud app (Google Drive, Dropbox, OneDrive). Navigate to the uploaded MOV file, tap the Share icon, and select Save to Files or Save Video.
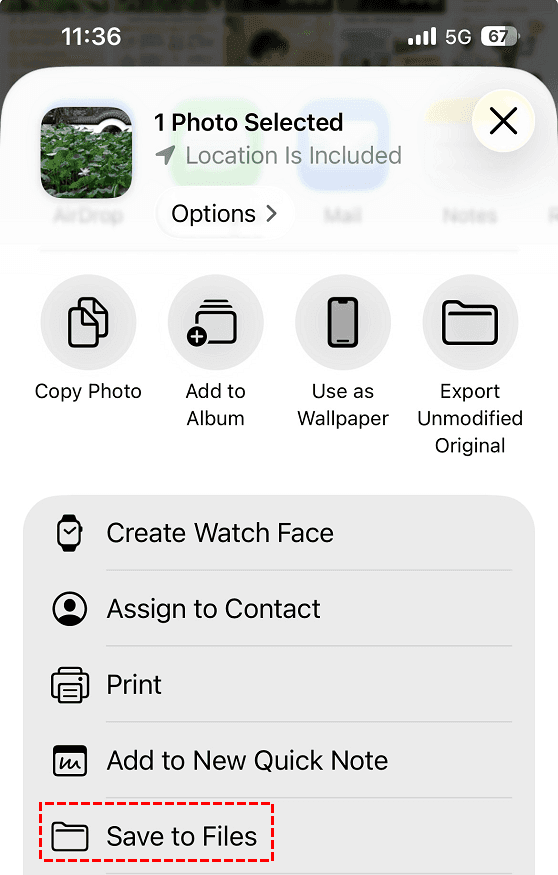
If saved to Files, follow Method 1 to move it to Camera Roll using iMovie.
✅ Pros: Works across Windows, Mac, and iPhone; no cables needed. ❌Cons: Upload and download speeds depend on your internet connection; free storage limits apply.
Which Method Should You Choose?
| 🔍Your Situation | 🔧 Recommended Method |
|---|---|
| MOV already on iPhone | Method 1: Files App + iMovie |
| Large files on Windows PC | Method 2: AOMEI FoneBackup |
| Already use iTunes | Method 3: iTunes |
| Small files, want wireless | Method 4: iCloud |
| Mac user | Method 5: AirDrop |
| Use cloud storage regularly | Method 6: Google Drive / Dropbox |
Frequently Asked Questions
Q: Why can't I just tap "Save to Camera Roll" on a downloaded MOV file?
A: iOS doesn't provide a direct "Save to Camera Roll" option for files downloaded outside the Photos app. You need to use one of the methods above to transfer them.
Q: Will transferring via AOMEI FoneBackup compress my video quality?
A: No. The transfer process doesn't compress .mov files, so your video quality remains intact.
Q: What's the fastest way to transfer large MOV files?
A: For large files, a wired transfer using AOMEI FoneBackup or iTunes is significantly faster than wireless methods like iCloud or AirDrop.
Q: My MOV file won't play on iPhone after transfer. What should I do?
A: iPhone supports MOV files encoded with H.264 or HEVC. If your file uses a different codec, you may need to convert it first using a video converter tool.
Conclusion
That's all for the ways to transfer .mov files to iPhone Camera Roll. To summarize:
-
If the videos are already on your iPhone, locate them in the Files app and move them to Camera Roll one by one using iMovie.
-
To send .mov from your computer to iPhone Camera Roll, you can utilize AOMEI FoneBackup, iTunes, or iCloud.
-
For Mac users, AirDrop offers a fast wireless alternative.
-
For cross‑platform cloud users, Google Drive or Dropbox work seamlessly.
Choose the method that best fits your devices, file sizes, and preferences and you'll have your MOV videos in Camera Roll in no time.

 as a preferred
source on Google
as a preferred
source on Google