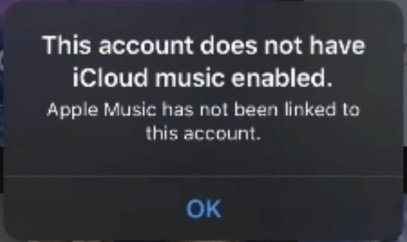
7 Fixes | "This Account Does Not Have iCloud Music Enabled"
his account does not have iCloud music enabled? Try 7 fixes - check settings, sign out and in, update software, and more. Plus a tool to transfer music without iCloud.
By Kelsey Updated on May 14, 2026
Doesn't Have A Subscription to Apple Music
I have 1 iCloud account I use across all my devices, and I have purchased an Apple Music subscription. When I toggle Sync Library option and after about 15 seconds I get the message saying that This account does not have iCloud Music Library enabled.
- Question from Apple user
Whether you're a current Apple Music subscriber or you've recently canceled, that pop‑up is frustrating. You just want to listen to your music, but instead, you're stuck dismissing an error that keeps coming back. The message this account does not have iCloud music enabled can appear for several reasons - server issues, outdated software, or simply a setting that got flipped.
This guide covers seven proven fixes, plus a way to transfer music between devices that doesn't rely on iCloud at all.
Why Does "This Account Does Not Have iCloud Music Enabled" Appear?
The error can happen whether you have an active Apple Music subscription or not. Common causes include:
- Apple server issues: Sometimes the problem isn't on your end; Apple's servers can be temporarily down.
- Outdated iOS or iTunes: Older versions can have bugs that trigger this message.
- Improper settings: iCloud Music Library may be turned off, or your computer may not be authorized.
- Network problems: A weak or unstable connection can prevent your iPhone from verifying your account.
- Account sign‑out issues: Sometimes signing out and back in clears the error.
7 Fixes for the iCloud Music Library Error
Try these in order. Most take just a minute or two.
🔍You May Wanna Know: How to Transfer Apple Music to Spotify | 2 Useful Ways
Tip 1. Check Basic Settings
Make sure iCloud Music Library is turned on across your devices.
📱On iPhone or iPad: Go to Settings > Music and toggle on Sync Library (or iCloud Music Library, depending on your iOS version).
🖥In iTunes on Windows: Open iTunes. Go to Account > Authorizations > Authorize This Computer. Then click Edit > Preferences > General and check iCloud Music Library.
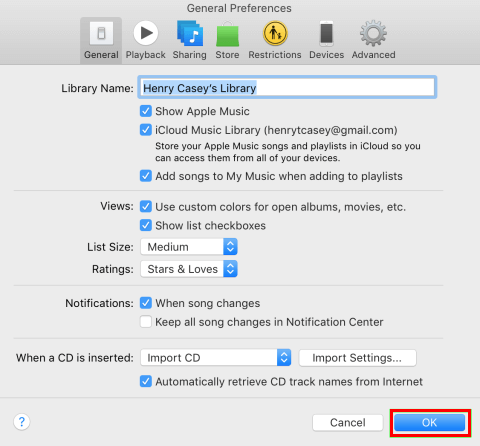
💻On Mac (Apple Music app): Open Apple Music. Go to Music > Preferences > General and check Sync Library.
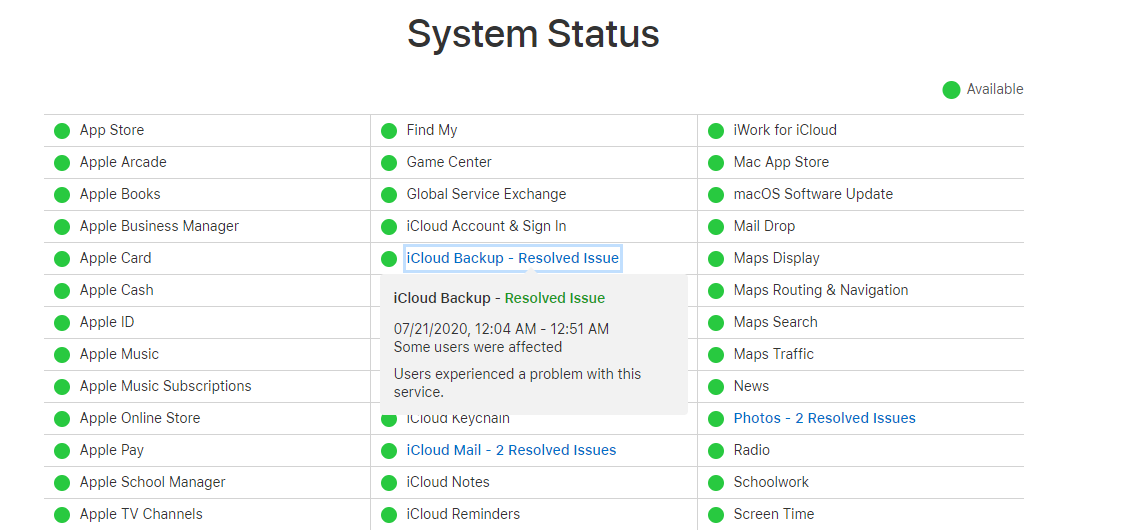
Tip 2. Check Apple System Status
If your settings are correct, the issue might be on Apple's side.
Step 1. Visit apple.com/support/systemstatus in a browser.
Step 2. Look for Apple Music in the list.
Step 3. If the dot is green, the server is working, move to the next fix. If it's yellow or red, wait a few hours and try again.
Tip 3. Sign Out and Sign Back In
A fresh sign‑in can clear authentication glitches.
📱On iPhone:
- Go to Settings > tap your name at the top > scroll down and tap Sign Out. Enter your Apple ID password if prompted.
- Then go to Settings > iTunes & App Store > tap your Apple ID > Sign Out.
Wait a few seconds, then sign back in to both iCloud and iTunes.
🖥On iTunes for Windows: Open iTunes, click Account > Sign Out, then sign back in.
Tip 4. Restart Your Device
A restart can clear temporary software glitches.
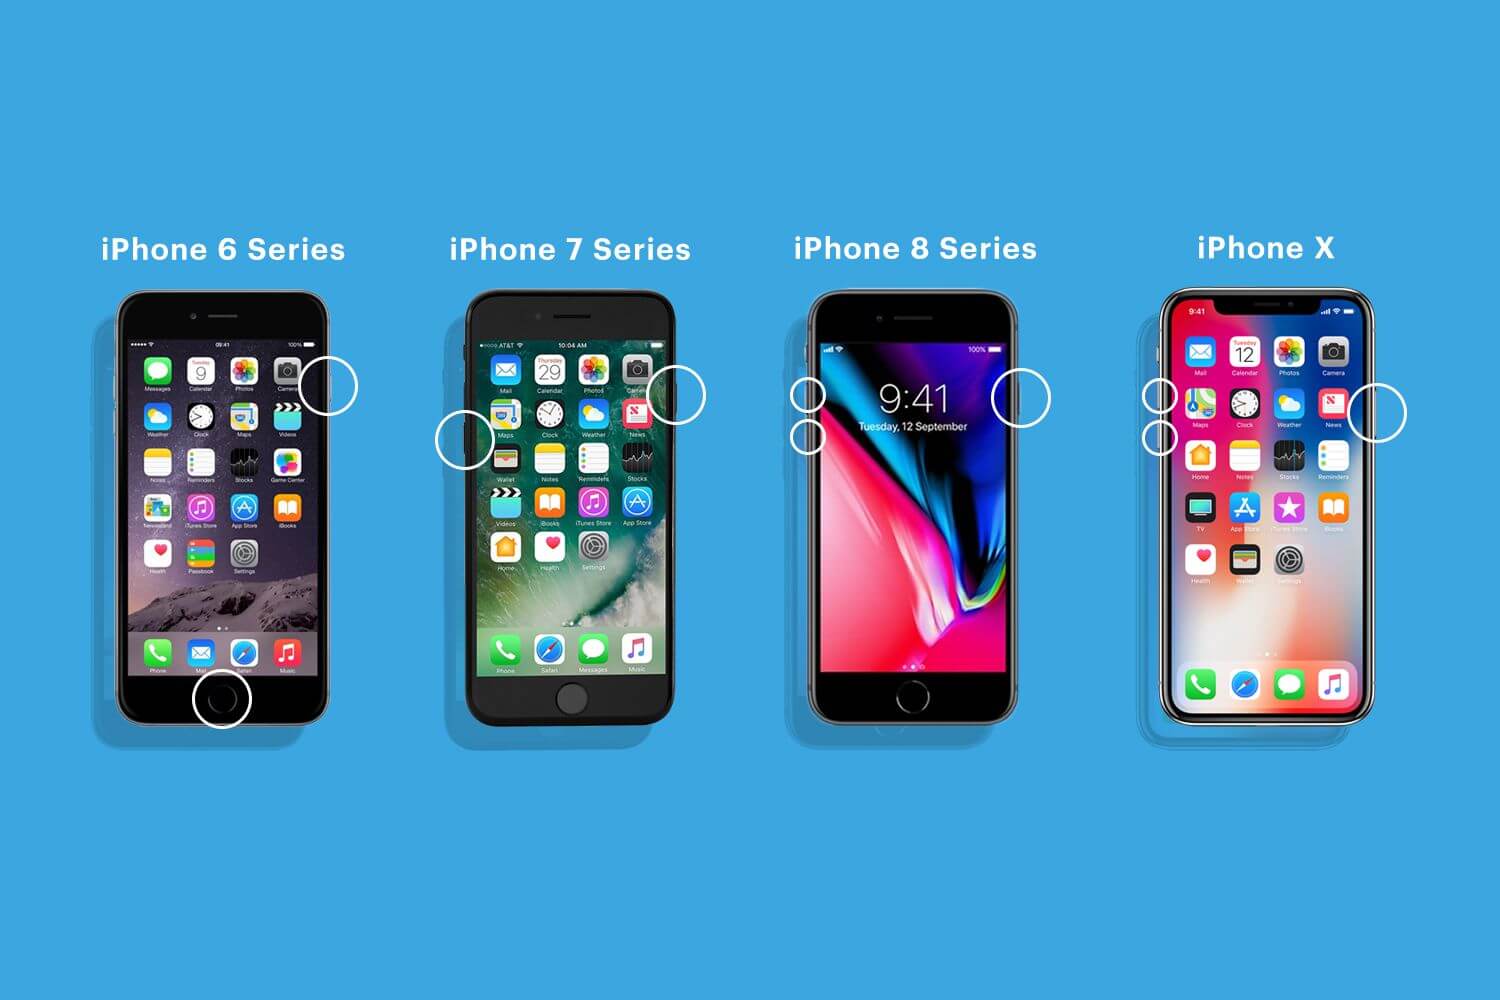
- iPhone 8 and later: Press and quickly release Volume Up, then Volume Down. Press and hold the Side button until you see the Apple logo.
- iPhone 7/7 Plus: Press and hold the Side button and Volume Down button until the Apple logo appears.
- iPhone 6s and earlier: Press and hold the Top (or Side) button and the Home button until the Apple logo appears.
Also restart your computer if you're using iTunes.
Tip 5. Check Your Network Connection
A poor connection can prevent your iPhone from reaching Apple's servers.
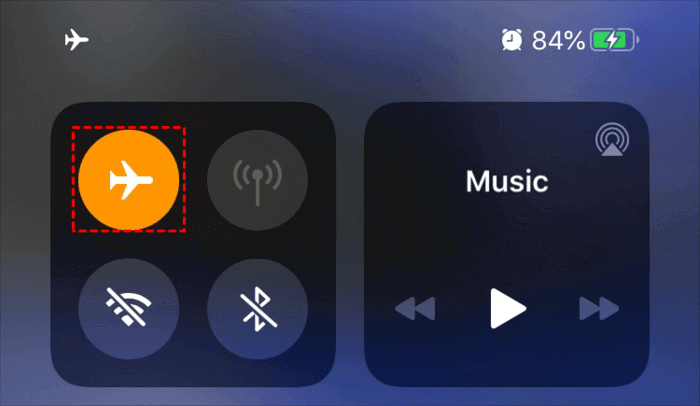
Step 1. Toggle Airplane Mode on and off.
Step 2. If you're on Wi‑Fi, restart your router.
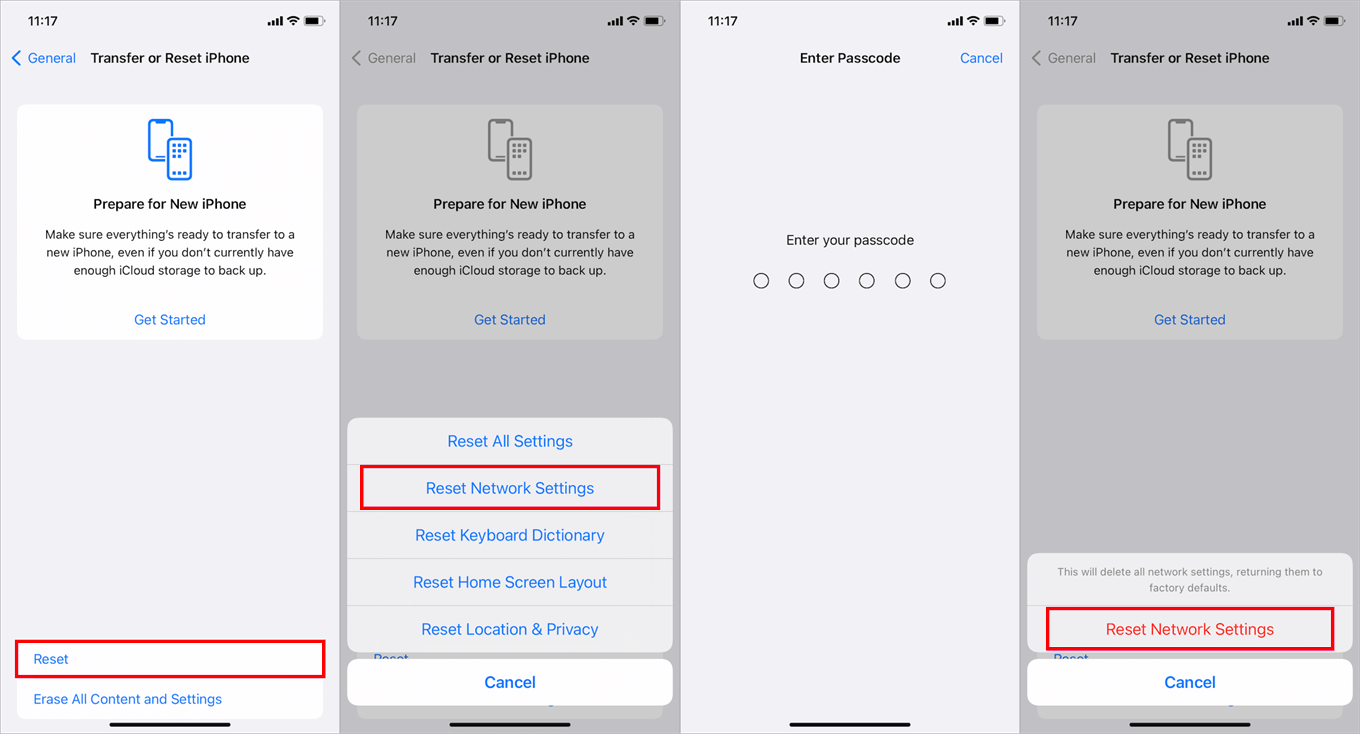
Step 3. For persistent issues, reset network settings: Settings > General > Transfer or Reset iPhone > Reset > Reset Network Settings. You'll need to re‑enter Wi‑Fi passwords afterward.
Tip 6. Update iOS, iTunes, and macOS
Outdated software is a common culprit.
📱On iPhone: Go to Settings > General > Software Update. Install any available update.

🖥On Windows: Open iTunes, go to Help > Check for Updates.
💻On Mac: Click the Apple logo > System Settings > Software Update.
Tip 7. Factory Reset Your iPhone
If nothing else works, a factory reset can clear deep‑seated software issues. This erases all data on your iPhone, so back up first.
✨How to back up before resetting:
AOMEI FoneBackup is a free Windows tool that lets you back up only the data you care about, or everything to your PC.
Step 1. Download and install AOMEI FoneBackup. Connect your iPhone with a USB cable and tap "Trust This Computer".
Step 2. Open AOMEI FoneBackup. Click Phone Backup, then choose Selective Backup to pick specific files, or Full Backup to save everything.

Step 3. Select the data you want to back up (photos, music, contacts, etc.). Click OK. Choose a location on your PC or external drive. Click Start Backup.
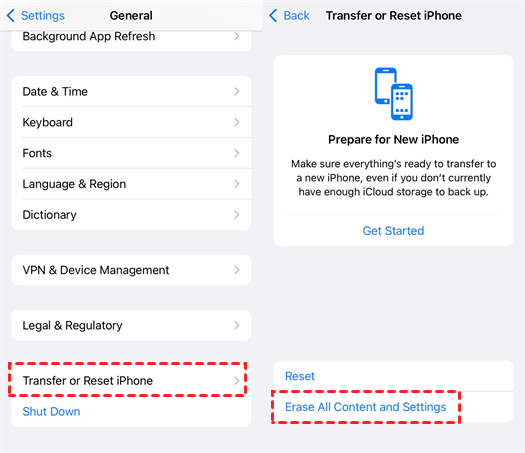
🔑Now reset your iPhone: Go to Settings > General > Transfer or Reset iPhone > Erase All Content and Settings. After the reset, set up your iPhone and restore your backup.
Bonus: An Easier Way to Transfer Music Between Devices
iCloud Music Library is convenient when it works, but it has limits. It requires a subscription, needs a stable internet connection, and won't let you share music with friends who have a different Apple ID.
If you want a simpler, more flexible way to move music between your iPhone and computer, or between two iPhones, AOMEI FoneBackup handles it in a few clicks.
- No Apple ID restrictions: Transfer music between devices with different accounts.
- Works with any music: Purchased songs or downloaded files—both work.
- Selective transfer: Pick specific songs instead of moving your whole library.
- USB connection: No internet required.
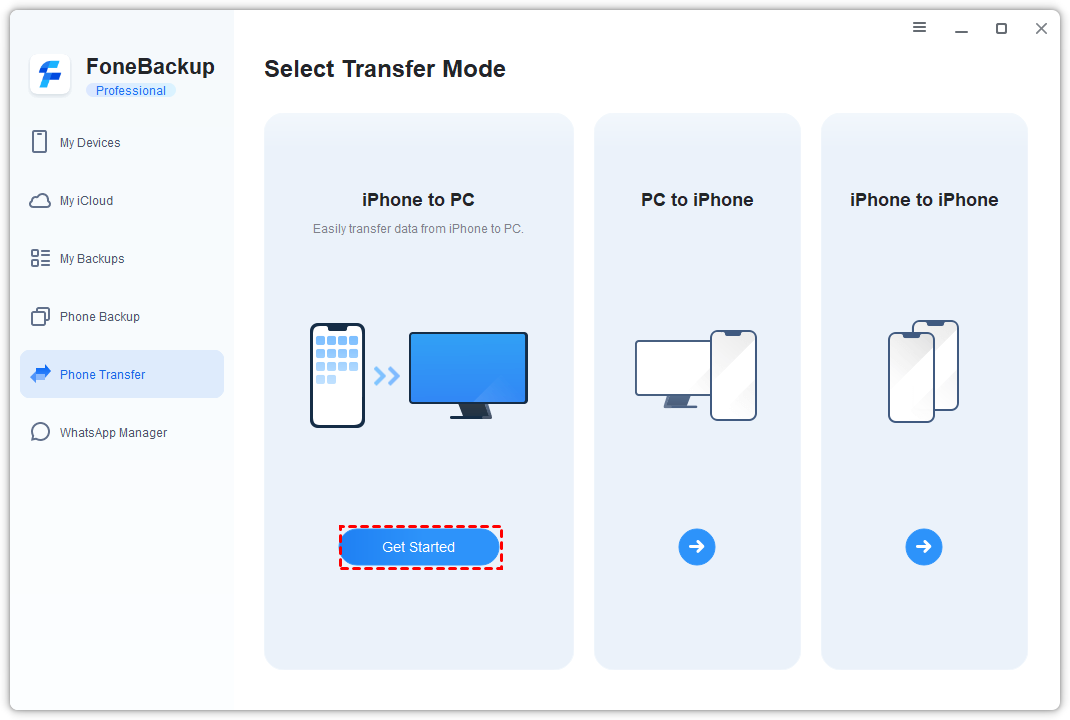
Transfer music from iPhone to computer:
Step 1. Connect your iPhone and open AOMEI FoneBackup. Click Phone Transfer > iPhone to PC.
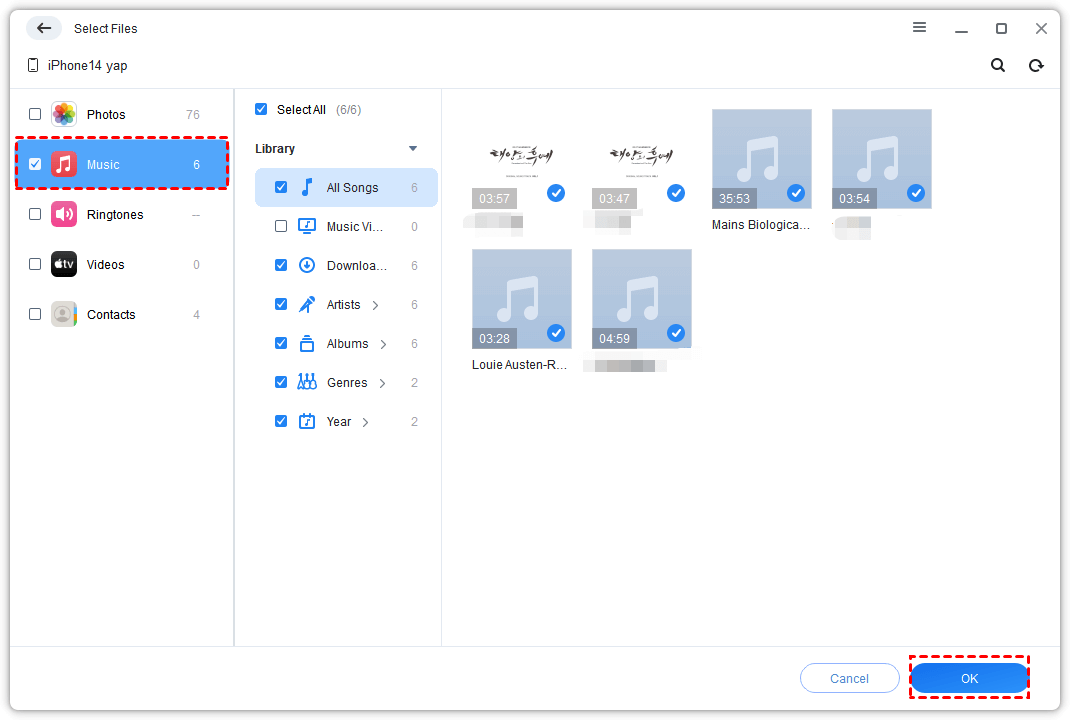
Step 2. Click the "+" icon, select the songs you want, and click OK.
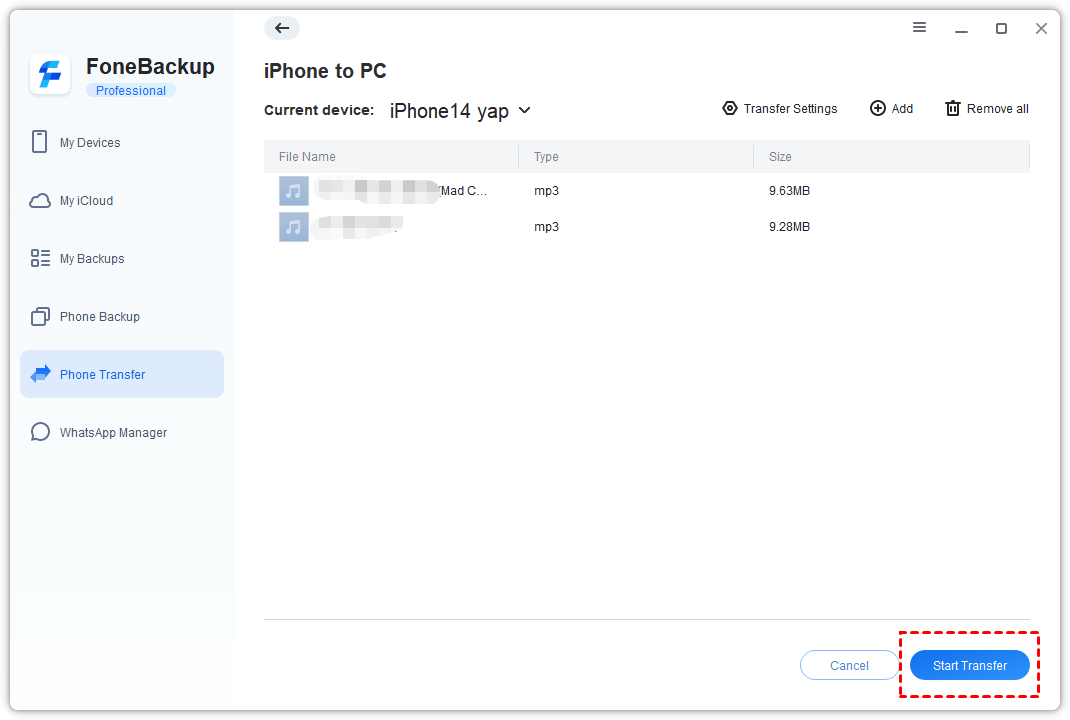
Step 3. Choose a destination folder and click Start Transfer.
Transfer music from computer to iPhone:
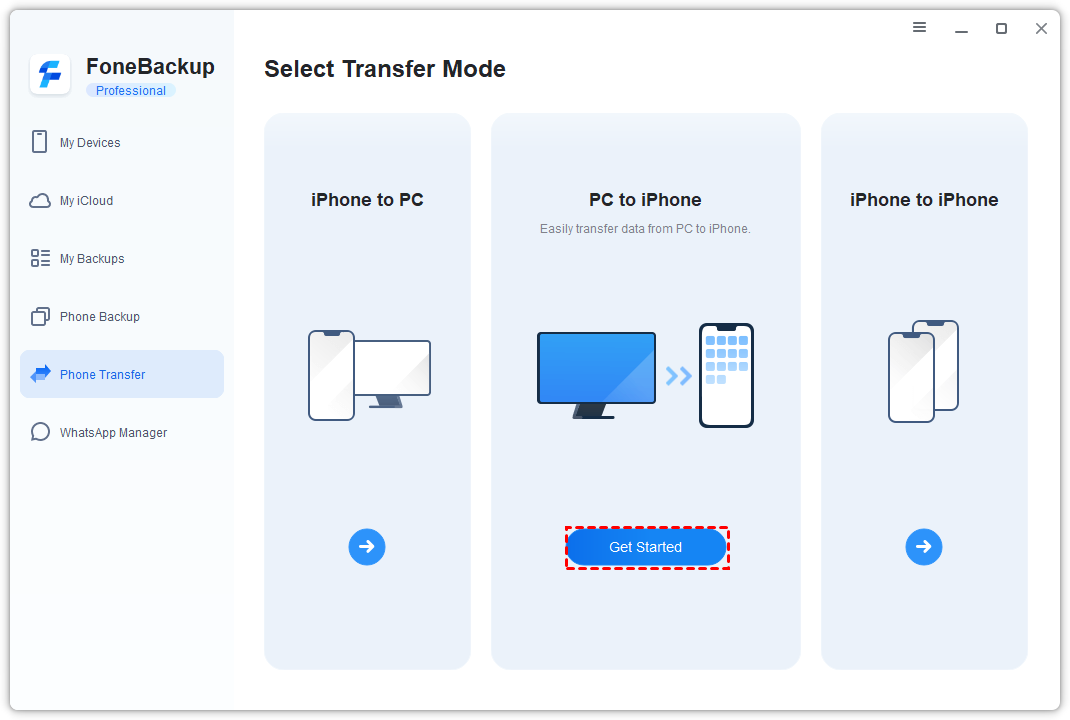
Step 1. In AOMEI FoneBackup, click Phone Transfer > PC to iPhone.
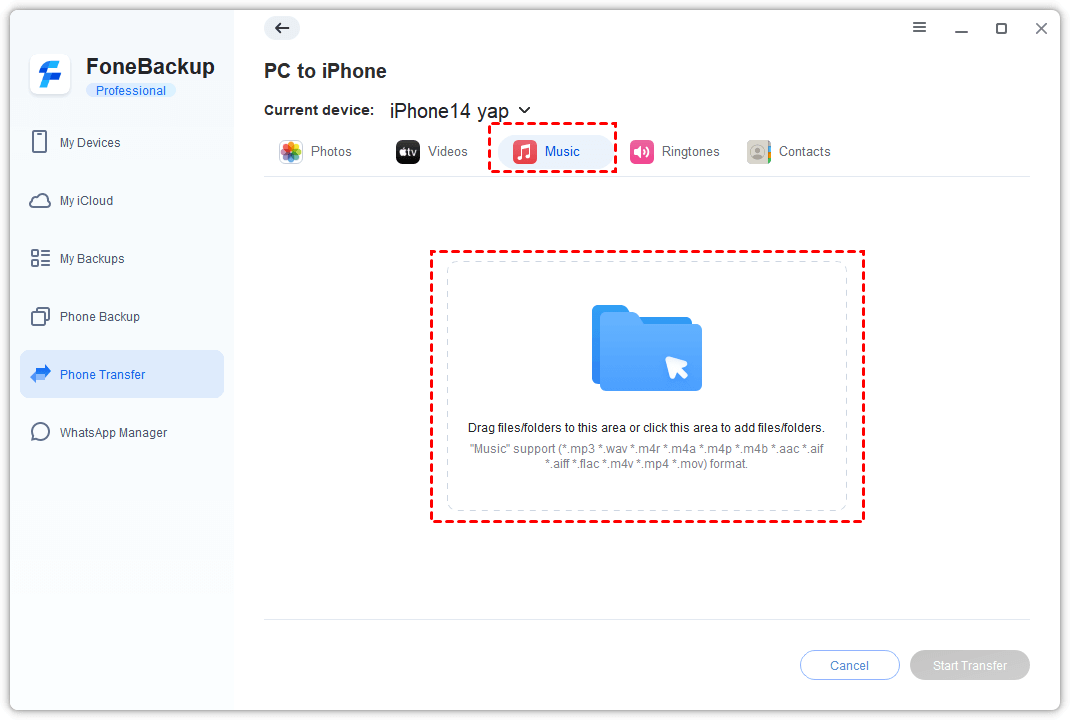
Step 2. Click the Music icon, add songs from your computer, and click OK.
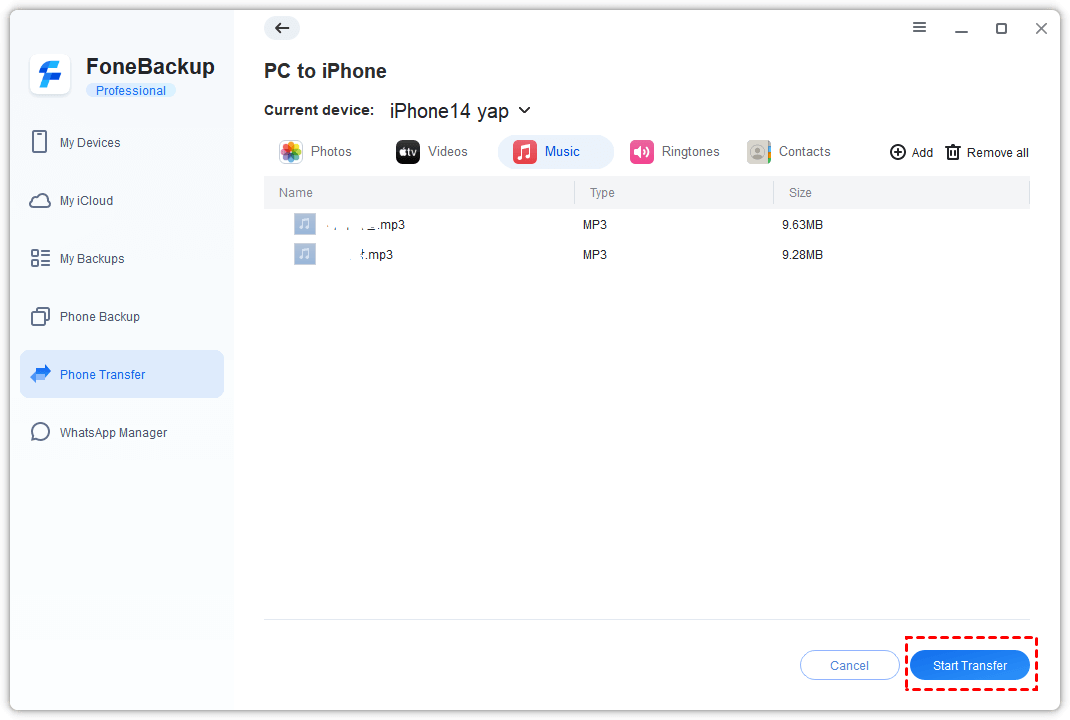
Step 3. Click Start Transfer. The songs will appear in Apple Music on your iPhone.
Final Words
The this account does not have iCloud music enabled error is frustrating, but it's usually fixable. Start with the basics; if the problem persists, signing out and back in or resetting network settings often does the trick. And if iCloud Music Library continues to give you trouble, AOMEI FoneBackup offers a reliable way to transfer your music without the headaches.