



My Music Disappeared from iTunes Library: 6 Fixes
Music gone from iTunes? Apply these practical fixes to restore missing songs, rebuild your library, and keep your collection safe going forward.

By Lily Updated on August 4, 2026


Why Did My Music Disappear from iTunes Library?
Seeing an empty or incomplete library does not always mean that your audio files were deleted. iTunes and the Apple Music app use a library database to display songs, playlists, ratings, and other details. If the app opens a new or damaged database, your collection can appear to vanish even while the media files remain on the drive.
The most common triggers include an app or system update, signing in with a different Apple Account, disabled Sync Library, a moved iTunes Media folder, a disconnected external drive, a damaged library file, or songs that exist only on an iPhone or iPad. Start with the quick checks below before rebuilding anything.
Quick Checks Before You Restore the Library
Confirm that the songs are truly missing rather than hidden, filtered, or stored elsewhere.
✅ Check the account: Open Account in iTunes or the Apple Music app and confirm that you are signed in with the Apple Account used for purchases or Apple Music.
✅ Clear filters: Switch to the Songs or Albums view, clear the search box, and show the complete library rather than only downloaded items.
✅ Reconnect storage: If the media folder is on an external drive, connect it and verify that the drive letter or volume name has not changed.
✅ Search the computer: Look for a known song title or common audio formats such as MP3, M4A, AAC, or WAV. Finding the files means you may only need to reimport or relink them.
Fix 1. Turn On Sync Library and Update the Cloud Library
Use this method if you subscribe to Apple Music or iTunes Match and the songs are present on another device. All devices must use the same Apple Account. Apple Music is not a backup service, so preserve any local originals before changing sync settings.
Step 1. Open the Apple Music app or iTunes and verify the signed-in Apple Account.
Step 2. Enable Sync Library.
- On iPhone or iPad, open Settings > Music and turn on Sync Library.
- In the Apple Music app on Mac or Windows, open Settings and enable Sync Library under General.
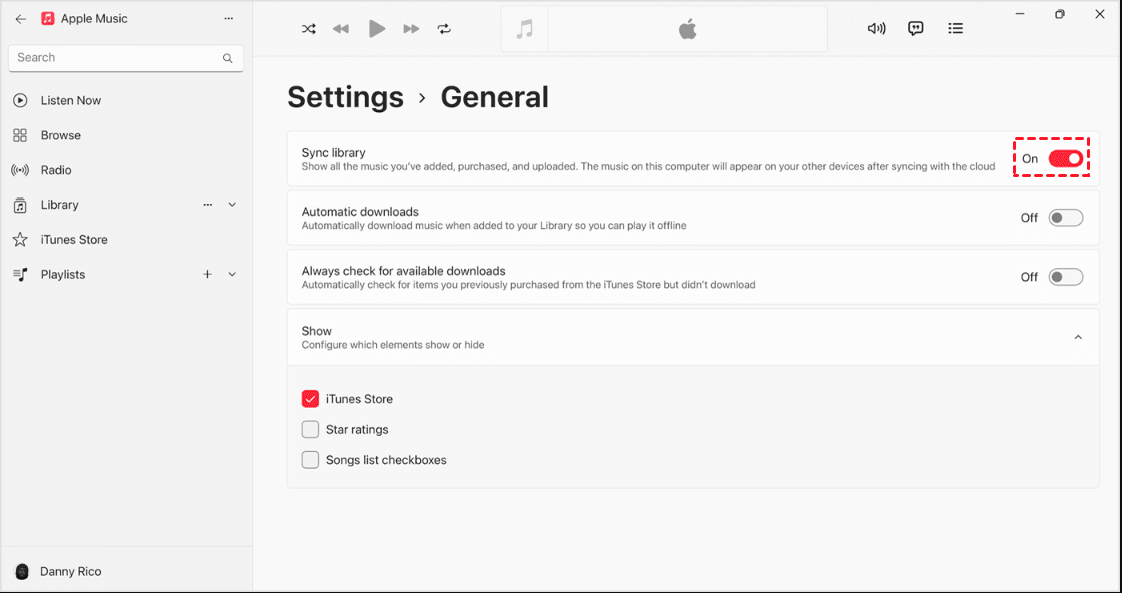
Step 3. Connect every device to a stable network and allow the library time to update.
Step 4. Update your Cloud Library on the computer that contains the original local library.
- In the Apple Music app on Mac, choose File > Library > Update Cloud Library.
- In the Apple Music app for Windows, use Sidebar Actions > Library > Update Cloud Library.
Step 5. Open iTunes. If a track shows an exclamation point, click the exclamation point, choose Locate, and point the app to the original audio file.
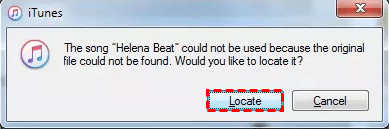
💡 Note: Use Find Files when offered to reconnect other tracks in the same folder.
Fix 2. Restore a Previous iTunes Library File
This solution is most useful for legacy iTunes installations that keep an iTunes Library.itl database and a Previous iTunes Libraries folder. It can restore playlists and library records after an update opens a blank or damaged database. Make a copy of the current iTunes folder first.
Restore the previous library on Windows
Step 1. Close iTunes completely.
Step 2. Open File Explorer and browse to C:\Users\[username]\Music\iTunes. Older systems may display this location as My Music\iTunes.
Step 3. Copy the entire iTunes folder to a safe location. Then move the current iTunes Library.itl file to the desktop instead of deleting it.
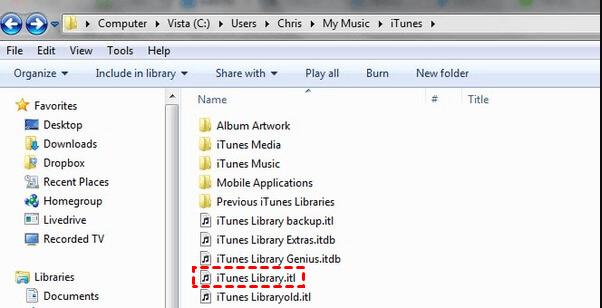
Step 4. Open the Previous iTunes Libraries folder and choose the newest dated .itl file created before the problem began.
Step 5. Copy that file into the main iTunes folder and rename the copy iTunes Library.itl.
Step 6. Open iTunes and check the songs and playlists. If the library is still incomplete, repeat the process with the next older dated file.
Restore an older library on macOS Mojave or earlier
Step 1. Quit iTunes and open Finder.
Step 2. Go to your Home folder > Music > iTunes and back up that entire folder.
Step 3. Move the active iTunes Library.itl file to the desktop.
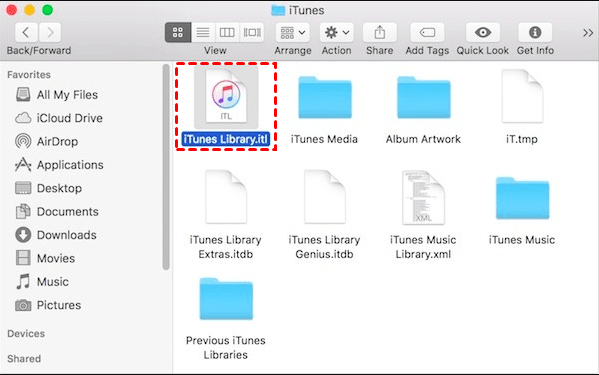
Step 4. Open Previous iTunes Libraries, copy the most suitable dated file to the iTunes folder, and rename it iTunes Library.itl.
Step 5. Launch iTunes and verify the collection.
💡 Note: On macOS Catalina or later, use the Music app and its library-management options because iTunes is no longer the standard music app.
Fix 3. Open the Correct Library Manually
If several libraries exist, the app may be opening a new empty one. Selecting the correct database can restore the view immediately without moving media files.
Step 1. Quit iTunes or the Music app.
Step 2. Hold Shift while opening iTunes on Windows, or hold Option while opening iTunes or Music on Mac.
Step 3. Click Choose Library when the small window appears. Then, browse to the expected library database and open it.
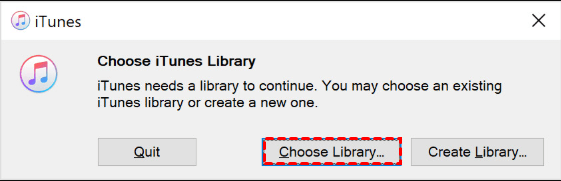
Step 4. Check whether the song count and playlists are correct. If not, close the app and test another backed-up library file.
Fix 4. Reimport Music Files That Are Still on the Computer
When the database entry is gone but the audio files remain, add the folder again. Reimporting may not restore ratings, play counts, or every playlist, but it returns playable tracks to the library.
Step 1. Search the computer and any external drive for the iTunes Media or Music folder.
Step 2. Open iTunes and choose File > Add Folder to Library on Windows, or use File > Import in the Music app on Mac.
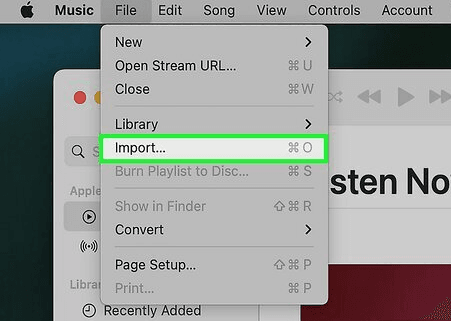
Step 3. Select the folder containing the missing audio files and confirm the import.
Step 4. After the import, remove only confirmed duplicates and rebuild playlists as needed.
Fix 5. Redownload Purchased Music
Songs bought from the iTunes Store can often be downloaded again when you use the purchasing Apple Account. Availability can vary by country, region, or catalog status.
Step 1. Open iTunes on your PC. Sign in with the Apple Account used to buy the missing songs.
Step 2. In the menu bar, choose Account, then select Purchased. If you use Family Sharing, you see Family Purchases.
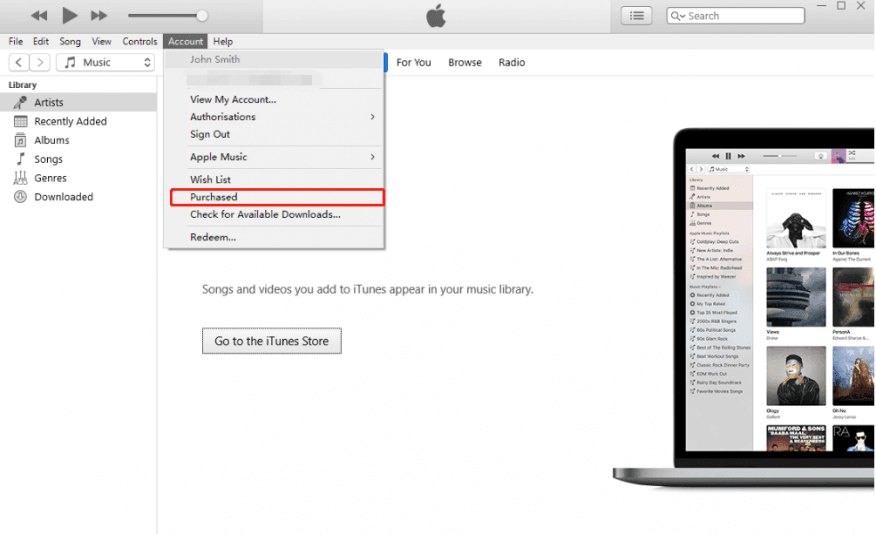
Step 3. In the upper-left corner of the iTunes window, choose Music from the pop-up menu.
Step 4. Find the music that you want to redownload. If you use Family Sharing, choose a family member to see their purchased music. From here, you can:
- Download an album: Click Albums, then click the Download button.
- Download a song: Click Songs, then click the Download button next to a song.
- Download all songs and albums: At the bottom of the screen, click Download All.
Fix 6. Transfer Missing Music from iPhone or iPad to PC
If the only remaining copies are on an iPhone or iPad, recover them before syncing the device with an empty library. iTunes can transfer eligible iTunes Store purchases to an authorized PC, but it does not provide a general export path for every locally stored or non-purchased song.
Option A: Transfer eligible purchases with iTunes
Step 1. Open iTunes on the PC and choose Account > Authorizations > Authorize This Computer. Then sign into your Apple account and click Authorize.
Step 2. Connect the iPhone or iPad with a USB cable and trust the computer if prompted.
Step 3. Click Transfer Purchases in the window that appears, or choose File > Devices > Transfer Purchases from [device].
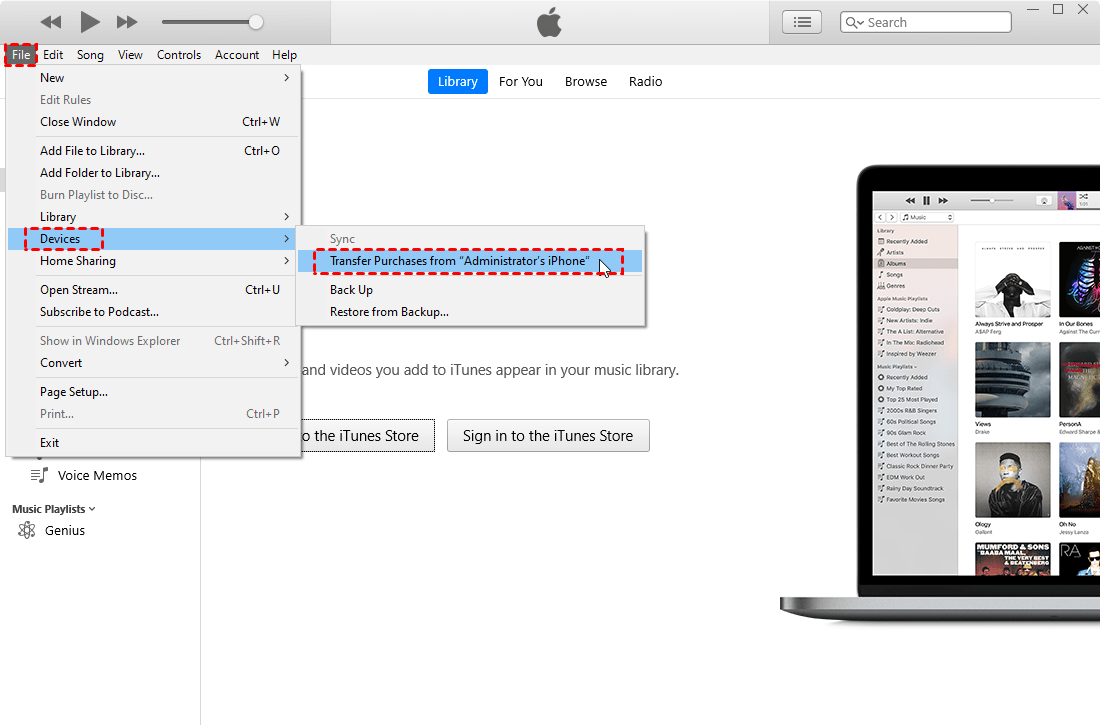
Step 4. Wait for the transfer to finish, then check the Recently Added or Songs view.
Option B: Export purchased and non-purchased songs with AOMEI FoneBackup
AOMEI FoneBackup is a Windows-based iPhone transfer and backup tool. Its iPhone-to-PC transfer can export selected music files from an iPhone or iPad to a computer, including compatible tracks obtained outside the iTunes Store.
 AOMEI FoneBackup
- User-Friendly: A clear, intuitive design makes transfers possible in just a few clicks.
- Your Music, Your Way: Transfer all songs simultaneously or select specific tracks to move.
- Lightning Fast: Move 1,000 songs in only 9 minutes and 13 seconds.
- Full iOS Support: Works flawlessly with every iPhone, iPod, and iPad model, including the latest iPhone 17and iOS 27.
 100% Secure
Download AOMEI FoneBackup and follow the steps below to transfer music from iPhone to iTunes library:
Step 1. Install and open AOMEI FoneBackup on the Windows PC.
Step 2. Connect the iPhone or iPad by USB, unlock it, and tap Trust if requested.
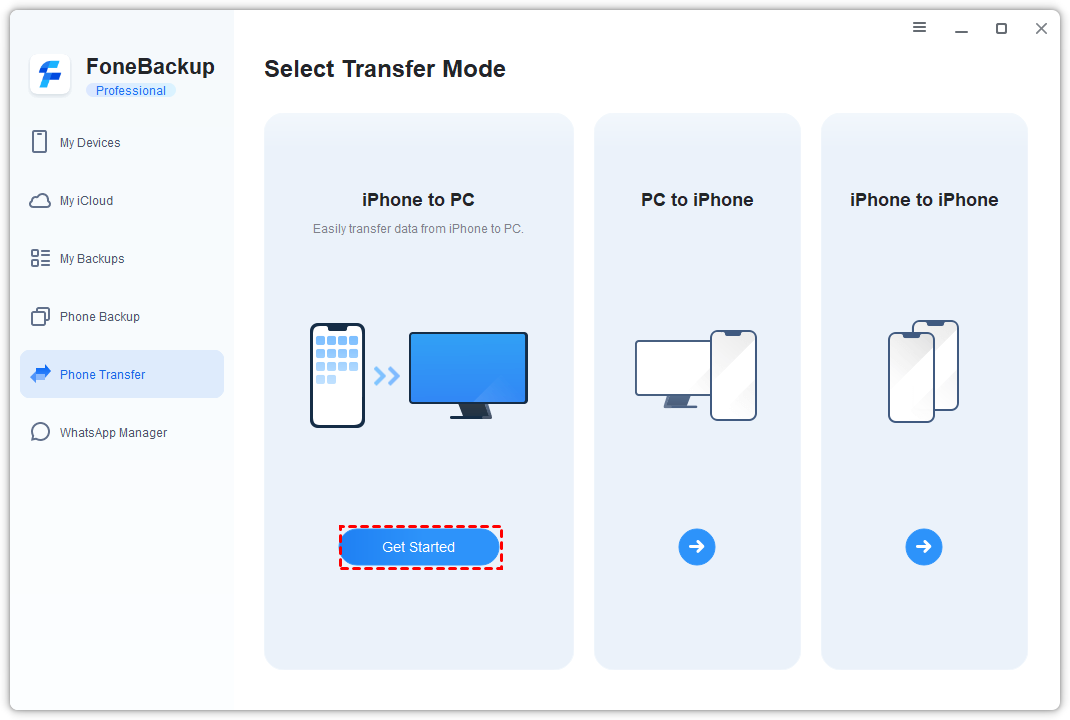
Step 3. Choose Phone Transfer > iPhone to PC, and then click Get Started.
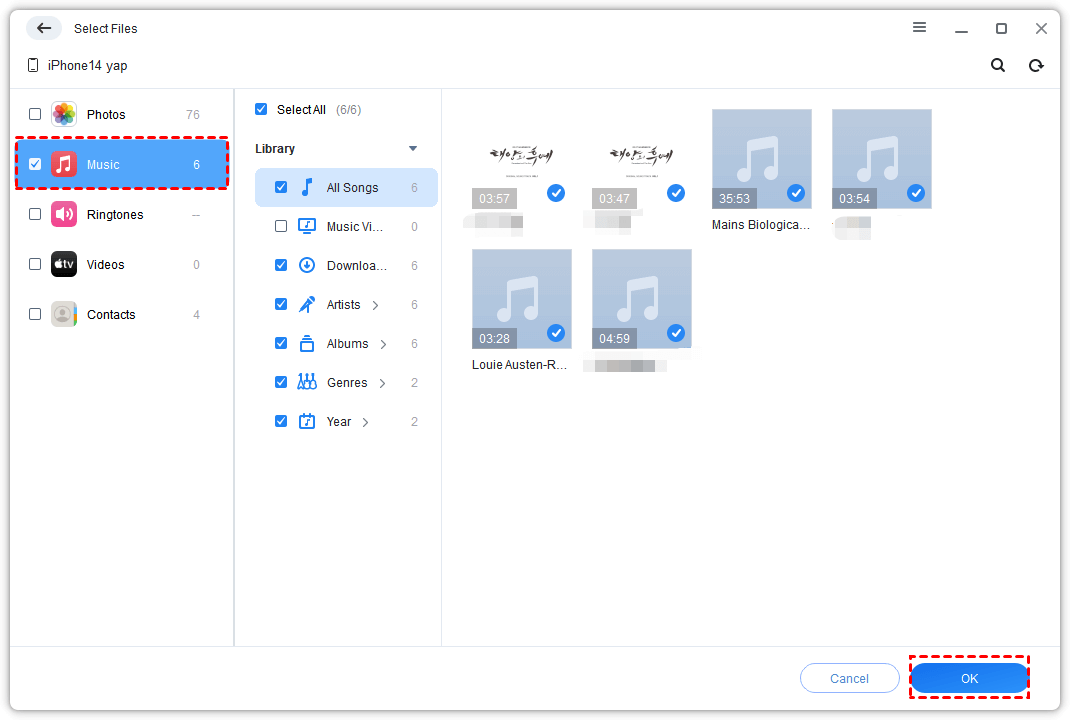
Step 4. Select Music, choose the tracks you want to recover, and confirm the selection with OK.
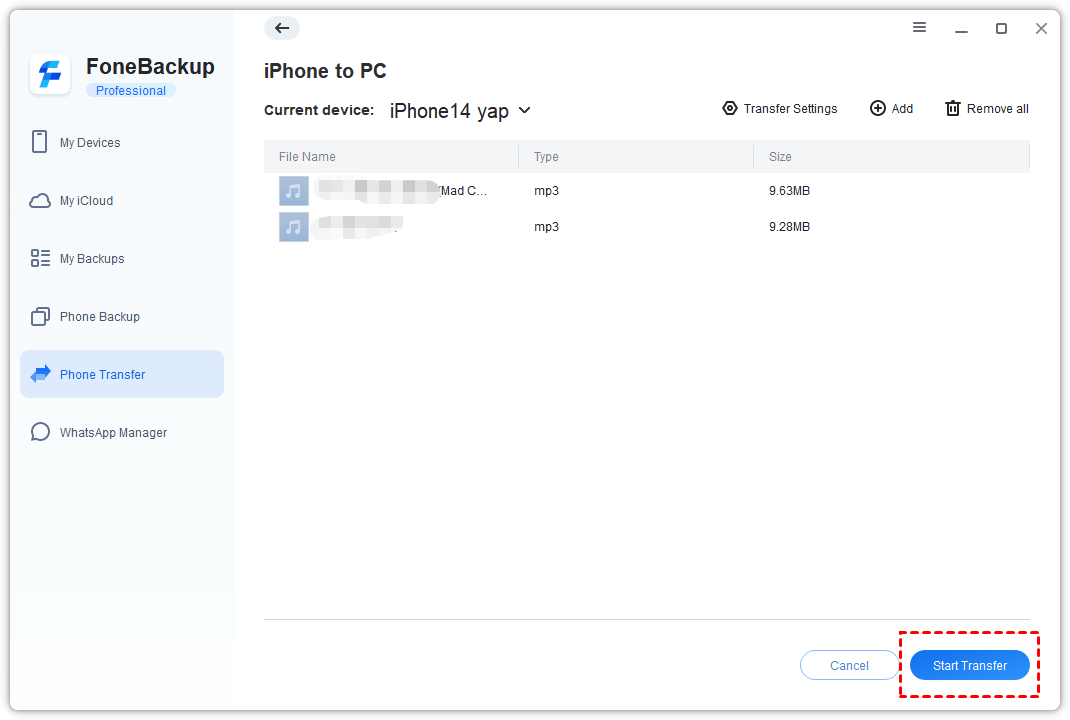
Step 5. Choose a destination folder under Transfer Settings and click Start Transfer. Keep the device connected until the export completes.
Step 6. Open iTunes and choose File > Add File to Library or Add Folder to Library, then select the exported music. In the Apple Music app, use File > Import.
How to Prevent the iTunes Library from Disappearing Again
A reliable backup should protect both the database and the actual audio files. Copying only iTunes Library.itl may restore playlists and references, but it cannot recreate media files that no longer exist.
1️⃣ Consolidate the library: In iTunes, choose File > Library > Organize Library and use Consolidate Files when appropriate so media is gathered in the managed folder.
2️⃣ Copy the complete folder: Back up the entire iTunes or Music folder to an external drive, including the library database and media subfolders.
3️⃣ Keep another backup: Use File History, Time Machine, or another scheduled backup so one drive failure does not erase both the working library and its only copy.
4️⃣ Back up device-only tracks: Use AOMEI FoneBackup to export important iPhone or iPad music to a normal PC folder that can be copied and verified.
5️⃣ Test the backup: Periodically confirm that the backup contains playable audio files, not only shortcuts or database records.
Conclusion
When my music disappeared from iTunes library on PC or Mac, the safest approach is to identify where the remaining copies live before making changes. Then you can apply the practical fixes offered in this article.
If an iPhone or iPad holds the only usable copies, export them to the PC with AOMEI FoneBackup and then rebuild the library. Besides music transfer, AOMEI FoneBackup is also specialized iPhone backup software. You can use it to backup contacts, photos, videos, messages, and more. Just give it a shot!

 as a preferred
source on Google
as a preferred
source on Google