




How to Recover Permanently Deleted Photos for Free on Windows
You may be able to recover permanently deleted photos for free if a copy still exists or the original drive holds recoverable data. Start by checking where the photos were stored

By Ivy Updated on November 5, 2026


You deleted a folder of photos, opened the Recycle Bin to get it back and the folder isn't there. The good news: those permanently deleted photos may still be recoverable, even for free. A backup or a synced copy could give you the originals back. And if the only copy was on a local drive, recovery software can scan the hard drive for data that's still there.
Start with the Recycle Bin: if the photos are there, just restore them. If not, minimize writes to the drive where they were stored. Pause new downloads and file transfers to that drive while you decide what to do next.
Choose the Right Photo Recovery Method
Start with the folder where you last saw the photos - the Pictures folder synced to OneDrive, an existing backup, or a scan of the drive.
|
📍 Where the photos are |
🛠️ What to try |
🎒 What you'll need |
|---|---|---|
| Photos previously synced to OneDrive | Method 1: OneDrive Recycle Bin | Photos still in the online recycle bin |
| A File History backup | Method 2: File History | A saved version of the folder from before deletion |
| A backup made with Backup and Restore | Method 3: Windows backup | A backup that contains deleted photos |
| A local drive, prefer a graphical interface | Method 4: AOMEI FastRecovery | Prepare a different drive for setup and recovered photos |
| A local drive, compatible with command line | Method 5: Windows File Recovery |
Method 1: Restore Photos from the OneDrive Recycle Bin
👍 Best for: Photos you previously synced to OneDrive that are still in its online recycle bin.
If the photos were saved in a OneDrive folder, including a Pictures folder you set up to sync with OneDrive, check the recycle bin on the OneDrive website. It’s separate from the Windows Recycle Bin.
Step 1. Open OneDrive in your browser and sign in with the account that held the photos.
Step 2. Select Recycle bin in the navigation pane and look for the photos or their parent folder.
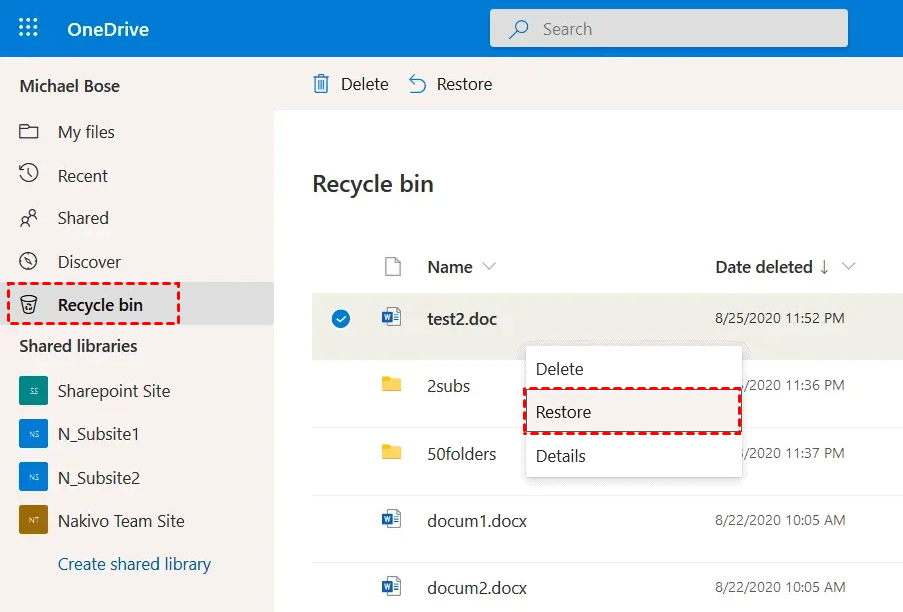
Step 3. Select the deleted photos and click Restore. Open the original folder in OneDrive to check that they’re back.
Method 2: Recover Photos from File History
Best for: Photos in a folder that File History backed up before you deleted them.
File History is a built-in Windows backup feature that keeps previous copies of user folders like Pictures, Downloads, etc. If your photos was backed up, you can open a saved version from before the deletion and copy out the photos you need.
Step 1. In File Explorer, go to the folder that contained the photos. If you deleted the entire folder, go to its parent folder. Right-click that folder and select Restore previous versions.
Step 2. Choose a version from before the deletion, then click Open > Open in File History to check whether it contains the missing photos.
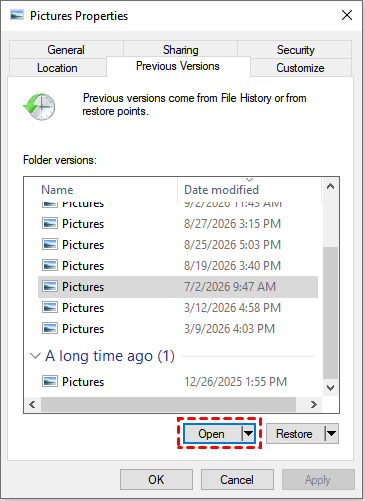
Step 3. Copy the photos you need and paste it to a separate drive. This lets you recovering deleted photos on Windows 10 or 11 while keeping the current folder intact.
Method 3: Restore Photos from a Windows Backup
👍 Best for: Photos saved in an existing backup created with Backup and Restore (Windows 7).
Backup and Restore first came out in Windows 7, but you can still use it in Windows 10 or 11 to back up the photos you want as long as they're in one of the Users folders. If your photos were deleted after the backup, just restore them from there.
Step 1. Connect the drive containing the backup. Open Control Panel, search for backup, and select Backup and Restore (Windows 7).
Step 2. Click Select another backup to restore files from, then select the backup that contains deleted photos.
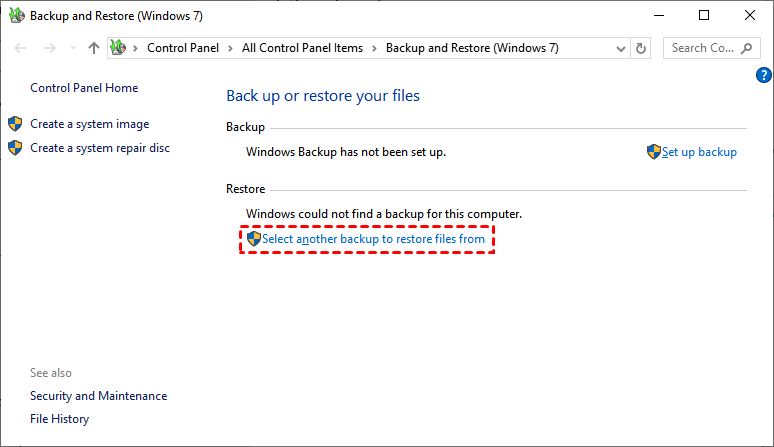
Step 3. Follow the Restore Files wizard to browse for files or folders you need and select them.

Remember to choose an alternate location on a separate drive before putting them back. Otherwise, the new data may overwrite photos you are trying to recover.
Method 4: Scan Hard Drive for Deleted Photos with AOMEI FastRecovery
👍 Best for: Permanently deleted photos on a local drive, whether you used Shift+Delete, emptied the Recycle Bin, or due to files too large for Recycle Bin.
AOMEI FastRecovery is a dedicated photo recovery software that can scan the original drive and let you select which pictures to save instead of everything.
AOMEI FastRecovery- 🧩 Scenario matching: Offer dedicated modes for different situations, whether it's deleted files, formatted drives, lost partition, etc.
- ⚡ Two Scan Modes: Quick Scan finds deleted images fast, while Deep Scan offers a more thorough search.
- 🎬 Wide Range of Images Formats: Recover deleted or lost images including JPG, PNG, TIF, HEIC, GIF, PSD, SVG, and more.
- 🗂️ Flexible browsing: Browse by Type or Path, then use search or sort to narrow down the results.
- 🎁 Free recovery: The Free edition provides thumbnail preview and saves up to 500MB.
 100% Secure
Step 1. Open AOMEI FastRecovery after installing, then select Deleted Files Recovery.
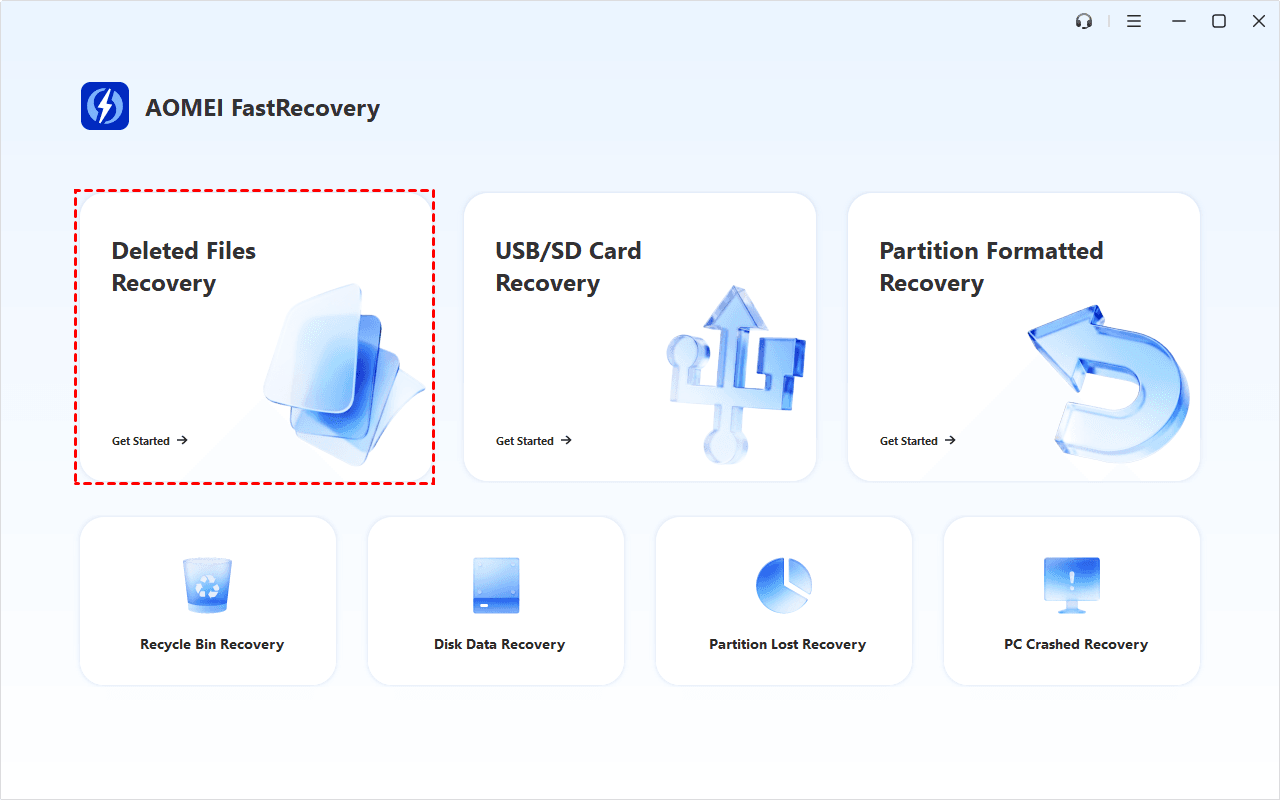
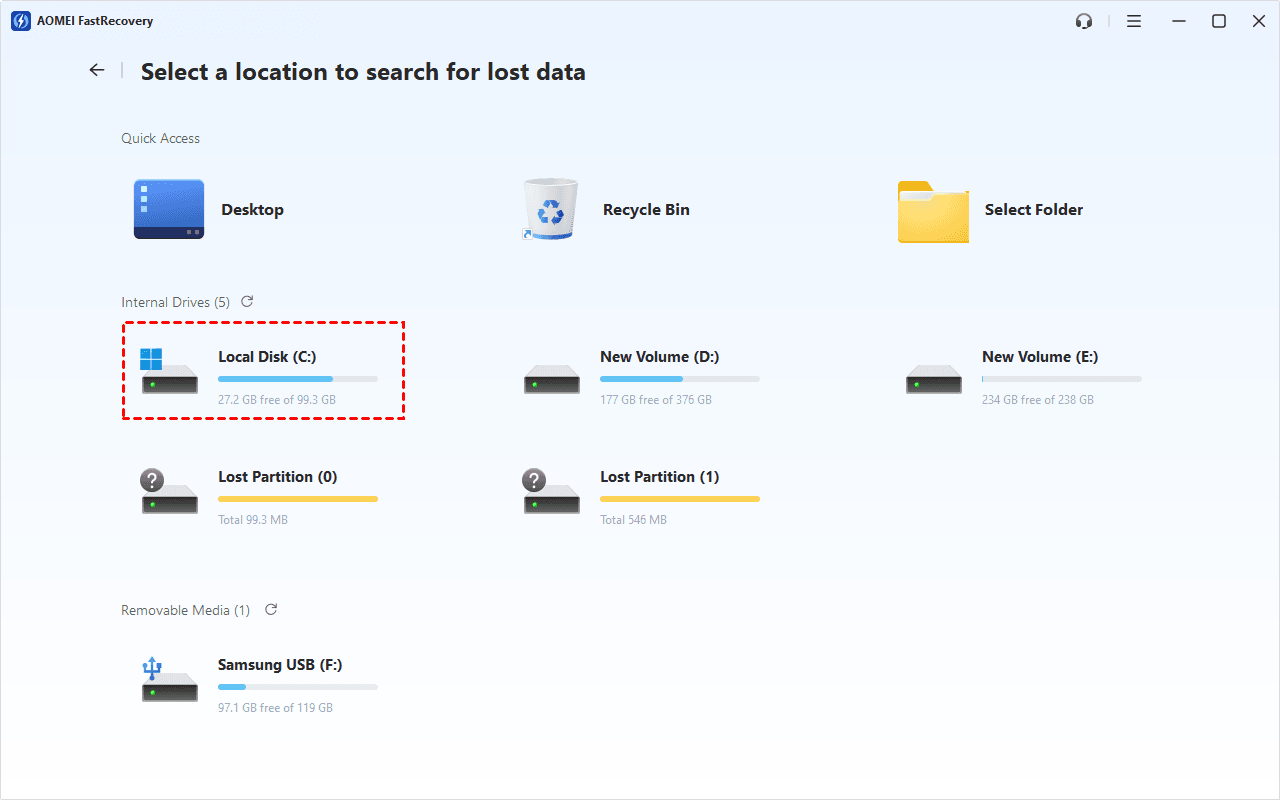
Step 2. Choose the drive where the photos were stored and click Scan. It will start a Quick Scan automatically to find deleted photos.
Step 3. Under Type, expand Images to see the available formats and pick the one you want. Or search by file name or extension, such as .jpeg, .png, .heic, etc., to find delete photos faster.
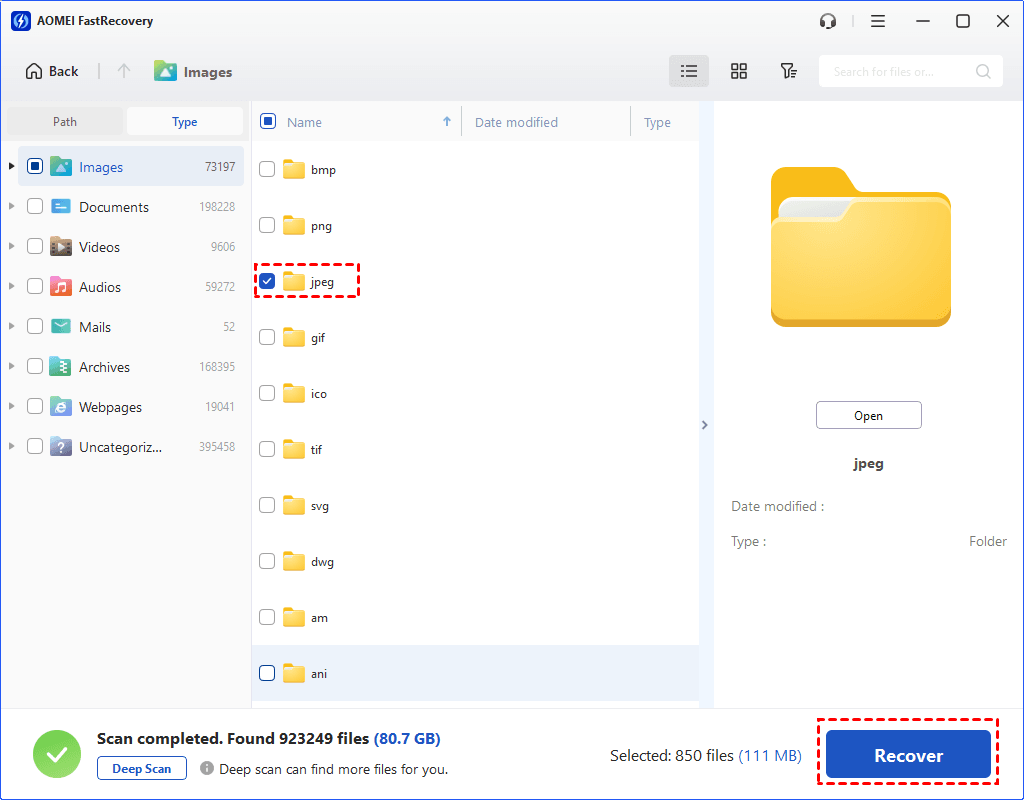
Step 4. Select the photos you need, click Recover. Save them to a different drive from the original. Another folder on the original drive can still overwrite deleted data.
- The free edition can recover up to 500MB. To recover more data, you need to upgrade AOMEI FastRecovery.
- To recover deleted JPEG files, just select JPEG instead of all image formats.The same applies to other formats.
- If you still can't find the photos, click Deep Scan. It's more thorough but takes longer.
Method 5: Recover Photos with Windows File Recovery
👍 Best for: Scanning a local drive for deleted photos with a free command-line tool
Windows File Recovery is available from the Microsoft Store. Use Regular for a recent deletion on a healthy NTFS drive. Use Extensive for older deletions or for FAT and exFAT drives.
Step 1. Open This PC, right-click the source drive, and select Properties to check its file system. Connect a different drive to hold the recovered photos.
Step 2. Open Windows File Recovery and allow it to run when prompted.
Step 3. Enter a command like the one below. This example scans an exFAT drive at F: and saves JPEG to D: drive. Replace both letters with your own.
winfr F: D: /extensive /n *.jpg
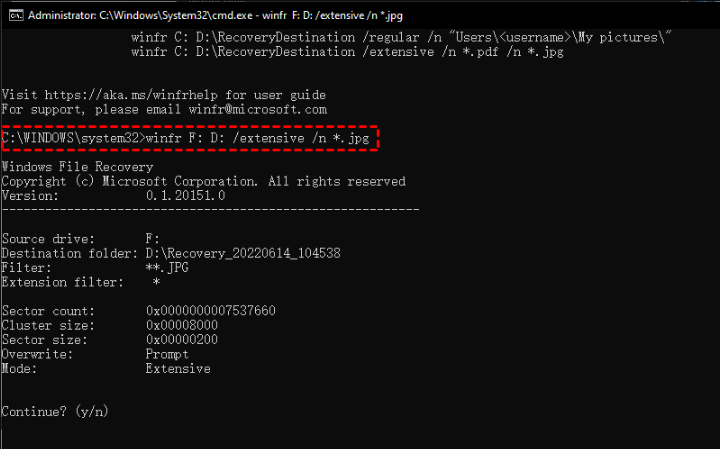
Enter Y when prompted and wait until the recovery process is complete. When the scan finishes, open the Recovery_ folder that Windows File Recovery created on the destination drive.
Conclusion
You may be able to recover permanently deleted photos for free from a backup, a cloud copy, or the original drive. If you have a copy from before the deletion, start there. Otherwise, minimize writes to the original drive and choose a local scan that fits the amount you need to recover.
Open the recovered photos at full size from the destination drive before putting them back. Look for missing sections or images that stop loading partway through. Overwriting and SSD TRIM can reduce what a scan can recover, so check the saved photos themselves before counting them as restored.

 as a preferred
source on Google