




How to Format USB Drive Without Losing Data: Complete Guide
Need to format USB without losing data? Learn when formatting is safe, how to format it correctly, and r how to recover files from USB when it is formatted accidentally.

By Jonna Updated on September 11, 2026


Does Formatting a USB Delete Everything?
Yes, formatting a USB drive logically wipes its contents - but how it erases data depends on the formatting method used.
When you initiate a format, the operating system cleans the existing file directory structure so that the drive can write new data using a refreshed file system layout (such as FAT32, exFAT, or NTFS). To understand what happens to your files, it helps to distinguish between the two primary formatting types available in Windows:
-
Quick Format: A Quick Format strips away the index headers and file allocation tables that point to your files. The actual raw data sectors remain physically intact on the flash memory chips until new data overwrites them. Because the operating system marks those sectors as available space, the drive appears empty, even though specialized recovery tools can often retrieve the underlying files.
-
Full Format: In modern Windows versions, a Full Format goes much further. In addition to rebuilding the file index, it performs a sector-by-sector scan to identify bad sectors and writes zeros (0x00) across every memory block. This zero-fill process renders previous data permanently unrecoverable.
Part 1. How to Format USB without Losing Data
If you need to format a flash drive, you must safeguard your files prior to running the format operation. Below are 3 reliable ways to protect your files depending on the health and status of your USB drive. You may choose to protect your USB drive or perform USB data recovery after formatting.
Way 1. Copy USB Files to Another Location
If your USB drive is healthy, functioning properly, and accessible via Windows File Explorer, the simplest and safest approach is manual file transfer.
Step 1. Connect your USB flash drive to an available USB port on your computer.
Step 2. Press Win + E to launch File Explorer and click This PC in the left sidebar.
Step 3. Open your USB drive. In the top navigation bar, click View (or Show in Windows 11) and ensure Hidden items is checked so system or hidden files aren't missed.
Step 4. Select all files and folders (Ctrl + A), right-click, and select Copy (or press Ctrl + C). Note: Avoid using "Cut" at this stage so the original files remain safe on the USB until verified.
Step 5. Navigate to a secure location on your local drive or an external hard drive, create a new folder (e.g., USB Backup Before Format), and press Ctrl + V to paste the files.
Open a few transferred documents, photos, or videos to confirm that the backup is readable and complete.
Way 2. Create a USB Image
When dealing with an unstable USB flash drive that frequently disconnects, suffers from corrupted system files, or throws intermittent read errors, dragging and dropping files manually can cause File Explorer to freeze. Creating a full byte-to-byte disk image is the recommended strategy in this situation.
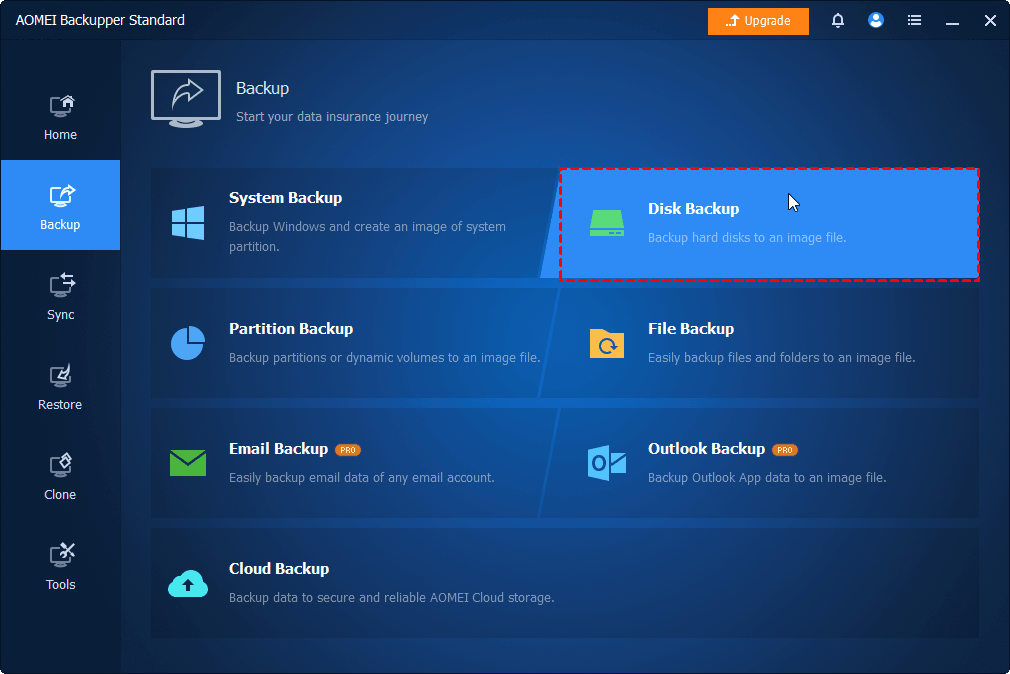
A disk image creates an exact sector-by-sector copy of the USB drive preserved in a single backup file, such as an .img or .iso file. By using backup software like AOMEI Backupper, you capture the full state of the drive onto your local hard disk. You can then mount or scan this offline image file at your convenience without subjecting the fragile physical USB drive to continuous wear or read failures.
Way 3. Recover USB Files after Formatting
What if you have already formatted the USB and didn't back up the files? Stop using the USB immediately. Do not copy new files to it, because new data can overwrite information associated with deleted files.
While Microsoft provides Windows File Recovery, a command-line tool with extensive mode recommended for FAT/exFAT drives and for erased data recovery after formatting, you may also rely on reliable and simple Windows data recovery program such as AOMEI FastRecovery, which can scan storage devices for deleted or lost files in only 3 steps.
 AOMEI FastRecovery
- 👍Free data recovery, up to 500MB.
- Recover Data in 3 Easy Steps: Perform quick & deep scan to find deleted or lost files, then filter and preview data before recovery.
- Support 1000+ File Types: Documents (TXT, DOC, XLSX), images (JPG, PNG, TIF), videos (MP4, MOV, AVI), audio files (MP3, CDA, WAV), archives (7Z, ZIP, RAR), and so on.
- Support 500+ Storage Devices: Supports data recovery from external drives, HDDs/SSDs, USB drives, SD cards, etc., and NTFS, FAT32, exFAT, and ReFS file systems.
- Cover Most Data Loss Scenarios: Recover files from emptied Recycle Bin, formatted drive, accidental deletion, virus attack, crashed computer, and more.
 100% Secure
Step 1. Download and install the professional AOMEI FastRecover data recovery tool onto your computer. Connect your inaccessible USB drive to the PC and launch the recovery software.
Step 2. Select the formatted USB drive from the device list and click Scan.
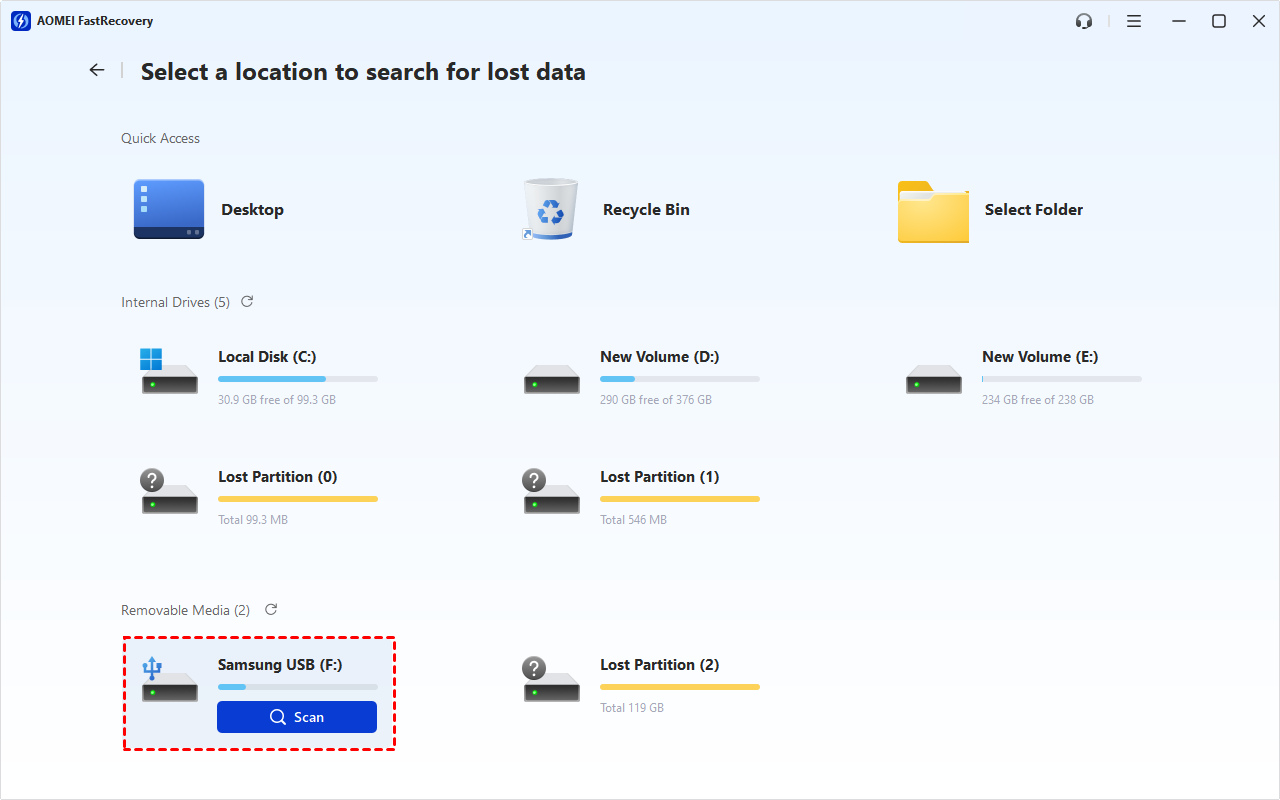
Step 3. Allow the tool to perform a Fast Scan across the drive's sectors to locate lost partition headers and raw file signatures. If needed, you can perform a Deep Scan for more data to recover.
Step 4. Filter and preview the scan results by file type (e.g., photos, documents, archives).
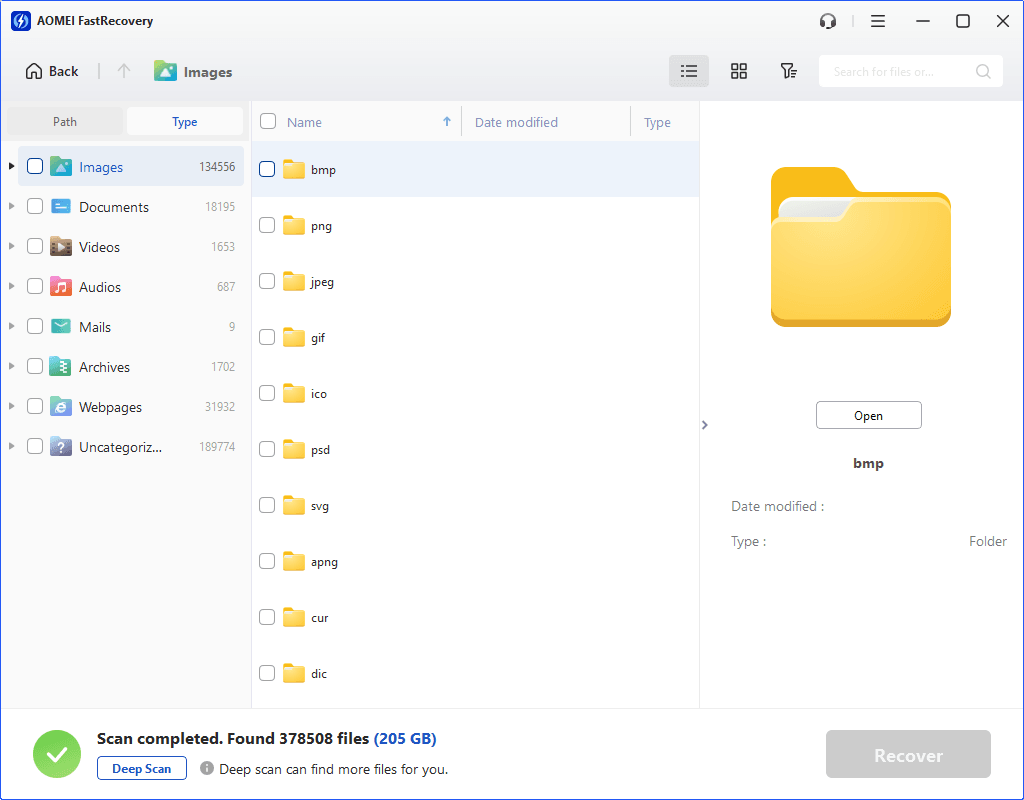
Step 5.Select the critical files you need, click Recover, and save them to a different healthy drive (never back onto the problem USB drive).
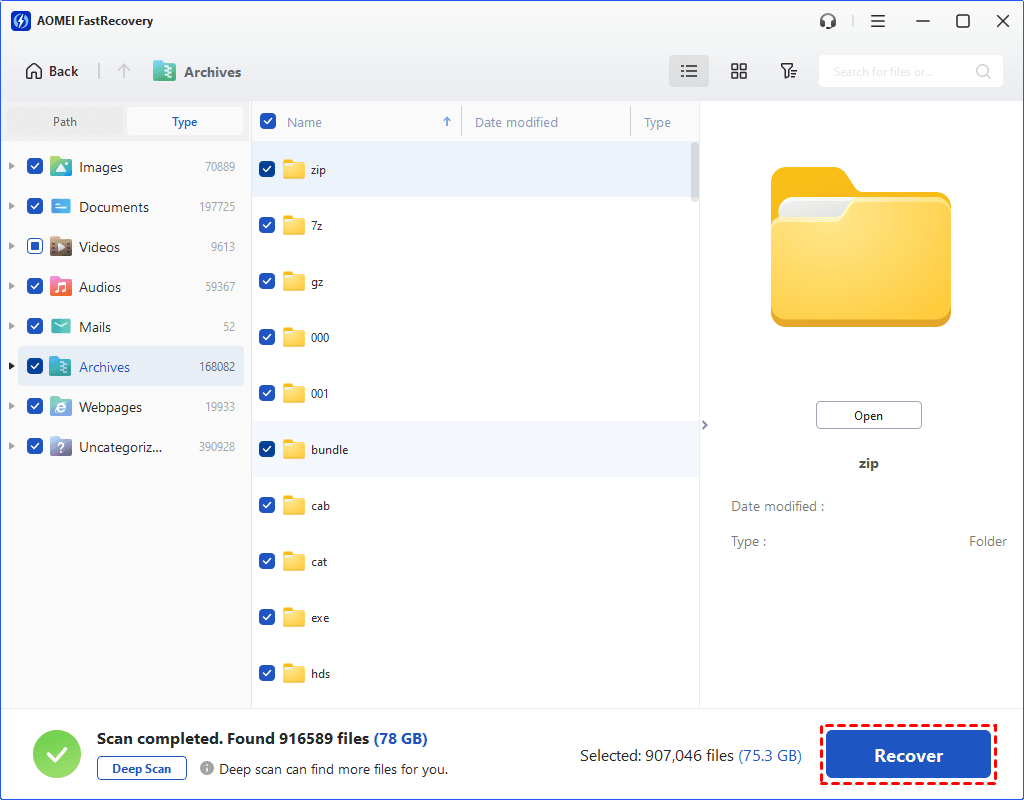
Once your files are safely extracted to your PC, you can reformat the USB flash drive without worrying about data loss.
Part 2. 3 Simple Ways to Format USB Drives
Once your files are securely backed up or recovered, you can reformat your USB flash drive. Here are three straightforward methods available natively in Windows 10 and 11.
Way 1. Through Windows File Explorer
File Explorer offers the fastest graphical method for formatting functional flash drives.
Step 1. Press Win + E to open File Explorer and click on This PC.
Step 2. Right-click your USB flash drive under Devices and drives and select Format...
Step 3. Configure your desired formatting options:
- File System: Choose exFAT for broad compatibility between Windows and Mac, NTFS for Windows-only use with large files (>4GB), or FAT32 for maximum compatibility with older media equipment and gaming consoles.
- Allocation Unit Size: Leave set to Default.
- Volume Label: Type a descriptive name for your USB flash drive.
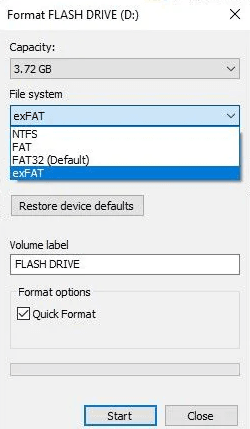
Step 4. Keep Quick Format checked if you want a fast drive reset. Uncheck it if you want Windows to scan for bad sectors during the process.
Step 5. Click Start, read the warning confirmation dialog, and click OK to complete the format.
Way 2. Use Disk Management
Disk Management is ideal if your USB drive lacks a drive letter, contains hidden partitions, or fails to appear in File Explorer.
Step 1. Right-click the Start button and select Disk Management, or press Win + X to access it.
Step 2. Locate your USB drive in the disk list at the bottom. Check the storage capacity to ensure you have selected the correct disk.
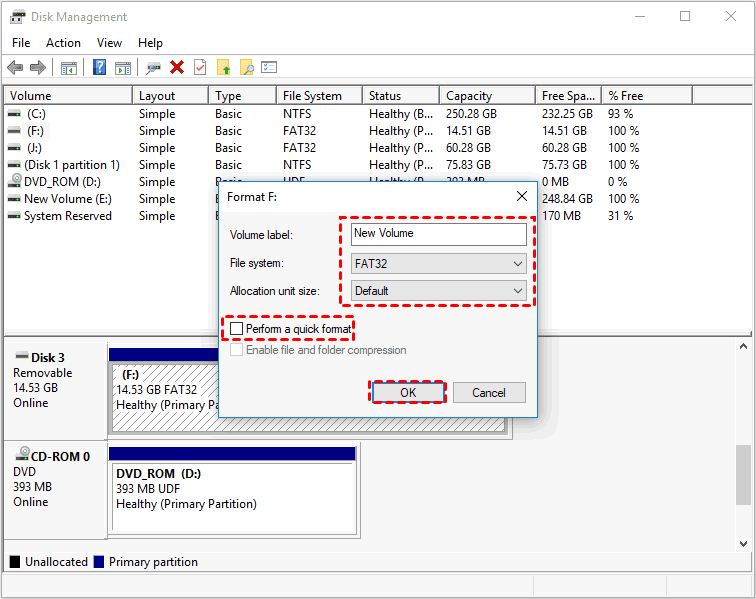
Step 3. Right-click the USB partition and select Format... (If the drive shows as Unallocated space, right-click it and select New Simple Volume instead).
Step 4. Specify your preferred Volume Label and File System (NTFS, exFAT, or FAT32).
Step 5. Ensure Perform a quick format is checked, then click OK. Click OK again when the warning prompt appears.
Way 3. Via Command Prompt
Command Prompt provides a DiskPart command-line utility, which is capable of clearing write-protection glitches, removing stubborn partition structures, and resolving RAW drive issues.
Step 1. Press Win + S, type cmd, right-click Command Prompt, and select Run as administrator.
Step 2. Type diskpart and press Enter to launch the DiskPart tool.
Step 3. Type the following commands sequentially, pressing Enter after each line:
- list disk
- select disk X
- clean
- create partition primary
- format fs=exfat
- quick assign
- exit
🌟Note: Replace X with the actual disk number of your USB flash drive. You can also replace exfat with ntfs or fat32 depending on your formatting needs.
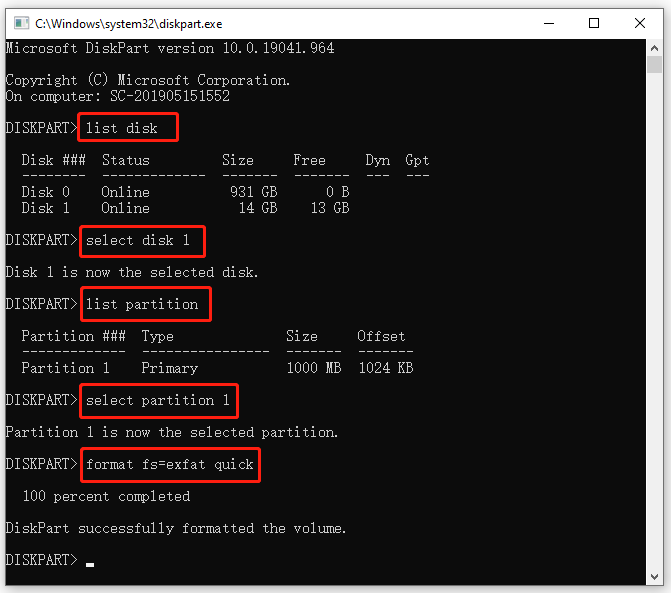
💥Warning: Always verify your disk number using list disk before running the clean command. Running clean on the wrong disk number can result in accidental data loss on your primary operating system drive!
Conclusion
Formatting a USB flash drive is an effective way to fix file system errors, restore corrupted RAW storage, or reconfigure file systems for cross-platform compatibility. While formatting inherently wipes the drive's file allocation table, you can easily format a USB without losing data.
Always put data safety first: manually copy healthy files, create a sector-by-sector disk image for unstable drives, or use reliable data recovery software for formatted drive recovery. Once your important files are secured in a secondary location, formatting your flash drive using File Explorer, Disk Management, or Command Prompt is safe, simple, and fast.

 as a preferred
source on Google
as a preferred
source on Google