



File History Doesn't Recognize This Drive – 5 Ways to Fix It
File History doesn't recognize this drive? Here are 5 ways to fix it - plus FastRecovery for data recovery if needed. Keep reading.

By Ivy Updated on July 3, 2026


You've set up File History to protect your important documents, photos, and more. It runs quietly in the background until it doesn't.
Suddenly, you see it: "File History doesn't recognize this drive." Your backups have stopped. And without a working backup, your files are at risk.
Frustrating? Absolutely. But fixable.
We've put together 5 practical solutions to get File History working again. And if you've already lost files, or simply want to be prepared, we'll also show you how to recover your data using a reliable tool, just in case.
Keep reading. Your backups are worth saving.
Why "File History Doesn’t Recognize the Drive"?
There are 4 common reasons for the "File History doesn’t recognize this drive" error.
- An incorrectly connected drive or a damaged USB port prevents File History from recognizing the drive.
- File History is unexpectedly closed or disabled.
- The file History service is disabled.
- Windows system cannot detect corrupted external drive.
How to Fix File History Doesn't Recognize This Drive Error
The following 5 easy and effective ways could fix the “File History doesn’t recognize this drive” error. You can have a try.
Way 1. Turn on File History in the Control Panel
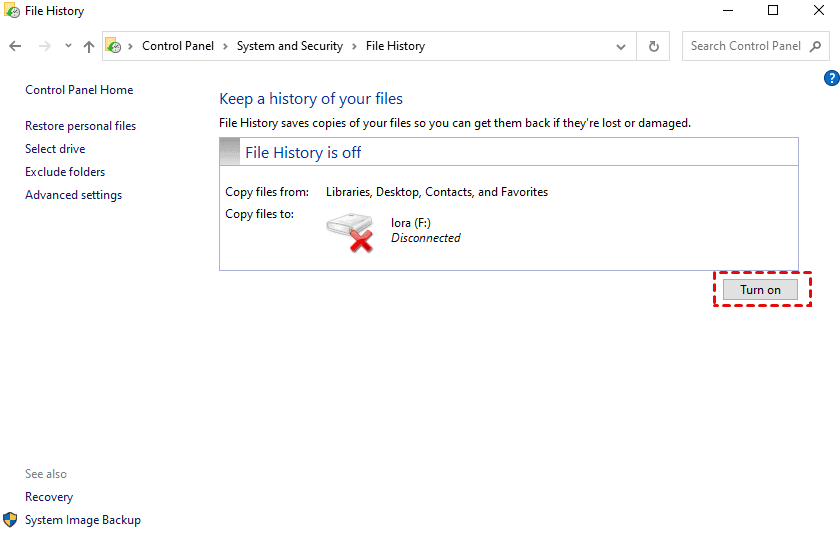
If File History doesn't work in Windows 10, the first thing is to check the status of File History. If File History is turned off, it won't detect your connected external hard drive, and you won't be able to back up your files.
Step 1. Type Control Panel in the search bar to open Control Panel > click System and Security > File History.
Step 2. If the File History is turned off, click the Turn on button to enable it. Then, quit the window and check whether File History recognizes your external hard drive or not.
Way 2. Try “Select Another Drive”
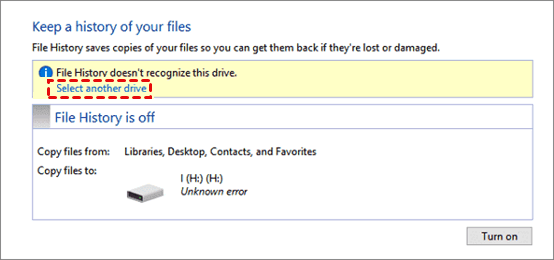
Sometimes, if your existing drive is something wrong and you have more than one usable drive to save backups, you may simply fix the issue of Windows 10 File History not recognizing the drive by selecting another drive for File History backup. Here’s how to do this.
Step 1. Type Control Panel in the search box to open Control Panel > System and Security > File History.
Step 2. Click Select another drive. Then, click OK to proceed with the changes.
Way 3. Enable the File History Service
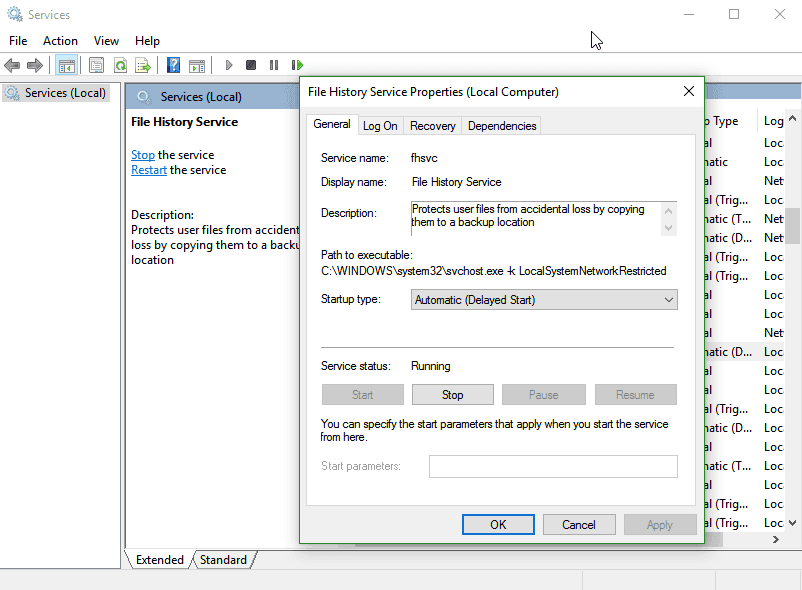
The problem of "File History doesn’t recognize this drive" in Windows 11/10 might occur due to the disabled File History Service. To resolve this, you can follow these steps to start the service:
Step 1. Search for Services and open it.
Step 2. Locate and click File History Service > Start the service. Then, set the Start type to Automatic.
Way 4. Delete File History Configuration Folder
Deleting the File History configuration folder can be a solution. Configuration Folders are a designer folder behavior that enables users to create, or adjust additional configurations on the data structure.
You can make File History work again and fix the error by deleting the File History Configuration Folder. Here's how you can do it:
Step 1. Press Win + E to open File Explorer. Then click the View tab at the top toolbar and check Hidden items.
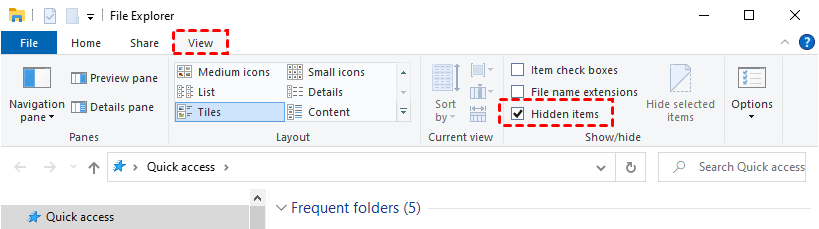
Step 2. Go to the following path and then delete the files inside this folder:
C:\Users\"username"\AppData\Local\Microsoft\Windows\FileHistory\Configuration\Config
Step 3. After that, go to check if File History works properly.
Way 5. Use File History Alternative to Create Backups
If the File History is not working in Windows after using the 4 methods above, we strongly recommend you use this free Windows backup software AOMEI Backupper Standard. It offers many extra features that File History cannot.
You can use it to create system backups, disk backups, cloud backups, incremental backups, automatic backups, etc., backup them to network, NAS, or cloud drives.
Step 1. Free download, run it, and connect your drive. Under the Backup tab, choose File Backup.
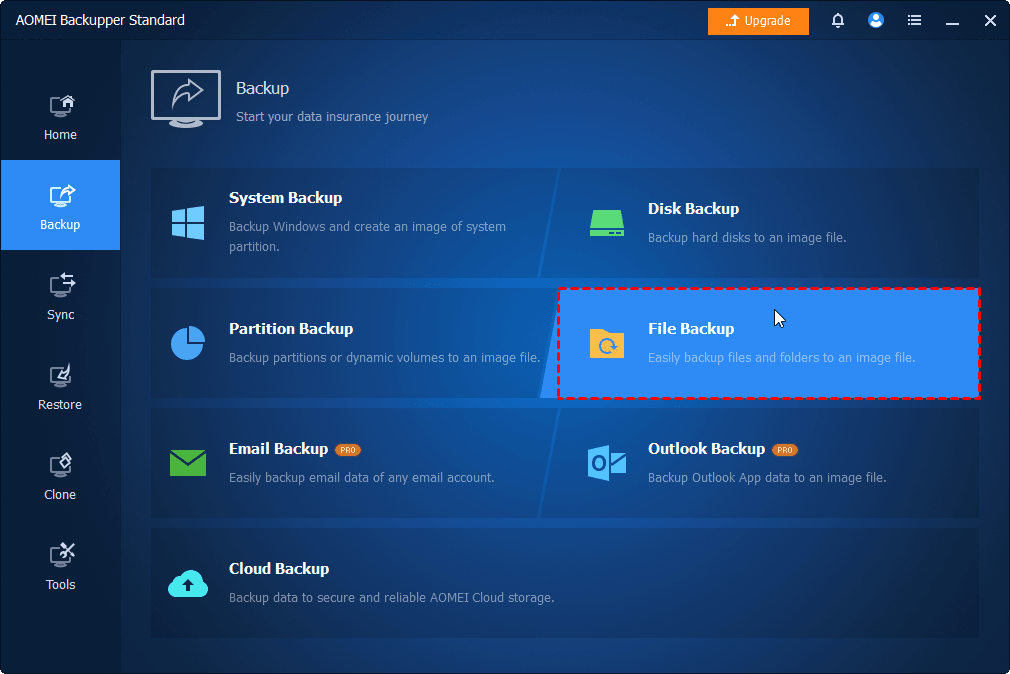
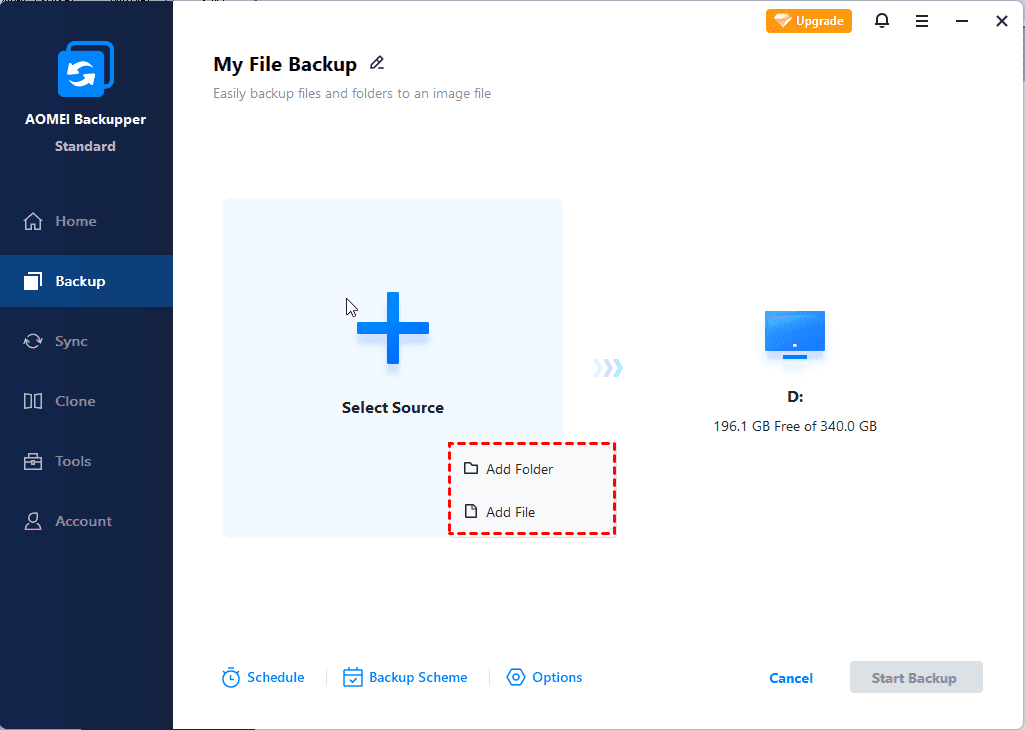
Step 2. Click Select Source > Add Folder/ File to select files or folders you want to back up. Then, click the PC icon to choose a destination, from local drive to NAS/network share.
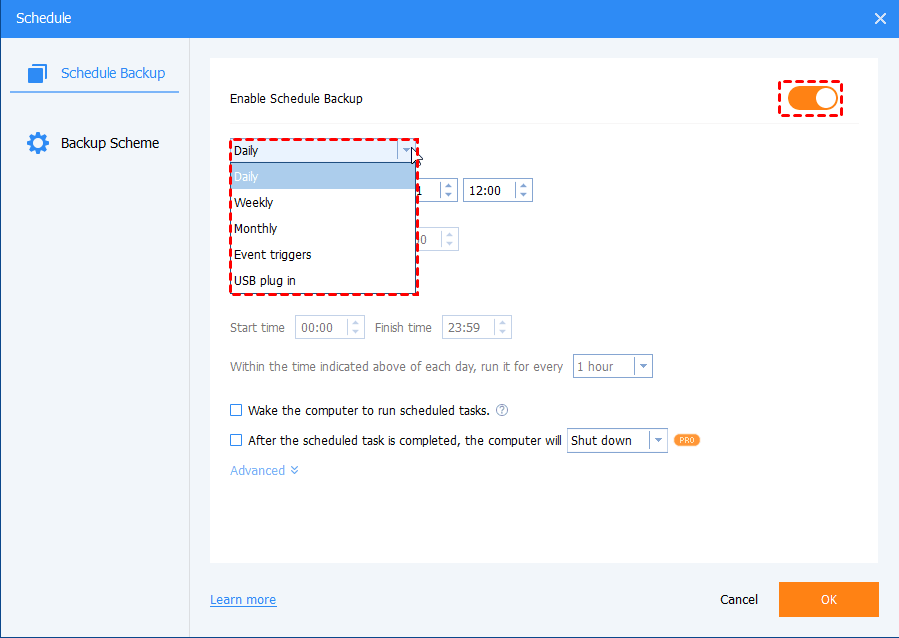
Step 3. Click Schedule to enable automatic backup (One Time, Daily, Weekly, Monthly, or Event triggers). Afterward, click to backup your data.
File History Can't Recover Your Files? Try FastRecovery
What if File History can't save you? That's where FastRecovery comes in. It's designed to recover permanently deleted files in Windows 10, even when you don't have a backup. Here's what makes it stand out:
 AOMEI FastRecovery
- 🔎 Dual-Scan Modes: Quick Scan for recently deleted files, Deep Scan for more complex scenarios. Together, they find more files and recover them with greater success.
- 📚 1000+ Data Types: Recover deleted or lost documents (TXT, DOC, XLSX, CSV), images (JPG/JPEG, PNG, GIF), videos (MP4, MOV, AVI, WMV), audio, and more.
- 🧩 Wide Range of Scenarios: Recover files from accidental deletion, Recycle Bin, formatted drive, virus attack, system crash, and more.
- 🚀 Find Your Files Fast: Browse by type or path, sort, search, filter, and preview files before recovery. No more digging through endless lists.
- ✅ Safe & Easy to Use: Read-only, no data overwriting. simple, intuitve interface.
- 👍 Try It with No Risk: The free edition recovers up to 500MB of data - no commitment, no quality compromise.
 100% Secure
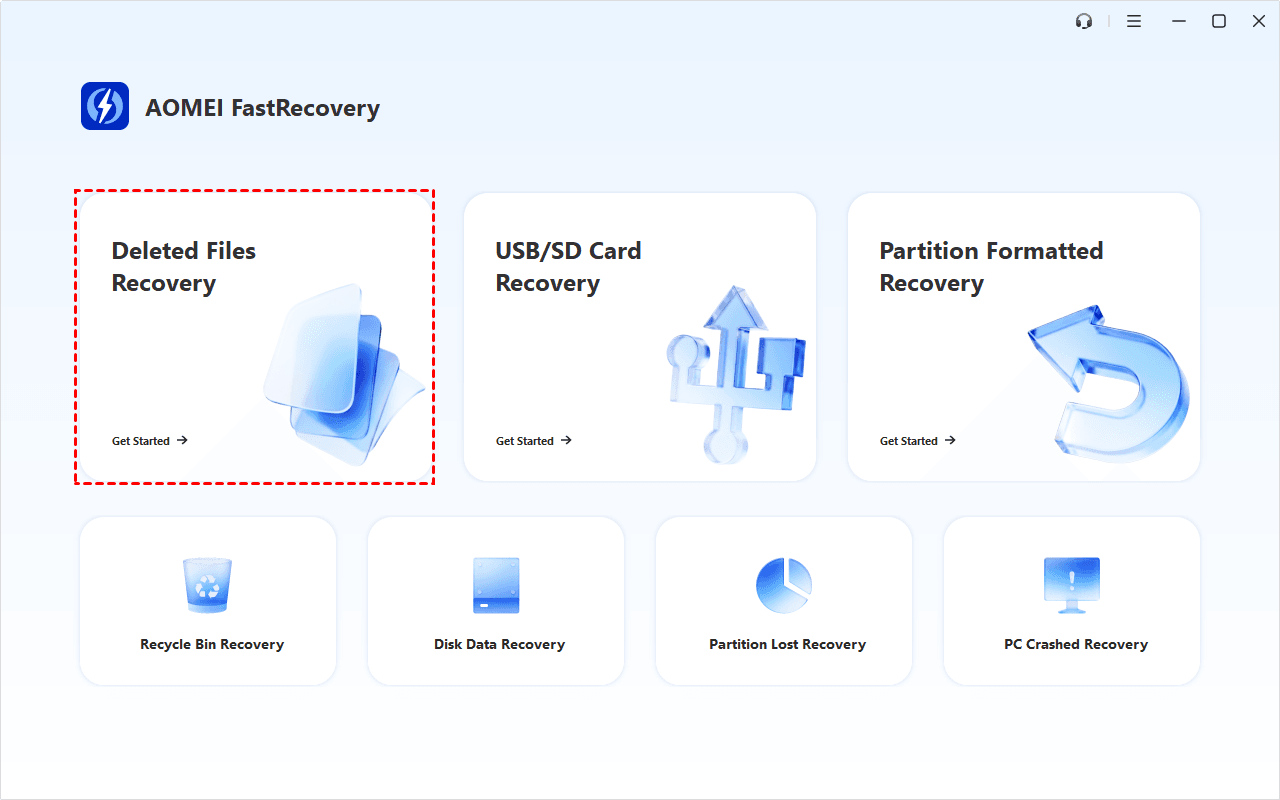
Step 1. Download, install, and launch AOMEI FastRecovery. Then, click Deleted Files Recovery, specifically designed for quick recovery.
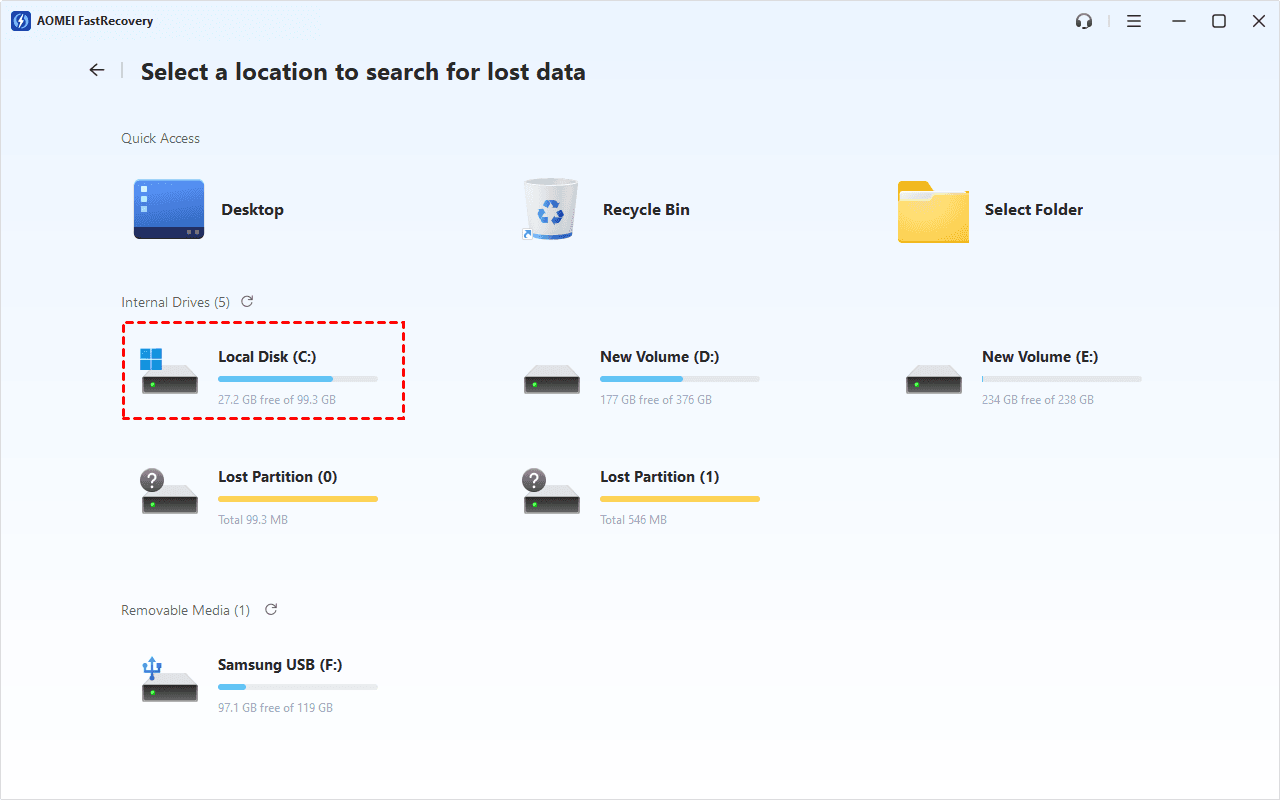
Step 2. Hover the mouse over the drive used to store the deleted files before and click Scan.
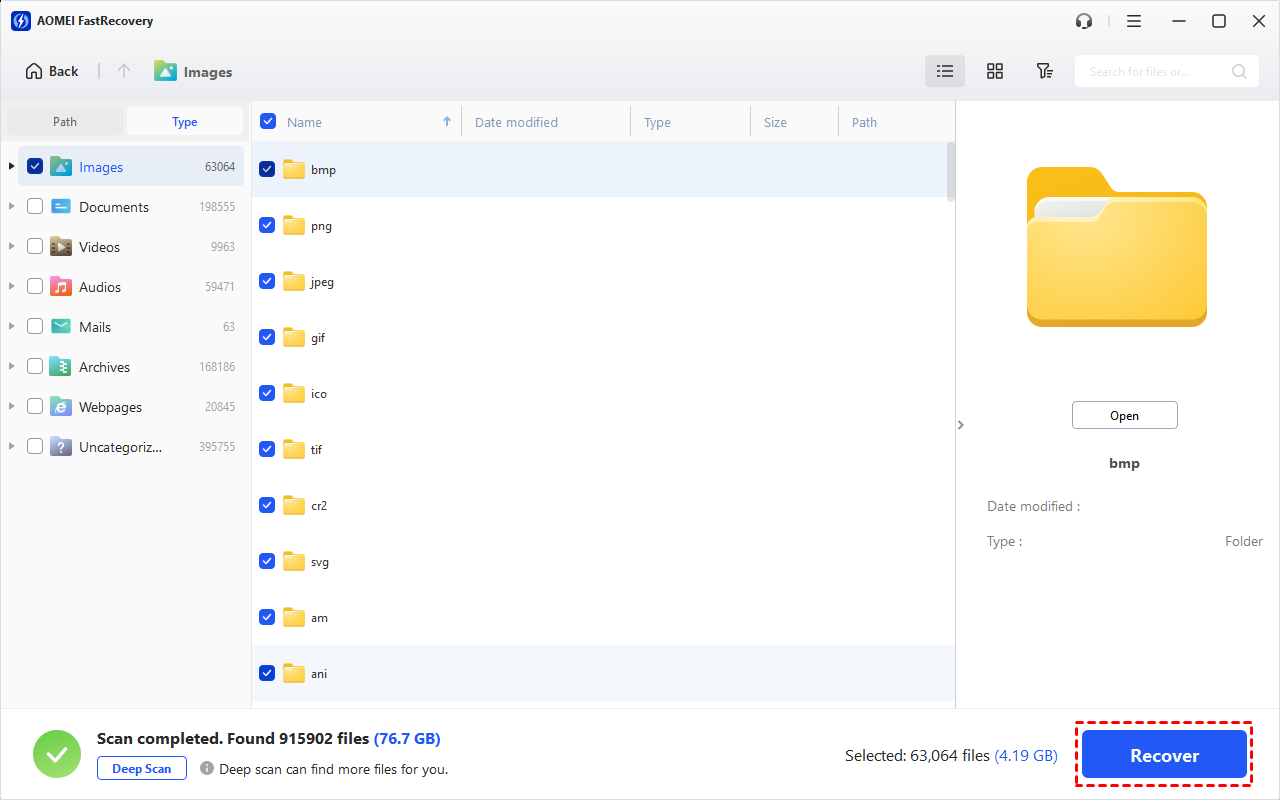
Step 2. Then the scanning process will start automatically. Once it finishes, check the results by file type (e.g., Documents, Images, Videos, etc) and specific formats. Expand to check specific files in the Deleted Files, Recycle Bin, or Existing Files directories.
To find files quickly, combine the following options:
-
Sort files by name, date modified, type, etc., using the column headers.
-
For faster searching, type the file name or extension (e.g., docx, .png, .mp4) in the search box.
- Or click the funnel-shaped button to narrow your search by type or size, especially useful for large deleted files.
-
Browse by Path if you remember where the file was originally saved.
-
Click the Deep Scan to find more data if Quick Scan fails. It will scan every sector of the disk and take longer.
Step 4. Select the desired files and click Recover to get your data back quickly. Always save them to a new location to avoid data overwriting.
You can recover deleted files from hard drive for free, up to 500MB. To recover all files, please upgrade to the advanced editions.
FAQs
1. Why isn’t File History recognizing my external drive?
File History might not recognize a drive if it's formatted in a file system that's not supported, or if there are hardware or connectivity issues.
2. What if File History suddenly stops recognizing my drive?
Restart your computer and reconnect the drive. Sometimes, a simple reboot resolves the issue.
3. What if File History recognizes the drive but doesn’t back up?
Check File History settings to ensure the correct folders are selected for backup. Also, make sure the drive has enough space for backups.
You can consider using other backup solutions Windows Backup and Restore, free third-party backup software like AOMEI Backupper, or cloud-based backup services.
4. Is it possible to use File History with an external SSD?
Yes, File History can be used with external SSDs. Ensure the drive is properly connected and formatted correctly.
5. Can I use a network drive with File History?
No, File History typically works with local drives. It may not recognize network drives.
6. How can I check if File History is running on my computer?
Type "File History" in the Windows search bar and open the settings. It will show whether File History is on or off.
Conclusion
With the above efficient 5 ways, you can easily fix the “File History doesn’t recognize this drive” error in Windows 10, 11, 8, 7.
If you are worried about data loss during this process or don't have File History backup. You may also recover lost data simply and quickly by using reliable data recovery software like FastRecovery. It can also get data back from an SD card, USB flash disk, computer, etc. with easy steps.

 as a preferred
source on Google
as a preferred
source on Google